Inhaltsverzeichnis
Werbung
Quicklinks
DVD AUDIO-VIDEO/SUPER AUDIO CD PLAYER
DVD-A1XV
OPERATING INSTRUCTIONS
ON / STANDBY
SELECT
OPEN/CLOSE
PLAY
STOP
STILL / PAUSE
REPEAT
RANDOM
VIDEO MODE
HDMI / DVI
SUPER
PURE
AUDIO CD
DIRECT
SELECT
FORMAT
SET UP
SELECT
SETUP
PUSH ENTER
DVD-A1XV
DVD AUDIO-VIDEO / SUPER AUDIO CD PLAYER
FORMAT
NTSC/PAL
ANGLE
SUBTITLE
AUDIO
A-B
MARKER
ZOOM
DIMMER
PICT ADJ.
MEMORY
SELECT
RC-993
Werbung
Inhaltsverzeichnis

Verwandte Anleitungen für Denon dvd a1xv


Inhaltszusammenfassung für Denon dvd a1xv
- Seite 1 DVD AUDIO-VIDEO/SUPER AUDIO CD PLAYER DVD-A1XV OPERATING INSTRUCTIONS SELECT FORMAT NTSC/PAL ANGLE SUBTITLE AUDIO OPEN/CLOSE PLAY STOP STILL / PAUSE REPEAT RANDOM MARKER ZOOM DIMMER ON / STANDBY VIDEO MODE HDMI / DVI SUPER PURE AUDIO CD DIRECT SELECT FORMAT SET UP SELECT SETUP...
- Seite 2 Zustimmung In order to prevent electric shock, do not open the top cover. Urheberrechtinhabers. If problems occur, contact your DENON DEALER. • Droits d’auteur La reproduction, la diffusion, la location, le prêt ou la lecture publique de 3. Do not place anything inside ces disques sont interdits sans le consentement du détenteur des droits...
- Seite 3 CAUTION: • DECLARATION OF CONFORMITY We declare under our sole responsibility that this product, to which this • The ventilation should not be impeded by covering the ventilation declaration relates, is in conformity with the following standards: openings with items, such as newspapers, table-cloths, curtains, etc. EN60065, EN55013, EN55020, EN61000-3-2 and EN61000-3-3.
- Seite 4 NOTE ON USE / HINWEISE ZUM GEBRAUCH / OBSERVATIONS RELATIVES A L’UTILISATION / NOTE SULL’USO NOTAS SOBRE EL USO / ALVORENS TE GEBRUIKEN / OBSERVERA • Do not let foreign objects in the set. • Keine fremden Gegenstände in das Gerät kommen •...
-
Seite 5: Wissenswertes Über Die Bedienungsanleitung Auf Der Cd-Rom
About the operating instructions on the A propos du mode d’emploi fourni sur le CD-ROM [ ENGLISH ] CD-ROM [ FRANCAIS ] 1. Check the computer environment. 1. Vérifier l’équipement de l’ordinateur. • Adobe Acrobat Reader 5.0 or later is required to view the text. •... - Seite 6 Acerca de las instrucciones de funcionamiento Om bruksanvisningarna på CD-ROM- del CD-ROM [ ESPAÑOL ] skivan [ SVENSKA ] 1. Compruebe el entorno del ordenador. 1. Kontrollera datormiljön. • Se necesita la versión del Adobe Acrobat Reader 5.0 o una superior •...
-
Seite 7: Inhaltsverzeichnis
Main Specifications..............91 • ACCESSORIES Please check to make sure the following items are included with the main unit in the carton: q Audio cord ................1 y DENON LINK cord..............1 w Video cord.................1 u IEEE 1394 cord.................1 e Remote control unit (RC-993)...........1 i CD-ROM (Operating instructions) ..........1... -
Seite 8: Features
7. High precision 24-bit D/A converter signals can be output at the same time. The audio playback circuit includes an advanced segment type 3. DPI (DENON Pixel Image) correction function for more D/A converter with the high technical specifications in the natural outline correction... - Seite 9 10. Super Audio CD multi-channel playback compatibility NOTES: In addition to playing DVD audio and video discs, the DVD- 1. “NSV” is a trademark of Analog Devices, Inc. A1XV can play multi-channel Super Audio CDs with a playback 2. HDMI, the HDMI logo and High-Definition Multimedia frequency range covering 100 kHz and a dynamic range of 120 Interface are trademarks or registered trademarks of HDMI dB or greater within the audible frequency range, and a...
-
Seite 10: Discs
2 DISCS NOTE: • This DVD player is designed and manufactured to respond • The types of discs listed on the table below can be used on the to the Region Management Information that is recorded on a DVD disc. DVD-A1XV. -
Seite 11: Cautions On Handling Discs
3 CAUTIONS ON HANDLING DISCS Discs Cautions on Handling Discs Only the discs including the marks shown on page 10 can be • Do not get fingerprints, grease or dirt on discs. played on the DVD-A1XV. • Be especially careful not to scratch discs when removing them Note, however, that discs with special shapes (heart-shaped from their cases. -
Seite 12: Connections
4 CONNECTIONS NOTES: • Read the manuals of all the components when making • Be sure to connect the left and right channels properly, L connections. (left) to L, R (right) to R. • Keep the power supply cord unplugged until all connections •... - Seite 13 (2) Connecting to a TV or Monitor Equipped with Component Video Input Connectors Component video output connectors (P and Y) The red (P ), blue (P ) and brightness (Y) signals are output independently, achieving more faithful reproduction of the colors. •...
-
Seite 14: Connecting To A Av Amplifier With A Built-In Decoder
(3) Connecting to a TV with 21-pin SCART Terminal Use the commercially 21-pin SCART cable to connect the TV’s 21-pin SCART terminal to the DVD-A1XV’s 21-pin SCART terminal (AV1). DVD-A1XV 21-pin SCART terminal NOTE: • Some discs contain copy prohibit signals. If such discs are played via a VCR, the copy prohibit system may cause disturbance in the picture. - Seite 15 2 Sound output from the DVD-A1XV’s digital audio output connectors [ In the case of bitstream output ] Settings DIGITAL OUTPUT Audio recording format NORMAL Dolby Digital Dolby Digital bitstream 2 channels PCM (48 kHz / 16 bit) DVD video DTS bitstream 2 channels PCM (48 kHz / 16 bit) MPEG Audio...
- Seite 16 (5) Connecting a basic 5.1-channel surround system Analog 5.1-channel audio signals can be output from the DVD-A1XV. The multi-channel audio signals recorded in packed PCM and the multi-channel Super audio CDs can be played when an AV amplifier equipped with analog 5.1-channel audio inputs is connected. To power outlet DVD-A1XV CH SEL...
- Seite 17 (6) Connecting to a Digital Recorder (MD Recorder, DAT Deck, etc.) Set the “AUDIO SETUP” default setting as shown below. (See pages 46 ~ 51.) • “DIGITAL OUTPUT” → “PCM” “LPCM (44.1kHz/48kHz)” → “ON” Playing DVDs with incorrect settings may result noise that could damage your ears or the speakers. DVD-A1XV Digital audio input connector Digital audio input connector...
- Seite 18 NOTES: • When DENON LINK is set, the down-mixed audio signals are output only from the left and right terminals and front left and front right terminals. If you want to use the analog terminals, set to “DENON LINK” to “OFF”.
- Seite 19 DVD video, DVD audio that up until now could only be connected by 5-conductor audio cable in an analog connection, or Super Audio CD and other multi-channel audio. (unless DENON LINK connections) (IEEE 1394 is an international standard established by the Institute of Electrical and Electronics Engineers, Inc. of the U.S.)
- Seite 20 (loop connection). If this is done, the signal output from one device will return to the same device, resulting in malfunction. • No audio signals are output from the DVD-A1XV’s analog audio connectors, digital audio connectors, DENON LINK and HDMI connector when IEEE 1394 is set.
- Seite 21 SETUP” at SETUP. When set to DENON LINK and IEEE1394, switch the “HDMI AUDIO SETUP” setting to “2CH”. When the setting for outputting audio signals from the IEEE1394 connector is made, no audio signals are output via the HDMI connector.
- Seite 22 (11) DVI-D connections Connection with equipment that has a DVI (Digital Visual Interface)-D connector permits the transfer of digital images. When using display equipment that is not supported by the HDCP (content protection function), the image will not be output properly. Make an audio connection also because an audio signal will not be output via the DVI-D connector.
-
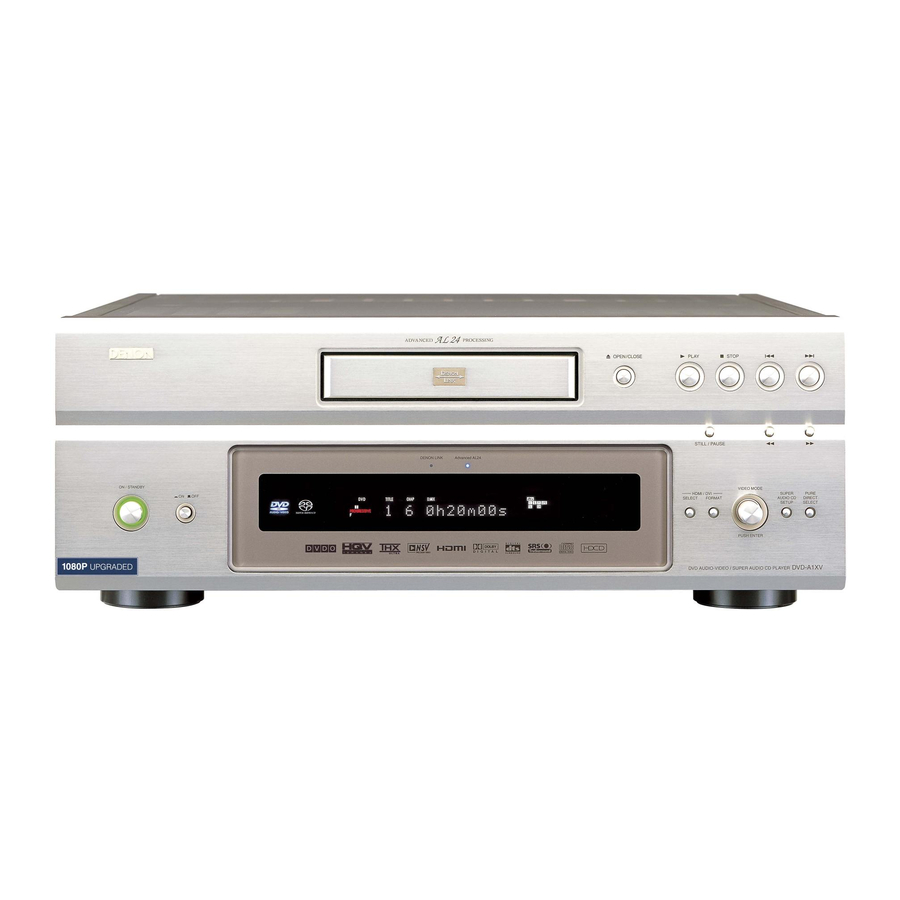
Seite 23: Part Names And Functions
5 PART NAMES AND FUNCTIONS (1) Front Panel OPEN/CLOSE PLAY STOP STILL / PAUSE ON / STANDBY VIDEO MODE HDMI / DVI SUPER PURE AUDIO CD DIRECT SELECT FORMAT SET UP SELECT PUSH ENTER DVD-A1XV DVD AUDIO-VIDEO / SUPER AUDIO CD PLAYER q w e Power ON/STANDBY button VIDEO MODE button... - Seite 24 (or chapter). (See page 69.) • This indicator lights when the audio signals are transferred Slow/Search buttons ( by DENON LINK connections. • Press this to set the slow or search play mode. Advanced AL24 Processing indicator (See pages 68, 69.) •...
- Seite 25 • Connect using the included audio cord. • This is the input connector for wired remote control. Multi-channel sound is down-mixed and output. Consult your DENON dealer if you wish to use this connector. Component video output connectors (COMPONENT VIDEO OUT) Control output connector (ROOM TO ROOM OUT) •...
- Seite 26 (3) Display r t y u SUPER DVD GROUP TITLE TRACK CHAP ANGLE D.MIX PROG RAND TOTAL SING REM HDCD DIGITAL AUDIO VCD L.PCMP.PCM 1 A-B MPEG JPEG SL SL SR SR PROGRESSIVE WMA MP3 HDMI IEEE1394 DVI Lights to indicate the currently playing disc. Lights to indicate the currently playing video type.
-
Seite 27: Remote Control Unit
6 REMOTE CONTROL UNIT 2 The DVD-A1XV can be controlled from a distance using the included remote control unit (RC-993). (1) Inserting Batteries q Remove the remote control unit’s rear cover. Cautions On Batteries • Use R6P/AA batteries in this remote control unit. •... - Seite 28 (3) Names and Functions of Remote Control Unit Buttons 2 Button not explained here function in the same way as the corresponding buttons on the main unit. POWER ON/POWER OFF buttons • Press this to switch the power between on and standby. HDMI/DVI SELECT/FORMAT buttons •...
- Seite 29 OPEN/CLOSE button NTSC/PAL button • Use this to switch the set’s video output format (NTSC/PAL). SUPER AUDIO CD SETUP button PROGRAM/DIRECT button CLEAR button SELECT FORMAT NTSC/PAL • Press this to clear numbers that you have input. CALL button • Press this to check the program contents. SEARCH MODE button •...
-
Seite 30: Loading Discs
7 LOADING DISCS 2 Set discs in the disc tray with the labeled (printed) side facing up. (2) Loading Discs • Pick up the disc carefully so as not to touch the signal surface and hold it with the labeled side facing up. Outer disc guide •... -
Seite 31: Changing The Default Settings
8 CHANGING THE DEFAULT SETTINGS 2 Make the initial settings to suit your usage conditions before starting playback. The initial settings are retained until they are next changed, even if the power is turned off. SELECT FORMAT NTSC/PAL OPEN/CLOSE PLAY STOP STILL / PAUSE ANGLE... - Seite 32 And use this to set the language for the default setting screen and Remote control unit messages displayed on the TV screen (“PLAY”, etc.). DIGITAL INTERFACE SETUP Use this to set the output of DVI, HDMI, DENON LINK and IEEE1394 L ANGUAGE SE TUP terminals. D I AL OG...
- Seite 33 SURROUND LCH 0 dB SUBWOOFER 0 dB HDMI PANEL RES. AUTO FORMAT MAX RES. DELAY TIME DISTANCE METERS FEET DENON LINK FRONT LCH 3.6m 2nd (AUTO) FRONT RCH 3.6m 2nd (1394) CENTER 3.6m 2nd (ANALOG) SURROUND LCH 3.0m SURROUND RCH 3.0m...
- Seite 34 Bold characters indicate factory defaults. SPEAKER FRONT SP LARGE AUDIO SETUP CONFIGURATION SMALL AUDIO CHANNEL MULTI CHANNEL SPEAKER SETUP CENTER SP LARGE 2 CH (SRS OFF) SMALL 2 CH (SRS ON) NONE SUBWOOFER DIGITAL OUTPUT NORMAL SURROUND SP LARGE SMALL LPCM NONE (44.1 kHz/48 kHz)
-
Seite 35: Disc Menus
When “LANGUAGE SETUP” is selected See pages 31, 32. Use the • and ª cursor buttons to select the desired setting, then press the ENTER button. DIALOG Remote control unit Remote control unit Use this to set the language of the sound output from the speakers. SUBTITLE Use this to set the language of the subtitles displayed on the TV. - Seite 36 w When “SUBTITLE” is selected: Select this if you do not want to display the subtitles. (For some discs it is not possible to turn off the subtitle display.) ENGLISH (Factory default) Select this when you want to play the DVD with the subtitles in English.
-
Seite 37: Language Code List
Language code list Code Language Code Language Code Language Code Language 6565 Afar 7079 Faroese 7678 Lingala 8375 Slovak 6566 Abkhazian 7082 French 7679 Laothian 8376 Slovenian 6570 Afrikaans 7089 Frisian 7684 Lithuanian 8377 Samoan 6577 Ameharic 7165 Irish 7686 Latvian, Lettish 8378 Shona... - Seite 38 I E E E 1 3 9 4 OF F DENON LINK Use this to output digital signals from the DENON LINK terminal. E X I T SE TUP IEEE1394 Use this to output digital signals from the IEEE1394 terminal.
- Seite 39 w When “HDMI AUDIO SETUP” is selected: 2CH (Factory default) The audio signals are output via the HDMI connector with a down- mixed to 2 channel. MULTI (NORMAL) The multi-channel audio signals are output via the HDMI connector with a bitstream. MULTI (LPCM) Remote control unit Remote control unit...
- Seite 40 B When “CHANNEL LEVEL” is selected, use the • and ª cursor buttons to select the speaker to be adjusted, then use the cursor buttons to set the level. • TEST TONE Use the cursor buttons to select auto or manual. Adjust so that the volume of the test tones output from the different speakers sounds the same.
- Seite 41 DENON LINK connector. Please use the analog output terminals or the IEEE1394 connection. When the DENON LINK is set, the down mixed audio signals are output only from the Left and Right and Front Left and Front Right...
- Seite 42 AUTO PL AY AUD I O F ORMAT B When “AUDIO FORMAT” is selected: FORMAT1 (Factory default) Set this when you conjunction with a DENON device. FORMAT2 This is a mode for future system expansion. SE L ECT : DE C I S I ON : ENTER BUT TON [IEEE1394 indicator in the display] •...
- Seite 43 When “VIDEO SETUP” is selected See pages 31, 32. Use the • and ª cursor buttons to select the desired setting, then press the ENTER button. TV ASPECT Use this to set the shape of your TV’s screen. TV TYPE Use this to set your TV’s video format (NTSC, PAL or MULTI).
- Seite 44 w When “TV TYPE” is selected: NTSC Select this when your TV’s video format is NTSC. If NTSC is selected, output format is fixed to NTSC. Select this when your TV’s video format is PAL. If PAL is selected, output format is fixed to PAL. MULTI (Factory default) Remote control unit Remote control unit...
- Seite 45 t When “SQUEEZE MODE” is selected: OFF (Factory default) Select this to display as full size of a 16:9 TV, regardless of the image’s size. Select this to display the image with a ratio of 4:3 at the center of a 16:9 TV display, regardless of the image’s size.
- Seite 46 The low pass filter value when playing Super Audio CDs can be set. The audio channel, digital output, LPCM conversion mode and source direct bass expand items cannot be selected when DENON LINK or IEEE1394 is selected or when the HDMI audio is “MULTI (NORMAL)”.
-
Seite 47: Speaker Configuration
Use the • and ª cursor buttons to select the desired setting, then press the ENTER button. q When “AUDIO CHANNEL” is selected: MULTI CHANNEL (Factory default) Select this for systems in which three or more speakers are connected. When MULTI CHANNEL is set, the speaker settings (SPEAKER CONFIGURATION), speaker output level adjustment (CHANNEL Remote control unit Remote control unit... - Seite 48 B When “SPEAKER CONFIGURATION” is selected, use the • and ª cursor buttons to select the speaker to be set then press the ENTER button. • The type of speaker used for the front speakers, center speaker, subwoofer and surround speakers can be set. Use the • and ª cursor buttons to select the speaker type, then press the ENTER button.
- Seite 49 B When “DELAY TIME” is selected: With 5.1-channel surround sound, ideally the distance between the listening position and all the speakers aside from the subwoofer should be the same. The delay time setting can be used to make the sound from the different speakers reach the listening position at the same time.
- Seite 50 w When “DIGITAL OUTPUT” is selected: NORMAL (Factory default) When playing DVDs recorded in Dolby Digital or DTS, bitstream signals are output from the digital audio output terminals. When playing DVDs recorded in linear PCM or packed PCM, linear PCM signals are output.
- Seite 51 t When “BASS ENHANCER” is selected: (For 2 channel source.) OFF (Factory default) Remote control unit Remote control unit No sound is produced from the subwoofer. Sound is produced from the subwoofer. In the case, set the subwoofer to “YES” at the speaker settings. AUD I O SE TUP AUD I O CHANNE L This works only with analog audio output.
-
Seite 52: Rating Level
When “RATINGS” is selected See pages 31, 32. Use the • and ª cursor buttons to select the desired RAT I NGS setting, then press the ENTER button. RAT I NG L EVE L 8(NO L IMI T) PASSWORD RATING LEVEL Use this to restrict playback of adult DVDs you do E X I T SE TUP Remote control unit... - Seite 53 Remote control unit Remote control unit w When “PASSWORD” is selected: Use the cursor button to select the “CHANGE”, then press the ENTER button. RAT I NGS RAT I NG L EVE L CHANGE PASSWORD Remote control unit E X I T SE TUP SE L EC T : DE C I S I ON : ENTER BUT TON Remote control unit...
- Seite 54 When “OTHER SETUP” is selected See pages 31, 32. Use the • and ª cursor buttons to select the desired setting, then press the ENTER button. PLAYER MODE The DVD video play mode can be set to play the DVD video contents included on a DVD audio disc.
- Seite 55 w When “CAPTIONS” is selected: OFF (Factory default) Select this when you do not want to display the captions on the screen when playing DVDs containing English captions Remote control unit Remote control unit Select this to display the captions on the screen when playing DVDs containing English captions.
- Seite 56 y When “AUTO POWER MODE” is selected: Remote control unit Remote control unit OFF (Factory default) The power does not automatically switch to the standby mode. OTHER SE TUP The DVD-A1XV’s power turns off and the standby mode is set if the PL AYER MODE DVD-A1XV remains in the stop mode for approximately 30 minutes.
-
Seite 57: Using The Pure Direct Mode
Also, when the “HDMI AUDIO SETUP” is set to Remote control unit “MULTI (NORMAL)”, the setting of DIGITAL OUTPUT cannot be made. (See pages 38, 39.) When DENON LINK and IEEE 1394 settings are valid, the setting of DIGITAL OUTPUT cannot be selected. PURE DIRECT MEMORY SELECT Press the PURE DIRECT MEMORY button. -
Seite 58: Using The Super Audio Cd Setup
Press the PURE DIRECT SELECT button. • The modes described below will appear on the display. NORMAL : All signals are output normally. MODE 1 : The settings stored for MODE 1 are used. The factory default settings are: “DIGITAL OUTPUT” : “ON” PURE PURE DIRECT DIRECT... -
Seite 59: Adjusting The Picture Quality
11 ADJUSTING THE PICTURE QUALITY ANGLE SUBTITLE AUDIO 2, 3, 4, 5, 6, 7 REPEAT RANDOM MARKER ZOOM DIMMER SETUP PICT ADJ. MEMORY SELECT Press the PICTURE ADJUST button. P I CTURE MODE • The image quality adjustment screen will appear. PICTURE ADJUST Returns the settings to the factory default settings. - Seite 60 When Image Quality Adjustment 1 is selected and adjusted: • Press cursor button (ª), then select the image quality adjustment item with cursor buttons ( ), set the adjustment value with cursor buttons (•, ª), and press the ENTER button. •...
- Seite 61 When Gamma Correction is selected and adjusted: Two kinds of displays are prepared for adjustment of Gamma Correction. • When use the Numerical table of Gamma Correction. (Figure 1) :Pressing the cursor button (ª) • When use the Graph of Gamma Correction. (Figure 2) :Pressing the enter button Remote control unit Select the adjust point with cursor buttons (...
- Seite 62 P I CTURE MODE When the Display Position is Selected and Adjusted: • Press the cursor button (ª), then select the horizontal/vertical direction with the cursor buttons ( ), set the adjustment value with the (•, ª) cursor buttons, and press the ENTER button. SETUP LEVEL (0 IRE, 0 IRE) (Factory default: 0 IRE) Remote control unit...
-
Seite 63: Using The Video Setup
12 USING THE VIDEO SETUP 2 The video output setting of the HDMI and the DVI-D connectors can be changed. 2 The video output setting of the PICTURE MODE, TV SYSTEM, SQUEEZE MODE and AUDIO ADJUST also can be changed. OPEN/CLOSE PLAY STOP... - Seite 64 Turning the VIDEO MODE knob. • The modes described below will appear on the display. Select the item you wish to set and press the VIDEO MODE knob to define PICTURE MODE It is possible to select between five modes at which picture quality settings are stored (M1 to M5) as well as the standard settings set upon shipment VIDEO MODE from the factory.
- Seite 65 When “TV SYSTEM” is selected: • The modes described below will appear on the display. Select the item you wish to set and press the VIDEO MODE knob to define VIDEO MODE PROGRESSIVE (Factory default) The audio signals are synchronized with the progressive output. (For component video output signals when “COMPONENT VIDEO OUT”...
-
Seite 66: Playback
13 PLAYBACK (1) Playback 2, 4 2, 4 SELECT FORMAT NTSC/PAL PLAY STOP OPEN/CLOSE STILL / PAUSE ON / STANDBY VIDEO MODE ANGLE SUBTITLE AUDIO HDMI / DVI SUPER PURE AUDIO CD DIRECT SELECT FORMAT SET UP SELECT PUSH ENTER DVD-A1XV DVD AUDIO-VIDEO / SUPER AUDIO CD PLAYER ON / STANDBY... - Seite 67 PLAY PLAY PLAY Press the PLAY button. • For many interactive DVDs and video CDs with playback Main unit Remote control unit control, a menu screen appears. In this case use the Example: For DVDs with menu Example: For video CDs with screens playback control procedure in step 6 to select the desired item.
-
Seite 68: Remote Control Unit (Rc-993)
STOP button SKIP buttons SELECT FORMAT NTSC/PAL STILL/PAUSE button Number buttons PLAY STOP OPEN/CLOSE SEARCH MODE button ANGLE SUBTITLE AUDIO STILL / PAUSE ON / STANDBY VIDEO MODE HDMI / DVI SUPER PURE AUDIO CD DIRECT SELECT FORMAT SET UP SELECT PUSH ENTER ENTER button... -
Seite 69: Skipping To The Beginning Of Chapters Or Tracks
(5) Skipping to the Beginning of Chapters or Tracks Cueing using the SKIP buttons SKIP During playback, press one of the SKIP buttons on the main unit or the remote control unit. : Reverse direction (PREVIOUS) : Forward direction (NEXT) •... - Seite 70 (8) Selecting the still image (only for DVD-audios) During playback, press the PAGE + or PAGE – button on the remote control PAGE unit. • For DVD audio discs with still images, the desired image can be selected. Remote control unit •...
-
Seite 71: Playing Repeatedly
14 PLAYING REPEATEDLY 2 Use this function to play your favourite audio or video sections repeatedly. Playing Repeatedly (Repeat Playback) ANGLE SUBTITLE AUDIO REPEAT RANDOM MARKER ZOOM DIMMER SETUP PICT ADJ. MEMORY SELECT RC-993 In the play mode, press the REPEAT button. •... - Seite 72 Playing a Certain Section Repeatedly (A-B Repeat Playback) ANGLE SUBTITLE AUDIO REPEAT 1, 2 RANDOM MARKER ZOOM DIMMER SETUP PICT ADJ. MEMORY SELECT RC-993 A TO B SET A During playback, press the A-B button. • This sets start point A. Remote control unit A TO B SET B...
-
Seite 73: Playing Tracks In The Desired Order
15 PLAYING TRACKS IN THE DESIRED ORDER 2 Use this function with DVD-AUDIO discs, video CDs, Super audio CDs and music CDs to play the tracks in the desired order. 2 This function does not affect with DVD-VIDEO discs. SELECT FORMAT NTSC/PAL OPEN/CLOSE... -
Seite 74: Playing Tracks In The Random Order
16 PLAYING TRACKS IN THE RANDOM ORDER 2 Use this function with video CDs, Super audio CDs and music CDs to play the tracks in random order. With DVD-AUDIO discs, random playback is performed within the selected group. 2 This function does not affect with DVD-VIDEO discs. SELECT FORMAT NTSC/PAL... -
Seite 75: Using The On-Screen Display
17 USING THE ON-SCREEN DISPLAY SELECT FORMAT NTSC/PAL 2 Use this function to display and change information on the disc (titles, chapters, time, etc.) ANGLE SUBTITLE AUDIO DISPLAY In the play mode, press the DISPLAY button. • The On-Screen Display appears. Remote control unit •... -
Seite 76: Using The Multiple Audio, Subtitle And Angle Functions
18 USING THE MULTIPLE AUDIO, SUBTITLE AND ANGLE FUNCTIONS Switching the Audio Language (Multiple Audio Function) 2 With DVDs containing multiple audio language signals, the audio language can be switched during playback. SELECT FORMAT NTSC/PAL ANGLE SUBTITLE AUDIO AUDIO 1/3 :DOLBY D 3 /2.1 ENGLISH AUDIO During playback, press the AUDIO button. - Seite 77 Switching the Subtitle Language (Multiple Subtitle Function) 2 With DVDs containing multiple subtitle language signals, the subtitle language can be switched during playback. SELECT FORMAT NTSC/PAL ANGLE SUBTITLE AUDIO SUBTITLE : 01/ 0 3 ENGLISH SUBTITLE During playback, press the SUBTITLE button. •...
- Seite 78 Switching the Angle (Multiple Angle Function) 2 With DVDs containing multiple angle signals, the angle can be switched during playback. SELECT FORMAT NTSC/PAL ANGLE SUBTITLE AUDIO 3 / 5 ANGLE During playback, press the ANGLE button. • The current angle number is displayed. Remote control unit 4 / 5 Use the •...
-
Seite 79: Using The Menus
19 USING THE MENUS Using the Top Menu 2 For DVDs containing multiple titles, the desired title can be selected and played from the top menu. SELECT FORMAT NTSC/PAL ANGLE SUBTITLE AUDIO Example: TOP MENU TOP MENU During playback, press the TOP MENU button. Apple Banana •... -
Seite 80: Using The Dvd Menu
Using the DVD Menu 2 Some DVDs include special menus called DVD menus. For example, DVDs with complex contents may contain guide menus, and DVDs with multiple languages may contain audio and subtitle language menus. These menus are called “DVD menus”. Here we describe the general procedure for using DVD menus. -
Seite 81: Marking Scenes You Want To See Again
20 MARKING SCENES YOU WANT TO SEE AGAIN 2 Set marks at scenes you want to see again so that you can start playback from the marked position whenever you want. Setting Marks (for DVD-audios and DVD-videos only) ANGLE SUBTITLE AUDIO 2, 3 REPEAT... -
Seite 82: Playing In The Zoom Mode
21 PLAYING IN THE ZOOM MODE ANGLE SUBTITLE AUDIO REPEAT RANDOM MARKER ZOOM DIMMER SETUP PICT ADJ. MEMORY SELECT RC-993 In the play or pause mode, press the ZOOM button. ZOOM • The zoom rate increases each time the ZOOM button is pressed. For DVD video discs and video CDs: OFF Æ... -
Seite 83: Playing Mp3
22 PLAYING MP3 Listening to MP3 CD, CD-Rs and CD-RWs 2 There are many music distribution sites on the internet from which music files in MP3 format can be downloaded. Music downloaded as instructed on the site and written onto a CD-R/RW disc can be played on the DVD-A1XV. If music recorded on commercially available music CDs is converted on a computer into MP3 files using an MP3 encoder (conversion software), the data on a 12 cm CD is reduced into about 1/10 the amount of the original data. - Seite 84 Use the • and ª cursor buttons to select the MP3 file you want to play, then press the PLAY button or ENTER button. • Playback starts. The display can be switched between the single elapsed time and the single remaining time and the track name by pressing the DISPLAY button.
-
Seite 85: Playing Wma
23 PLAYING WMA 2 Listening to WMA (Windows Media Audio) CD-R/CD-RW • This unit can play CD-R/RW music files that have been recorded in the WMA (Windows Media Audio)* audio compression format. Windows Media and the Windows logo are trademarks, or registered trademarks of Microsoft Corporation in the United States and/or other countries. -
Seite 86: Playing Still Picture Files (Jpeg Format)
24 PLAYING STILL PICTURE FILES (JPEG FORMAT) 2 JPEG files stored on Kodak picture CDs, Fujicolor CDs, CD-Rs and CD-RWs can be played as a slide show and enjoyed on the DVD-A1XV. Playing still picture 2 Kodak picture CDs and Fujifilm Fujicolor CDs can be played on the DVD-A1XV. When a CD (recording still picture) is played, the photographs on the CD can be displayed on a TV. - Seite 87 Use the • and ª cursor buttons to select the folder D I SC I NFORMATI ON containing the file(s) you want to play, then press the ENTER button. ROOT • • JPEG 1 JPEG 2 JPEG 3 To change the folder JPEG 4 Use the cursor button to select “ROOT”, then JPEG 5...
- Seite 88 • TRACK REPEAT (the select WMA or MP3 or JPEG file is played repeatedly) NOTES: • The DVD-A1XV is compatible with image data stored in JPEG format, but Denon does not guarantee that all image data stored in JPEG format can be viewed.
-
Seite 89: Troubleshooting
If the DVD-A1XV does not seem to be functioning properly, check the table below. If this does not solve the problem, the DVD-A1XV may be damaged. Turn off the power, unplug the power cord from the power outlet, and contact your store of purchase or nearest Denon sales office. - Seite 90 Symptom Check Page Menu screen messages for the desired • Check the setting of “DISC MENUS” under “LANGUAGE SETUP” in “SETUP”. 35~37 language do not display. • Check the HDMI/DVI connection.(Check the status of the HDMI/DVI indicators.) • Check whether the connected monitor equipment or other equipment supports HDCP. (The 20~22 DVD-A1XV will not output a video signal unless the connected equipment supports HDCP.) An image is not projected with an...
-
Seite 91: Main Specifications
: 112 dB Digital audio output: Optical digital output : Optical connector, 1 set Coaxial digital output : Pin jack, 1 set DENON LINK output : DENON LINK connector, 1 set IEEE 1394 terminal : IEEE 1394 connectors, 2 sets Power supply:... - Seite 92 TOKYO, JAPAN www.denon.com 00D 511 4289 013...