Herunterladen Inhalt Inhalt Diese Seite drucken
Fronius RC Panel Basic Bedienungsanleitung
Vorschau ausblenden Andere Handbücher für RC Panel Basic:
Inhaltsverzeichnis

Werbung

Verfügbare Sprachen
  • DE

Verfügbare Sprachen

  • DEUTSCH, seite 1
/ Perfect Charging /
Perfect Welding
RC Panel Basic
RC Panel Basic /BT
RC Panel Basic TIG /TMC
RC Panel Standard
42,0410,2068
Fronius prints on elemental chlorine free paper (ECF) sourced from certified sustainable forests (FSC).
/ Solar Energy
012-05122019
Bedienungsanleitung
Fernbedienung
Operating Instructions
Remote control
Instructions de service
Commande à distance
Manual de instrucciones
Mando a distancia
Návod k obsluze
Dálkové ovládání
Instrukcja obsługi
Zdalne sterowanie

Werbung

Inhaltsverzeichnis
loading

Inhaltszusammenfassung für Fronius RC Panel Basic

  • Seite 1 RC Panel Standard Remote control Instructions de service Commande à distance Manual de instrucciones Mando a distancia Návod k obsluze Dálkové ovládání Instrukcja obsługi Zdalne sterowanie 42,0410,2068 012-05122019 Fronius prints on elemental chlorine free paper (ECF) sourced from certified sustainable forests (FSC).
  • Seite 3: Einleitung

    Fronius Produkt. Die vorliegende Anleitung hilft Ihnen, sich mit diesem vertraut zu machen. Indem Sie die Anleitung sorgfältig lesen, lernen Sie die viel- fältigen Möglichkeiten Ihres Fronius Produktes kennen. Nur so können Sie seine Vorteile bestmöglich nutzen. Bitte beachten Sie auch die Sicherheitsvorschriften und sorgen Sie so für mehr Sicherheit am Einsatzort des Produktes.
  • Seite 5: Inhaltsverzeichnis

    Technische Daten RC Panel Basic /BT ....................Bluetooth trademarks..........................Hinweise zur Funkkennzeichnung ......................Bedienelemente am RC Panel Basic, RC Panel Basic /BT, RC Panel Basic TIG /TMC ......Allgemeines ............................Funktion der Einstellregler beim MIG/MAG-Schweißen ............... Funktion der Einstellregler beim Elektroden-Schweißen ..............
  • Seite 7: Allgemeines

    Systemkomponenten der TPS/i Geräteserie Systemkomponenten der TT/MW-Geräteserie (mit Bluetooth-Funktion) nur in zertifizierten Ländern RC Panel Basic TIG /TMC mit TMC-Anschluss Systemkomponenten der TT/MW-Geräteserie (mit TMC-Anschluss) Systemkomponenten der TP-Geräteserie (mit TMC-Anschluss) Mit der Fernbedienung werden je nach Schweißverfahren und Stromquelle Parameter ein- gestellt und Funktionen ausgewählt.
  • Seite 8: Lieferumfang

    Lieferumfang Fernbedienung dieses Dokument Kabel nicht vorhanden bei RC Panel Basic / BT Optionen TMC Verlängerung 5 m 43,0004,5979 Technische Daten Versorgungsspannung + 24 V DC RC Panel Basic, Schutzklasse IP 44 RC Panel Basic TIG /TMC, RC Pa- Prüfzeichen...
  • Seite 9: Bluetooth Trademarks

    Bluetooth SIG, Inc. und werden vom Hersteller in Lizenz verwendet. Andere Marken und Handelsbezeichnungen sind Eigentum der jeweiligen Rechteinhaber. Hinweise zur Die Fernbedienung RC Panel Basic /BT ist mit einem Funkmodul ausgestattet. Funkkennzeich- nung Funkmodule unterliegen in den USA der Kennzeichnungspflicht nach FCC: Dieses Gerät entspricht Abschnitt 15 der FCC-Bestimmungen.
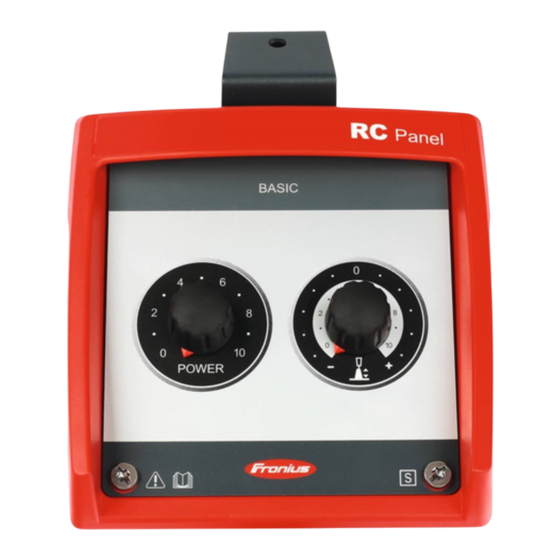
  • Seite 10: Bedienelemente Am Rc Panel Basic, Rc Panel Basic /Bt, Rc Panel Basic Tig /Tmc

    Bedienelemente am RC Panel Basic, RC Panel Basic /BT, RC Panel Basic TIG /TMC Allgemeines HINWEIS! Nähere Informationen zu den nachfolgend angeführten Schweißparametern der Be- dienungsanleitung der Stromquelle entnehmen. Funktion der Ein- Je nach Schweißverfahren sind die Einstellregler mit unterschiedlichen Funktionen be- stellregler beim legt.
  • Seite 11: Funktion Der Einstellregler Beim Elektroden-Schweißen

    Funktion der Ein- Einstellung des Schweißstromes stellregler beim Beeinflussung der Dynamik: Elektroden- 0 = weicher und spritzerarmer Schweißen Lichtbogen 10 = härterer und stabilerer Lichtbogen Funktion der Ein- Einstellung des Schweißstromes stellregler beim nicht aktiv WIG-Schweißen (SpeedNet-Anschluss) Einstellung des Absenkstromes (TMC-Anschluss)
  • Seite 12: Weitere Bedienelemente Rc Panel Basic /Bt

    Weitere Bedie- Aufkleber mit QR-Code und nelemente RC Pa- MAC-Adresse nel Basic /BT Kontroll-Leuchte zum Ein-/Ausschalten der Fernbe- dienung als Statusanzeige: Leuchtet nach dem Einschalten für 3 Sekunden. Blinkt 4 x, wenn sich die Fernbedie- nung mit einem Empfänger verbin- det.
  • Seite 13: Bedienelemente Und Anzeigen Am Rc Panel Standard

    Bedienelemente und Anzeigen am RC Panel Stan- dard Allgemeines HINWEIS! Nähere Informationen zu den nachfolgend angeführten Schweißparametern der Be- dienungsanleitung der Stromquelle entnehmen. Bedienelemente und Anzeigen am RC Panel Stan- dard (10) (14) (11) (13) (12)
  • Seite 14 Taste Parameteranwahl links zur Anwahl der nachfolgend angeführten Parameter. Bei angewähltem Parameter leuchtet die entsprechende Anzeige. Materialstärke *) in mm oder inch Strom *) Strom in A Vor Schweißbeginn wird automatisch ein Richtwert angezeigt, der sich aus den programmierten Parametern ergibt. Während des Schweißvorganges wird der aktuelle Istwert angezeigt.
  • Seite 15 Taste Parameteranwahl rechts zur Anwahl der nachfolgend angeführten Parameter. Bei angewähltem Parameter leuchtet die entsprechende Anzeige. Lichtbogen-Längenkorrektur zur Korrektur der Lichtbogen-Länge - ... kürzere Lichtbogen-Länge 0 ... neutrale Lichtbogen-Länge + ... längere Lichtbogen-Länge Spannung *) in V Vor Schweißbeginn wird automatisch ein Richtwert angezeigt, der sich aus den programmierten Parametern ergibt.
  • Seite 16: Einstellrad Mit Dreh-/Drück-Funktion

    Taste Schweißverfahren zur Auswahl des Schweißverfahrens PULS SYNERGIC - MIG/MAG Puls-Synergic Schweißen SYNERGIC - MIG/MAG Standard-Synergic Schweißen MANUAL - MIG/MAG Standard-Manuell Schweißen JOB - Job Betrieb STICK/TIG - Stabelektroden-Schweißen, WIG-Schweißen SP (SP = Sonderprogramme: LSC, PMC, ...) - Je nach freige- schaltetem Funktionspaket sind verschiedene Schweißverfah- ren auswählbar.
  • Seite 17: Installation Und Inbetriebnahme

    Installation und Inbetriebnahme Allgemeines HINWEIS! Die nachfolgenden Arbeitsschritte werden anhand des RC Panel Basic beschrieben, sind jedoch bei allen Varianten des RC Panels auf die gleiche Weise durchzuführen. Montagemöglich- VORSICHT! keiten Gefahr von Personen- und Sachschäden durch herabfallende Fernbedienung. ► Die Fernbedienung immer gegen Herabfallen sichern.
  • Seite 18: Rc Panel Basic /Bt: Fernbedienung Via Bluetooth Mit Der Stromquelle Verbinden

    RC Panel Basic / Fernbedienung an der Kontroll-Leuchte einschalten BT: Fernbedie- Stromquelle einschalten und die Bluetooth-Funktion aktivieren nung via Bluetoo- th mit der Die Fernbedienung ist betriebsbereit, wenn diese von der Stromquelle erkannt und Stromquelle ver- angezeigt wird. binden Falls erforderlich, Bluetooth-Einstellungen an der Stromquelle bestätigen Beim Aus-/Einschalten der Fernbedienung beachten: Die Fernbedienung nach dem Ausschalten für mindestens 3 Sekunden ausgeschaltet las-...
  • Seite 19: Optionen Montieren

    Optionen montieren Allgemeines HINWEIS! Die nachfolgenden Arbeitsschritte werden anhand des RC Panel Basic beschrieben, sind jedoch bei allen Varianten des RC Panels auf die gleiche Weise durchzuführen. Option Magnet- Der Magnethalter ist nur optional erhältlich und nicht im Standard-Lieferumfang der Fern- halter montieren bedienung enthalten.
  • Seite 20: Rc Panel Basic /Bt: Batterie Wechseln

    RC Panel Basic /BT: Batterie wechseln Anzeichen für lee- Die Kontroll-Leuchte leuchtet nach dem Einschalten nicht oder weniger als 3 Sekunden. re Batterien An der Stromquelle wird neben dem Bluetooth-Teilnehmer ein Batteriesymbol mit dem ak- tuellen Entladezustand der Batterien angezeigt.
  • Seite 23 Thank you for the trust you have placed in our company and congratulations on buying this high-quality Fronius product. These instructions will help you familiarise yourself with the product. Reading the instructions carefully will enable you to learn about the many different features it has to offer.
  • Seite 25 RC Panel Basic /BT technical data ....................... Bluetooth trademarks..........................Information on radio certification......................Control elements on the RC Panel Basic, RC Panel Basic /BT, RC Panel Basic TIG /TMC ..... General ..............................Adjuster functions during MIG/MAG welding ..................Adjuster functions during electrode welding ..................
  • Seite 27: General

    System components from the TT/MW series (with Bluetooth function) Only in certified countries RC Panel Basic TIG/TMC with TMC connection socket System components from the TT/MW series (with TMC connection socket) System components from the TP series (with TMC connection socket) When using the remote control, the parameters are set and functions selected depending on the welding process and power source.
  • Seite 28: Scope Of Supply

    Scope of supply Remote control This document Cable not provided with RC Panel Basic / BT Options TMC extension 5 m 43,0004,5979 RC Panel Basic, Supply voltage + 24 V DC RC Panel Basic Protection class IP 44 TIG / TMC, RC...
  • Seite 29: Bluetooth Trademarks

    The Bluetooth® word mark and logos are registered trademarks owned by Bluetooth SIG, marks Inc. and any use of such marks by Fronius International GmbH is under license. Other trademarks and trade names are those of their respective owners. Information on ra- The RC Panel Basic /BT remote control is fitted with a wireless module.
  • Seite 30: Control Elements On The Rc Panel Basic, Rc Panel Basic /Bt, Rc Panel Basic Tig /Tmc

    Control elements on the RC Panel Basic, RC Panel Basic /BT, RC Panel Basic TIG /TMC General NOTE! See the power source Operating Instructions for more details of the welding param- eters listed below. Adjuster func- The adjuster performs different functions depending on the welding process.
  • Seite 31: Adjuster Functions During Tig Welding

    Adjuster func- Setting the welding current tions during TIG inactive welding (SpeedNet connection socket) Setting the reduced current I (TMC connection socket)
  • Seite 32: Rc Panel Basic /Bt Further Control Elements

    RC Panel Basic / Sticker with QR code and MAC BT further control address elements Indicator light for switching the remote control on/ as status indicator: lights up after switching on for 3 se- conds. Flashes four times, if the remote control is connected to a receiver.
  • Seite 33: Controls And Indicators On The Rc Panel Standard

    Controls and indicators on the RC Panel Standard General NOTE! See the power source Operating Instructions for more details of the welding param- eters listed below. Controls and indi- cators on the RC Panel Standard (10) (14) (11) (13) (12)
  • Seite 34: Special Function

    Parameter selection button (left) for selecting the parameters listed below. The corresponding indicator lights up when a parameter is select- Material thickness *) in mm or inches Current *) current in A Before the start of welding, the machine automatically displays a standard value based on the programmed parameters.
  • Seite 35 Parameter selection button (right) for selecting the parameters listed below. The corresponding indicator lights up when a parameter is select- Arc length correction for correcting the arc length - ... shorter arc length 0 ... neutral arc length + ... longer arc length Voltage *) in V Before the start of welding, the machine automatically displays a...
  • Seite 36 Welding process button for selecting the welding process PULS SYNERGIC - MIG/MAG pulse synergic welding SYNERGIC - MIG/MAG standard synergic welding MANUAL - MIG/MAG standard manual welding JOB - Job Mode STICK/TIG - Manual metal arc welding, TIG welding SP (SP = special programs: LSC, PMC, etc.) - Depending on which package of functions is enabled, various welding pro- cesses can be selected.
  • Seite 37: Installation And Commissioning

    Installation and commissioning General NOTE! The following steps are described using the RC Panel Basic as an example, however the process is the same on all variants of the RC Panel. Fitting options CAUTION! Risk of injury and material damage from falling remote control.
  • Seite 38: Rc Panel Basic /Bt: Connecting The Remote Control To The Power Source Via Bluetooth

    RC Panel Basic / Switch on remote control at the indicator light BT: connecting Switch on power source and activate Bluetooth function the remote con- trol to the power The remote control is ready to use when this is detected and displayed by the power source via Blue- source.
  • Seite 39: Fitting Optional Extras

    Fitting optional extras General NOTE! The following steps are described using the RC Panel Basic as an example, however the process is the same on all variants of the RC Panel. Fitting the mag- The magnetic holder is only available as an option and is not included in the remote control netic holder op- scope of supply.
  • Seite 40: Rc Panel Basic /Bt: Changing The Battery

    RC Panel Basic /BT: changing the battery Indication of emp- The indicator light does not light up after the device is switched on or does so for less than ty batteries 3 seconds. Alongside the Bluetooth user, a battery symbol showing the current state of discharge for the batteries is displayed on the power source.
  • Seite 43 Nous vous remercions de la confiance que vous nous témoignez et vous félicitons d'avoir acquis ce produit Fronius de haute qualité technique. Les présentes Instructions de service doivent vous permettre de vous familiariser avec ce produit. Par une lecture attentive de ces instructions, vous apprendrez à...
  • Seite 45 Installation et mise en service ........................Généralités............................Options de montage..........................Raccorder la commande à distance aux composants périphériques ........... RC Panel Basic /BT : connecter la commande à distance à la source de courant par Bluetooth ..Monter les options............................Généralités............................Installer l'option Support magnétique....................
  • Seite 47: Généralités

    Composants périphériques de la série d'appareils TT/MW (avec fonction Bluetooth) uniquement dans les pays certifiés RC Panel Basic TIG /TMC avec multi connecteur TIG Composants périphériques de la série d'appareils TT/MW (avec multi connecteur TIG) Composants périphériques de la série d'appareils TP (avec multi connecteur TIG) À...
  • Seite 48: Contenu De La Livraison

    Contenu de la li- Commande à distance vraison Le présent document Câble non disponible pour RC Panel Basic / BT Options Rallonge TMC 5 m 43,0004,5979 Caractéristiques Tension d'alimentation + 24 V DC techniques RC Classe de protection IP 44...
  • Seite 49: Bluetooth Trademarks

    La marque verbale et les logos Bluetooth® sont des marques déposées appartenant à marks Bluetooth SIG, Inc. et leur utilisation par Fronius International GmbH fait l’objet d’une li- cence. D’autres marques et dénominations commerciales sont la propriété de leur ayant- droits respectifs.
  • Seite 50: Éléments De Commande Sur Rc Panel Basic, Rc Panel Basic /Bt, Rc Panel Basic Tig /Tmc

    Éléments de commande sur RC Panel Basic, RC Pa- nel Basic /BT, RC Panel Basic TIG /TMC Généralités REMARQUE! Pour de plus amples informations sur les paramètres présentés ci-dessous, consul- ter les Instructions de service de la source de courant.
  • Seite 51: Fonction Des Boutons De Réglage En Cas De Soudage À L'électrode

    Fonction des Réglage de l'intensité de sou- boutons de ré- dage glage en cas de Influence de la dynamique : soudage à l'élec- 0 = arc électrique doux et à trode faibles projections 10 = arc électrique plus ferme et plus stable Fonctions des Réglage de l'intensité...
  • Seite 52: Autres Éléments De Commande Rc Panel Basic /Bt

    Autres éléments Autocollant avec code QR et ad- de commande RC resse MAC Panel Basic /BT Voyant de contrôle Pour éteindre/allumer la comman- de à distance En tant que voyant d'état : s'allume pendant 3 secondes après le démarrage. Clignote 4 x, lors de la connexion de la commande à...
  • Seite 53: Éléments De Commande Et Affichage Sur Le Rc Panel Standard

    Éléments de commande et affichage sur le RC Panel Standard Généralités REMARQUE! Pour de plus amples informations sur les paramètres présentés ci-dessous, consul- ter les Instructions de service de la source de courant. Éléments de com- mande et affi- chage sur le RC Panel Standard (10) (14)
  • Seite 54: Fonction Spéciale

    Touche sélection des paramètres gauche pour la sélection des paramètres présentés ci-dessous. Pour le paramètre sélectionné, l'indication correspondante s'éclaire. Épaisseur du matériau*) en mm ou en inch Courant*) Intensité de courant en A Une valeur indicative calculée à partir des paramètres programmés est affichée automatiquement avant le début du soudage.
  • Seite 55 Touche sélection des paramètres, droite pour la sélection des paramètres présentés ci-dessous. Pour le paramètre sélectionné, l'indication correspondante s'éclaire. Correction de la longueur de l'arc électrique pour corriger la longueur de l'arc électrique - ... longueur de l'arc plus courte 0 ...
  • Seite 56 Touche Easy Job pour la sauvegarde, la consultation et la suppression des Easy Job. La DEL sur la touche signale que l'Easy Job a été sélectionné Mode de fonctionnement : Maintenir la touche enfoncée pendant 3 secondes = sauvegarder l'Easy Job (sauvegarde des ré- glages actuels).
  • Seite 57 Indication Arc globulaire entre l'arc court et la pulvérisation axiale se forme un arc globulaire géné- rant beaucoup de projections. Le voyant de l’arc globulaire s’éclaire pour signaler cette zone. Indication Hold Après la fin de chaque soudage, les valeurs réelles (courant, tension, vi- tesse d'avance du fil) s'affichent automatiquement.
  • Seite 58: Installation Et Mise En Service

    Installation et mise en service Généralités REMARQUE! Les opérations suivantes sont décrites en fonction du panneau RC Panel Basic mais doivent cependant être réalisées de la même manière sur tous les modèles de RC Panel. Options de mon- ATTENTION ! tage Risque de dommages corporels et matériels par chute de la commande à...
  • Seite 59: Raccorder La Commande À Distance Aux Composants Périphériques

    Connecteur SpeedNet Multi connecteur TIG RC Panel Basic / Allumer la commande à distance au niveau du voyant de contrôle BT : connecter la Allumer la source de courant et activer la fonction Bluetooth commande à dis- tance à...
  • Seite 60: Monter Les Options

    Monter les options Généralités REMARQUE! Les opérations suivantes sont décrites en fonction du panneau RC Panel Basic mais doivent cependant être réalisées de la même manière sur tous les modèles de RC Panel. Installer l'option Le support magnétique est disponible uniquement en option et n'est pas inclus dans le Support magné-...
  • Seite 61: Rc Panel Basic /Bt : Remplacer Les Piles

    RC Panel Basic /BT : remplacer les piles Indication en cas Le voyant de contrôle s'allume pendant moins de 3 secondes ou pas du tout après le dé- de piles vides marrage. Sur la source de courant, à côté du périphérique Bluetooth, un symbole affiche l'état de charge des piles.
  • Seite 63 Introducción Le agradecemos su confianza y queremos felicitarle por la adquisición de este producto de Fronius de alta calidad técnica. El presente manual le ayudará a familiarizarse con el producto. Si lee detenidamente este manual, aprenderá las numerosas posibilidades que le ofrece su producto Fronius.
  • Seite 65 Datos técnicos RC Panel Basic /BT...................... Bluetooth trademarks..........................Observaciones para la identificación de radio ..................Elementos de manejo en el RC Panel Basic, RC Panel Basic /BT, RC Panel Basic TIG /TMC....Generalidades............................Función de los reguladores de ajuste para la soldadura MIG/MAG .............
  • Seite 67: Generalidades

    Componentes del sistema de la serie de equipos TT/MW (con función Bluetooth) Únicamente en países certificados RC Panel Basic TIG/TMC con borna de conexión TIG Multi Connector Componentes del sistema de la serie de equipos TT/MW (con borna de conexión TIG Multi Connector) Componentes del sistema de la serie de equipos TP (con borna de conexión TIG Multi...
  • Seite 68: Volumen De Suministro

    Volumen de sumi- Mando a distancia nistro Este documento El cable no está disponible en caso de la variante RC Panel Basic / BT Opciones Prolongación TIG Multi Connector de 5 m 43,0004,5979 Datos técnicos Alimentación de tensión + 24 V CC RC Panel Basic, Clase de protección...
  • Seite 69: Bluetooth Trademarks

    Observaciones El mando a distancia RC Panel Basic /BT está equipado con un módulo de radio. para la identifica- ción de radio En los EE. UU., los módulos de radio están sometidos a una identificación obligatoria se- gún FCC:...
  • Seite 70: Elementos De Manejo En El Rc Panel Basic, Rc Panel Basic /Bt, Rc Panel Basic Tig /Tmc

    Elementos de manejo en el RC Panel Basic, RC Pa- nel Basic /BT, RC Panel Basic TIG /TMC Generalidades ¡OBSERVACIÓN! En el manual de instrucciones de la fuente de corriente se ofrece información más detallada sobre los parámetros de soldadura indicados a continuación.
  • Seite 71: Función De Los Reguladores De Ajuste Para La Soldadura Por Electrodo

    Función de los re- Ajuste de la corriente de solda- guladores de dura ajuste para la sol- Repercusión sobre la dinámica: dadura por elec- 0 = arco voltaico suave y con trodo pocas proyecciones 10 = arco voltaico más duro y estable Función de los re- Ajuste de la corriente de solda-...
  • Seite 72: Otros Elementos De Manejo Rc Panel Basic /Bt

    Otros elementos Etiqueta adhesiva con código de manejo RC Pa- QR y dirección MAC nel Basic /BT Lámpara de control Para encender y apagar el mando a distancia b) Como indicación del estado: Se ilumina durante 3 segundos después de la conexión. Parpadea 4 veces cuando el man- do a distancia se ha conectado a un receptor.
  • Seite 73: Elementos De Manejo E Indicaciones En El Rc Panel Standard

    Elementos de manejo e indicaciones en el RC Panel Standard Generalidades ¡OBSERVACIÓN! En el manual de instrucciones de la fuente de corriente se ofrece información más detallada sobre los parámetros de soldadura indicados a continuación. Elementos de ma- nejo e indicacio- nes en el RC Panel Standard (10)
  • Seite 74: Función Especial

    Tecla "Selección de parámetros izquierda" Para seleccionar los parámetros mencionados a continuación. Una vez seleccionado el parámetro, se ilumina la indicación co- rrespondiente. Espesor del material *) en mm o pulgadas Corriente *) Corriente en A Antes de comenzar la soldadura se indica automáticamente un va- lor de orientación, resultante de los parámetros programados.
  • Seite 75 Tecla "Selección de parámetros derecha" Para seleccionar los parámetros mencionados a continuación. Una vez seleccionado el parámetro, se ilumina la indicación co- rrespondiente. Corrección de la longitud de arco voltaico Para la corrección de la longitud de arco voltaico - ... menor longitud del arco voltaico 0 ...
  • Seite 76 Tecla EasyJob Para guardar, consultar y borrar EasyJobs. El LED de la tecla indica que el Easy Job está seleccionado Funcionamiento: Mantener pulsada la tecla durante 3 segundos = Guardar el Easy Job (guardar los ajustes actuales). Después de guardar, se ilumina el LED de la tecla y en la pantalla se muestra "Sto- re"...
  • Seite 77 Indicación de arco voltaico globular Entre el arco voltaico corto y el arco voltaico de rociadura se produce un arco voltaico globular con proyecciones. Para indicar este margen se ilu- mina la indicación de arco voltaico globular. Indicación Hold Al finalizar cada soldadura, se muestran automáticamente los valores rea- les (corriente, tensión, avance de hilo, etc.).
  • Seite 78: Instalación Y Puesta En Servicio

    Instalación y puesta en servicio Generalidades ¡OBSERVACIÓN! Los siguientes pasos de trabajo se describen en base al RC Panel Basic, pero deben ser iguales para todas las variantes del RC Panel. Posibilidades de ¡PRECAUCIÓN! montaje Peligro de daños personales y materiales provocado por la caída del mando a dis- tancia.
  • Seite 79: Conectar El Mando A Distancia A Los Componentes Del Sistema

    Conexión de SpeedNet Conexión TIG Multi Connector RC Panel Basic / Encender el mando a distancia con la lámpara de control BT: Conectar el Encender la fuente de corriente y activar la función Bluetooth mando a distan- cia mediante El mando a distancia está...
  • Seite 80: Montar Las Opciones

    Montar las opciones Generalidades ¡OBSERVACIÓN! Los siguientes pasos de trabajo se describen en base al RC Panel Basic, pero deben ser iguales para todas las variantes del RC Panel. Montar la opción El dispositivo fijador magnético únicamente está disponible como opción y no forma parte de dispositivo fi- del volumen de suministro estándar del mando a distancia.
  • Seite 81: Rc Panel Basic /Bt: Cambiar La Pila

    RC Panel Basic /BT: Cambiar la pila Síntomas de pilas La lámpara de control no se ilumina o se ilumina durante menos de 3 segundos después vacías del encendido. En la fuente de corriente se muestra al lado del participante de Bluetooth un símbolo de pila con el estado de descarga actual de las pilas.
  • Seite 83 Úvod děkujeme Vám za projevenou důvěru a gratulujeme k získání tohoto technicky vyspělého výrobku společnosti Fronius. Předložený návod Vám pomůže seznámit se s výrobkem. Proto jej pečlivě přečtěte, abyste poznali všechny mnohostranné možnosti, které vám ten- to výrobek naší firmy poskytuje. Jen tak budete moci všechny jeho přednosti co nejlépe využít.
  • Seite 85 Technické údaje pro RC Panel Basic / BT.................... Bluetooth trademarks..........................Upozornění týkající se označení bezdrátového zařízení ..............Ovládací prvky na panelu RC Panel Basic, RC Panel Basic /BT, RC Panel Basic TIG /TMC....Všeobecné informace ........................... Funkce ovladačů při svařování MIG/MAG ....................
  • Seite 87: Všeobecné Informace

    Systémové komponenty ze série přístrojů TT/MW (s funkcí Bluetooth) jen v zemích s certifikací RC Panel Basic TIG /TMC s přípojkou TMC Systémové komponenty ze série přístrojů TT/MW (s přípojkou TMC) Systémové komponenty ze série přístrojů TP (s přípojkou TMC) Pomocí...
  • Seite 88: Obsah Balení

    Obsah balení Dálkový ovladač Tento dokument RC Panel Basic / BT není vybaven kabelem Rozšířená výbava Prodloužení TMC 5 m 43,0004,5979 Technické údaje Napájecí napětí + 24 V DC pro RC Panel Ba- Třída ochrany IP 44 sic, RC Panel Ba-...
  • Seite 89: Bluetooth Trademarks

    Slovní ochranná známka Bluetooth® a loga Bluetooth® jsou registrované ochranné znám- marks ky a vlastnictví společnosti Bluetooth SIG, Inc. a společnost Fronius International GmbH je používá na základě licence. Ostatní ochranné známky a obchodní názvy jsou vlastnic- tvím příslušných vlastníků práv.
  • Seite 90: Ovládací Prvky Na Panelu Rc Panel Basic, Rc Panel Basic /Bt, Rc Panel Basic Tig /Tmc

    Ovládací prvky na panelu RC Panel Basic, RC Panel Basic /BT, RC Panel Basic TIG /TMC Všeobecné infor- UPOZORNĚNĺ! mace Podrobné informace týkající se níže uvedených parametrů svařování naleznete v ná- vodu k obsluze svařovacího zdroje. Funkce ovladačů V závislosti na svařovacím postupu jsou ovladače obsazeny různými funkcemi.
  • Seite 91: Funkce Ovladačů U Svařování Tig

    Funkce ovladačů Nastavení svařovacího proudu u svařování TIG není aktivní (přípojka SpeedNet) Nastavení sníženého proudu I (přípojka TMC)
  • Seite 92: Další Ovládací Prvky Na Zařízení Rc Panel Basic /Bt

    Další ovládací Štítek s kódem QR a MAC adre- prvky na zařízení RC Panel Basic / Kontrolní světlo pro zapnutí/vynutí dálkového ovladače pro zobrazení stavu: Po zapnutí svítí 3 sekundy. Blikne 4x, když se dálkový ovladač spojí s přijímačem. Pokud se navazování spojení pře- ruší, blikání...
  • Seite 93: Ovládací Prvky A Indikace Na Zařízení Rc Panel Standard

    Ovládací prvky a indikace na zařízení RC Panel Stan- dard Všeobecné infor- UPOZORNĚNĺ! mace Podrobné informace týkající se níže uvedených parametrů svařování naleznete v ná- vodu k obsluze svařovacího zdroje. Ovládací prvky a indikace na zaří- zení RC Panel Standard (10) (14) (11)
  • Seite 94 Levé tlačítko pro volbu parametrů pro výběr níže uvedených parametrů. U zvoleného parametru svítí odpovídající indikace. Tloušťka materiálu*) v mm nebo in. Proud*) proud v A Před začátkem svařování se automaticky zobrazí směrná hodnota vycházející z naprogramovaných parametrů. Během svařovacího postupu se zobrazuje aktuální...
  • Seite 95 Pravé tlačítko pro volbu parametrů pro výběr níže uvedených parametrů. U zvoleného parametru svítí odpovídající indikace. Korekce délky oblouku pro korekci délky oblouku - ... kratší oblouk 0 ... střední oblouk + ... delší oblouk Napětí*) napětí ve V Před začátkem svařování se automaticky zobrazí směrná hodnota vycházející...
  • Seite 96 Tlačítko svařovacího postupu pro výběr svařovacího postupu PULS SYNERGIC - pulzní synergické svařování MIG/MAG SYNERGIC - standardní synergické svařování MIG/MAG MANUAL - standardní ruční svařování MIG/MAG JOB - provoz s programovými bloky STICK/TIG - svařování obalenou elektrodou, svařování WIG SP (SP = speciální programy: LSC, PMC, ...) - V závislosti na dostupném balíčku funkcí...
  • Seite 97: Instalace A Uvedení Do Provozu

    Instalace a uvedení do provozu Všeobecné infor- UPOZORNĚNĺ! mace Následující pracovní kroky byly popsány podle panelu RC Panel Basic, u všech va- riant panelů RC se však provádějí stejným způsobem. Možnosti montá- POZOR! že Nebezpečí ohrožení osob a poškození majetku v důsledku padajícího dálkového ovladače.
  • Seite 98: Připojení Dálkového Ovladače Na Systémové Komponenty

    Připojení dálko- vého ovladače na systémové kom- ponenty Přípojka SpeedNet Přípojka TMC RC Panel Basic / Zapněte dálkový ovladač prostřednictvím kontrolního světa. BT: Spojení dál- Zapněte svařovací zdroj a aktivujte funkci Bluetooth. kového ovladače se svařovacím Dálkový ovladač je připraven k provozu, jakmile je rozpoznán svařovacím zdrojem zdrojem přes...
  • Seite 99: Montáž Rozšířené Výbavy

    Všeobecné infor- UPOZORNĚNĺ! mace Následující pracovní kroky byly popsány podle panelu RC Panel Basic, u všech va- riant panelů RC se však provádějí stejným způsobem. Montáž volitelné- Magnetický držák je k dostání pouze jako volitelná výbava a není součástí standardní do- ho magnetického...
  • Seite 100: Rc Panel Basic /Bt: Výměna Baterie

    RC Panel Basic /BT: Výměna baterie Indikace prázd- Kontrolní světlo se po zapnutí nerozsvítí nebo svítí méně než 3 sekundy. ných baterií Na svařovacím zdroji se vedle účastníka Bluetooth zobrazí symbol baterie s aktuálním sta- vem vybití baterií. RC Panel Basic /...
  • Seite 103 Niniejsza instrukcja obsługi pomoże Państwu się z nim za- znajomić. Czytając uważnie instrukcję, poznają Państwo szeroki zakres zastosowań ni- niejszego produktu firmy Fronius. Tylko w ten sposób mogą Państwo najlepiej wykorzystać zalety produktu. Prosimy również o przestrzeganie instrukcji bezpieczeństwa, by zapewnić większe bezpie- czeństwo w miejscu użytkowania produktu.
  • Seite 105 Dane techniczne RC Panel Basic /BT ....................108 Bluetooth trademarks..........................109 Wskazówki dotyczące zakłóceń radiowych ..................109 Elementy obsługi na RC Panel Basic, RC Panel Basic /BT, RC Panel Basic TIG /TMC......110 Informacje ogólne ..........................110 Funkcje regulatorów podczas spawania metodą MIG/MAG ..............110 Funkcje regulatorów podczas spawania elektrodą...
  • Seite 107: Informacje Ogólne

    Komponenty systemu serii urządzeń TT/MW (z funkcją Bluetooth) tylko w niektórych krajach, w zależności od certyfikatu RC Panel Basic TIG /TMC z przyłączem TMC Komponenty systemu serii urządzeń TT/MW (z przyłączem TMC) Komponenty systemu serii urządzeń TP (z przyłączem TMC) W zależności od metody spawania i źródła spawalniczego, za pomocą...
  • Seite 108: Zakres Dostawy

    Zakres dostawy Zdalne sterowanie Niniejszy dokument Brak kabla w przypadku RC Panel Basic / BT Opcje Przedłużacz TMC 5 m 43,0004,5979 Dane techniczne Napięcie zasilające + 24 V DC RC Panel Basic, Klasa ochrony IP 44 RC Panel Basic TIG /TMC, RC Pa- Znak jakości...
  • Seite 109: Bluetooth Trademarks

    Bluetooth trade- Nazwa marki Bluetooth® i logo Bluetooth® są zarejestrowanymi markami i są własnością marks firmy Bluetooth SIG, Inc. i są wykorzystywane przez Fronius International GmbH na mocy licencji. Pozostałe marki i nazwy handlowe są własnością ich prawnych właścicieli. Wskazówki doty- Zdalne sterowanie RC Panel Basic /BT jest wyposażone w moduł...
  • Seite 110: Elementy Obsługi Na Rc Panel Basic, Rc Panel Basic /Bt, Rc Panel Basic Tig /Tmc

    Elementy obsługi na RC Panel Basic, RC Panel Ba- sic /BT, RC Panel Basic TIG /TMC Informacje ogól- WSKAZÓWKA! Więcej informacji na temat niżej wymienionych parametrów spawania można zna- leźć w instrukcji obsługi źródła spawalniczego. Funkcje regulato- W zależności od metody spawania, regulatory pełnią różne funkcje.
  • Seite 111: Funkcje Regulatorów Podczas Spawania Tig

    Funkcje regulato- Ustawianie prądu spawania rów podczas spa- nieaktywne wania TIG (przyłącze SpeedNet) Ustawienie prądu obniżania I (przyłącze TMC)
  • Seite 112: Inne Elementy Obsługi Rc Panel Basic /Bt

    Inne elementy ob- Naklejka z kodem QR i adresem sługi RC Panel Basic /BT Kontrolka Do włączania i wyłączania zdalne- go sterowania Jako wskazanie statusu: świeci po włączeniu przez 3 sekundy. Miga 4x, gdy zdalne sterowanie łąc- zy się z odbiornikiem. W przypadku przerwania nawiązy- wania połączenia, przestaje również...
  • Seite 113: Elementy Obsługi I Wskaźniki Na Panelu Rc Standard

    Elementy obsługi i wskaźniki na Panelu RC Stan- dard Informacje ogól- WSKAZÓWKA! Więcej informacji na temat niżej wymienionych parametrów spawania można zna- leźć w instrukcji obsługi źródła spawalniczego. Elementy obsługi i wskaźniki na Pa- nelu RC Standard (10) (14) (11) (13) (12)
  • Seite 114 Lewy przycisk wyboru parametrów do wybierania niżej wymienionych parametrów. Przy wybranym parametrze świeci odpowiedni wskaźnik. Grubość materiału *) w mm lub inch Prąd *) Prąd w A Przed rozpoczęciem spawania automatycznie wyświetlana jest wartość orientacyjna, wynikająca z zaprogramowanych parame- trów. Podczas procesu spawania wyświetlana jest zawsze aktual- na wartość...
  • Seite 115 Prawy przycisk wyboru parametrów do wybierania niżej wymienionych parametrów. Przy wybranym parametrze świeci odpowiedni wskaźnik. Korekta długości łuku spawalniczego do korekty długości łuku spawalniczego - ... krótszy łuk spawalniczy 0 ... neutralna długość łuku spawalniczego + ... dłuższy łuk spawalniczy Napięcie *) Przed rozpoczęciem spawania automatycznie wyświetlana jest wartość...
  • Seite 116 Przycisk „EasyJob” do zapisywania, kasowania lub wywoływania zadań typu „Easy- Job”. Dioda przycisku informuje o wybraniu trybu „EasyJob” Zasada działania: Naciśnięcie przycisku i przytrzymanie go przez 3 sekundy = zapisanie zadania „Easy Job” (zapisanie aktualnych usta- wień). Po zapisaniu świeci dioda przycisku, a na wyświetlaczu pojawia się...
  • Seite 117 Wskaźnik Przejściowy łuk spawalniczy Między łukiem zwarciowym a łukiem natryskowym powstaje przejściowy łuk spawalniczy, któremu towarzyszą znaczne rozpryski. Aby wskazać ten obszar, świeci wskaźnik pośredniego łuku spawalniczego. Wskaźnik „Hold” Po każdym zakończeniu spawania automatycznie wyświetlane są wartości rzeczywiste (prąd, napięcie, prędkość podawania drutu itp.). Wyświetlanie wartości rzeczywistych jest sygnalizowane pojawieniem się...
  • Seite 118: Instalacja I Uruchamianie

    Panelu RC należy wykonać te same czynności. Możliwości mon- OSTROŻNIE! tażu Niebezpieczeństwo obrażeń i szkód materialnych w wyniku upadku zdalnego stero- wania. ► Zawsze zabezpieczać zdalne sterowanie przed upadkiem. Montaż na rurze uchwytu: Montaż na haku: Brak kabla w przypadku RC Panel Basic /BT...
  • Seite 119: Podłączanie Pilota Do Zdalnej Obsługi Do Urządzeń Peryferyjnych

    Podłączanie pilo- ta do zdalnej ob- sługi do urządzeń peryferyjnych Przyłącze SpeedNet Przyłącze TMC RC Panel Basic / Włączyć zdalne sterowanie za pomocą kontrolki. BT: Podłączanie Włączyć źródło spawalnicze i uaktywnić funkcję Bluetooth zdalnego stero- wania do źródła Jeśli zdalne sterowanie zostało wykryte i jest wyświetlane przez źródło spawalnicze, spawalniczego za jest gotowe do pracy.
  • Seite 120: Montaż Opcji

    Uchwyt magnetyczny jest wyposażeniem opcjonalnym i nie należy do standardowego za- uchwytu magne- kresu dostawy zdalnego sterowania. tycznego OSTROŻNIE! Niebezpieczeństwo obrażeń i szkód materialnych w wyniku upadku zdalnego stero- wania. ► Zawsze zabezpieczać zdalne sterowanie przed upadkiem. Brak kabla w przypadku RC Panel Basic /BT...
  • Seite 121: Rc Panel Basic /Bt: Wymiana Akumulatora

    RC Panel Basic /BT: Wymiana akumulatora Sygnalizowanie Kontrolka nie świeci po włączeniu lub świeci krócej niż 3 sekundy. wyczerpania aku- mulatora Na źródle spawalniczym obok urządzenia Bluetooth jest wyświetlany symbol akumulatora z bieżącym stanem naładowania. RC Panel Basic / BT: Wymiana...
  • Seite 124 FRONIUS INTERNATIONAL GMBH Froniusstraße 1, A-4643 Pettenbach, Austria E-Mail: sales@fronius.com www.fronius.com Under www.fronius.com/contact you will find the addresses of all Fronius Sales & Service Partners and locations...

Inhaltsverzeichnis