Herunterladen Inhalt Inhalt Diese Seite drucken
Midland H9 Kurzanleitung
Vorschau ausblenden Andere Handbücher für H9:

Werbung

Verfügbare Sprachen
  • DE

Verfügbare Sprachen

  • DEUTSCH, seite 10
H9
4K ACTION CAM
QUICK GUIDE
2-inch LCD
Wide angle lens
4K@30fps
Waterproof
1.5 Hours
up to 30m

Werbung

Inhaltsverzeichnis
loading

Inhaltszusammenfassung für Midland H9

  • Seite 1 4K ACTION CAM QUICK GUIDE 2-inch LCD Wide angle lens 4K@30fps Waterproof 1.5 Hours up to 30m...
  • Seite 3: Descrizione Dei Tasti

    ITALIANO DESCRIZIONE DEI TASTI LED DX indicatore di stato Microfono Lente LED SX indicatore di carica Tasto Wi-Fi Tasto accensione/modalità Altoparlante Tasto Scatto/Selezione Schermo Alloggiamento Micro SD Porta Micro HDMI Porta Micro USB...
  • Seite 4: Accessori Inclusi

    Tasto Foto Tasto Video ACCESSORI INCLUSI 1. Custodia waterproof 30m 7. Supporto 90° 2. Aggancio rapido (x2) 8. Fascette di fi ssaggio 3. Aggancio con vite fotografi ca 9. Cavo USB 4. Supporto base piatta 10. Supporto per manubrio 5. Supporto base curva 11.
  • Seite 5: Per Iniziare

    PER INIZIARE Accensione: Premete il tasto Accensione/Modalità. Spegnimento: Tenete premuto il tasto Accensione/Modalità. IMPOSTAZIONI GENERALI Accendete la videocamera e premete ripetutamente il tasto Accensione/Modalità per scorrere le varie funzioni/impostazioni. Troverete: Video Registrazione video Foto Scatta una singola fotografia Burst (Sequenza foto) Scatta una sequenza rapida di foto Time Lapse Video Registra video in modalità...
  • Seite 6 ENGLISH THE BASICS Status Indicator Light (right) Microphone Lens Charging status Light (left) Wi-Fi button Power/mode button Speaker Shutter/Select button Screen Micro SD slot Micro HDMI Micro USB port...
  • Seite 7: Included Accessories

    Photo Button Video Button INCLUDED ACCESSORIES 1. Waterproof case 30m 7. 90° mount 2. Quick release mount (x2) 8. Tethers 3. Standard photo mount 9. USB Cable 4. Curved mount 10. Handlebar mount 5. Flat mount 11. Wireless remote control 6.
  • Seite 8: Getting Started

    GETTING STARTED To power ON: Press the Power/mode button. To power OFF: Press and hold the Power/mode button. OVERVIEW Turn camera ON and repeatedly press the Power/mode button to cycle through camera modes and settings. The modes will appear in following order: Video Record video...
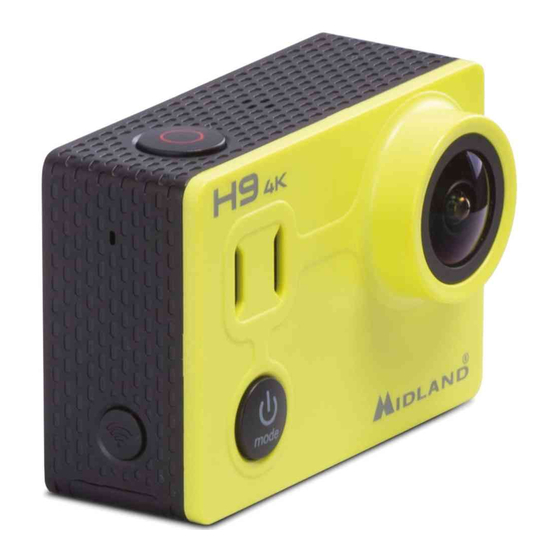
  • Seite 9 DEUTSCH BEDIENELEMENTE Status Anzeige (rechts) Mikrofon Linse Ladestandsanzeige (links) WLAN Taste Ein/Aus/Modus-Taste Lautsprecher Auslöser Auswahltaste Bildschirm Micro SD Buchse Micro HDMI Anschluss Micro USB Anschluss...
  • Seite 10 Fototaste Videotaste ZUBEHÖR 1. Unterwassergehäuse 30m 7. 90° Halterung 2. Schnellverschluss- 8. Kabelbinder Halterung (x2) 9. USB Kabel 3. Standard Halterung 10. Lenkerhalterung 4. gebogene Klebehalterung 11. Fernbedienung 5. flache Klebehalterung 12. Rahmen 6. Stativgewinde-Halterung Achtung: Bitte reinigen und trocknen Sie das Gehäuse, nachdem Sie es im Wasser verwendet haben.
  • Seite 11: Erste Schritte

    ERSTE SCHRITTE EINSCHALTEN: Drücken Sie die Einschalt-/Modus-Taste. AUSSCHALTEN: Halten Sie die Einschalt-/Modus-Taste gedrückt. ÜBERSICHT Schalten Sie die Kamera EIN und drücken Sie wiederholt die Einschalt-/ Modus-Taste, um durch die Kameramodi und die Einstellungen zu blät- tern. Die Modi werden in der folgenden Reihenfolge angezeigt: Modus Modus Modus...
  • Seite 12 ESPAÑOL CONTROLES Y CONEXIONES Luz indicadora de estado (derecha) Micrófono Lente Luz indicadora de carga (izquierda) Botón WiFi Botón Encendido/modo Altavoz Botón Obturador/selector Pantalla Ranura Micro SD Puerto Micro HDMI Puerto Micro USB...
  • Seite 13: Accesorios Incluidos

    Botón Foto Botón Vídeo ACCESORIOS INCLUIDOS 1. Funda waterproof 30m 7. Soporte 90º 2. Soporte de liberación rápida 8. Bridas (x2) 9. Cable USB 3. Soporte de montaje estándar 10. Soporte manillar 4. Base curva 11. Control remoto 5. Base plana 12.
  • Seite 14: Puesta En Marcha

    PUESTA EN MARCHA Para encender: presiona el botón Encendido/Modo. Para apagar: mantén pulsado el botón Encendido/Modo. VISUALIZACIÓN Enciende la cámara y presiona repetidamente el botón Encendido/Modo para navegar por los diferentes modos y ajustes. Los modos aparecerán en el siguiente orden: Vídeo Grabar vídeo Foto...
  • Seite 15: Les Bases

    FRANÇAIS LES BASES Lumière d’indicateur d’état (droite) Microphone Lentille Lumière indicateur de charge (gauche) Bouton Wi-fi Bouton/mode d’alimentation Haut-parleur Bouton déclencheur sélectionneur Écran Carte Micro -SD Port Micro-HDMI Port micro-USB...
  • Seite 16: Accessoires Inclus

    Bouton Bouton Photo Video ACCESSOIRES INCLUS 1. Caisson d’étanchéité 30m 7. Support pour montages à 90° de profondeur 8. Attaches 2. Support pour fixation rapide 9. Câble USB (x2) 10. Support pour guidon 3. Support photo standard 11. Télécommande 4. Monture courbée 12.
  • Seite 17: Pour Commencer

    POUR COMMENCER Pour allumer: appuyez sur le bouton Power/ Mode Pour éteindre: restez appuyé sur le bouton Power / Mode VUE D’ENSEMBLE Allumez la caméra et appuyez encore sur le bouton Power/ Mode pour passer les menus et réglages de la caméra. Les modes apparaissent dans cette ordre: Vidéo Enregistrement vidéo...
  • Seite 18 PORTUGUÊS CONTROL E CONEXÕES Luz indicadora de estado (direito) Microfone Lente Luz indicadora de carga (esquerda) Botão WiFi Botão ligado/modo Coluna Botão Obturador/selector Ecran Entrada Micro SD Porta Micro HDMI Porta Micro USB...
  • Seite 19: Acessórios Incluidos

    Botão Foto Botão Vídeo ACESSÓRIOS INCLUIDOS 1. caixa estanque waterproof 7. Suporte 90º 8. Bracadeiras 2. Suporte carro (x2) 9. Cabo USB 3. Suporte de montajem Standar 10. Suporte tubular 4. Base curva 11. Comando 5. Base plana 12. Suporte de montajem câmara 6.
  • Seite 20: Ligar A Câmara

    LIGAR A CÂMARA Para Ligar: pressiona o botão Ligar/Modo. Para apagar: mantem pressionado o botão Ligar/Modo. VISUALIZAÇÃO Liga a câmara e pressiona repetidamente o botão Ligar/Modo para nave- gar no menu. As funções/modo aparecem na siguiente ordem: Vídeo Gravar vídeo Foto foto unica Explosão...
  • Seite 21 POLSKI WPROWADZENIE LED (prawy) wskaźnik statusu Mikrofon Obiektyw LED (lewy) wskaźnik ładowania Przycisk WiFi Przycisk zasilanie/tryb Głośnik Przycisk migawka/wybór Ekran Gniazdo karty micro SD Gniado micro HDMI Gniado micro...
  • Seite 22: Zawartość Opakowania

    Przycisk foto Przycisk video ZAWARTOŚĆ OPAKOWANIA ZAWARTOŚĆ OPAKOWANIA 1. Obudowa wodoodporna do 7. Mocowanie 90°. 30m. 8. Paski. 2. Mocowanie szybkie (x2) 9. Kabel USB. 3. Mocowanie fotograficzne 10. Mocowanie na kierownicę, standard. rurkę. 4. Mocowanie gięte. 11. Pilot zdalnego sterowania 5.
  • Seite 23 URUCHOMIENIE Włączanie: Wciśnij przycisk Włącz/tryb. Wyłączanie: Wciśnij i przytrzymaj dłużej przycisk Włącz/tryb. PODSTAWOWE MENU Włącz kamerę. Przyciskając ponownie przycisk Zasilanie/Mode będziesz cyklicznie zmieniał pozycje podstawowego menu, co uwidocznią zmiany ikon w lewym, górnym rogu ekranu, bądź pojawienie się dużego symbolu odtwarzania i ustawień.
  • Seite 24 ΕΛΛΗΝΙΚΆ ΤΑ ΒΑΣΙΚΑ Ενδεικτική Λυχνία Κατάστασης (δεξιά) Μικρόφωνο Φακός Ενδεικτική λυχνία φόρτισης (αριστερή) Πλήκτρο Wi-Fi Πλήκτρο ενεργοποίησης / Λειτουργίας Μεγάφωνο Κλείστρο/Πλήκτρο επιλογών Οθόνη Υποδοχή Micro SD Θύρα Micro HDMI Θύρα Micro USB...
  • Seite 25: Παρεχομενα Αξεσουαρ

    Πλήκτρο λήψης Πλήκτρο Φωτογραφίας εγγραφής Βίντεο ΠΑΡΕΧΟΜΕΝΑ ΑΞΕΣΟΥΑΡ επιφάνεια 1. Αδιάβροχη θήκη για βάθος έως 30m 6. Βάση τρίποδο 2. Βάση γρήγορης εγκατάστασης 7. Βάση στήριξης 90ο 8. Λουράκια πρόσδεσης και tire up (x2) 3. Βάση στήριξης για φωτογραφία 9. USB καλώδιο 4.
  • Seite 26 ΕΚΚΊΝΗΣΗ Για να ενεργοποιήσετε την κάμερα (ΟΝ): Πιέστε το Πλήκτρο Ενεργοποίησης / Λειτουργίας. Για να απενεργοποιήσετε την κάμερα (OFF): Πιέστε και κρατήστε πατημένο το Πλήκτρο Ενεργοποίησης / Λειτουργίας. ΣΥΝΟΠΤΙΚΆ Ενεργοποιήστε την κάμερα και πατήστε επανειλημμένα το Πλήκτρο Ενεργοποίησης /Λειτουργίας για να μετακυλήσετε στις λειτουργίες της κάμερας και...
  • Seite 27 L’apparato è di libero uso in tutti i paesi europei. The equipment is free use in all UE countries. Dieses Produkt kann in allen EU-Ländern verwendet werden. El producto es de libre uso en todos los países de la UE. Ce produit est libre d’utilisation dans tous les pays membre de l’UE.
  • Seite 28 Hereby Cte International Srl declares that this product is in compliance with the essential requirements and other relevant provisions of Directive 2014/53/UE. The declaration of conformity is available on the web site http://www.midland- europe.com/it/pagina/10090-certifications AT / DE / CH / LI Hiermit erklärt Cte International Srl, dass das Produkt die grundlegenden An-...
  • Seite 29 2014/53/UE. Overens- stemmelseserklæringen findes på webstedet http://www.midlandeurope.com/ it/pagina/10090-certifications CTE INTERNATIONAL Srl förkunnar att produkten överensstämmer med de väsentliga kraven och övriga bestämmelser i direktiv 2014/53/EU. Denna försäkran om överensstämmelse finns på webbplatsen http://www.midland- europe.com/it/pagina/10090-certifications...
  • Seite 30 CTE INTERNATIONAL Srl vakuuttaa, että tuote täyttää direktiivin 2014/53/ UE. Vaatimuksenmukaisuusvakuutus on saatavilla http://www.midlandeurope. com/it/pagina/10090-certifications -verkkosivuilla. Cte International Srl ovime izjavljuje da je ime ovog modela u suglasnosti sa bitnim zahtjevima te ostalim relevantnim odredbama Propisa 2014/53/EU. Ova Izjava o suglasnosti je dostupna na web stranici http://www.midlandeurope.com/it/ pagina/10090-certifications.
  • Seite 32 Informationen über die Garantie der Artikel, besuchen sie bitte unsere www.midlandeurope.com • Para descargar el manual completo y mayor información sobre la garantía, visite la web www.midland.es • Pour télécharger le manuel d’utilisation complet et des informations sur la garantie, s’il vous plaît visitez le site www.midlandeurope.com •...

Inhaltsverzeichnis