Herunterladen Inhalt Inhalt Diese Seite drucken
auna DisGo Box 100 Bedienungsanleitung
Vorschau ausblenden Andere Handbücher für DisGo Box 100:

Werbung

Verfügbare Sprachen
  • DE

Verfügbare Sprachen

  • DEUTSCH, seite 1

Werbung

Inhaltsverzeichnis
loading

Inhaltszusammenfassung für auna DisGo Box 100

  • Seite 3: Inhaltsverzeichnis

    Sicherheitshinweise 4 Übersicht 6 Inbetriebnahme 9 Bedienung 10 Hinweise zur Entsorgung 13 TECHNISCHE DATEN Artikel 10033685 10033686 DisGo Box 2100 DisGo Box 100 Stromversorgung Netzbetrieb 230 V~ 50/60 Hz Interner Akku 12 V 12 V Akkukapazität 7 Ah 4,5 Ah...
  • Seite 4: Sicherheitshinweise

    SICHERHEITSHINWEISE • Lesen Sie die Sicherheitshinweise und die Bedienungsanleitung sorgfältig durch, bevor Sie das Gerät bedienen. • Bewahren Sie die Bedienungsanleitung an einem sicheren Ort auf, damit Sie später darauf zurückgreifen können. • Halten Sie sich an alle erforderlichen Bedienungsschritte. •...
  • Seite 5 MHz). Die Übertragungsreichweite beträgt ca. 50 m und hängt von den örtlichen Gegebenheiten ab. Die Geräte sind zur Verwendung in Innenräumen konzipiert.
  • Seite 6: Übersicht

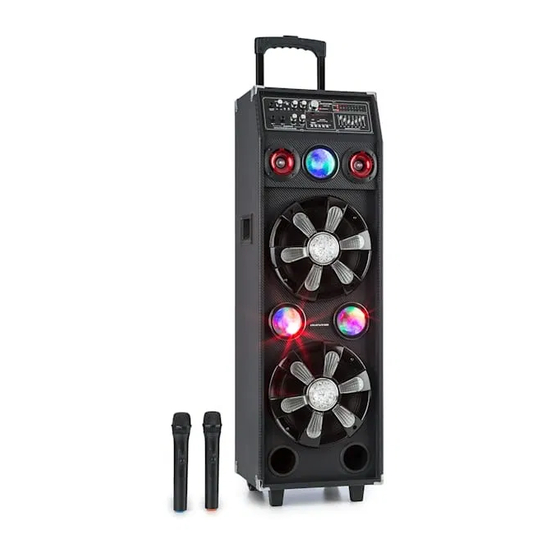
    ÜBERSICHT Vorderansicht 7-Band EQ Mic-1-Eingang Level LEDs Mic-2-Eingang Batterielampe (rot: Aufladevorgang Mikrofonlautstärke grün: fertig geladen) Lautstärke Mikrofonecho Höhen Display Bass USB-Eingang Mikrofonpriorität ein/aus Navigations-Tasten Gitarrenlautstärke SD-Kartenslot Gitarreneingang Navigationstasten...
  • Seite 7: Rückseite

    Rückseite BATTERY 12V INPUT AUDIO INPUT FM ANT Caution: Back Panel maybe hot Do Not Touch. Please keep 4-6 inches away from wall LED Light Switch Power Switch ~230V/50Hz (CHARGE) (AC) (DC) CAUTION RISK OF ELECTRIC SHOCK DO NOT OPEN EXTERNAL POWER SUPPLY CAUTION This system can accept extemal power supply DC INPUT voltage...
  • Seite 8 Fernbedienung Stummschaltung Ein/Aus Zifferntasten MODE (USB/SD/FM/Line/BT) Repeat (Wiederholen) Wiedergabe / Pause Einstellungen Equalizer FM-Sendersuche Lautstärke + /- Ordner +/- Voriger Titel / Sender Nächster Titel / Sender...
  • Seite 9: Inbetriebnahme

    INBETRIEBNAHME Erste Inbetriebnahme / Laden des Akkus Für den netzunabhängigen Betrieb ist das Soundsystem mit einem Akku ausgestattet. Der Akku wird automatisch geladen, sobald der Netzstecker in eine Steckdose gesteckt wird. Nach dem Laden wird wird automatisch auf Erhaltungsladen umgeschaltet. Lassen Sie das Gerät aber nicht dauerhaft mit einer Steckdose verbunden.
  • Seite 10: Bedienung

    BEDIENUNG Warnung: Stromschlaggefahr Das Gerät darf unter keinen Umständen Feuchtigkeit ausgesetzt werden. Öffnen Sie das Gehäuse des Geräts nicht. Erste Schritte • Verbinden Sie den AC IN per Netzkabel mit einer Steckdose oder verbinden Sie den DC 12 V In des Geräts mit einem geeigneten Netzteil und dieses mit einer Steckdose.
  • Seite 11 Mikrofonprioriät. Schalten Sie die Mikrofonprioriät ein, wenn das Mikro aktiv ist. The Musik wird dann angehalten bzw. der Ton wird leiser. Vermehrtes Rauschen kann von einer leeren Batterie herrühren. Ersetzen Sie mit einer Batterie gleichen Typs und beachten Sie die korrekte Polarität. Schalten Sie die Mikrofone ab, wenn diese nicht in Benutzung sind.
  • Seite 12 LINE Verbinden Sie externe Mediengeräte per Cinch-Audiokabel am LINE IN. Schalten Sie per MODE-Schalter zum LINE-Modus. Stellen Sie sicher, dass der Audio-Ausgang des externen Geräts auf eine adäquate Lautstärke eingestellt ist und regeln Sie mit dem VOLUME-Knopf an diesem Gerät nach.
  • Seite 13: Hinweise Zur Entsorgung

    HINWEISE ZUR ENTSORGUNG Befindet sich die linke Abbildung (durchgestrichene Mülltonne auf Rädern) auf dem Produkt, gilt die Europäische Richtlinie 2012/19/EU. Diese Produkte dürfen nicht mit dem normalen Hausmüll entsorgt werden. Informieren Sie sich über die örtlichen Regelungen zur getrennten Sammlung elektrischer und elektronischer Gerätschaften.
  • Seite 15 Dear Customer, Congratulations on purchasing this equipment. Please read this manual carefully and take care of the following hints to avoid damages. Any failure caused by ignoring the items and cautions mentioned in the instruction manual are not covered by our warranty and any liability. Scan the QR code to get access to the latest user manual and other information about the product.
  • Seite 16: Specifications

    SPECIFICATIONS Item 10033685 10033686 Power supply Mains operation 230 V~ 50/60 Hz Internal battery 12 V 12 V 4,5 A RMS power 100 W 50 W Connections SD, USB, LINE IN, LINE OUT, MIC1, MIC2, GIT, DC IN, AC IN Speakers 1 x 10“...
  • Seite 17: Safety Instructions

    SAFETY INSTRUCTIONS Read the safety instructions and the manual carefully, before operating the appliance. • Keep the instructions manual in a safe play, so you can refer to it later. • Follow all necessary operating steps. • Do not place the appliance in a humid location, neither a place which with electromagnetic fields, direct sunlight, and do not expose it to high temperatures.
  • Seite 18: Overview

    OVERVIEW Front view 7-band EQ Mic 1 In Level LEDs Mic 2 In Battery LED (red: charging Mic volume green: fully charged) Volume Mic echo Treble Display Bass USB socket MIcrophone priority on/off Navigation buttons; IR sensor Guitar volume SD card slot Guitar in Navigation buttons...
  • Seite 19 Rear BATTERY 12V INPUT AUDIO INPUT FM ANT Caution: Back Panel maybe hot Do Not Touch. Please keep 4-6 inches away from wall LED Light Switch Power Switch ~230V/50Hz (CHARGE) (AC) (DC) CAUTION RISK OF ELECTRIC SHOCK DO NOT OPEN EXTERNAL POWER SUPPLY CAUTION This system can accept extemal power supply DC INPUT voltage...
  • Seite 20 Remote control Mute Power on/off Num Pad MODE (USB/SD/FM/Line/BT) Repeat Play / pause EQ presets FM scan Volume + /- Folder +/- Previous Track / channel Next track / channel...
  • Seite 21: Getting Started

    GETTING STARTED Battery charging This device is equipped with a with a rechargeable battery. The batty will be charged automatically as soon as the device is connected to power. After recharging, the device switches to trickle charging. However, do not leave the device constantly connected to a socket.
  • Seite 22: Operation

    OPERATION Warning: Danger of electric shock The appliance must under no circumstances be exposed to fire. Do not open the housing of the appliance. First steps • Connect the AC IN to a household mains outlet, using the supplied mains cord. Or connect the DC 12V IN with a matching AC/DC adapter, connecting the latter to a household mains socket.
  • Seite 23 Switch the POWER switch on the rear to the AC position when using the AC mains cord, switch to DC position when using an AC/DC power adapter. Switch to OFF to turn off. Use the POWER/STANDBY button on the device front panel or on the RC to switch the unit on/off.
  • Seite 24 on the front panel. Use the PREV/NEXT/PLAY/STOP buttons to navigate through your media library. REPEAT: Press this button to repeat the current track on the USB/SD input (ONE or ALL). REC: Press to record from microphone. LINE Connect external media players to the LINE IN using an RCA cable.
  • Seite 25: Disposal Considerations

    DISPOSAL CONSIDERATIONS According to the European waste regulation 2012/19/EU this symbol on the product or on its packaging indicates that this product may not be treated as household waste. Instead it should be taken to the appropriate collection point for the recycling of electrical and electronic equipment.
  • Seite 27: Fiche Technique

    Aperçu 30 Mise en marche 33 Utilisation 34 Informations sur le recyclage 37 FICHE TECHNIQUE Article 10033685 10033686 DisGo Box 2100 DisGo Box 100 Alimentation Fonctionnement sur 230 V~ 50/60 Hz secteur Capacité de la batterie 12 V 12 V interne...
  • Seite 28: Consignes De Sécurité

    CONSIGNES DE SÉCURITÉ • Lisez attentivement les consignes de sécurité et le mode d'emploi avant d'utiliser l'appareil. • Conservez le mode d'emploi en lieu sûr pour pouvoir vous y reporter ultérieurement. • Suivez toutes les étapes nécessaires. • Ne placez pas l'appareil dans un endroit humide, ni dans un endroit comportant des champs électromagnétiques, à...
  • Seite 29: Utilisation Prévue

    Utilisation prévue • Cet appareil sert à transmettre la voix et le chant. Il est destiné uniquement à cet usage et ne peut être utilisé qu'à cette fin. Il ne peut être utilisé que de la manière décrite dans ce manuel d'utilisation. •...
  • Seite 30: Aperçu

    APERÇU Vue avant Egaliseur 7 bandes Entrée Mic-1 LED de niveau Entrée Mic-2 Témoin de batterie (rouge : en charge vert : Volume du micro chargée) Volume Echo du micro Aigus Ecran Graves Port USB Priorité micro marche/arrêt Touches de navigation Volume de la guitare Lecteur de cartes SD Entrée de guitare...
  • Seite 31 Vue arrière BATTERY 12V INPUT AUDIO INPUT FM ANT Caution: Back Panel maybe hot Do Not Touch. Please keep 4-6 inches away from wall LED Light Switch Power Switch ~230V/50Hz (CHARGE) (AC) (DC) CAUTION RISK OF ELECTRIC SHOCK DO NOT OPEN EXTERNAL POWER SUPPLY CAUTION This system can accept extemal power supply DC INPUT voltage...
  • Seite 32 Télécommande Fonction muet Marche /Arrêt Touches numériques MODE (USB/SD/FM/Line/BT) Repeat (répétition) Lecture / Pause Réglages de l'égaliseur Recherche de stations FM Volume + /- Dossier +/- Titre / station précédente Titre / station suivante...
  • Seite 33: Mise En Marche

    MISE EN MARCHE Première mise en marche / chargement de la batterie Pour un fonctionnement hors réseau, le système audio est équipé d'une batterie. La batterie charge automatiquement dès que vous branchez la fiche d'alimentation sur une prise de secteur. Après le chargement, la batterie passe automatiquement en maintien de charge.
  • Seite 34: Utilisation

    UTILISATION Mise en garde : risque de choc électrique L'appareil ne doit en aucun cas être exposé à l'humidité. Ne pas ouvrir le boîtier de l'appareil. Premiers pas • Branchez l’entrée AC IN à une prise de courant ou connectez l’entrée DC 12 V de l’appareil à...
  • Seite 35 Priorité micro. Activer la priorité du micro lorsque celui-ci est actif. La musique s'arrête alors ou son volume diminue. L'augmentation du bruit peut être due à une batterie déchargée. Remplacez- la par une pile du même type et respectez la polarité. Éteignez les micros quand vous ne les utilisez pas.
  • Seite 36 LINE Branchez les périphériques de stockage externes à LINE IN via un câble audio RCA. Passez en mode LINE avec le sélecteur MODE. Assurez-vous que la sortie audio du périphérique externe est réglée sur un volume adéquat et utilisez le bouton VOLUME de cet appareil pour régler le volume. Activez ou désactivez l'égaliseur à...
  • Seite 37: Informations Sur Le Recyclage

    INFORMATIONS SUR LE RECYCLAGE Vous trouverez sur le produit l’image ci-contre (une poubelle sur roues, barrée d‘une croix), ce qui indique que le produit se trouve soumis à la directive européenne 2012/19/UE. Renseignez-vous sur les dispositions en vigueur dans votre région concernant la collecte séparée des appareils électriques et électroniques.
  • Seite 39: Dati Tecnici

    Panoramica 42 Messa in funzione 45 Utilizzo 46 Avviso di smaltimento 49 DATI TECNICI Articolo 10033685 10033686 DisGo Box 2100 DisGo Box 100 Alimentazione Rete elettrica 230 V~ 50/60 Hz Batteria interna 12 V 12 V Capacità batteria 7 Ah...
  • Seite 40: Avvertenze Di Sicurezza

    AVVERTENZE DI SICUREZZA • Leggere attentamente tutte le avvertenze di sicurezza e il manuale d’uso prima dell’utilizzo. • Conservare il manuale d’uso in un luogo di sicuro per consultarlo in futuro. • Rispettare tutti i passaggi necessari all’utilizzo. • Non posizionare il dispositivo in ambienti umidi, in ambienti con campi elettromagnetici, nella luce solare diretta o in ambienti con temperature elevate.
  • Seite 41 Utilizzo corretto • Il dispositivo serve a trasmettere discorsi e canto. Serve solo a questi scopi e non deve essere utilizzato altrimenti. Il dispositivo deve essere utilizzato solo secondo le modalità descritte in questo manuale. • Il dispositivo non è adatto all’utilizzo da parte di persone (inclusi bambini) con limitate capacità...
  • Seite 42 PANORAMICA Lato anteriore Equalizzatore a 7 bande Mic-1-Eingang LED di livello Mic-2-Eingang Spia batteria (rossa: batteria in carica Volume microfono Verde: batteria completa- mente carica) Volume Eco microfono Alti Display Bassi Ingresso USB Priorità microfono: on/off Tasti di navigazione Volume chitarra Slot scheda SD Ingresso chitarra Tasti di navigazione...
  • Seite 43: Lato Posteriore

    Lato posteriore BATTERY 12V INPUT AUDIO INPUT FM ANT Caution: Back Panel maybe hot Do Not Touch. Please keep 4-6 inches away from wall LED Light Switch Power Switch ~230V/50Hz (CHARGE) (AC) (DC) CAUTION RISK OF ELECTRIC SHOCK DO NOT OPEN EXTERNAL POWER SUPPLY CAUTION This system can accept extemal power supply DC INPUT voltage...
  • Seite 44 Telecomando Muto On/Off Tasti numerici MODE (USB/SD/FM/Line/BT) Repeat (ripetizione) Play/Pausa Impostazioni equalizzatore Ricerca emittenti FM Volume +/- Cartella +/- Canzone/emittente precedente Canzone/emittente successiva...
  • Seite 45: Messa In Funzione

    MESSA IN FUNZIONE Prima messa in funzione/Caricare la batteria Per permettere l’utilizzo senza collegamento alla rete elettrica, il soundsystem è dotato di una batteria. La batteria viene caricata automaticamente quando viene collegata la spina alla presa elettrica. Dopo la carica, la batteria passa automaticamente alla modalità di mantenimento carica.
  • Seite 46: Interruttore On/Off

    UTILIZZO Avvertimento: pericolo di folgorazione Il dispositivo non deve essere esposto a umidità in nessun caso. Non aprire l’alloggiamento del dispositivo. Primi passaggi • Collegare AC IN a una presa di corrente con il cavo di alimentazione o collegare DC 12V del dispositivo con un alimentatore adatto e collegare quest’ultimo a una presa elettrica.
  • Seite 47 Priorità microfono. . Accendere la priorità microfono quando il microfono è attivo. La musica viene fermata o il volume si abbassa. Un rumore gracchiante in aumento può essere dovuto alla batteria scarica. Sostituire la batteria con una equivalente e fare attenzione alla corretta polarità.
  • Seite 48 LINE Collegare dispositivi esterni a LINE-IN con il cavo audio RCA. Selezionare LINE con MODE. Assicurarsi che l’uscita audio del dispositivo collegato sia impostato su un volume adeguato e regolare il volume con il tasto VOLUME del dispositivo. Accendere o spegnere l’equalizzatore a 7 bande del dispositivo con EQ on/ off.
  • Seite 49 AVVISO DI SMALTIMENTO Se sul prodotto è presente la figura a sinistra (il bidone dei rifiuti con le ruote), si applica la direttiva europea 2012/19/ UE. Questi prodotti non possono essere smaltiti con i rifiuti normali. Informarsi sulle disposizioni vigenti per la raccolta di dispositivi elettrici ed elettronici.
  • Seite 51 Puesta en marcha 57 Operación 58 Retirada del aparato 61 DATAS TÉCNICOS Artículo 10033685 10033686 DisGo Box 2100 DisGo Box 100 Alimentación eléctrica Operación de redes 230 V~ 50/60 Hz Batería interna 12 V 12 V Capacidad de batería 7 Ah 4,5 Ah RMS Potencía...
  • Seite 52: Instrucciones De Seguridad

    INSTRUCCIONES DE SEGURIDAD • Lea atentamente las instrucciones de seguridad y de funcionamiento antes de utilizar el aparato. • Guarde el manual de instrucciones en un lugar seguro para futuras consultas. • Siga todos los pasos de funcionamiento necesarios. • No instale la unidad en un lugar húmedo.
  • Seite 53 Uso previsto • Este dispositivo se utiliza para transmitir el sonido y el canto. Está destinado exclusivamente a este fin y sólo puede utilizarse para este fin. Sólo se puede utilizar de la manera descrita en este manual. • Este dispositivo no está destinado a ser utilizado por personas (incluyendo niños) con capacidades físicas, sensoriales o mentales limitadas o por falta de experiencia y/o conocimiento, a menos que sean supervisados o instruidos por una persona responsable...
  • Seite 54: Vista General

    VISTA GENERAL Vista frontal Banda 7 EQ Entrada de Mic-1 Nivel LED Entrada de Mic-2 Lámpara de batería (rojo: proceso de carga Volumen del micrófono verde: cargada completa- mente Volumen Eco del micrófono Alturas Pantalla Profundos Entrada USB Prioridad de micrófono en- Teclas de navegación cendido/apagado Volumen de guitarra...
  • Seite 55: Parte Posterior

    Parte posterior BATTERY 12V INPUT AUDIO INPUT FM ANT Caution: Back Panel maybe hot Do Not Touch. Please keep 4-6 inches away from wall LED Light Switch Power Switch ~230V/50Hz (CHARGE) (AC) (DC) CAUTION RISK OF ELECTRIC SHOCK DO NOT OPEN EXTERNAL POWER SUPPLY CAUTION This system can accept extemal power supply DC INPUT voltage...
  • Seite 56 Mando a distancia Silenciamiento Encender/Apagar Teclas de números MODO (USB/SD/FM/Line/BT) Repeat (Repetir) Reproducir/Pausa Ajustes Ecualizador Búsqueda de emisoras de FM Volumen +/- Carpeta +/- Título/ emisora anterior Título/ emisora siguiente...
  • Seite 57: Puesta En Marcha

    PUESTA EN MARCHA Primera puesta en marcha / carga de la batería El sistema de sonido está equipado con una batería recargable para un funcionamiento independiente de la red eléctrica. La batería se carga automáticamente cuando el enchufe se conecta a una toma de corriente. Después de la carga, el sistema cambia automáticamente a la carga de goteo.
  • Seite 58 OPERACIÓN Atención: Riesgo de descarga eléctrica No exponga la unidad a la humedad bajo ninguna circunstancia. No abra el gabinete de la unidad. Los primeros pasos • Conecte la entrada de CA a una toma de corriente con un cable de alimentación o conecte la entrada de CC de 12 V del dispositivo a una fuente de alimentación adecuada y la entrada de CA a una toma de corriente de la pared.
  • Seite 59 Prioridad del micrófono. Encienda la prioridad del micrófono cuando el micrófono esté activo. La música se detendrá o el sonido será más suave. El aumento de ruido puede ser causado por una batería vacía. Reemplace con una batería del mismo tipo y observe la polaridad correcta. Apague los micrófonos cuando no estén en uso.
  • Seite 60 LINE Conecte los dispositivos de medios externos a la entrada LINE IN mediante un cable de audio cinch. Utilice el interruptor MODE para cambiar al modo LINE. Asegúrese de que la salida de audio del dispositivo externo esté ajustada a un volumen adecuado y ajústela con el botón VOLUME de este dispositivo.
  • Seite 61: Retirada Del Aparato

    RETIRADA DEL APARATO Si el aparato lleva adherida la ilustración de la izquierda (el contenedor de basura tachado) entonces rige la normativa europea, directiva 2012/19/UE. Este producto no debe arrojarse a un contenedor de basura común. Infórmese sobre las leyes territoriales que regulan la recogida separada de aparatos eléctricos y electrónicos.

Diese Anleitung auch für:

Disgo box 2100

Inhaltsverzeichnis