Inhaltsverzeichnis
Werbung
Verfügbare Sprachen
Verfügbare Sprachen
Werbung
Inhaltsverzeichnis

Verwandte Anleitungen für auna Areal Bar 700


Inhaltszusammenfassung für auna Areal Bar 700
- Seite 1 Areal Bar 700 4.1 Soundbar - BT, USB, DTS 10026465 www.auna-multimedia.com...
- Seite 2 Sehr geehrter Kunde, zunächst möchten wir Ihnen zum Erwerb Ihres Gerätes gratulieren. Bitte lesen Sie die folgenden Anschluss- und Anwendungshinweise sorgfältig durch und befolgen Sie diese um möglichen technischen Schäden vorzubeugen. Warnung • Diese Bedienungsanleitung dient dazu, Sie mit der Funktionsweise dieses Produktes vertraut zu ma- chen.
-
Seite 3: Technische Daten
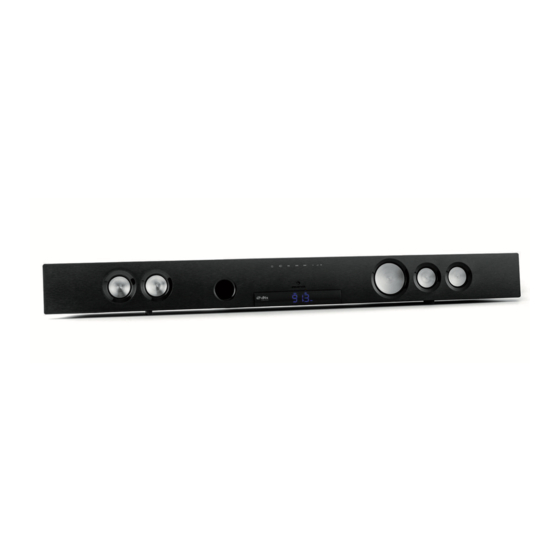
Technische Daten Artikelnr. 10026465 Verstärker Frequenzbereich 20Hz-20kHz +/- 3 dB Eingangsspannung 550 mV Haupteinheit Stromversorgung 100-240 V ~ 50-60 Hz Leistungsaufnahme 35 W Leistungsaufnahme Standby ≤ 0.5 W Abmessungen (H x B x T) 90 mm x 930 mm x 60 mm Kabellänge 1.5 m Lautsprecher Durchmesser 52 mm... - Seite 4 Geräteübersicht...
- Seite 5 Geräteübersicht Display USB Anschluss Ein / Standby AUX Anschluss (3,5mm Klinke) SOURCE Eingangswahl (TV, AUX, COAX, BT, OPTC, Optischer Eingang USB, ARC) Koaxialer Eingang PLAY/PAUSE Vor / Zurück Haken für Wandmontage (Titel / Sender) Netzkabel VOL+/- TV RCA Anschluss eines analogen Audiosignals von TV oder anderen Geräten...
-
Seite 6: Geräteübersicht: Fernbedienung
Geräteübersicht: Fernbedienung SLEEP: Aktiviert den Sleep-Timer PLAY/PAUSE DIMMEN: Anpassen der Displayhelligkeit SOURCE STANDBY / EIN BASS +/- VOR/ZURÜCK MUTE VOLUME+/- AUDIOMODUS OPTION: Halten Sie die Taste im BT- Modus 3 Sekunden lang zurück, um die Verbindung zu trennen. Drücken Sie die Taste im USB Modus mehrmals hintereinander zwischen... - Seite 7 Wandmontage Schritt 1: Schritt 3: Richten Sie die Soundbar gerade an der gewünsch- Stecken Sie Dübel und Schrauben (nicht im Liefer- ten Stelle aus. Markieren Sie mit einem Stift die umfang enthalten) in die Löcher und schrauben Sie Stellen für die Bohrlöcher in einem Abstand von die Schrauben so weit herein, dass die Schrauben- 75 cm.
- Seite 8 Vorbereiten / Anschlüsse Fernbedienung vorbereiten Drücken Sie mit einem Fingernagel auf das Batterie- fach an der Unterseite der Fernbedienung, um es zu öffnen. Legen Sie eine CR2025 Knopfbatterie in die Mulde und achten Sie darauf, dass Sie die Batterie richtig herum einlegen. Schieben Sie das Batterie- fach wieder in die Fernbedienung.
- Seite 9 Vorbereiten / Anschlüsse Option 3: Geräte über optische Kabel anschließen Die Abbildung zeigt, wie Sie einen MP3 Player und ähnliche Geräte über ein Audiokabel mit 3,5 mm Klinkenstreckern anschließen. • Verbinden Sie das eine Ende des Audiokabels mit dem Kopfhörerausgang Ihres MP3 Players. •...
-
Seite 10: Bedienung
Bedienung Stromanschluss Verbinden Sie das Gerät über das mitgelieferte Netzkabel mit einer Steckdose. Schalten Sie den Haupt- netzschalter ein. Standby Modus • Drücken Sie auf die Standby Taste (3 & 10), um das Gerät einzuschalten. • Um das Gerät wieder in den Standby Modus zu versetzen, drücken Sie die Taste erneut. •... - Seite 11 Bevor Sie sie Soundbar mit Ihrem Mobiltelefon oder einem anderen BT Gerät benutzen können, müssen Sie zuerst eine Verbindung zwischen Ihrem Gerät und der Soundbar herstellen. • Drücken Sie mehrmals hintereinander auf die SOURCE Taste, (U3 & R2), bis „BT“ im Display erscheint. Nachdem Sie „BT“...
- Seite 12 • Stecken Sie das USB-Speichermedium in den USB-Eingang der Soundbar. • Drücken Sie mehrmals hintereinander die SOURCE Taste (U3 & R2), bis „USB“ im Display erscheint. Wählen Sie den gewünschten Titel aus, indem sie die VORWÄRTS/ZURÜCK Taste drücken. • Drücken Sie die OPTION Taste (R6) mehrmals hintereinander: die Displayanzeige ändert sich in der folgenden Reihenfolge: Titel wiedergeben >...
-
Seite 13: Hinweise Zur Entsorgung
Hinweise zur Entsorgung Elektroaltgeräte Befi ndet sich die diese Abbildung (durchgestrichene Mülltonne auf Rädern) auf dem Pro- dukt, gilt die Europäische Richtlinie 2002/96/EG. Diese Produkte dürfen nicht mit dem normalen Hausmüll entsorgt werden. Informieren Sie sich über die örtlichen Regelungen zur getrennten Sammlung elektrischer und elektronischer Gerätschaften. -
Seite 14: Important Safety Advice
Dear Customer, Congratulations on purchasing this product. Please read and follow these instructions, in order to avoid damaging the item. We do not cover any damages that may arise from improper use of the item or the disregard of the safety instructions. Important Safety Advice •... -
Seite 15: Technical Data
Technical Data Art #. 10026465 Amplifier Frequency range 20Hz-20kHz +/- 3 dB Input 550 mV Main Unit Power supply 100-240 V ~ 50-60 Hz Power consumption 35 W (standby: <1W) Dimensions 90 mm x 930 mm x 60 mm (H x W x D) Cable 1.5 m Speakers Ø... - Seite 16 Overview...
- Seite 17 Overview Display USB slot On / Standby AUX IN (3.5mm) SOURCE Input selection (TV, AUX, COAX, BT, OPTC, Optical IN USB, ARC) Coax IN PLAY/PAUSE Next / Previous Hooks for wall-mounting (Title / station) Mains cable VOL+/- TV RCA Connect analogue audio sources here...
- Seite 18 Overview: Remote Control SLEEP: Activate sleep timer PLAY/PAUSE DIM: Adjust display backlight SOURCE STANDBY / ON BASS +/- NEXT / PREVIOS MUTE VOLUME+/- AUDIO MODE OPTION: In BT mode, press and hold for 3 seconds to „unpair“ a connected BT device. In USB mode, press repeatedly...
-
Seite 19: Wall Mounting Advice
Wall Mounting Advice Step 3: Step 1: Insert 2 screws (not supplied) into the holes and Align the Sound Bar in the chosen location. Use a tighten. Take care to leave 5mm between the screw pencil to mark the drilling positions 750mm apart. heads and the wall. -
Seite 20: Installation And Connections
Installation and Connections Prepairing the RC Slide the battery compartment on the bottom of the remote control open, using a fingernail. Insert a CR2025 battery into the space taking care to match the + and - polarity symbols correctly. Replace the battery compartment door. - Seite 21 Installation and Connections Option 3: Connecting devices using OPTICAL cable. • Connect one end of the OPTICAL cable to the TV, DVD/Blu-ray Player or Games Console OP- TICAL audio output socket. • Connect the other end to the OPTC input on the side of the Sound Bar (U10).
-
Seite 22: Operation
Operation Connecting mains power Connect the attached mains plug to a mains power supply outlet. Switch the power outlet ON. Standby Mode • Press the STANDBY button (U2 Unit & R3 Remote). to wake the unit from STANDBY mode. • To enter STANDBY mode press either STANDBY buttons (U2 Unit &... - Seite 23 Before you can use the Sound Bar with your phone or other BT capable device you will need to pair the device to the Sound Bar. • Press the SOURCE button (U3, R2) repeatedly until you see ‘BT’ appear on the display. •...
- Seite 24 • Connect a USB storage device to the sound bar. • Press SOURCE button (U3 Unit or R2 Remote) repeated until you see USB mode, if not already in that mode. You will see “USB” appear on the display. Select a file you want to play by pressing PREVIOUS/ NEXT.
-
Seite 25: Environment Concerns
Environment Concerns According to the European waste regulation 2002/96/EG this symbol on the product or on its packaging indicates that this product may not be treated as household waste. Instead it should be taken to the appropriate collection point for the recycling of electrical and electronic equipment. - Seite 26 Chère cliente, cher client, Toutes nos félicitations pour l’acquisition de ce nouvel appareil. Veuillez lire attentivement et respecter les consignes suivantes de branchements et d’utilisation pour éviter d’éventuels dommages techniques. Consignes de sécurité et garantie • Ce mode d’emploi sert à vous familiariser aux fonctions de ce produit. Conservez-le bien afin de pou- voir vous y référer à...
-
Seite 27: Fiche Technique
Fiche Technique Numéro d’article 10026465 Amplificateur Réponse en fréquences 20Hz-20kHz +/- 3 dB Tension d‘entrée 550 mV Élément central Alimentation 100-240 V ~ 50-60 Hz Consommation d‘énergie 35 W (Standby ≤ 0.5 W) Dimensions 90 mm x 930 mm x 60 mm (L x H x P) Longueur du câble 1.5 m Enceintes Diamètre 52 mm... -
Seite 28: Aperçu De L'appareil
Aperçu de l’appareil... - Seite 29 Aperçu de l’appareil Aff ichage Connecteur USB Marche/veille Connecteur AUX (prise jack 3,5 mm) SOURCE Source d’entrée (TV, AUX, COAX, BT, OPTC, Entrée optique USB, ARC) Entrée coaxiale PLAY/PAUSE Suivant/précédent Crochets pour fi xation murale (Titre / station) Cordon d’alimentation VOL+/- TV RCA Connecteur pour signal audio analogique...
- Seite 30 Aperçu de l’appareil : télécommande SLEEP : active la mise en veille programmée LECTURE/PAUSE VARIATEUR : ajuste la luminosité de l’affichage SOURCE VEILLE/MARCHE BASSE +/- SUIVANT/PRÉCÉDENT SOURDINE VOLUME +/- MODE AUDIO OPTION : En mode BT, maintenir cette touche pendant 3 secondes pour se déconnec- ter.
-
Seite 31: Fixation Murale
Fixation murale Placez la barre à l‘endroit voulu. Marquez avec un Insérez les chevilles et les vis (non comprises dans crayon les endroits à percer par deux points dis- la livraison) dans les trous et vissez jusqu‘à ce que tants de 75 cm. les têtes des vis dépassent de 5 mm du mur Avertissement : la barre devrait être placée 7,5 cm Avertissement : utilisez des vis assez longues qui seront... -
Seite 32: Installation Et Branchements
Installation et branchements Préparation de la télécommande Appuyez avec un ongle sur le compartiment à pile au-dessous de la télécommande pour l‘ouvrir. Placez une pile bouton CR2025 dans le creux en respectant la polarité. Repoussez le couvercle du compartiment pour le fermer. Première option : branchement des appareils avec câble audio RCA. - Seite 33 Installation et branchements Troisième option : branchement avec un câble optique. • L‘image montre comment brancher un lecteur MP3 ou tout autre appareil similaire avec un câble audio 3,5 mm. • Connectez une des extrémités du câble sur la sortie casque du lecteur MP3. •...
- Seite 34 Utilisation Raccordement électrique Branchez l‘appareil sur une prise de secteur avec le cordon d‘alimentation fourni dans la livraison. Allumez l‘interrupteur principal. Mode stand-by • Appuyez sur la touche stand-by (3 & 10) pour allumer l‘appareil. • Appuyez à nouveau sur la touche pour remettre l‘appareil en mode stand-by. •...
- Seite 35 Avant de pouvoir utiliser la barre de son avec un téléphone portable ou un autre appareil Bluetooth, il faut établir la connexion entre les deux appareils. • Appuyer plusieurs fois de suite sur la touche SOURCE (U3 & R2) jusqu‘à ce que « BT » s‘affiche. Une fois le mode BT sélectionné, l‘affichage «...
- Seite 36 • Insérez un périphérique USB dans le port USB de la barre de son. • Appuyez plusieurs fois sur la touche SOURCE (U3 & R2) jusqu‘à ce que « USB » s‘affiche. Sélectionnez le titre que vous voulez écouter avec les touches SUIVANT/PRÉCÉDENT. •...
-
Seite 37: Information Sur Le Recyclage
Information sur le recyclage Appareils électriques et électroniques usagés Vous trouverez sur le produit l’image ci-contre (une poubelle sur roues, barrée d‘une croix), ce qui indique que le produit se trouve soumis à la directive européenne 2002/96/ CE. Renseignez-vous sur les dispositions en vigueur dans votre région concernant la coll- ecte séparée des appareils électriques et électroniques. - Seite 38 Estimado cliente: Le felicitamos por la adquisición de este producto. Lea atentamente el siguiente manual y siga cuidadosamente las instrucciones de uso con el fin de evitar posibles daños técnicos. Indicaciones de seguridad y Garantía • El objetivo de este manual de instrucciones es familiarizarle con el funcionamiento de este producto. Guarde el manual para poder consultarlo siempre que sea necesario.
-
Seite 39: Datos Técnicos
Datos técnicos Número de artículo. 10026465 Amplificador Respuesta de frecuencia 20Hz-20kHz +/- 3 dB Voltaje de entrada 550 mV Unidad principal Fuente de alimentación 100-240 V ~ 50-60 Hz Consumo de potencia 35 W (Standby: ≤ 0.5 W) Dimensiones 90 mm x 930 mm x 60 mm Longitud de cable 1.5 m Altavoz de banda ancha Diámetro 52 mm... -
Seite 40: Vista General Del Aparato Y Panel De Control
Vista general del aparato y panel de control... - Seite 41 Vista general del aparato y panel de control PANTALLA USB: Conexión para dispositivos USB STANDBY / ON Entrada AUX (3,5 mm) FUENTE Pulse para elegir una fuente de audio entre Entrada óptica las entradas (TV, AUX, COAX, BT, OPTC, USB, ARC) Entrada coaxial (COAX) PLAY/PAUSE ANTERIOR/SIGUIENTE...
- Seite 42 Vista general del aparato y panel de control SLEEP: Activa la función del temporizador PLAY/PAUSE de apagado automático. DIMMEN: Ajusta el brillo de la pantalla FUENTE STANDBY / ON BASS +/- ANTERIOR/SIGUIENTE MUTE VOLUMEN +/- MODOS DE SONIDO OPCIÓN: En el modo BT, mantenga pulsado el botón durante 3 segundos para desconectar un dispositivo BT conectado.
-
Seite 43: Montaje En Pared
Montaje en pared Inserte y enrosque los tacos y los tornillos (no in- Coloque la barra de sonido en el lugar deseado. cluidos en el envío) en los agujeros de manera que Marque con lápiz los puntos de las perforaciones a las cabezas de los tornillos sobresalgan 5 mm de una distancia de 75 cm. -
Seite 44: Instalación Y Conexiones
Instalación y conexiones Preparación del mando a distancia Con una uña, abra de un empujón la tapa de la pila en la parte inferior del mando. Inserte una pila CR2025 correctamente en el espacio. Vuelve a colocar la tapa de la pila en el mando a distancia. - Seite 45 Vorbereiten / Anschlüsse Opción 3: Conectar dispositivos mediante un cable óptico • La ilustración muestra como conectar su repro- ductor MP3 y dispositivos similares mediante un cable de audio con conector jack de 3,5 mm. • Conecte un final del cable de audio a la salida de auriculares de su reproductor MP3.
- Seite 46 Funciones Conexión a la corriente Conecte el cable de alimentación suministrado a una toma de corriente. Enciende el interruptor principal. Modo de espera • Pulse el botón Standby (3 y10) para poner en marcha el aparato. • Para poner el aparato otra vez en modo de espera, pulse de nuevo el botón Standby. •...
- Seite 47 Reproducir audio a través de BT Antes de poder usar la barra de sonido con su teléfono móvil u otro dispositivo BT, tendrá que emparejar su aparato con la barra de sonido. • Pulse varias veces el botón FUENTE (U3 y R2) hasta que aparezca «BT» en la pantalla. •...
- Seite 48 Reproducir audio procedente de un dispositivo USB • Conecte el dispositivo USB al puerto USB de la barra de sonido. • Pulse varias veces el botón FUENTE (U3 y R2) hasta que aparezca «USB» en la pantalla. Elija la pista deseada mediante el botón ANTERIOR/SIGUIENTE.
-
Seite 49: Indicaciones Sobre La Retirada Del Aparato
Indicaciones sobre la retirada del aparato Si el aparato lleva adherida la ilustración de la izquierda (el contenedor de basura tacha- do) entonces rige la normativa europea, directiva 2002/96/CE. Este producto no debe arrojarse a un contenedor de basura común. Infórmese sobre las leyes territoriales que regulan la recogida separada de aparatos eléctricos y electrónicos. - Seite 50 Gentile cliente, La ringraziamo per aver acquistato il nostro dispositivo. La preghiamo di leggere attentamente le segu- enti istruzioni e di seguirle per evitare eventuali danni. Non ci assumiamo alcuna responsabilità per danni derivati da una mancata osservazione delle avvertenze di sicurezza e da un uso improprio del dispositivo. Avvertenze di sicurezza e garanzia •...
-
Seite 51: Dati Tecnici
Dati Tecnici Codice articolo. 10026465 Amplificatore Campo di frequenza 20Hz-20kHz +/- 3 dB Tensione in entrata 550 mV Unità centrale Alimentazione 100-240 V ~ 50-60 Hz Potenza assorbita 35 W Potenza assorbita STANDBY ≤ 0.5 W Dimensioni (A x L x P) (H x B x T) 90 mm x 930 mm x 60 mm Lunghezza cavo 1.5 m Altoparlanti Diametro 52 mm... - Seite 52 Descrizione dispositivo e tasti funzione...
- Seite 53 Descrizione dispositivo e tasti funzione Display USB: collegamento per dispositivi USB. On / Standby Ingresso AUX (3,5 mm) SOURCE scegliete tra gli ingressi TV, AUX, COAX, BT, Ingresso cavo ottico OPTC, USB, ARC Ingresso coassiale (COAX) PLAY/PAUSE AVANTI/INDIETRO Ganci per fi ssaggio a parete (titolo / emittenti) Cavo alimentazione VOL+/-...
- Seite 54 Descrizione dispositivo e tasti funzione SLEEP: attiva la funzione Sleeptimer. PLAY/PAUSE DIM: con questo tasto regolate l’intensità SOURCE dell’illuminazione del display. STANDBY / EIN BASS +/- VOR/ZURÜCK MUTE MODALITÀ AUDIO: premendo più volte il tasto potrete scegliere tra diverse imposta- VOLUME+/- zioni audio.
-
Seite 55: Montaggio A Parete
Montaggio a parete Posizionare la Soundbar nel luogo desiderato. Seg- Inserire viti e dadi (non inclusi in consegna) nei fori nare con una matita la posizione per i fori con una e avvitate in modo da lasciare esposti 5mm della distanza di 75cm. -
Seite 56: Installazione E Connessioni
Installazione e connessioni Preparazione telecomando Fare pressione con un‘unghia sul compartimento per la batteria nella parte inferiore per aprirlo. In- serire una batteria a bottone CR2025 nel vano e assicurarsi che sia ben posizionata. Far scorrere il compartimento della batteria nuovamente nel tele- comando. - Seite 57 Installazione e connessioni Opzione 3: collegamento tramite cavo ottico • L’immagine mostra come collegare un lettore MP3 o dispositivi simili tramite un cavo audio con jack da 3,5mm. • Collegare, l’estremità del cavo audio con l’uscita per le cuffie del vostro lettore MP3. •...
- Seite 58 Funzioni Allaccio elettrico Collegare il dispositivo tramite l’alimentatore incluso in consegna ad una presa elettrica. Attivare l’interruttore principale. Modalità Standby • Premere il tasto Standby (3 & 10), per attivare il dispositivo. • Per ritornare alla modalità Standby, premere nuovamente il tasto. •...
- Seite 59 Prima di poter utilizzare la Soundbar con telefoni cellulari o altri dispositivi BT è necessario creare un col- legamento. • Premete ripetutamente il tasto SOURCE (U3 & R2), finché „BT“ sia indicato sul Display. • Dopo aver selezionato „BT“, il testo sul display comincia dopo 5 secondi a lampeggiare rapidamente, mentre la Soundbar cerca di stabilire una connessione con il dispositivo collegato più...
- Seite 60 • Inserire il supporto USB nell’apposita slot sulla Soundbar. • Premere ripetutamente sul tasto SOURCE (U3 & R2), finché “USB” apparirà sul display. Scegliete il titolo desiderato premendo i tasti AVANTI/INDIETRO. • Premere il tasto OPTION (R6) più volte, l’indicazione sul display cambierà come di seguito: Riproduci titolo >...
-
Seite 61: Dichiarazione Di Conformità
Smaltimento Se sul prodotto è presente la fi gura a sinistra (il cassonetto dei rifi uti mobile sbarrato), si applica la direttiva europea 2002/96/CE. Questi prodotti non possono essere smaltiti con i rifi uti normali. Informarsi sulle disposizioni vigenti in merito alla raccolta separata di dispositivi elettrici ed elettronici.