Herunterladen Inhalt Inhalt Diese Seite drucken

Werbung

Verfügbare Sprachen
  • DE

Verfügbare Sprachen

Remote Control HCP 10/11
Installation and User Manual
Rev. 1.0
en ● de ● fr ● es ● da

Werbung

Inhaltsverzeichnis
loading

Inhaltszusammenfassung für Dantherm HCP 10

  • Seite 1 Remote Control HCP 10/11 Installation and User Manual Rev. 1.0 en ● de ● fr ● es ● da...
  • Seite 3 Remote Control HCP 10/11 – Installation and User Manual Introduction This instruction provides the procedures for installing and using the wired Remote Control: HCP 10 (with visual alarm only) and • HCP 11 (with both visual and acoustic alarm) •...
  • Seite 4: Control Panel

    Put the cable from the wall through the plastic frame and click it into the socket on the Control panel. Switch the power on and check if the display on the HCP 10/11 lights up, and Click the Control panel on the metal frame.
  • Seite 5 How to calibrate the Domestic Ventilation unit Introduction Before you can get full benefit of the Ventilation unit, you need to calibrate it. Calibration Follow the steps below to calibrate the airflows in the unit according to the values stated in the specific Service Manual for the unit: Step Action Result...
  • Seite 6: Using The Control Panel

    Using the control panel Introduction This part describes how to use the remote control (HCP 10/11). The functionality varies depending on if any accessory is mounted. Manual fan speed When pressing this button once, the fan speed will increase one step. When reaching...
  • Seite 7 Auto bypass Only available if mechanical bypass damper is mounted inside the unit, cooling and enabled in the PC tool or via remote control (HCP 10/11). mode Automatic bypass cooling is dependent on user settings. On remote control (HCP 10/11) and PC tool the following is possible: Setting the minimum outside temperature within the range 8-15°C.
  • Seite 8 (see error number in the Service manual of the ventilation unit). This visual LED alarm will be followed by a buzzer sound on the HCP11. Remote Control Error indicated by HCP 10 Flashing LED HCP 11 Flashing LED and buzzer sound...
  • Seite 9 Sorgen Sie vor der Installation dafür, dass die Stromzufuhr zum Gerät abgeschaltet ist. Bevor Sie beginnen Stellen Sie sicher, dass Sie die HCP 10/11 und einen kleinen Schraubenzieher bereit halten, bevor Sie beginnen. Schließen Sie das RJ11-Kabel mithilfe des MODBUS-Anschlusses (2) an die Raumlüftung...
  • Seite 10: Unterputzdose

    Fernsteuerung HCP 10/11 – Installations- und Benutzerhandbuch, Fortsetzung Teile Diese Abbildung zeigt die Teile, die in der HCP 10/11 enthalten sind (Unterputzdose nicht enthalten): RJ-Kabel Unterputzdose Metallrahmen Kunststoffrahmen Bedienblende Vorgehensweise Gehen Sie wie folgt vor, um die Fernsteuerung zu montieren:...
  • Seite 11: Kalibrieren Der Raumlüftung

    Kalibrieren der Raumlüftung Einführung Bevor Sie das Lüftungsgerät optimal nutzen können, müssen Sie es kalibrieren. Kalibrierung Gehen Sie wie nachfolgend beschrieben vor, um die Luftströme im Gerät entsprechend den im Wartungshandbuch des Geräts angegebenen Werten zu kalibrieren: Schritt Handlung Ergebnis gleichzeitig drücken und 5 Die beiden grünen Sekunden lang gedrückt halten, um den...
  • Seite 12: Verwendung Der Bedienblende

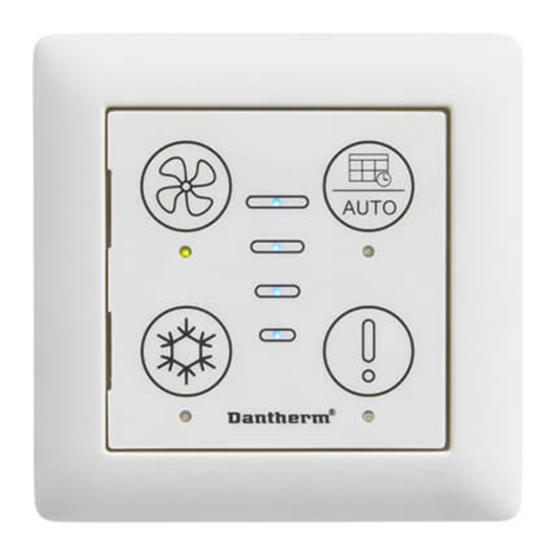
    Verwendung der Bedienblende Einführung Dieser Abschnitt beschreibt die Verwendung der Fernsteuerung (HCP 10/11). Die Funktionen sind von dem gegebenenfalls installierten Zubehör abhängig. Manuelle Einstellung Durch einmalige Betätigung dieser Taste wird die Ventilatorgeschwindigkeit jeweils um eine Stufe erhöht. Wenn sie bei Stufe 4 angekommen ist, stellt der Ventilator auf Ventilatorgeschwind Geschwindigkeit 0 um und erhöht daraufhin erneut seine Geschwindigkeit.
  • Seite 13 Kühlbetrieb Fernsteuerung (HCP 10/11) aktiviert wurde. Die automatische Bypass-Kühlung ist abhängig von den Benutzereinstellungen. Auf der Fernsteuerung (HCP 10/11) und dem PC-Tool stehen folgende Optionen zur Verfügung: Einstellung der Mindestaußentemperatur innerhalb eines Bereichs von 8 °C bis 15 °C. •...
  • Seite 14 Nummer des Alarms (siehe Fehlermeldung in der Service- und Montageanleitung des Entlüftungsgerätes). Der HCP 11 hat außer dem visuellen Alarm auch einen akustischen Alarm. Fernsteuerung Fehlermeldung angezeigt durch einer HCP 10 Blinkenden Alarm-Leuchtdiode HCP 11 Blinkenden Alarm-Leuchtdiode und einem akustischen Alarm...
  • Seite 15 Avant de commencer l'installation, assurez-vous que l'alimentation de l'appareil est coupée. Avant de Avant de commencer, assurez-vous de disposer de l'ensemble du produit HCP 10/11 et commencer d'un petit tournevis. Raccordez le câble RJ11 à l'unité de ventilation domestique au moyen du raccord MODBUS (2).
  • Seite 16 Commande à distance HCP 10/11 – Manuel d'installation et d'utilisation, suite Pièces La figure suivante présente les éléments associés au HCP 10/11 (boîtier mural non fourni) : Câble RJ Boîtier mural Cadre métallique Cadre en plastique Tableau de commande Procédure Suivez les étapes ci-dessous pour monter la commande à...
  • Seite 17 Étalonnage de l'unité de ventilation domestique Introduction Avant de pouvoir profiter pleinement de l'unité de ventilation, vous devez procéder à son étalonnage. Étalonnage Suivez les étapes ci-dessous pour étalonner les débits d'air de l'unité en fonction des valeurs indiquées dans le manuel d'entretien spécifique à l'unité : Étape Action Résultat...
  • Seite 18: Utilisation Du Tableau De Commande

    Utilisation du tableau de commande Introduction Cette section décrit l'utilisation de la commande à distance (HCP 10/11). Les fonctionnalités varient en fonction de la présence d'accessoires. Vitesse du Une pression sur ce bouton permet d'augmenter d'un cran la vitesse du ventilateur. Une...
  • Seite 19 Le refroidissement par dérivation automatique dépend des paramètres de l'utilisateur. La commande à distance (HCP 10/11) et le logiciel PC-Tool proposent les options suivantes : Définir la température extérieure minimale dans une fourchette de 8 à 15 °C. • ∙...
  • Seite 20 (voir le numéro d'alarme dans le manuel d'entretien de l'unité de ventilation). Cette alarme visuelle est suivie d'un avertisseur sonore sur le HCP 11. Commande à Erreur indiquée par distance HCP 10 Voyant clignotant HCP 11 Voyant clignotant et avertisseur sonore...
  • Seite 21 Control remoto HCP 10/11 – Instalación y manual del usuario Introducción En este manual de instrucciones se indican los procedimientos de instalación y uso del control remoto por cable: HCP 10 (solo con alarma visual) y • HCP 11 (con alarma visual y acústica) •...
  • Seite 22 Control remoto HCP 10/11 – Instalación y manual del usuario, continuación Piezas Aquí se muestran los componentes suministrados con el HCP 10/11 (caja mural no incluida): Cable RJ Caja Bastidor Bastidor de Panel de Procedimiento Siga los siguientes pasos para montar el control remoto: Paso Acción...
  • Seite 23 Cómo calibrar la unidad de ventilación doméstica Introducción Para obtener todas las ventajas que ofrece la unidad de ventilación, tendrá que calibrarla. Calibración Siga los siguientes pasos para calibrar los flujos de aire de la unidad conforme a los valores indicados en su manual de mantenimiento específico: Paso Acción Resultado...
  • Seite 24: Uso Del Panel De Control

    Uso del panel de control Introducción En esta parte se describe el uso del control remoto (HCP 10/11). Las funciones variarán según los accesorios que se hayan instalado. Velocidad manual Al pulsar una vez este botón, la velocidad del ventilador subirá un nivel. Cuando alcance del ventilador el nivel 4, pasará...
  • Seite 25 (HCP 10/11). refrigeración La refrigeración automática por derivación depende de la configuración del usuario. En el control remoto (HCP 10/11) y la herramienta para PC, puede hacerse lo siguiente: Ajuste la temperatura exterior mínima dentro del intervalo 8-15 °C.
  • Seite 26 (véase el número de error en el manual de mantenimiento de la unidad de ventilación). Esta alarma led visual irá seguida de un pitido en el HCP11. Control remoto Error señalado por HCP 10 Led parpadeante HCP 11 Led parpadeante y pitido...
  • Seite 27 Tryk én gang for at vælge driftstilstanden ugeprogram. Enheden bruger det seneste anvendte program. Kun med fjernbetjening (HRC 3) eller Dantherm PC tool (DPT 1) er det muligt at vælge mellem de 11 uge programmer som der findes i styringen på anlægget.
  • Seite 28 Kun tilgængelig, hvis det mekaniske bypass-spjæld er monteret indvendigt i via bypass enheden og aktiveret i Dantherm PC tool eller via fjernbetjening (HRC 3) Automatisk bypass-køling afhænger af brugerindstillingerne. Følgende kan udføres ved hjælp af fjernbetjening (HRC3) og Dantherm PC tool HPT 1pc-værktøjet:...
  • Seite 29 (en oversigt over fejlnumre kan ses i Service Manualen for ventilationsanlægget). Den visuelle alarm via lysdioden vil blive fulgt af en akustisk alarm på HCP 11. Trådet betjening Fejl angivet ved HCP 10 Blinkende lysdiode HCP 11 Blinkende lysdiode og akustisk alarm...
  • Seite 30 Før installation skal det sikres, at strømforsyningen til enheden er afbrudt. Før du starter Sørg for, at du har HCP 10/11 og en lille skruetrækker ved hånden, før du starter. Tilslut RJ11-kablet til boligventilationsenheden ved hjælp af MODBUS-forbindelsen (2). Tilslutning...
  • Seite 31: Kontrolpanel

    Monter metalrammen på indmuringsdåsen ved hjælp af to pladeskruer. Træk kablet fra væggen gennem plastrammen, og klik den på soklen på kontrolpanelet. Tænd for strømmen, og kontrollér, om displayet på HCP 10/11 lyser op. Klik herefter på kontrolpanelet på metalrammen. Kalibrering...
  • Seite 32 Sådan kalibreres boligventilationsenheden Introduktion Før du kan få fuldt udbytte af ventilationsenheden, skal den kalibreres. Kalibrering Følg nedenstående trin for at kalibrere luftstrømmene i enheden i henhold til de angivne værdier i den specifikke servicemanual for enheden: Trin Handling Resultat Tryk på...

Diese Anleitung auch für:

Hcp 11

Inhaltsverzeichnis