Inhaltsverzeichnis
Werbung
Verfügbare Sprachen
Verfügbare Sprachen
Quicklinks
German, second half of this manual
Pro Batt Ultra - Battery to Battery Charger
Test Report Sheet
Each product gets uniquely tested and a report is generated.
This unique test report is present inside this box.
You must keep this test sheet in this box and keep this box safe.
This sheet should be present when the charger is being warranted.
For other European languages refer to website:
Europe / RoW: www.sterling-power.com
North America: www.sterling-power.usa.com
For the vast majority of users (90%+) reading this paragraph should
be sufficient for installation. The unit can be installed by simply
connecting it between an input and output battery as depicted. The
unit, by default, shall start charging when the input voltage exceeds
13.2V and switches off when the voltage drops below 13.0V for more
than 240s (adjustable). Going above 13.2V for 5 seconds shall reset
this timer . The default charging profile is 14.4V abs. and 13.6V float -
for sealed lead acid batteries (x2 for 24V | x3 for 36V | x4 for 48V). This
means that the vast amount of installations can be fitted out of the box
without any adjustments.
There is also an ignition feed option - Unit on when ignition is on, unit off
when ignition is off. Please read the manual for additional information.
Copyright © 2017
Sterling Power
V60 July 2017
S
TERLI G
P
USERS MANUAL.
Code:
BB1260
12V-12V 60A input
BB122470 12V-24V 70A input
BB123670 12V-36V 70A input
BB124870 12V-48V 70A input
BB242435 24V-24V 35A input
BB241235 24V-12V 35A input
BB123670 12V-36V 70A input
BB124870 12V-48V 70A input
MUST READ
4
RoHS
compliant
technology
ProDigital
OWER
Main Power
Engine Bat.
*default mode does not require ignition feed*
Please read the legal and safety
information first before proceeding
and we strongly advise hiring a
professional to fit.
Important
upgrades
and features
These instructions are constantly
being modified and updated. The
Sterling website is worth referring to
for the latest instruction download.
Code:
BB1230
12V-12V 30A input
BB122440
12V-24V 40A input
Optional Remote
battery temp
Instructions inside
sensor
Neg
+
+ +
Terminals
Pos
in
fuse
fuse
Starter
House / Domestic / Aux
/ Bow thruster
Absorption
Cond.
H Charge
Float
Sterling Power Products
V
12.2
In / Unit
Out / Rem
Audible alarm on/off
hold > 3 sec
Batt.
Temp
On / Off
Volts
Menu
hold>3 sec
Select
Change
Fault
Pos
out
Regenerative
B
raking riendly
F
R.B.F
Werbung
Inhaltsverzeichnis

Verwandte Anleitungen für Sterling Power BB1230


Inhaltszusammenfassung für Sterling Power BB1230
- Seite 1 You must keep this test sheet in this box and keep this box safe. This sheet should be present when the charger is being warranted. Absorption Cond. H Charge Float Sterling Power Products 12.2 In / Unit Out / Rem Audible alarm on/off hold > 3 sec Batt.
-
Seite 2: Product Specifications
Customer service and w arranty declaration Front panel meter readings / meanings Seite 16 Deutsch Page 16 for German Product Specifications BB1230 BB1260 BB122470 BB123670 BB124870 BB241235 BB242435 Input Voltage (V DC) 11 - 20 11 - 20 11 - 20... - Seite 3 EXPLOSION this electronic device. Do not lose these instructions - keep them safe. The most up to date instructions can be found on the Sterling Power website. Please refer to Example - WARNING. Never use the device in Ÿ the latest instruction manual before contacting Sterling.
-
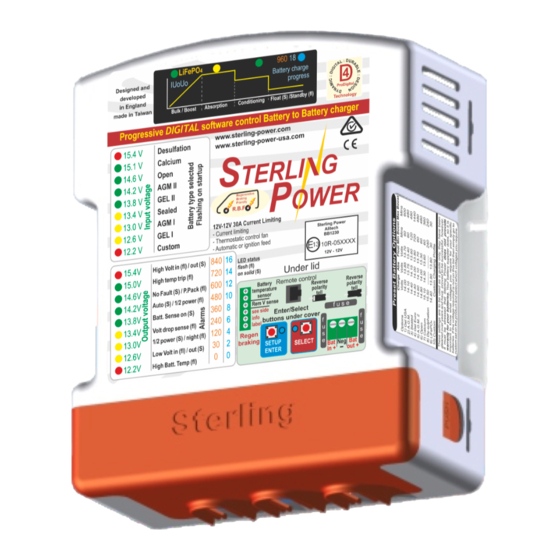
Seite 4: Front Panel
High bat temp (fl) SVEM (S) Models: BB1260 / BB122470 / BB123670 / BB124870 / Model: BB242435 / BB241235 / BB123670 / BB124870 BB1230 BB122440 Front label display High temp trip, if flashing then high unit 1 & 26) ENTER / SETUP and SELECT buttons, used to temperature trip. - Seite 5 SETUP BB123670 SELECT ENTER BB124870 in + out + Models: BB1230 BB122440 Models: BB1260 / BB122470 / BB123670 / BB124870 / BB242435 / BB241235 Dimensions Under the lid 158.00 1) DC output fuse 2) Negative fuse (position, model dependent)
- Seite 6 Bat out fuse...
- Seite 7 Guide to buttons Press Length (s) Action Forces unit into float mode. Press again to take out of float mode. 5-10 Turns unit on / off toggle. 10-20 Battery type select - use SETUP / SELECT to toggle between types. Both to confirm. 20-30 Change operational on/off voltages - use both buttons to scroll between voltages.
- Seite 8 Basic Operation / Installation Double all voltages for 24V, triple for 36V and quadruple for 48V. Fit in a cool dry well ventilated space. 1) Automatic activation (default setting). Should be installed by a competent The most common mode, used in 99% of Auxiliary person, conforming with the laws of the all installations including vehicles with...
- Seite 9 First Time Use (when wiring up) After unit has gone through its startup sequence the On first start up all LEDs will light up. A beep should LEDs displayed should be the input voltage on the left sound. The fan shall then start running for around 5 column and the output voltage on the right column.
- Seite 10 Force Options Force unit to operate without output battery connected Regen timer adjustment: default 240 seconds ( i.e. as a power pack / live output ). (Regen low voltage timer time). This mode shall allow the unit to operate without needing a The default auto Regen time is 240 sec.
-
Seite 11: Custom Settings
TERLI G OWER Custom Settings CUSTOM BATTERY TYPE SETTING (for expert Operation use only - not required for general operation) Press and hold both buttons for 10-20 seconds. All Left LEDs shall flash Before proceeding with this, please read and Press the setup/select button to move LED down to understand all instructions as it is quite complex and custom. - Seite 12 Charging profile Information displayed on top 4 LEDs on main unit Backlash voltage. If Fast charge High absorption Float / Power pack If voltage drops Lower conditioning charger power exceeded constant current charge rate constant due to heavy mode, constant and battery discharge charge rate constant load in excess...
-
Seite 13: Remote Control
Remote control: Absorption cut hole diameter Cond. 54mm H Charge Float Sterling Power Products Remote Control 12.2 In / Unit Out / Rem Audible alarm on/off Batt. hold > 3 sec 1) Volts select button. 6) Charge complete on float. - Seite 14 Fault Finding | Troubleshooting Is your output voltage slightly higher or lower than Firstly, ensure the Pro Batt Ultra (BB) is wired up as per expected - even with no loads / chargers on? page 7. Ensure negatives are common and the BB Check if you have the temperature sensor connected.
-
Seite 15: Customer Service & Warranty
Sterling Power. We cannot accept warranty claims from any other Sterling Power distributor. Purchase or other acceptance of the product shall be on the condition and agreement that Sterling Power USA LLC and Sterling Power LTD shall not be liable for incidental or consequential damages of any kind. Some states may not allow the exclusion or limitation of consequential damages, so, the above limitations may not apply to you. -
Seite 16: Pro Batt Ultra Batterie-Zu-Batterie-Ladegerät
Bewahren Sie diesen Report auf. Der Testreport wird im Falle eines Garantieanspruchs Absorption benötigt und muss mit dem Gerät zurückgeschickt werden. Cond. H Charge Float Sterling Power Products 12.2 In / Unit Out / Rem Audible alarm on/off hold > 3 sec Batt. - Seite 17 TERLI G OWER Inhaltsverzeichnis Hinweise und Sicherheitsinformation Seite 3 Benutzung dieser Anleitung Copyright Wartung und Reparatur Sicherheit und Vorsichtsmaßnahmen Beschriftungs-Erklärung Seite 4 - 5 Vordere Beschriftung Beschriftung unter dem Deckel / Techn. Daten Emfpohlene Kabelstärken und Sicherungen Schnell- Installationshilfe Seite 6 Standard Anschluss Skizze Basis Operations-Modus Ausführliche Installationshilfe...
- Seite 18 Schnee, Dunst, Sprühnebel, Rauch oder extrem hoher Copyright and Abschriften Feuchtigkeit ausgesetzt werden. Auch darf es nicht abgedeckt werden und die Lüftungsöffnungen müssen Copyright © 2015 Sterling Power. Alle Rechte sind in offen bleiben. unserem Eigentum. Vervielfältigung, Auszug und Der Geräte-Minus-Anschluss muss mit dem Ÿ...
-
Seite 19: Beschriftung
TERLI G OWER Modelle: BB1260 / BB122470 / BB123670 / BB124870 / Modell: BB242435 / BB241235 BB1230 Beschriftung Zu hohe Temperatur des Gerätes = blinken 1 & 26) ENTER / SETUP und SELECT Taster, werden (Lüfter defekt oder blockiert?) zur Einstellung benötigt. -
Seite 20: Unter Der Abdeckung
+ out + Modelle: Modell: Bb1260 / BB122470 / BB123670 / BB124870 / BB1230 BB242435 / BB241235 Zur Entfernung der Abdeckung drücken Sie bitte an beiden Seiten die Laschen max. 4mm ein. Dann sollte sich die Abdeckung lösen. Technische Daten:... - Seite 21 SICHERUNG SICHERUNG SICHERUNG AUSGANG SETUP / ENTER TASTER Haltedauer (Sek.) Aktion SETUP - Schnellanleitung > 0,5 zurück zur Spannungsanzeige > 5 1/2 Leistung ein/aus/ausschalten > 10 Rekuperationszeit einstellen SETUP / ENTER + SELECT TASTER > 15 Ausgangsspannungs-Prüfung ein/aus Haltedauer (Sek.) Aktion >...
-
Seite 22: Bei Der Auswahl Des Betriebsmodus Haben Sie 3 Möglichkeiten
TERLI G Installationsanleitung Für 24V alle Spannungen x 2, OWER für 36V alle Spannungen x3 und Wir empfehlen wie folgt bei der Installation vor- für 48V alle Spannungen x4 zugehen: 1.3. Direktaktivierung über externes Signal und Auswahl des Betriebsmodus sehr tiefe Eingangsspannung Regelung Montage des Gerätes (für Fahrzeuge mit sehr tiefer Rekuperation) Verlegen der Ladekabel... -
Seite 23: Anschlüsse
TERLI G OWER Anschlüsse 7. Anschluss der positiven Ladekabel Schließen Sie zuerst die potentialfreien, kontaktlo- Positiv Positiv sen, positiven Eingangs- und Ausgangskabel an den Eingang Ausgang Kabelklemmen 5) + 3) an. Achten Sie darauf, dass die Kabel entsprechend abgesichert sind. Nachdem fuse beide Kabel angeschlossen sind, verbinden Sie das fuse... -
Seite 24: Einstellungen
TERLI G Einstellungen OWER 8. Einstellen des Batterieprofils 8.13 Ausgleichsladungszeitfaktor auswählen Dieser Faktor bestimmt die berechnete Zeit der Aus- Zur Einstellung gibt es 2 Möglichkeiten. 1. Direkt gleichsladung. Dabei wird die Zeit vom Start der nach dem Anschließen des positiven Eingangs- Ladevorgangs bis zum Erreichen der Ausgleichsla- Ladekabels während der Anzeige des Batterietyps despannung mit diesem Faktor multipliziert. -
Seite 25: Weitere Einstellungen
TERLI G OWER 9. Weitere Einstellungen Alle linken und rechten LEDs blinken abwechselnd. Innerhalb von 10 Sekunden muss diese Aktion durch gleichzeitiges Drücken beider Tasten für mind. 2 Sekunden bestätigt werden. Ansonsten geht es in den normalen Betrieb zurück. 9.1 Zwangsumschaltung in Erhaltungsladung >... - Seite 26 TERLI G OWER auch mit der Ladung angefangen, wenn keine Batte- rie angeschlossen ist und die Spannung somit unter 9.13 Standby ein / aus 4V ist. Es gibt dann keinen Alarm und keine Warn- > 5 Sekunden - Select meldung. Durch Drücken der Select Taste für mehr als 5 Mit dieser Funktion kann die Prüfung auch wieder Sekunden schaltet das Gerät in den Standby-Modus...
- Seite 27 TERLI G OWER sen Sie das Gerät stromlos machen und anschlie- ßend wieder verbinden. Dann laufen die Lüfter ein- mal für 5 Sekunden von 0 bis max. an. 10.4 LED 21 blinkt gelb - Spannungsabfall Wenn die gelbe LED 21 blinkt, dann ist der Batterie- Spannungs-Sensor angeschlossen.
-
Seite 28: Ladekennlinie, Statusanzeige Durch Die 4 Leds (Blau/Gelb/Grün/Blau)
TERLI G OWER Ladekennlinie, Statusanzeige durch die 4 LEDs (blau/gelb/grün/blau) Maximal Ausgleichs- Konditionelle Erhaltungs Leistung des Geräte Fällt die Span- Ladung Ladung Ladung Ladung hat nicht ausgereicht die nung über einen Stufe 1 Stufe 2 Stufe 3 Stufe 4 Spannung zu halten. kurzen Zeitraum schaltet das Rückschaltung... -
Seite 29: Optionale Fernbedienung
Drücken: (> 1 Sekunde) Absorption Wechsel der Spannungsanzeige Cond. Eingang, Ausgang, Batterie H Charge Float Sterling Power Products längeres Drücken (> 4 Sekunden): 12.2 Temporäres Abschalten des Alarmsignals. In / Unit Out / Rem Audible alarm on/off Temp/Menü/Change - Taste: (8) Batt. -
Seite 30: Einstellungen Von Parametern
TERLI G OWER Einstellungen von Parametern: Um Einstellungen zu verändern, halten Sie den rechten Druckschalter für mindestens 4 Sekun- den gedrückt, bis die Anzeige „SEL“ erscheint. Dann lassen Sie den Schalter los. Jetzt erscheint die Anzeige „rt“. Um einen anderen Menüpunkt zu wählen drücken Sie kurz den rechten Druck- schalter (Temp/Menu/Setup) (8). -
Seite 31: Wartung, Pflege & Garantie
übeprüft werden, um welchen Fehler es sich handelt und ob es Möglichkeiten gibt (solange des Unsere Adresse: sich um einen Fehler handelt, der außerhalb des Sterling Power Products Ltd. Ladegerätes die Ursache hat), diesen zu beheben. 8 Wassage Way Im Zweifelsfall rufen Sie bitte unsere Service- GB - Droitwich WR9 0NX Nummer an, die Sie bei Ihrem Händler oder auf...