Inhaltsverzeichnis
Werbung
Verfügbare Sprachen
Verfügbare Sprachen
Quicklinks
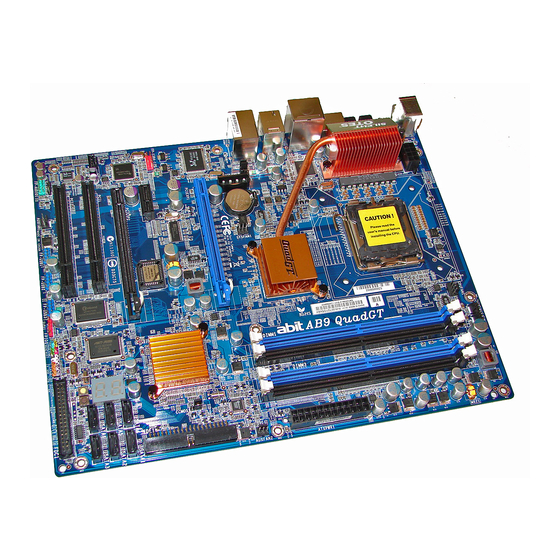
AB9 QuadGT
Motherboard
Socket 775
Intel Core 2 Quad / Core 2 Duo /
Core 2 Extreme / Pentium Dual
Core / Pentium Extreme /
Pentium D / Pentium 4
User's Manual
About this Manual:
This user's manual contains all the information you may
need for setting up this motherboard. To read the user's
manual of PDF format (readable by
the "Driver & Utility CD" into the CD-ROM drive in your
system. The auto-run screen will appear, click the
"Manual" tab to enter its submenu. If not, browse the
root directory of the CD-ROM via the File Manager, and
double click the "AUTORUN" file.
Adobe
Reader), place
LGA775 ATX
Intel P965 / ICH8R
FSB 1066/800 MHz
Dual DDR2 800
Dual PCI-E X16 Graphics Slots
Gigabit LAN
8x SATA 3Gb/s with RAID
IEEE1394
7.1 Channel HD Audio
Silent OTES™ Technology
uGuru™ Technology
External CMOS Clearing
Switch
Vista Ready
Werbung
Inhaltsverzeichnis

Verwandte Anleitungen für Abit AB9 QuadGT


Inhaltszusammenfassung für Abit AB9 QuadGT
- Seite 30 AB9 QuadGT...
- Seite 32 AB9 QuadGT...
-
Seite 35: German//Kurze Installationsanleitung
Jumperkappe einige wenige Sekunden auf die Einstellung Hardwareinformationen, die Sie zur “CMOS löschen” und setzen Sie sie dann wieder zurück auf Installation Ihres abit-Motherboards die Einstellung “Normal”. Nach dem Wiederanschluss aller benötigen. Details finden Sie im ausführlichen Netzkabel und einem Neustart des Computers setzt sich der Handbuch. -
Seite 36: Anschließen Von Speichergeräten
• LAN1: Anschluss für ein ortsgebundenes Netzwerk. • USB1/USB2: Anschluss für USB-Geräte wie Scanner, digitale Lautsprecher, Monitor, Maus, Tastatur, Hub, Digitalkamera, Joystick, etc. Statische Elektrizität kann elektronische Komponenten des Computers oder der optionalen Platinen beschädigen. Vor Beginn dieser Schritte AB9 QuadGT... -
Seite 57: Arabic
4.13 Arabic// AB9 QuadGT 4-25... - Seite 58 4-26 AB9 QuadGT...
- Seite 60 ﯾ زدن د ،ا ت ا ﯾ ر ا ﯾ ، ا و ا • LAN1 ا ه ، ا ه د USB1/USB2 ،ل دﯾ ، ه ب، دور ،وس ،ر ،ل دﯾ و و ا 4-28 AB9 QuadGT...
- Seite 84 P/N: 4310-0000-54 Rev. 1.00...