Herunterladen Inhalt Inhalt Diese Seite drucken
Inhaltsverzeichnis

Werbung

Verfügbare Sprachen
  • DE

Verfügbare Sprachen

  • DEUTSCH, seite 158
Flat Panel Display
取扱説明書  
Operating Instructions
Mode d'emploi
Bedienungsanleitung
Manual de instrucciones
Istruzioni per l'uso
使用说明书  
お買い上げいただきありがとうございます。
電気製品は安全のための注意事項を守らないと、
火災や人身事故になることがあります。
この取扱説明書には、事故を防ぐための重要な注意事項と製品の取り扱
いかたを示してあります。この取扱説明書をよくお読みのうえ、製品を
安全にお使いください。お読みになったあとは、いつでも見られるとこ
ろに必ず保管してください。
PFM-50C1/50C1E
 2002 Sony Corporation
4-089-578-04 (2)
JP
GB
FR
DE
ES
IT
CS

Werbung

Inhaltsverzeichnis
loading

Inhaltszusammenfassung für Sony PFM-50C1

  • Seite 1 4-089-578-04 (2) Flat Panel Display 取扱説明書   Operating Instructions Mode d’emploi Bedienungsanleitung Manual de instrucciones Istruzioni per l’uso 使用说明书   お買い上げいただきありがとうございます。 電気製品は安全のための注意事項を守らないと、 火災や人身事故になることがあります。 この取扱説明書には、事故を防ぐための重要な注意事項と製品の取り扱 いかたを示してあります。この取扱説明書をよくお読みのうえ、製品を 安全にお使いください。お読みになったあとは、いつでも見られるとこ ろに必ず保管してください。 PFM-50C1/50C1E  2002 Sony Corporation...
  • Seite 2: Jp)

    安全のために ソニー製品は安全に充分配慮して設計されています。しかし、電気製品は、 警告表示の意味 まちがった使いかたをすると、 火災や感電などにより死亡や大けがなど人身 取扱説明書および製品では、次の 事故につながることがあり、危険です。 ような表示をしています。表示の 事故を防ぐために次のことを必ずお守りください。 内容をよく理解してから本文をお 読みください。 安全のための注意事項を守る 5(JP)∼ 7(JP)ページの注意事項をよくお読みください。 8(JP)ページの 「本機の性能を保持するために」 もあわせてお読みください。 この表示の注意事項を守らないと、 定期点検をする 火災や感電などにより死亡や大け がなど人身事故につながることが 5 年に 1 度は、内部の点検を、お買い上げ店またはソニーのサービス窓口に あります。 ご依頼ください(有料) 。 故障したら使わない すぐに、お買い上げ店またはソニーのサービス窓口にご連絡ください。 この表示の注意事項を守らないと、 感電やその他の事故によりけがを 万一、異常が起きたら したり周辺の物品に損害を与えた りすることがあります。 ・ 煙が出たら 1 ディスプレイの電源を切る。 ・ 異常な音、におい 注意を促す記号...
  • Seite 3: Inhaltsverzeichnis

    目次 ................... 5 (JP) ................... 6 (JP) 電池についての安全上のご注意 ..........7 (JP) 万一、異常が起きたら ............... 7 (JP) 本機の性能を保持するために ..........8 (JP) 特長 ..................8 (JP) 各部の名称と働き ..............9 (JP) 前面/後面/右側面 ................ 9 (JP) 1 (ス タ ンバイ ) スイ ッチ/イ ンジケーター部 ........10 (JP) コ...
  • Seite 4 高音、低音、バラ ンスなどを調整する..........41 (JP) 調整した音質を出荷時の設定に戻す ..........41 (JP) メモリーを使う ..............42 (JP) 現在の調整状態をメモ リ ーする............42 (JP) メモ リ ー した設定値を呼び出す ............43 (JP) メニュー表示の言語を選ぶ ..........43 (JP) スクリーンセーバー機能 ............44 (JP) 画像の色あいを反転させる ............. 44 (JP) 画像の表示位置を自動的に変える ..........45 (JP) カラーマトリクスを調整する...
  • Seite 5: Jp)

    設置・取り付けは確実に 不確実な設置を行うと、 ディスプレイが転倒 火災 感電 してけがや火災・感電の原因となります。 設 置の際は、 以下の注意事項を必ずお守りくだ 下記の注意を守らないと、 さい。 火災 感電 死亡 大けが や により や に 壁面・天井・台上への設置、または転倒防 止のためディスプレイを固定するなど、特 つながることがあります。 殊な設置を行う場合には、必ずお買い上げ 店に工事を依頼してください。 規定の電源電圧で使う この取扱説明書に記されている電源電圧でお 衝撃を与えない 使いください。 本機の前面にガラスを使用しているため、 衝 規定外の電源電圧での使用は、 火災や感電の 撃を与えるとガラスが割れ、 けがの原因とな 原因となります。 ることがあります。 油煙、湯気、湿気、ほこりの多い場所では設 置・使用しない 安全アースを接続する 上記のような場所に設置すると、 火災や感電 安全アースを接続しないと、...
  • Seite 6 通風孔をふさがない 通風孔をふさぐと内部に熱がこもり、 火災や 故障の原因となることがあります。 風通しを よくするために次の項目をお守りください。 下記の注意を守らないと、 ・ 使用上のご注意の項(15 (JP)ページ)に けが 損害 をしたり周辺の物品に を与える 従って設置してください。 ・ 密閉された狭い場所に押し込めない。 ことがあります。 ・ 毛足の長い敷物(じゅうたんや布団など) の上に設置しない。 ・ 布などで包まない。 重いディスプレイは、 2人以上で開梱 ・ 運搬する ・ あお向けや横倒し、逆さまにしない。 ディスプレイは見た目より重量があります。 開梱・運搬は、けがや事故を防ぐため、必ず 2人以上で行ってください。 1人で行うと腰を 設置時には必ずスタンドを使用する 痛めることがあります。 ディスプレイの転倒によるけがや事故を防ぐ ため、 台 ・ 床などに本機を据え置きする際は、 別売りの専用スタンド...
  • Seite 7: 万一、異常が起きたら

    電池についての安全上の 移動させるときは電源コード、接続ケーブル を抜く ご注意 接続したまま移動させると、 電源コードや接 続ケーブルが傷つき、 火災や感電の原因とな ここでは、本機での使用が可能なソニー製アルカリ乾電池に ることがあります。 ついての注意事項を記載しています。 定期的に内部の掃除を依頼する 万一、異常が起きたら 長い間、 掃除をしないと内部にホコリがたま り、火災や感電の原因となることがありま すぐにきれいな水で洗い、 ただ 電 池 の 液 が 目 に す。1 年に 1 度は、内部の掃除をお買い上げ ちに医師の治療を受ける。 入ったら 店またはソニーのサービス窓口にご依頼くだ さい(有料) 。 1 電池を抜く 。 特に、 湿気の多くなる梅雨の前に掃除をする 煙が出たら 2 お買い上げ店またはソニー...
  • Seite 8: 本機の性能を保持するために

    の16:9 マルチメディ ア対応ディ スプレイ です。 PDP (プラズマディスプレイパネル)について 高画質・高精細 ・ 画面上に赤や青、 緑の点 (輝点) が消えなかったり 、 黒い点 (滅 PFM-50C1は水平 1365ドッ ト ×垂直 768ライ ンの高精細プラズマ 点) がある場合があ り ますが、 故障ではあ り ません。 パネルは非 ディ スプレイ パネルを採用。 さ ま ざまな映像ソースを高画質で再現 常に精密な技術で作られており 、 ごく わずかの画素欠けや常に...
  • Seite 9: 各部の名称と働き

    各部の名称と働き 1 1 (スタンバイ)スイッチ/インジケーター部 各部の名称と働き ◆ 1 (スタ ンバイ ) スイ ッチ/イ ンジケーター部について詳しく は、 「1 (ス タ ンバイ ) スイ ッチ/イ ンジケーター部」 (10 (JP) ページ) をご覧く ださ い。 前面/後面/右側面 2 コントロールボタン部 ◆ コン ト ロールボタ ン部について詳しく は、 「 コン ト ロールボタ ン部 (上面) 」 前面...
  • Seite 10: スタンバイ)スイッチ/インジ ケーター部

    各部の名称と働き 1 (スタンバイ)スイッチ/インジ コントロールボタン部(上面) ケーター部 MENU ENTER VOLUME 1 MENU(メニュー)ボタン 1 1 (スタンバイ)スイッチ 画面にメニューを出すときに使用します。 も う一度押すとメニュー スイ ッチを押すと電源が入り 、 も う1度押すとス タ ンバイ 状態に戻り が消えます。 ◆ MENUボタ ンをメニューの階層を戻すために使用する場合は、 「初期 ます。 設定メニュー」 (26 (JP)ページ) をご覧く ださい。 ご注意 ボタン パネル保護のため電源ON/STANDBYに時間がかかり ます。 約 メニューでカーソル...
  • Seite 11: 入出力端子パネル

    各部の名称と働き 入出力端子パネル 2 INPUT2 (RGB/YUV信号入力)端子 RGB/YUV (RGB/YUV信号入力) 端子 (D-sub 15ピン) : コンピューターや映像機器のアナログRGB信号出力端子ま たはコンポーネン ト (YUV)信号出力端子と接続します。 また、 HDアナログコンポーネン ト (Y/P ) 信号の入力に も対応しています。 コンポーネン ト信号をこの端子へ入力す る場合には、 53 (JP)ページのピン配列を参考にしてく ださ い。 AUDIO (音声入力) 端子 (ステレオ ミニジャ ッ ク) :音声信号を 入力します。 コ ンピューターや映像機器の音声出力端子と接 続します。...
  • Seite 12 各部の名称と働き D4端子アダプターBKM-B11(別売り) VIDEO端子部はスロ ッ ト イ ン方式になっていて、 別売りのD4端子 アダプターBKM-B11に付け換える こ とができます。 ◆ BKM-B11の取り付けかたについては、 お買い上げ店またはソニーの サービス窓口にご相談く ださい。 1 VIDEO1 IN (ビデオ1入力)端子 Y/C (映像入力) 端子 (ミニDIN4ピン) :映像機器のY/C出 力端子と接続します。 COMPOSITE (映像入力) 端子 (ピンジャ ッ ク) :映像機器の コンポジッ ト信号出力端子と接続します。 AUDIO (音声入力) 端子 (ステレオ ミニジャ ッ ク) :音声信号を 入力します。映像機器の音声出力端子と接続します。...
  • Seite 13 各部の名称と働き リモートコマンダーRM-971 8 S/VIDEOボタン 標準装備またはオプシ ョ ンアダプターを装着した際の、 VIDEO端 子からの入力信号を切り換えます。押すたびに、 COMPOSITE INとY/C IN の間で切り換わり ます。 MUTING DISPLAY STBY M/m/</,/ ENTER (エンター) ボタン POWER M/m/</, ボタ ンでメニューのカーソル (黄色) を移動させた INPUT 1 INPUT 2 VIDEO OPTION り、数値などを設定します。 ENTERボタンを押すと、選んだメ ニューや設定した内容を確定します。 q; BRIGHT (ブライトネス)ボタン 画質モー ドが 「ユーザー1∼3」 のとき、 画像のブライ ト ネスを調整 します。...
  • Seite 14 各部の名称と働き wa V SIZEボタン ご注意 垂直方向の画像の大き さ を調整します。 このボタ ンを押した後に、 ・ 落と したり、 踏みつけたり 、 中に液体をこぼしたり しないよう 、 て M/mボタ ン9 で調整します。 いねいに扱ってく ださい。 ws CONTRAST (コントラスト) +/−ボタン ・ 直射日光が当たる と ころ、 暖房器具のそばの温度が高いと ころ、 湿気が多いと ころには置かないでく ださい。 画質モー ドが 「ユーザー1∼ 3」 のと き、画像のコン ト ラス ト を調整 ・...
  • Seite 15: 使用上のご注意

    使用上のご注意 水平方向で使用する場合 使用上のご注意 前面 周囲に十分なスペースをとる ・ 内部の温度上昇を防ぐためディ スプレイ の周囲に以下に示す以 上の距離をあけてく ださい (下図参照) 。 ・スタ ン ドには、 専用ス タ ン ドSU-P50C (別売り) をご使用く ださい。 ・ 通電中は高温になる部分があ り 、 やけどの原因となり ます。 通電 中やスタ ンバイ にした直後は、本機の上側、後側には手を触れ ないでく ださい。 側面 スタンド(別売り)を使用する場合 前面 単位: cm 垂直方向で使用する場合...
  • Seite 16: スピーカーの接続

    使用上のご注意/接続 画面の焼き付きや残像についてのご注意 接続 次の1∼5のよ う な画像を画面上に一定時間表示し続ける と、 スピーカーの接続 部分的に焼き付きや残像が発生する こ とがあ り ます。 これはプラズ マディ スプレイ パネルの特性上起こる ものであ り 、 以下のA∼D 別売りのス ピーカー (SS-SP10A) を接続して、 よ り臨場感あふれる の操作を行う こ とによ り、焼き付きや残像を低減できます。 映像をお楽しみいただけます。 スピーカーの接続について詳しく は、 ス ピーカーに付属の取扱説明書をご覧の上、 正しく 接続して 焼き付きや残像が発生しやすい状態 く ださい。 上下に帯が表示されるワイ...
  • Seite 17 接続 接続例 ベータカムSPビデオ カセットレコーダーなど コンピューター コンポーネント 信号出力へ RGB/YUVへ 音声 音声出力へ 映像出力へ 出力へ AUDIOへ RGB/YUVへ CONTROL S INへ AUDIOへ CONTROL S OUTへ CONTROL S CONTROL S 入力端子へ 出力端子へ Y/C INまたは COMPOSITE INへ AUDIO INへ 映像出力へ 音声出力へ ビデオカセットレコーダー、 ゲーム機、DVDプレーヤーなど (JP)
  • Seite 18 接続 D4端子アダプターBKM-B11(別売り)を装着 した場合の接続例 別売りの D4 端子アダプターBKM-B11を取り付けた場合の接続 例は以下のとおりです。 ビデオカセットレコーダー、 ゲーム機など 映像 音声出力へ Y/Cまたは 出力へ COMPOSITEへ D4へ AUDIOへ AUDIOへ D映像出力へ 音声出力へ BSデジタルチューナー、 DVDプレーヤーなど (JP)
  • Seite 19: フェライトコアの取り付け

    接続 フェライトコアの取り付け ケーブルに取り付ける場合 ケーブルの本体側にフェ ライ ト コアを取り付け、カチッ と音が 電源コードに取り付ける場合 するまでしっかり と しめる。 10mm 以内 電源コー ドの両端にフェ ライ ト コアを取り付け、 カチッ と音がす るまでしっかり と しめる。 10mm 以内 10mm 以内 フェ ライ ト コアがずれないよう にス ト ッパーを巻き付ける。 10mm 以内 フェ ライ ト コアがずれないよう にス ト ッパーを巻き付ける。 10mm 以内...
  • Seite 20 接続 ケーブルホルダーを使う 付属のケーブルホルダーB (×6) を使って、 ス ピーカーケーブル をすっき り とま とめる こ とができます。 ケーブルホルダーは、 以下の よう に取り付けます。 本機後面 ス ピーカーを使用しない場合は、 付属のケーブルホルダーA (×2) とケーブルホルダーB (×2) を使ってケーブル類をま とめる こ とが できます。ケーブルホルダーは図のよ う に取り付けます。 本機後面 (JP)
  • Seite 21: メニューで行う調整と設定

    メニューで行う調整と設定 M/mボタ ンで設定や調整値を選び、 ENTERボタ ンを押す。 メニューで行う調整と設定 設定が決ま り、元のメニューに戻り ます。 メニューの操作 通常の画面に戻るには、 MENUボタ ンを押します。 メニューの階層を移動するには、 </,ボタ ンを使います。 ◆ MENUボタ ンを階層の移動に使用したいときは、 「 メニューキー動作」 メニュー操作ボタン (26(JP) ページ) をご覧く ださい。 メニューは、 リ モー ト コマンダーまたはディ スプレイ 本体のコ ン ト ロー メニュー表示言語を切り換えるには ルボタ ン部のメニュー操作ボタ ンを使って操作します。 メニュー画面やメ...
  • Seite 22 メニューで行う調整と設定 シネマドライブ 画質調整メニュー 自動にする と、 フ ィ ルム映像特有の滑らかな動きのある映像を再現 画像を信号処理によ り調整するメニューです。 します。 画質モー ドが 「ユーザー1∼3」 のとき、 お好みの画質に調整する ◆ シネマ ドライ ブについて詳しく は、 「シネマ ドライ ブ」 (34(JP)ページ) を ご覧く ださい。 こ とができます。 ダイナミックピクチャー ご注意 白をよ り白く 、黒をよ り黒く してコン ト ラス ト を強めます。 画質モー...
  • Seite 23 メニューで行う調整と設定 バランス オートワイド設定 M/,を押すと右側の音が強く なり、 m/<を押すと左側の音が オー ト ワイ ド機能を設定するメニューです。オー ト ワイ ド機能とは、 強く なり ます。 通常のテレビ放送やワイ ドク リ アビジ ョ ン、 ワイ ドスク リ ーン画像な ど、 横縦比の異なる映像の種類に対して最適なワイ ド切換を選び、 サラウンド 横縦比16:9のワイ ド画面いっぱいに自動的に画像を拡大する機能 サラウン ド機能を 「切」 「ホール」 「シ ミ ュ レー ト」 の3段階で設定し です。...
  • Seite 24 メニューで行う調整と設定 標準 画像位置メニュー ド ッ ト調整メニューの調整値を出荷時の値に戻します。 画像の位置を調整するメニューです。 ◆ 標準機能について詳しく は、 「 ド ッ ト調整項目を出荷時の設定に戻すに は」 (40(JP)ページ) をご覧く ださい。 この画面はメニューキー動作が 「入/切」 に設定されている と きの み表示されます。 標準 画面モー ドメニューのすべての調整値を出荷時の値に戻します。 ◆ 標準機能について詳しく は、 「 設定した画面モー ドメニューの調整値を 出荷時の設定値に戻す」 (40(JP)ページ) をご覧く ださい。  水平位置               0 0  垂直位置              ...
  • Seite 25 メニューで行う調整と設定 同期モード スクリーンセーバーメニュー INPUT1、 INPUT2のRGB/YUV端子の13番ピンに入力される信 長時間にわたって同じ画面を映したりする場合に生じる画面の焼 号によって、モー ドを設定します。設定できる信号は、 575/50i、 きつきや残像を補正したり軽減する と きに使用します。 480/60i のみです。 同期信号 : 水平信号またはコンポジッ ト同期信号*が入力される 各種切換 スクリ ーンセ ーバ ー 場合  画像反転       :       切 画質/音質  自動表示位置移動 映像信号 : 映像信号またはコンポジッ ト同期信号*が入力される 場合 画面モー ド *コ ンポジッ ト 同期の信号レベルによっては正しく 画像が表示され 各種切換...
  • Seite 26 メニューで行う調整と設定 初期設定メニュー タイマー/時計設定メニュー メニュー表示の言語や映像ソースを選んだり 、 メニューキーの機 時刻やタイ マーを設定したり 、 時刻を表示させたり、 自動的に電源 能を設定したりするメニューです。 が入ったり切れたりするよう に設定するメニューです。 初期設定 タイマ ー / 時計設定  言語           :      日本語  スリ ープ        :       切 画質/音質  カラ ー方式      :  時刻設定 タイマー    キ ー動作     :     入 / 切 MENU  時計表示       :       切  電源タイマ ー     :       切 画面モー...
  • Seite 27 メニューで行う調整と設定 メモリーメニュー リモートモード リ モー ト コマンダーのモー ドを切り換えます。 画質/音質調整メニューと画面モー ド調整メニューの調整値をナ TV: ディ スプレイ またはTVに付属している リモー ト コマンダーか ンバー1∼20のメモリ ーに保存したり 、 呼び出したりするメニュー ら操作する とき。 です。 PJ:業務用プロジェク ターに付属している リ モー ト コマンダーか ら操作する とき。 調整値の保存 / 呼出 切: リモー ト コマンダーから操作しないとき。 (リモー ト コマンダー  呼出...
  • Seite 28 メニューで行う調整と設定 ステータスメニュー ファン 本機には、冷却用フ ァ ンが内蔵されています。 フ ァ ンが正常に動 ディ スプレイ 本体の内部状態を表示するメニューです。 いているかどうかを表示します。 OK:正常時 ステ ータス NG:異常時  機種名:         P F M — 5 0 C 1 このフ ァ ンが何らかの異常によ り停止したと きは、 異常表示となり 、 メモリー  シリアル番号:       2 0 0 0 0 0 1  累積通電時間:...
  • Seite 29: 画像を見る

    画像を見る ビ デ オ (コンポジッ ト) :ビ デ オ( VIDEO IN)端 子 の 画像を見る COMPOSITE IN(COMPOSITE)端子に接続し た機器の入力信号を選ぶ場合。 準備 ビデオ (Y/C) :ビデオ (VIDEO IN) 端子の Y/C IN (Y/ ・ ディ スプレイ の電源を入れておきます。 C) 端子に接続した機器の入力信号を選ぶ場合。 ・ 接続した機器の電源を入れ、映像ソースを再生します。 オプションボード「BKM-B11」を装着している場合 ・ 電源投入時または入力切り換え時に入力信号の種類と画質モー ビデオ 1(コンポジッ ト) :ビデオ 1(VIDEO1 IN)端子の ドを画面に表示させたいと...
  • Seite 30: 入力信号と画質モードの情報とディス プレイの設定状態の表示について

    画像を見る 入力信号と画質モードの情報とディス プレイの設定状態の表示について 電源投入時または入力切り換え時に、 入力信号と画質モー ドの情 報が約 5 秒間画面に表示されます。 情報を画面に表示しないよ う にする と きは、 以下の手順に従って 設定してく ださい。 各種切換メニューから、 M/mボタ ンで 「ステータス表示」 を選 び、 ENTERボタ ンを押す。 以下の画面が表示されます。 各種切換  消費電力       :      標準 画質/音質  スピ ーカー出力     :       入  クロ ーズド キャプション:  ステ ータス表示    : 入 画面モー ド  スクリ...
  • Seite 31 れも標準位置 (00) にし、ズームを標準に設定してく ださい。 こ 720×400@85Hz (VESA STD) 37.9kHz 85.0Hz れらを動かして使用する と、画像が乱れる こ とがあ り ます。 800×600@56Hz (VESA STD) 35.2kHz 56.3Hz ・ PFM-50C1 で DVD 信号を入力した場合、画像の色を薄く 感じ 800×600@60Hz (VESA STD) 37.9kHz 60.3Hz たら、 画質調整メニューの 「色の濃さ」 でお好みの色の濃さに調 800×600@72Hz (VESA STD) 48.1kHz 72.2Hz 整してく...
  • Seite 32: 画面表示を切り換える

    画像を見る 画面表示を切り換える 節電モード機能 節電しながら映像を見る こ とができます。 字幕を表示させる MENUボタ ンを押す。 MENUボタ ンを押す。 メ イ ンメニューが表示されます。 メ イ ンメニューが表示されます。 画質 / 音質調整 画質 / 音質調整  画質モ ード       :   スタンダード  画質モ ード       :   スタンダード 画質/音質  画質調整  画質調整 画質/音質  音質調整  音質調整...
  • Seite 33: 画質を選ぶ

    画質を選ぶ/画質を調整する 画質を選ぶ 画質を調整する 映像の種類や周囲の明る さに合わせて画質を選ぶこ とができま 画像を見ながら、 コン ト ラス ト 、明る さ、色の濃さ、色あいなどを調 す。 整する こ とができます。 また、 入力信号ごとに調整を行い、 調整値 をメモリ ーする こ とができます。 MENUボタ ンを押す。 画質モー ドを 「ユーザー1 ∼ 3」 のいずれかにしてく ださい。 メ イ ンメニューが表示されます。 コントラスト、明るさ、 画質 / 音質調整 色の濃さ、色あいなどを調整する...
  • Seite 34 画質を調整する 色あい シネマドライブ M/mボタ ンで 「色あい」 を選び、 ENTERボタ ンを押し、 M/m/</ フ ィ ルム (24コマ) で撮影された映像を自動検出し、 フ ィ ルム映像 ,ボタ ンで色あいを調整します。 特有の滑らかな動きのある映像を再現する ことができます。 赤(−128) ∼緑(+ 127) の範囲で設定できます。 M/,:画像が緑がかる M/mボタ ンで「シネマ ドライ ブ」 を選び、 ENTERボタ ンを押 m/<:画像が赤みがかる す。 以下の画面が表示されます。 シャープネス 画質 / 音質調整 画質調整(...
  • Seite 35 画質を調整する (2) M/m/</,ボタ ンでゲイ ンを調整し (0∼255) 、 ENTER 色温度 ボタ ンを押す。 色温度を設定します。 「高」 「中」 「低」 のほか、 各ゲイ ンを好みに 色温度メニュー画面に戻り ます。 合わせて細かく 調整する こ と もできます。 調整した色温度は、 3つ まで登録できます。登録した色温度の名前を変更する こ と もでき 調整した色温度の名前の変更は、以下の手順で行います。 ます(6 文字まで) 。 (3) M/mボタンで「名称登録」 を選び、 ENTERボタンを押 M/mボタ ンで「色温度」 を選び、 ENTERボタ ンを押す。 す。...
  • Seite 36: 調整した画質を出荷時の設定値に戻す

    画質を調整する 色補正 ご注意 ・ RGB信号を入力している場合、 色あいと色の濃さは調整できま 美しく 健康的な色を再現する こ とができます。 せん。 ・コンポーネン ト信号を入力している場合、 色あいは調整できませ M/mボタ ンで「色補正」 を選び、 ENTERボタ ンを押す。 ん。 以下の画面が表示されます。 ・ PAL、 PAL-M、 PAL-N、 PAL60および SECAM 方式の入力信号 の場合、色あいは調整できません。 画質 / 音質調整 画質調整( ユ ーザー 1 ) ・ 白黒信号を入力している と きは、 色の濃さ と色あいは調整できま  シャ...
  • Seite 37: 映像を拡大する

    映像を拡大する オートワイドを設定する 映像を拡大する 一部の通常のテレビ放送やワイ ドク リ アビジ ョ ン放送などでは、 映 像を判別するための識別制御信号が映像信号と重ねて送られて 通常のテレビ放送やワイ ドク リ アビジ ョ ンなど、 映像の種類に合わ います。オー ト ワイ ド機能は、識別制御信号に基づいて映像を忠 せて画面いっぱいに拡大表示する こ とができます。 実に再現したり、 識別制御信号に関係なく あらゆる映像を最適な ワイ ドモー ドには以下の種類があ り ます。 サイ ズで拡大表示する こ とができます。 また、 横縦比が4:3の通常のテレビ放送やBS放送を、 横縦比16: オリジナルの映像...
  • Seite 38: ワイド切換を設定する

    映像を拡大する ワイド切換を設定する M/mボタ ンで 「オー ト ワイ ド設定」 を選び、 ENTERボタ ンを押 す。 映像の種類に関係なく 、 お好きなワイ ドモー ドで画面を拡大表示す 以下の画面が表示されます。 る こ とができます。 画面モ ード 調整 オート ワイド 設定 画面モー ド調整メニューから、 M/mボタ ンで 「ワイ ド切換」 を  オート ワイド       :切   4 : 3 映像        : 画質/音質...
  • Seite 39: 画像のサイズや位置を調整する

    画像のサイズや位置を調整する 画像の位置を調整する 画像のサイズや位置を調 整する 画面モー ド調整メニューから、 M/mボタ ンで「画像位置」 を 選び、 ENTERボタ ンを押す。 以下の画面が表示されます。 画像の大き さや位置がディ スプレイ 画面に合っていないと きは、 位 置を調整したり、 縦 ・ 横方向に画像のサイ ズを変えたりする こ とが できます。 ◆ この取扱説明書では、 メニューキー動作が 「入/切」 に設定されてい る状態での操作を説明しています。 画面モー ド調整メニューについて 詳しく は、 「画面モー ド調整メニュー」 ( 23 ( JP) ページ) をご覧く ださい。  水平位置              ...
  • Seite 40: ドット位相を調整する

    画像のサイズや位置を調整する ドット位相を調整する 手動調整する場合 (1) M/mボタ ンで 「 ド ッ ト位相」 または 「水平総 ド ッ ト数」 を選 文字や縦線のエッ ジにチリ チリ と したノ イ ズが多いときに、 ド ッ ト位 び、 ENTERボタ ンを押す。 相と水平総 ド ッ ト数を調整します。 以下の画面が表示されます。 ( 下図は 「 ド ッ ト位相」 を選ん だ場合)...
  • Seite 41: 音質を調整する

    音質を調整する サラウンド 音質を調整する 映像の種類に合わせて、 サラウン ドモー ドを選ぶこ とができます。 音の高音、 低音、 バラ ンスを調整する こ とができます。 また、 サラ M/mボタ ンで「サラウン ド」 を選び、 ENTERボタ ンを押す。 ウン ドモー ドを設定する こ とができます。 M/mボタ ンでモー ドを選び、 ENTERボタ ンを押す。 高音、低音、バランスなどを調整する 切:サラウン ド出力はしない ホール:映画や音楽などのステレオ音声をよ り臨場感のある MENUボタ ンを押してメ イ ンメニューを表示し、 音質調整メニュー 音にする場合...
  • Seite 42: メモリーを使う

    メモリーを使う M/mボタ ンで設定を保存したいメモリ ーナンバー (01∼20) メモリーを使う を選び、 ENTERボタ ンを押す。 以下の画面が表示されます。 ある入力ソースからの映像がう ま く 表示されるよ う に調整したら、 そ 調整値の保存 / 呼出 の調整値をメモリ ーに保存しておく こ とができ ます。 画質/音質調 保存  M E M   0 1 整メニューと画面モー ド調整メニューの調整値をナンバー1∼20  保存 タイマー  名称登録 のメモリ ーに保存でき ます。 保存する設定に名前をつける こ と もで メモリー...
  • Seite 43: メモリーした設定値を呼び出す

    メモリーを使う/メニュー表示の言語を選ぶ メニュー表示の言語を選ぶ 手順8を繰り返し、 名前の入力が終わったら 「終了」 を選び、 ENTERボタ ンを押す。 メニュー表示に使う言語を、 日本語、 英語、 ドイ ツ語、 フラ ンス語、 4 の画面に戻り ます。 スペイ ン語、 イ タ リ ア語の6つの言語の中から選ぶこ とができます。 メモリーした設定値を呼び出す MENUボタ ンを押す。 メ イ ンメニューが表示されます。 調整値の保存/呼出メニューから、 M/mボタ ンで 「呼出」 を 選び、 ENTERボタ ンを押す。 画質 / 音質調整 以下の画面が表示されます。...
  • Seite 44: スクリーンセーバー機能

    スクリーンセーバー機能 M/mボタ ンで「画像反転」 を選び、 ENTERボタ ンを押す。 スクリーンセーバー機能 以下の画面が表示されます。 各種切換 コンピューターの画像のよ う に、 輝度の変化しない画像や静止画 スクリ ーンセ ーバ ー  画像反転       :       切 切 の映像を長時間表示する と、 画面に焼きつきや残像が生じる こ と 画質/音質  自動表示位置移動 自動 入 があ り ます。 画面モー ド これを補正したり 、軽減させるため、本機にはスク リ ーンセーバー 機能が搭載されています。スク リ ーンセーバー機能には、画像の 各種切換...
  • Seite 45: 画像の表示位置を自動的に変える

    スクリーンセーバー機能 / カラーマトリクスを調整する M/mボタ ンで 「移動量」 (移動の大き さ) または 「移動周期」 (4) 反転開始時間と同様に、反転終了時間を設定する。 (移動の時間) を選び、 ENTERボタ ンを押す。 1 日 1 回、反転開始時間に反転が始ま り 、反転終了時間 に反転表示が終了する設定になり ます。 選択でき る移動量、移動周期は以下のとおりです。 移動量:小、中、大 ご注意 移動周期:10 秒、 30 秒、 1 分、 5 分 反転開始時間と反転終了時間に同じ時刻を設定する と、反転開 以下の画面が表示されます。 (下図は 「移動量」 を選んだ場 始時間の設定が優先され、...
  • Seite 46: 電源のオン/オフを自動的に制御する (タイマー機能

    カラーマトリクスを調整する / 電源のオン/オフを自動的に制御する (タイマー機能) M/mボタ ンで「各種切換」 を選び、 ENTERボタ ンを押す。 電源のオン/オフを自動的に 各種切換メニューが表示されます。 制御する(タイマー機能) 各種切換  消費電力       :      標準  スピ ーカー出力    :       入 画質/音質 本機に信号が入力されない状態が続く と、 電源を自動的に切るパ  クロ ーズド キャプション: 切  ステ ータス表示    :       入 ワーセービング機能と、電源をオン/ オフする時間を自由に設定 画面モー ド  スクリ ーンセ ーバ ー  カラ ーマト リクス できる電源タイ マー機能があ り ます。 また、 画面を表示したままに  ...
  • Seite 47: 時刻を設定する

    電源のオン/オフを自動的に制御する(タイマー機能) 時計を表示する M/mボタ ンで電源が切れるまでの時間を選ぶ。 切:電源は切れない タイ マー/時計設定メニューから、 M/mボタ ンで 「時計表示」 30 分:30 分過ぎる と電源が切れる を選び、 ENTERボタ ンを押す。 60 分:60 分過ぎる と電源が切れる 以下の画面が表示されます。 90 分:90 分過ぎる と電源が切れる 120 分:120 分過ぎる と電源が切れる タイマ ー / 時計設定  スリ ープ        :       切 タイマー  時刻設定 時刻を設定する  時計表示       :       切...
  • Seite 48: パワーセービング機能

    電源のオン/オフを自動的に制御する(タイマー機能) M/mボタ ンで 「く りかえ し」 を選び、 ENTERボタ ンを押す。 M/mボタ ンで 「電源入時間」 を選び、 ENTERボタ ンを押す。 以下の画面が表示されます。 以下の画面が表示され、 時間の背景が黄色で表示されます。 タイマ ー / 時計設定 タイマ ー / 時計設定 電源タイマ ー : 入 電源タイマ ー : 入 切  くりかえし :        :    くりかえし  くりかえし :...
  • Seite 49: 自己診断機能

    電源のオン/オフを自動的に制御する(タイマー機能) / 自己診断機能 / 特定のディスプレイをリモートコマンダーで操作する パワーセービングモードを解除するには 自己診断機能 • 1 (スタ ンバイ ) スイ ッチ/イ ンジケーター部の1スイ ッチ、 または リモー ト コマンダーのPOWER ONスイ ッチを押すと、 電源が入り ます。 本機には自己診断機能が搭載されています。 これは本機が正しく 動作していないときに、 STANDBYイ ンジケーターの点滅によ りお 知らせする機能です。 点滅状態によって本機の状態が分かるよ う になっています。 STANDBYイ ンジケーターが点滅したら、 点滅状態を確認して、 お 買い上げ店またはソニーサービス窓口にご相談く ださい。 STANDBYイ...
  • Seite 50 特定のディスプレイをリモートコマンダーで操作する M/mボタ ンで 「リモー ト コン ト ロール設定」 を選び、 ENTERボ リ モー ト コマンダーの数字ボタ ンで、 操作したいディ スプレイ の イ ンデッ クスナンバーを入力する。 タ ンを押す。 すべてのディ スプレイ のイ ンデッ クスナンバーの右に、 入力し リモー ト コン ト ロール設定メニューが表示されます。 た数字が表示されます。 リモ ート コント ロ ール設定 入力した数字...
  • Seite 51: 他のリモートコマンダーから操作する

    CHROMA + / − CHROMA COLOR + / − — 色あい PHASE + / − HUE + / − 画面表示 DISPLAY DISPLAY STATUS ON 電源接続時のご注意 それぞれの地域に合った電源コー ドをお使いく ださい。 PFM-50C1 イギリス、アイルランド、オー アメリカ合衆国、カナダ ヨーロッパ諸国 日本 ストラリア、ニュージーランド プラグ型名 VM0233 COX-07 — VM1296 コネクタ型名 VM0089...
  • Seite 52 仕様 安全規格 電安法、 VCCIク ラスB 仕様 本機は「高調波ガイ ドライ ン適合品」 です。 映像処理系 D4端子アダプターBKM-B11(別売り) プリ セッ ト信号 入力プリ セッ ト信号(31(JP) ページ) 参照 VIDEO1 IN (NTSC、PAL、SECAM、NTSC4.43、 サンプリ ング周波数 13.5 MHz ∼ 140 MHz PAL60、PAL-M、PAL-N) パネル方式 プラズマディ スプレイ パネル COMPOSITE ピンジャ ック (×1) 解像度 1365ド...
  • Seite 53 仕様 その他 ピン配列 RGB/YUV端子 (D-sub 15ピン) 電源 AC 100 V∼ 240 V、 50/60 Hz、 5.4 A ∼ 2.2 A 消費電力 490 W 動作条件 温度:0∼+ 35 ℃ 湿度:20 ∼ 90% (結露のないこ と) 気圧:700 ∼ 1 060 hPa 保存・輸送条件 温度:− 10∼+ 40 ℃ 湿度:20 ∼...
  • Seite 54: 保証書とアフターサービス

    保証書とアフターサービス 保証書とアフターサービス 保証書 ・この製品には保証書が添付されていますので、 お買い上げの際 お受け取り く ださい。 ・ 所定事項の記入および記載内容をお確かめのう え、 大切に保存 してく ださい。 アフターサービス 調子が悪いときはまずチェックを この説明書をも う1 度ご覧になってお調べく ださい。 それでも具合の悪いときはサービスへ お買い上げ店、 または添付の 「サービス窓口 ・ ご相談窓口のご案 内」 にあるお近く のソニーサービス窓口にご相談く ださい。 保証期間中の修理は 保証書の記載内容に基づいて修理させていただき ます。 詳しく は 保証書をご覧く ださい。 保証期間経過後の修理は 修理によって機能が維持でき る場合は、 ご要望によ り有料修理を させていただきます。...
  • Seite 55 (JP)
  • Seite 56 If you have any questions about this product, you may vervangen hoeft te worden tijdens de levensduur van het apparaat. call: Sony’s Business Information Center (BIC) at 1- 800-686-SONY (7669) • Raadpleeg uw leverancier indien de batterij toch vervangen moet worden. De batterij mag alleen or Write to: Sony Customer Information Services Center vervangen worden door vakbekwaam servicepersoneel.
  • Seite 57 Table of Contents Precautions ............... 5 (GB) Features ..............6 (GB) Location and Function of Parts and Controls ..7 (GB) Front / Rear / Right Side .......... 7 (GB) 1 (standby) Switch / Indicator Section ....8 (GB) Control Button Section (Top) ........8 (GB) Connector Panel ............
  • Seite 58 Restoring the Screen Control Menu Adjustment Values..........37 (GB) Adjusting the Sound Quality ......... 38 (GB) Adjusting the Treble, Bass, and Balance, etc..38 (GB) Restoring the Adjust Sound Menu Items to Their Original Settings ........38 (GB) Using the Memory Function ........39 (GB) Storing the Current Setting ........
  • Seite 59: Precautions

    Otherwise, an afterimage or ghost may If you have any questions about this unit, contact your appear on a part of the panel. Use the screen saver authorized Sony dealer. function to equalize use of the screen display. (GB)
  • Seite 60: Features

    • Line correlation comb filter for PAL Y/C separation. Improved image quality • Automatic input signal detection with on-screen The PFM-50C1/50C1E utilizes an 1365 dot × 768 indication. line, high-precision plasma display panel. This allows • Windows 95/98 PnP (Plug and Play) compatible.
  • Seite 61: Location And Function Of Parts And Controls

    Location and Function of Parts and Controls 1 1 (standby) switch / indicator section Location and Function For details on the 1 (standby) switch / indicator section, see “1 (standby) Switch / Indicator Section” on page 8 of Parts and Controls (GB).
  • Seite 62: Standby) Switch / Indicator Section

    Location and Function of Parts and Controls 1 (standby) Switch / Indicator Control Button Section (Top) Section MENU ENTER VOLUME 1 MENU button Press to make the menu appear. The menu is no 1 1 (standby) switch longer displayed when this button is pressed again. Press to turn on the display unit.
  • Seite 63: Connector Panel

    4 REMOTE (RS-232C) connector (D-sub 9-pin) This connector allows remote control of the display using the RS-232C protocol. For details, contact your authorized Sony dealer. 5 VIDEO connectors The PFM-50C1E is not equipped with VIDEO connectors. For the PFM-50C1E, composite video and...
  • Seite 64 Location and Function of Parts and Controls If you are using the PFM-50C1E with the BKM-B10 (not supplied), and you notice lateral stripes on the screen, remove the part indicated in the illustration. Remove this part. (GB)
  • Seite 65: Remote Commander Rm-971

    Location and Function of Parts and Controls Remote Commander RM-971 7 RGB/YUV button Press to select the format matching that of the input signal connected to the INPUT1 or INPUT2 connector. Each press toggles between RGB and MUTING DISPLAY STBY YUV.
  • Seite 66: Installing Batteries

    Location and Function of Parts and Controls ql CHROMA button Installing batteries Adjusts the chroma when the picture mode is set to “User 1-3”. Press this button and then adjust the Insert two size AA (R6) batteries in correct polarity. chroma with the M/m or </, button 9.
  • Seite 67: Caution

    2.5 ( because actual installation is up to the authorized local dealers. For installation, consult with qualified Sony personnel. • While the unit is turned on, there are parts that may be come hot, and this can cause burns. When the...
  • Seite 68: Connections

    Caution/Connections Notes on Image Retention Connections If the 1 – 5 images (below) are displayed for an Connecting the Speakers extended period of time, image retention (afterimage) in areas of the screen may result due to the You can enjoy viewing with a greater sense of characteristics of the Plasma Display Panel.
  • Seite 69 Connections Betacam SP video cassette recorder Computer to audio to component output signal output to audio to video output output to RGB/YUV to RGB/YUV to AUDIO to CONTROL S IN to AUDIO to CONTROL S OUT to CONTROL S IN to CONTROL S OUT * to Y/C IN or COMPOSITE IN...
  • Seite 70: Attaching The Ferrite Core

    Connections Attaching the Ferrite Core When attaching to the cables Attach the ferrite core to the end of the cable When attaching to the AC power cord closer to this unit, closing it until it clicks. Attach the ferrite cores to both ends of the AC Within 10 mm ( inch) power cord and close the ferrite cores until they...
  • Seite 71 Connections Using the cable holders You can efficiently bundle the speaker cables with the cable holders B (×6) provided. Attach the cable holders as shown in the illustration below. Rear If you don’t use speakers, you can use cable holders A (×2) and B (×2) that are provided to bundle up the unused cables.
  • Seite 72: Using On-Screen Menus

    Using On-screen Menus Press M/m to move the cursor (yellow) and press Using On-screen Menus ENTER to select an item. The menu for the selected item appears on the display panel. Operating Through Menus Settings are similarly selected when the next menu is displayed.
  • Seite 73 Using On-screen Menus Cinema Drive (Cine motion) Adjust Picture menu When this is set to automatic, images are reproduced with the smooth movement characteristic of film This menu is used for adjusting the picture. images. The picture quality can be adjusted to suit your tastes For details, see “Cinema Drive (Cine motion)”...
  • Seite 74: Screen Control Menu

    Using On-screen Menus Case of MENU Function being set to “Return” Treble Press M/, to increase the treble and press m/< to decrease it. S c r e e n C o n t r o l W i d e S e t u p Bass W i d e...
  • Seite 75 Using On-screen Menus Adjust Pixel menu Screen Size menu This menu is used for adjusting the picture pixels. This menu is used for adjusting the picture size. Adjustment can only be made when the computer This screen is only displayed when the MENU Function is set to “On/Off”.
  • Seite 76: Custom Setup Menu

    Using On-screen Menus Custom Setup menu C u s t o m S e t u p S c r e e n S a v e r Reduces power consumption or sets a screen saver P i c . I n v e r s i o n O f f P i c .
  • Seite 77 Using On-screen Menus Initial Setup menu Sync Mode Sets the mode according to the signal input at pin 13 of the RGB/YUV terminals of INPUT1 and INPUT2. Selects the language or signal source of the menu Signals can be set only to 575/50i or 480/60i. display, functions of the menu key and so forth.
  • Seite 78: User Memory Menu

    Using On-screen Menus Timer/Clock menu User Memory menu Sets the time or timer and displays the time or sets This menu is used for saving or recalling the settings when the power is automatically switched on or off. in the Picture/Sound Control and Screen Control menus.
  • Seite 79: Input Select Menu

    Remote Mode Operation Time Selects the Remote Commander mode. Indicates the total number of hours of operation. TV: The Sony display’s or the TV’s commander Note PJ: The Sony projector’s commander The standby mode is not counted as part of the Off: Disables the remote control.
  • Seite 80: Watching The Picture

    Watching the Picture INPUT2 (RGB): Selects the audio and video Watching the Picture signal input from the INPUT2 connectors when the input signal is an RGB signal. INPUT2 (COMPONENT): Selects the audio and Before you start video signal input from the INPUT2 •...
  • Seite 81: Input Signal, Picture Mode And Display Status Information

    Watching the Picture Input Signal, Picture Mode and Display Status Information Input signal and Picture Mode information is appears on the display panel for about five seconds when the power is turned on or when switching the input signal. To disable this function, follow the steps below. In the Custom Setup menu, press M/m to move the cursor (yellow) to “Display”...
  • Seite 82 75.0Hz • If the image color is too light after inputting the 16 800×600@85Hz (VESA STD) 53.7kHz 85.1Hz DVD signal in the PFM-50C1/50C1E, adjust the Mac 16" 49.7kHz 74.6Hz color in the “Chroma” setting in the Adjust Picture 18 1024×768@60Hz (VESA STD) 48.4kHz...
  • Seite 83: Switching The Display Mode

    Watching the Picture Switching the Display Mode Energy Saving Function This lets you view the display while saving on energy. Displaying closed captions Press MENU. The main menu appears on the display panel. Press MENU. The main menu appears on the display panel. P i c t u r e / S o u n d C o n t r o l P i c t u r e...
  • Seite 84: Selecting Image Quality

    Selecting Image Quality / Adjusting the Picture Select the Picture Mode with M/m and press Selecting Image Quality ENTER. Standard: Based on moderate contrast and contour adjustment, image quality that appears Image quality can be selected according to the type of real can be obtained.
  • Seite 85: Dynamic Picture

    Adjusting the Picture Chroma Cinema Drive (Cine motion) Select “Chroma” with M/m and press ENTER. Automatically detects images captured on film (24- Adjust the chroma with M/m/</, in the range from frame) and reproduces those images with the MIN (–128) to MAX (+127). characteristic smooth movement of film images.
  • Seite 86 Adjusting the Picture (2) Adjust the gain (0 to 255) with M/m/</, Color Temp. and press ENTER. The menu returns to the Color Temp. menu. You can also set the color temperature. You can select Cool, Neutral or Warm, or adjust each gain more When you rename the adjusted color temperature, precisely.
  • Seite 87: Restoring The Adjust Picture Menu Items To Their Original Settings

    Adjusting the Picture Color Correct. Notes • Chroma and Phase controls do not function with an You can reproduce a beautiful, healthy color. RGB signal. • Phase control does not function with a component Select “Color Correct.” with M/m and press signal.
  • Seite 88: Picture Enlargement

    Picture Enlargement Setting Auto Wide Picture Enlargement An identification control signal is transmitted with the Enlarges the picture to cover the entire screen video signal in some ordinary television and Wide according to the type of picture, such as ordinary Clear Vision broadcasts, etc.
  • Seite 89: Setting The Wide Mode

    Picture Enlargement Press M/m to move the cursor (yellow) to “Wide Press ENTER. Setup” and press ENTER. The menu returns to the Wide Setup. The following menu appears on the display panel. Setting the Wide Mode S c r e e n C o n t r o l W i d e S e t u p...
  • Seite 90: Resizing And Positioning The Picture

    Resizing and Positioning the Picture Adjusting the Picture Position Resizing and Positioning In the Screen Control menu, press M/m to move the Picture the cursor (yellow) to “Screen Shift” and press ENTER. You can shift the position of the picture so that it fits The following menu appears on the display panel.
  • Seite 91: Adjusting The Pixels

    Resizing and Positioning the Picture Adjusting the Pixels Adjusting manually (1) Select “Dot Phase” or “Total H Pixel” with M/ m and press ENTER. If there is too much noise on the edges of the The following menu appears on the display characters or the vertical lines, you can adjust the dot panel.
  • Seite 92: Adjusting The Sound Quality

    Adjusting the Sound Quality Surround Adjusting the Sound Quality Select the Surround mode according to the type of picture. Sound treble level, bass level and balance can be Select “Surround” with M/m and press ENTER. adjusted. The surround mode can also be set. Select the Surround mode with M/m and press ENTER.
  • Seite 93: Using The Memory Function

    Using the Memory Function Press M/m to move the cursor (yellow) to “Save” Using the Memory and press ENTER. The following menu appears on the display panel. Function U s e r M e m o r y S a v e You can save the current picture setting for each input M E M M E M...
  • Seite 94: Calling Up A Stored Setting

    Using the Memory Function When you name the setting, follow the steps below. Press the ENTER button. The display returns to the User Memory screen Press M/m to move the cursor (yellow) to “Name used to store and recall adjustment values. Set”...
  • Seite 95: Selecting The On-Screen Language

    Selecting the On-screen Language / Screen Saver Function Press M/m to move the cursor (yellow) to the Selecting the On-screen desired language and press ENTER. The on-screen language is switched to the one you Language selected. : Japanese ENGLISH: English You can select the on-screen language from among DEUTSCH: German Japanese, English, German, French, Spanish or...
  • Seite 96 Screen Saver Function Press M/m to move the cursor (yellow) to “Screen (1) Press M/m to move the cursor (yellow) to Saver” and press ENTER. “Start Time” and press ENTER. The following menu appears on the display panel. The following menu appears and the background of the hour is displayed in relief.
  • Seite 97: Changing The Image Position Automatically

    Screen Saver Function / Adjusting Color Matrix Changing the Image Position Adjust the Orbit Range or Orbit Cycle with M/m Automatically and press ENTER. When both Pic Inversion and Pic. Orbit are In the Screen Saver menu, press M/m to move the set to ON cursor (yellow) to “Pic.
  • Seite 98: Controlling Power On/Off Automatically (Timer Function)

    Adjusting Color Matrix / Controlling Power On/Off Automatically (Timer Function) Press M/m to move the cursor (yellow) to “Color Controlling Power On/Off Matrix” and press ENTER. The following menu appears on the display panel. Automatically (Timer Function) C u s t o m S e t u p C o l o r M a t r i x...
  • Seite 99: Adjusting The Time

    If the time displayed is significantly slow, the internal The following menu appears on the display panel. battery may be losing its charge. Please contact the your authorized Sony dealer to have the battery T i m e r / C l o c k replaced.
  • Seite 100: On/Off Timer Function

    Controlling Power On/Off Automatically (Timer Function) On/Off Timer Function Select “Timer” with M/m and press ENTER. The following menu appears on the display panel. In the Timer/Clock menu, Press M/m to move the cursor (yellow) to “On/Off Timer” and press T i m e r / C l o c k ENTER.
  • Seite 101: Power Saving Function

    S l e e p O f f C l o c k S e t of flashes and contact your authorized Sony dealer. C l o c k D i s p l a y O f f O n / O f f...
  • Seite 102: Operating A Specific Display With The Remote Commander

    Operating a Specific Display With the Remote Commander When all of the setting changes have been Operating a Specific Display completed, press the ID MODE OFF button. The display returns to the normal mode. With the Remote Commander Using the supplied Remote Commander, you can operate a specific display without affecting other displays that are installed at the same time.
  • Seite 103: Using Other Remote Commander Models

    Using Other Remote Commander Models Using Other Remote Commander Models The following operations can be carried out using other Remote Commander models. • Power on/off • Input selection • Menu operations • Picture adjustments: Contrast, Phase and Chroma • On-screen display on/off The operations available and the buttons to be used for each operation are limited depending on each Remote Commander.
  • Seite 104: Specifications

    Specifications COMPOSITE OUT Specifications BNC-type (×1) Loop-through Safety regulations Video processing UL1950, CSA No. 950 (c-UL), FCC Class B, IC Class B, EN60 950 (NEMKO), CE, Preset signal See page 28 (GB). C-Tick Sampling rate 13.5 MHz to 140 MHz Panel system AC-type Plasma Display Panel Display resolution 1 365 dots (horizontal) ×...
  • Seite 105: Pin Assignment

    Specifications Pin assignment RGB/YUV connector (D-sub 15-pin) Pin No. Signal Red video or R-Y or P Green video or Y or Sync On Green Blue video or B-Y or P Ground Ground Red ground Green ground Blue ground Not used Ground Ground H sync or composite sync...
  • Seite 106 AVERTISSEMENT Pour prévenir tout risque d’incendie ou d’électrcution, garder cet appareil à l’abri de la pluie et de l’humidité. De dangereuses hautes tensions circulent à l’intérieur de cet appareil. N’ouvrez pas le châssis. Confiez-en l’entretien exclusivement à un personnel qualifié. Pour les utilisateurs au Canada Cet appareil est numérique de la classe B est conforme à...
  • Seite 107 Table des matières Précautions ..............5 (FR) Caractéristiques ............6 (FR) Emplacement et fonction des pièces et commandes ............7 (FR) Avant / Arrière / Côté droit ........7 (FR) Section du Commutateur / Indicateur 1 (veille) ..8 (FR) Section de la touche de contrôle (Haut) ....
  • Seite 108 Restauration des paramètres du menu Commande écran à leurs valeurs initiales ......38 (FR) Réglage de la qualité du son ........39 (FR) Réglage des aiguës, des graves et de la balance ..39 (FR) Restauration des paramètres du menu Réglage du son à...
  • Seite 109: Précautions

    • N’affichez pas une même image fixe à l’écran Pour toute question au sujet de cet appareil, consultez pendant une période prolongée. Sinon, une image un distributeur Sony agréé. rémanente ou une image fantôme peut apparaître sur une partie du panneau. Utilisez la fonction d’économiseur d’écran pour égaliser l’affichage sur...
  • Seite 110: Caractéristiques

    Caractéristiques • Un connecteur optionnel est prévu pour une extension future. Le PFM-50C1/50C1E est des écrans 16:9 à panneau • Fonction de mode lecteur cinéma plat de 50 pouces utilisant un écran PDP (écran • Prises de sortie de haut-parleurs gauche et droit d’affichage à...
  • Seite 111: Emplacement Et Fonction Des Pièces Et Commandes

    Emplacement et fonction des pièces et commandes 1 Section du commutateur / indicateur 1 (veille) Emplacement et fonction Pour obtenir des détails sur la section du commutateur / indicateur 1 (veille), reportez-vous à la section “Section des pièces et commandes du Commutateur / Indicateur 1 (veille)”, page 8 (FR).
  • Seite 112: Section Du Commutateur / Indicateur 1 (Veille)

    Emplacement et fonction des pièces et commandes Section du Commutateur / Section de la touche de contrôle Indicateur 1 (veille) (Haut) MENU ENTER VOLUME 1 Commutateur 1 (veille) 1 Touche MENU Appuyez sur ce commutateur pour mettre l’écran sous Appuyez pour faire apparaître le menu. Appuyez de tension.
  • Seite 113: Panneau Des Connecteurs

    Ce connecteur vous permet de commander l’écran à distance à l’aide du protocole RS-232C.Pour plus de détails, contactez votre revendeur Sony agréé. 5 Connecteur VIDEO Le PFM-50C1E n’est pas doté de connecteurs VIDEO. Pour le modèle PFM-50C1E, la vidéo composite et l’entrée Y/C peuvent être transmises sur...
  • Seite 114 Emplacement et fonction des pièces et commandes Si vous utilisez le PFM-50C1E avec le BKM-B10 (non fourni) et quez vous remarquez des bandes latérales sur l’écran, retirez la pièce indiquée dans l’illustration. Retirez cette pièce. (FR)
  • Seite 115: Télécommande Rm-971

    Emplacement et fonction des pièces et commandes Télécommande RM-971 5Touche INPUT1 Sélectionne l’entrée du signal depuis les connecteurs INPUT1. MUTING DISPLAY STBY 6 Touche INPUT2 Sélectionne l’entrée du signal depuis les connecteurs POWER INPUT2. INPUT 1 INPUT 2 VIDEO OPTION 7 Touche RGB/YUV Appuyez sur cette touche pour sélectionner le format correspondant à...
  • Seite 116: Installation Des Piles

    Emplacement et fonction des pièces et commandes qg Touche VIDEO Installation des piles Sélectionne l’entrée du signal à partir du connecteur Introduisez deux piles AA (R6) en respectant la COMPOSITE IN ou du connecteur Y/C IN parmi les polarité. connecteurs VIDEO. qh Touches numériques Appuyez sur ces touches pour entrer le numéro d’index.
  • Seite 117: Attention

    Attention Utilisation de l’écran à l’horizontale Attention Avant Laissez amplement d’espace autour de 25 (9 l’écran d’affichage • Lorsque vous utilisez l’écran, assurez-vous que l’espace présent autour de l’affichage est plus important que celui indiqué dans l’illustration ci- dessous. Ceci permettra d’assurer une ventilation correcte.
  • Seite 118: Raccordements

    Attention/Raccordements Remarques sur le phénomène d’image Raccordements rémanente Raccordement des haut-parleurs Si des images des types 1 à 5 (ci-dessous) restent affichées pendant une longue période, une image rémanente Vous pouvez bénéficier d’une ambiance plus réelle en peut apparaître dans certaines zones de l’écran à cause des raccordant les enceintes (SS-SP10A, non fournies).
  • Seite 119 Raccordements Magnétoscope Betacam SP Ordinateur vers la sortie vers la du signal sortie vers la vers la composante audio sortie sortie audio vidéo vers RGB/YUV vers RGB/YUV vers AUDIO vers Control S IN vers AUDIO vers Control S OUT vers Control S IN vers Control S OUT *vers Y/C IN ou COMPOSITE IN...
  • Seite 120: Fixation Du Noyau De Ferrite

    Raccordements Fixation du noyau de ferrite Fixation des câbles Fixez le noyau de ferrite à l’extrémité du câble la Fixation du cordon d'alimentation secteur plus proche du présent appareil. Fermez le noyau en appuyant jusqu’au déclic indiquant sa Fixez les noyaux de ferrite aux deux extrémités du fermeture.
  • Seite 121 Raccordements Utilisation des attaches de câbles Les porte-câbles B (×6) fournis sont très efficaces pour attacher les câbles des haut-parleurs. Fixez les porte-câbles comme indiqué dans l’illustration ci- dessous. Arrière Si vous n’utilisez pas de haut-parleurs, vous pouvez enrouler les câbles non utilisés sur les porte-câbles A (×2) et B (×2) fournis.
  • Seite 122: Utilisation Des Menus D'affichage

    Utilisation des menus d’affichage Appuyez sur M/m pour déplacer le curseur (jaune) Utilisation des menus et appuyez sur ENTER pour sélectionner une option. d’affichage Le menu de l’option sélectionnée apparaît à l’écran. Sélectionnez les réglages de la même manière Exploitation des menus lorsque le menu suivant est sélectionné.
  • Seite 123 Utilisation des menus d’affichage Réd. du bruit Menu Réglage de l’image Permet de régler le niveau de réduction de la Ce menu sert au réglage de l’image. granularité et des interférences de couleur de l’image. La qualité de l’image peut être réglée en fonction de Quatre niveaux de réduction sont possibles : “Arrêt”, vos préférences à...
  • Seite 124: Menu Commande Écran

    Utilisation des menus d’affichage Lorsque la touche Menu est réglée sur “Mar/ Remarque Arr.” (réglage par défaut) La qualité sonore ne peut pas être réglée lorsque le Mode image est réglé sur “Standard” ou “Eclatant”. C o mm a n d e é...
  • Seite 125 Utilisation des menus d’affichage Taille de l’écran Centrage vert. Agrandit l’image au double (×2), au triple (×3) ou au Réglage vertical du centrage de l’image. Appuyez sur M pour déplacer l’image vers le haut ou sur m pour la quadruple (×4), dans cet ordre. déplacer vers le bas.
  • Seite 126 Utilisation des menus d’affichage Menu Personnalisation Menu Economiseur d’écran Permet, entre autres, de régler le niveau d’économie Permet de corriger ou réduire les dommages dus à une d’énergie ou de régler un économiseur d’écran. image rémanente ou imprimée résultant de l'affichage prolongé...
  • Seite 127 Utilisation des menus d’affichage • Avec Sync On Green, si l’appareil n’est pas réglé Remarque pour accepter les signaux de synchronisation, La configuration de la carte en option ne peut pas être l’image ne s’affiche pas. effectuée dans ce mode. •...
  • Seite 128 Utilisation des menus d’affichage Menu Mémoire utilisateur Fonction MENU La touche MENU permet d’effectuer les opérations suivantes : Ce menu permet de sauvegarder et de rappeler les Mar/arr.: le menu s’affiche ou s’éteint chaque fois réglages des menus Commande image/son et que la touche MENU est enfoncée.
  • Seite 129 Mode télécomm. Temps de fonct. Permet de sélectionner le mode de télécommande. Indique le nombre total d’heures d’utilisation. TV: Télécommande de l’écran ou du téléviseur Sony Remarque PJ: Télécommande du projecteur Sony Le mode de veille n’est pas comptabilisé dans les Arrêt: Désactive la télécommande.
  • Seite 130: Visualisation De L'image

    Visualisation de l’image ENTRÉE2 (RVB): Sélectionne le signal d’entrée Visualisation de l’image audio et vidéo des connecteurs INPUT2 lorsque le signal d’entrée est un signal RVB. Avant de commencer ENTRÉE2 (COMP): Sélectionne le signal • Mettez l’écran sous tension. d’entrée audio et vidéo des connecteurs •...
  • Seite 131: Données Du Signal D'entrée, Du Mode Picture Et Du Statut D'affichage

    Visualisation de l’image Données du signal d’entrée, du mode Picture et du statut d’affichage Les données du signal d’entrée et du statut d’affichage sont visible pendant cinq secondes sur le panneau d’affichage lorsque l’appareil est mis sous tension ou lorsque le signal d’entrée est commuté. Pour désactiver cette fonction, reportez-vous aux instructions.
  • Seite 132 74,6Hz • Si la couleur de l’image est trop claire après avoir 18 1024×768@60Hz (VESA STD) 48,4kHz 60,0Hz entré le signal DVD dans le PFM-50C1/50C1E, 19 1024×768@70Hz (VESA STD) 56,5kHz 70,1Hz réglez la couleur dans le réglage “Chroma” du menu 20 1024×768@75Hz (VESA STD)
  • Seite 133: Commutation Du Mode D'affichage

    Visualisation de l’image Commutation du mode d’affichage Appuyez sur MENU. Le menu Personnalisation réapparaît. Affichage de sous-titres Fonction d’économie d’énergie Appuyez sur MENU. Le menu principal apparaît à l’écran. Ceci vous permet de regarder l’écran tout en économisant l’électricité. C o mm a n d e i m a g e / s o n Appuyez sur MENU.
  • Seite 134: Sélection Du Mode De Qualité De L'image

    Visualisation de l’image / Sélection du mode de qualité de l’image Appuyez sur M/m pour sélectionner le mode Appuyez sur M/m pour déplacer le curseur (jaune) Econ. d’énergie. sur “Commande image/son”, puis appuyez sur Standard: Pas d’économie d’énergie ENTER. Réduire: Economie d’énergie Le menu Commande image/son s’affiche à...
  • Seite 135: Réglage De L'image

    Réglage de l’image Chroma Réglage de l’image Sélectionnez “Chroma” à l’aide des touches M/m et appuyez sur ENTER. Pendant que vous visionnez l’image, vous pouvez Ajustez l’intensité des couleurs à l’aide des touches régler à votre gré le contraste, la luminosité, l’intensité M/m/</, dans la plage allant de MIN (–128) à...
  • Seite 136: Image Dynamique

    Réglage de l’image Sélectionnez le mode de Réd. du bruit souhaité Image dynamique avec la touche M/m, puis appuyez sur ENTER. Arrêt: Le signal vidéo est affiché directement, Permet d’améliorer le contraste en rendant les blancs sans modification. plus vifs et les noirs plus foncés. Faible: faible réduction des bruits parasites.
  • Seite 137 Réglage de l’image Lorsque vous sélectionnez une valeur Lorsque la [Fonction MENU] (page 24 (FR)) est réglée sur [Retour] dans le menu Réglage initial, comprise entre “Util.1” et “Util.3” les touches M/m sur la télécommande déplacent le Lorsque vous sélectionnez une valeur comprise curseur vers la droite et la gauche.
  • Seite 138: Restauration Des Réglages Par Défaut Des Options Du Menu Réglage De L'image

    Réglage de l’image / Agrandissement de l’image Sélectionnez le mode de correction gamma Agrandissement de l’image souhaité avec la touche M/m, puis appuyez sur ENTER. Élevé: pour un niveau élevé de correction gamma. Permet l’agrandissement automatique de l’image Moyen: pour un niveau moyen de correction pour qu’elle couvre la totalité...
  • Seite 139: Réglage Du Grand Format Automatique

    Agrandissement de l’image Appuyez sur M/m pour déplacer le curseur (jaune) sur “Commande écran”, puis appuyez sur ENTER. Le menu Commande écran s’affiche à l’écran. • Les images sont affichées au Le signal vidéo est affiché sans format d’écran d’origine de 4:3 agrandissement.
  • Seite 140: Réglage Du Mode Gr. Format

    Agrandissement de l’image Sélectionnez “Mode 4:3” avec la touche M/m, Sélectionnez le mode zoom avec la touche M/m. puis appuyez sur ENTER. Agr. 4/3: Agrandit les images en plein écran de la Le menu suivant s’affiche à l’écran. taille 4:3 à 16:9. B.lettre: Elargit l’image vers la droite et la gauche, jusqu’aux bords de l’écran.
  • Seite 141: Redimensionnement Et Positionnement De L'image

    Redimensionnement et positionnement de l’image Réglage de la position de l’image Redimensionnement et Dans le menu Commande écran, appuyez sur les positionnement de touches M/m pour déplacer le curseur (jaune) sur l’image “Centrage de l’écran” et appuyez sur ENTER. Le menu suivant apparaît à l’écran. Vous pouvez décaler la position de l’image de manière à...
  • Seite 142: Réglage Des Pixels

    Redimensionnement et positionnement de l’image Réglage des pixels Ajustement manuel (1) Sélectionnez Phase de points ou Total pixels h à l’aide des touches M/m et appuyez sur S’il y a trop de parasites sur les contours des ENTER. caractères ou des lignes verticales, vous pouvez Le menu suivant apparaît à...
  • Seite 143: Réglage De La Qualité Du Son

    Redimensionnement et positionnement de l’image / Réglage de la qualité du son Appuyez sur les touches M/m pour déplacer le Equilibrage curseur (jaune) sur “Valider” puis appuyez sur ENTER. Sélectionnez “Equilibrage” avec la touche Les paramètres du menu Commande écran sont puis appuyez sur ENTER.
  • Seite 144: Utilisation Des Fonctions De La Mémoire

    Réglage de la qualité du son / Utilisation des fonctions de la mémoire Pour annuler la fonction de réinitialisation Appuyez sur les touches M/m pour déplacer le curseur (jaune) sur “Sauvegarder” puis appuyez Appuyez sur MENU puis ENTER. sur ENTER. Tour à...
  • Seite 145: Appel D'un Paramètre Sélectionné

    Utilisation des fonctions de la mémoire / Sélection de la langue d’affichage à l’écran Appuyez sur les touches M/m pour déplacer le Déplacez le curseur vers le numéro de mémoire curseur (jaune) vers “Réglage du nom” et appuyez (01 à 20) du réglage que vous souhaitez rappeler à l’aide des touches M/m.
  • Seite 146: Fonction D'économiseur D'écran

    Sélection de la langue d’affichage à l’écran / Fonction d’économiseur d’écran Inverse les tons de couleur de l'image Déplacez le curseur (jaune) à l’aide des touches M/m vers “Langue” puis appuyez sur ENTER. Le menu suivant apparaît à l’écran. Appuyez sur MENU. Le menu principal apparaît à...
  • Seite 147: Changement Automatique De La Position De L'image

    Fonction d’économiseur d’écran Sélectionnez le mode Invers. image à l’aide des (4) De la même façon, définissez l’heure à touches M/m. laquelle le mode Invers. image doit être Arrêt: pour désactiver le mode Invers. image annulé. L’image affichée sera inversée à l’Heure de Auto: pour effectuer le mode Invers.
  • Seite 148: Réglage De La Matrice De Couleurs

    Fonction d’économiseur d’écran / Réglage de la matrice de couleurs Appuyez sur ENTER. Appuyez sur MENU. Le menu Mouvement d’image réapparaît. Le menu principal apparaît à l’écran. Sélectionnez Plage mouvem. (distance de C o mm a n d e i m a g e / s o n déplacement) ou Cycle mouvem.
  • Seite 149: Contrôle Automatique De La Fonction De Mise Sous/Hors Tension

    Réglage de la matrice de couleurs / Contrôle automatique de la fonction de mise sous/hors tension Appuyez sur M/m pour déplacer le curseur (jaune) Sélectionnez la matrice des couleurs à l’aide de M/ sur “Sommeil”, puis appuyez sur ENTER. Le menu suivant s’affiche à l’écran. Y/CB/CR: lorsque le format du signal est 480p.
  • Seite 150: Affichage De L'heure

    M i n u t e r i e M / A N o n A r r ê t votre revendeur agréé Sony pour faire remplacer la A r r ê t a u t o N o n M a r c h e pile.
  • Seite 151: Fonction D'économie D'énergie (Mode Eco)

    Contrôle automatique de la fonction de mise sous/hors tension Appuyez sur M/m pour régler les minutes, puis Sélectionnez Mode minuterie à l’aide des touches M/m et appuyez sur ENTER. appuyez sur ENTER. Appuyez sur < pour revenir à l’écran affiché à Le menu suivant apparaît dans la fenêtre d’affichage.
  • Seite 152: Fonction D'auto-Diagnostic

    écrans également installés. Si l’indicateur STANDBY clignote, vérifiez le nombre de clignotements et contactez votre distributeur Sony agréé. Appuyez sur ID MODE ON de la télécommande. Les numéros d’index de l’écran apparaissent en Vérifiez la séquence de clignotement de caractères blancs sur tous les écrans.
  • Seite 153 Utilisation d’un écran spécifique avec la télécommande Pour modifier le numéro d’index Appuyez sur ID MODE SET. Les caractères de l’affichage sélectionné Vous pouvez modifier le numéro d’index si deviennent bleu cyan tandis que les autres nécessaire. deviennent vert. L’alimentation ON/STANDBY Lorsque vous modifiez le numéro, utilisez les touches s’applique également aux autres affichages.
  • Seite 154: Utilisation D'autres Modèles De Télécommande

    Utilisation d’autres modèles de télécommande Utilisation d’autres modèles de télécommande Les opérations suivantes peuvent être effectuées à l’aide de la télécommande. • Mise sous/hors tension • Sélection de l’entrée • Exploitation des menus • Réglages d’image: contraste, phase et intensité des couleurs •...
  • Seite 155: Spécifications

    Spécifications AUDIO IN Miniprise stéréo Spécifications 500 m Vrms,haute impédance COMPOSITE OUT Traitement du signal vidéo Type BNC (×1) boucle directe Réglementations de sécurité UL1950, CSA No. 950 (c-UL), Signal présélectionné FCC Class B, IC Class B, voir page 28 (FR) EN60 950 (NEMKO), CE, Phase de décalage C-Tick...
  • Seite 156 Spécifications Attribution des broches Connecteur RGB/YUV (D-sub à 15 broches) N° de broche Signal Vidéo rouge ou R-Y ou P Vidéo vert ou Y ou Sync On Green Vidéo bleu ou B-Y ou P Masse Masse Masse du rouge Masse du vert Masse du bleu Non utilisé...
  • Seite 157 (FR)
  • Seite 158 ACHTUNG Um Feuergefahr und die Gefahr eines elektrischen Schlags zu vermeiden, setzen Sie das Gerät weder Regen noch sonstiger Feuchtigkeit aus. Im Inneren des Geräts liegen gefährlich hohe Spannungen an. Öffnen Sie daher das Gehäuse nicht. Überlassen Sie Wartungsarbeiten stets nur qualifiziertem Fachpersonal.
  • Seite 159 Inhalt Sicherheitsmaßnahmen ..........5 (DE) Merkmale und Funktionen ........6 (DE) Lage und Funktion der Teile und Bedienelemente ..........7 (DE) Vorderseite / Rückseite / Rechte Seite ......7 (DE) Bereich für Netzschalter 1 (Bereitschaft) / Netzanzeige............8 (DE) Steuertastenbereich (Oberseite) ........8 (DE) Anschlußfeld .............
  • Seite 160 Zurücksetzen der Optionen im Menü Bildschirm einstellen auf die ursprünglichen Werte ....38 (DE) Einstellen der Tonqualität ........39 (DE) Einstellen der Höhen, Bässe, Balance usw.....39 (DE) Zurücksetzen der Optionen im Menü Ton einstellen auf die ursprünglichen Werte......39 (DE) Die Speicherfunktion ..........
  • Seite 161: Sicherheitsmaßnahmen

    Fehlfunktion hin. Wenn Sie Fragen zu dem Gerät haben, wenden Sie • Lassen Sie nicht für lange Zeit dasselbe Standbild sich bitte an einen autorisierten Sony-Händler. ununterbrochen anzeigen. Andernfalls können auf einem Teil des Bildschirms ein Nachbild oder Doppelbilder zu sehen sein.
  • Seite 162: Merkmale Und Funktionen

    • Selbstdiagnosefunktion ausgestattet, die in Kombination mit gesondert • Fernsteuerungsanschluß RS-232C (D-Sub, 9polig) erhältlichen Lautsprechern eine hohe Tonqualität • Kann mit Infrarot-Fernbedienungen von Sony ermöglichen und Ihre Präsentationen noch eingesetzt werden, sofern diese mit dem SIRCS- wirkungsvoller machen. Code arbeiten.
  • Seite 163: Lage Und Funktion Der Teile Und Bedienelemente

    Lage und Funktion der Teile und Bedienelemente 1 Bereich für Netzschalter 1 (Bereitschaft) / Lage und Funktion der Netzanzeige Näheres zum Bereich für Netzschalter 1 (Bereitschaft) / Teile und Netzanzeige finden Sie unter “Bereich für Netzschalter 1 (Bereitschaft) / Netzanzeige” auf Seite 8 (DE). Bedienelemente 2 Steuertastenbereich Näheres zum Steuertastenbereich finden Sie unter...
  • Seite 164: Bereich Für Netzschalter 1 (Bereitschaft) / Netzanzeige

    Lage und Funktion der Teile und Bedienelemente Bereich für Netzschalter 1 Steuertastenbereich (Oberseite) (Bereitschaft) / Netzanzeige MENU ENTER VOLUME 1 Taste MENU Wenn das Menü auf dem Monitorbildschirm 1 Netzschalter 1 (Bereitschaft) angezeigt wird, wechseln Sie mit dieser Taste zur Zum Einschalten des Monitors.
  • Seite 165: Anschlußfeld

    Anschluss CONTROL S OUT am anderen Gerät. 4 RS-232C-Anschluß REMOTE (D-Sub, 9polig) Mit diesem Anschluß können Sie den Monitor über das RS-232C-Protokoll fernsteuern. Näheres dazu erfahren Sie bei Ihrem autorisierten Sony-Händler. 5 VIDEO-Anschlüsse Der PFM-50C1E ist nicht mit VIDEO-Anschlüssen ausgestattet. Beim PFM-50C1E können FBAS-Video-...
  • Seite 166 Lage und Funktion der Teile und Bedienelemente Wenn Sie den PFM-50C1E mit der BKM-B10 (nicht mitgeliefert) verwenden und seitliche Streifen auf dem Bildschirm auftreten, entfernen Sie das in der Abbildung gezeigte Teil. Dieses Teil entfernen. (DE)
  • Seite 167: Fernbedienung Rm-971

    Lage und Funktion der Teile und Bedienelemente Fernbedienung RM-971 6 Taste INPUT2 Zum Auswählen des Signals, das über die INPUT2- Anschlüsse eingespeist wird. 7 Taste RGB/YUV MUTING DISPLAY STBY Zum Auswählen des Formats, das dem POWER Eingangssignal an Anschluß INPUT1 oder INPUT2 INPUT 1 INPUT 2 VIDEO OPTION...
  • Seite 168: Einlegen Der Batterien

    Lage und Funktion der Teile und Bedienelemente qh Zahlentasten Einlegen der Batterien Dienen zum Eingeben der Indexnummer. Legen Sie zwei R6-Batterien der Größe AA polaritätsrichtig ein. qj Taste ASPECT Zum Auswählen des Bildformats (Breitbildmodus). Setzen Sie qk Taste MENU unbedingt Wenn das Menü...
  • Seite 169: Vorsicht

    Vorsicht Wenn Sie den Monitor horizontal verwenden Vorsicht Vorderseite Lassen Sie um den Bildschirm herum viel Platz. • Achten Sie beim Aufstellen bzw. Aufhängen des Monitors darauf, dass der Platz um den Bildschirm herum größer ist als in der Abbildung unten dargestellt.
  • Seite 170: Anschließen Des Monitors

    Vorsicht/Anschließen des Monitors Hinweise zu Nachbildern Anschließen des Monitors Wenn die Bilder 1 – 5 unten längere Zeit Anschließen der Lautsprecher unverändert auf dem Bildschirm angezeigt werden, kann es aufgrund der charakteristischen Merkmale Die Wirkung der Wiedergabe wird verstärkt, wenn Sie von Plasmabildschirmen in einigen Lautsprecher anschließen (SS-SP10A, nicht Bildschirmbereichen zu dauerhaften Nachbildern...
  • Seite 171 Anschließen des Monitors Betacam-SP- Videorecorder Computer Farbdifferenz- Audio- signalausgang ausgang Audio- Video- ausgang ausgang an RGB/YUV an RGB/YUV an AUDIO an Control S IN an AUDIO an Control S OUT an Control S IN an Control S OUT *an Y/C IN oder COMPOSITE IN *an AUDIO IN an Video-...
  • Seite 172: Anbringen Des Ferritkerns

    Anschließen des Monitors Anbringen des Ferritkerns Anbringen am Kabel Bringen Sie den Ferritkern an dem Kabelende an, Anbringen am Netzkabel das sich näher an diesem Gerät befindet, und schließen Sie ihn so, dass er mit einem Klicken Bringen Sie die Ferritkerne an den beiden Enden einrastet.
  • Seite 173: Anbringen Der Kabelhalter

    Anschließen des Monitors Anbringen der Kabelhalter Die Lautsprecherkabel lassen sich mit den mitgelieferten Kabelhaltern B (×6) hervorragend bündeln. Bringen Sie die Kabelhalter wie in der Abbildung unten dargestellt an. Rückseite Wenn Sie die Lautsprecher nicht verwenden, können Sie die nicht benutzten Kabel mithilfe der Kabelhalter A (×2) und B (×2) bündeln.
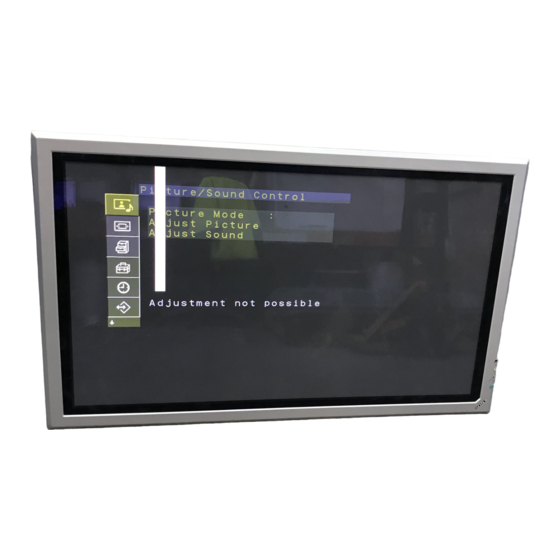
  • Seite 174: Die Bildschirmmenüs

    Die Bildschirmmenüs Mit den Tasten M/m können Sie den Cursor (gelb) Die Bildschirmmenüs bewegen und mit der Taste ENTER eine Option auswählen. Das Menü zu der ausgewählten Option erscheint auf dem Bildschirm. Arbeiten mit den Menüs Wenn das nächste Menü angezeigt wird, sind ähnliche Einstellungen ausgewählt.
  • Seite 175: Menü Ton Einstellen

    Die Bildschirmmenüs Dynamisch. Bild Hinweis Verbessert den Kontrast, indem Weiß beller und Die Bildqualität kann im Standardbildmodus und im Schwarz dunkler erscheint. dynamischen Bildmodus nicht eingestellt werden. Einzelheiten dazu finden Sie unter “Dynamisch. Bild” auf Seite 32 (DE). B i l d - / T o n s t e u e r u n g Farbtemperatur B i l d e i n s t e l l e n ( B e n u t z .
  • Seite 176: Menü Bildschirm Einstellen

    Die Bildschirmmenüs Wenn die Menütaste auf “Return” steht Bässe Mit M/, verstärken Sie die Bässe, mit m/< verringern Sie sie. B i l d s c h i r m e i n s t e l l e n Balance B r e i t b i l d e i n s t e l l e n...
  • Seite 177: Menü Bildschirmgröße

    Die Bildschirmmenüs Menü Bildschirmgröße Menü Pixel einstellen Mit diesem Menü können Sie die Bildgröße einstellen. Mit diesem Menü können Sie die Bildpunkte einstellen. Dieses Menü wird nur angezeigt, wenn die Menütaste auf “Ein/Aus” gestellt wird. Die Einstellung kann nur vorgenommen werden, wenn Computersignale eingespeist werden.
  • Seite 178: Menü Bildschirmschoner

    Die Bildschirmmenüs Menü Benutzerdef. Einstell. Menü Bildschirmschoner In diesem Menü können Sie die Leistungsaufnahme Zum Korrigieren oder Verringern von Schäden durch verringern oder die Bildschirmschonerfunktion Nachbilder oder eingebrannte Bilder, die darauf aktivieren usw. zurückzuführen sind, dass lange Zeit dasselbe Bild auf dem Bildschirm angezeigt wird.
  • Seite 179: Menü Anfangseinstellungen

    Die Bildschirmmenüs RGB-Modus • EINGANG1 und EINGANG2 können beim Zum Einstellen des Modus, wenn an die RGB/YUV- Einstellen des Synchronisationsmodus unabhängig Anschlüsse von EINGANG1 und EINGANG2 ein voneinander eingestellt werden. Wenn aber das Gerät auf ein anderes Eingangssignal umgeschaltet Gerät angeschlossen ist, das RGB-Signale ausgibt. DTV: Wenn ein digitaler Tuner mit RGB-Signalen wird als das, das in den Einstellungen angegeben ist, usw.
  • Seite 180: Menü Benutzerspeicher

    Die Bildschirmmenüs Farbsystem Uhr einstellen Dient zum Auswählen des Eingangssignals. Zum Einstellen der Uhrzeit. Autom.: Zum Anzeigen von NTSC-, PAL-, Einzelheiten dazu finden Sie unter “Einstellen der Uhrzeit” auf Seite 46 (DE). SECAM-, NTSC4.43- oder NTSC-/PAL-M-/ PAL-N-Signalen Uhrzeitanzeige NTSC: Zum Anzeigen von NTSC-Signalen Wenn diese Option aktiviert ist, wird die eingestellte NTSC4.43: Zum Anzeigen von NTSC4.43-Signalen Uhrzeit auf dem Bildschirm angezeigt.
  • Seite 181: Menü Fernbedienung

    Hier wird der Modellname angegeben. Fernbedienung” auf Seite 49 (DE). Seriennummer Fernbed.-Modus Hier wird die Seriennummer angegeben. Zum Auswählen des Fernbedienungsmodus. TV: Fernbedienung von Sony-Monitor oder Betriebsdauer -Fernsehgerät Gibt die Gesamtzahl der Betriebsstunden an. PJ: Fernbedienung des Sony-Projektors Aus: Deaktiviert die Fernbedienung.
  • Seite 182: Die Anzeigefunktionen

    • Wenn “NG” erscheint und rot blinkt, wenden Sie sich an den Händler, bei dem Sie das Gerät erworben Stellen Sie den Cursor (gelb) mit M/m auf haben, oder an das nächste Sony- “Eingangswahl”, und drücken Sie ENTER. Kundendienstzentrum. Das Menü Eingangswahl erscheinen auf dem...
  • Seite 183: Anzeige Von Eingangssignal, Bildmodus Und Monitorstatus

    Die Anzeigefunktionen Stellen Sie den Cursor (gelb) mit M/m auf die Hinweise Eingangsquelle, die angezeigt werden soll, und • Es empfiehlt sich, als Eingangssignalquelle ein drücken Sie ENTER. Videogerät mit TBC-Funktion (Time Base EINGANG1 (RGB): Das über die INPUT1- Corrector) zu verwenden. Wenn am Monitor ein Anschlüsse eingespeiste Audio- und Signal ohne TBC eingespeist wird, wird aufgrund Videosignal wird ausgewählt, sofern es sich...
  • Seite 184: Anzeigen Zum Monitorstatus Auf Dem Bildschirm

    Die Anzeigefunktionen a) VGA ist ein eingetragenes Warenzeichen der Voreingestellte Eingangssignale International Business Machines Corporation, USA. Farbsystem oder Horizontal-/ Signalname b) VESA ist ein eingetragenes Warenzeichen der Video Vertikalfrequenz Electronics Standards Association. Computersignale c) Mac (Macintosh) ist ein eingetragenes Warenzeichen der -1 (VGA 350) 31,5kHz 70,1Hz...
  • Seite 185: Wechseln Des Anzeigemodus

    Die Anzeigefunktionen Wechseln des Anzeigemodus Wählen Sie mit M/m den Untertiteltyp aus. Aus: Untertitel werden nicht angezeigt. Speich1: Untertitel 1 wird über das Bild Anzeigen von Untertiteln eingeblendet. Speich2: Untertitel 2 wird über das Bild Drücken Sie MENU. eingeblendet. Das Hauptmenü erscheint auf dem Bildschirm. Text1: Untertitel 1 wird vor einem schwarzen Hintergrund angezeigt.
  • Seite 186: Auswählen Der Bildqualität

    Die Anzeigefunktionen / Auswählen der Bildqualität Stellen Sie den Cursor (gelb) mit M/m auf Stellen Sie den Cursor (gelb) mit M/m auf “Bild-/ “Energie sparen”, und drücken Sie ENTER. Tonsteuerung” und drücken Sie ENTER. Das folgende Menü erscheint auf dem Bildschirm. Das Menü...
  • Seite 187: Einstellen Der Bildqualität

    Einstellen der Bildqualität Phase Einstellen der Bildqualität Wählen Sie mit M/m die Option “Phase” aus, und drücken Sie ENTER. Sie können das Bild anzeigen lassen und dabei Stellen Sie mit M/m/</, für die Phase einen Wert Kontrast, Helligkeit, Chroma (Farbintensität), Phase zwischen MIN (–128) und MAX (+127) ein.
  • Seite 188: Farbtemperatur

    Einstellen der Bildqualität Kino Farbtemperatur Auf Film (24 Vollbilder) aufgenommene Bilder Sie können auch die Farbtemperatur einstellen. Sie werden automatisch erkannt und mit den können Warm oder Kalt auswählen oder die einzelnen charakteristischen fließenden Bewegungen von Gain-Werte separat einstellen. Bis zu sechs Filmbildern reproduziert.
  • Seite 189: Gamma-Korrektur

    Einstellen der Bildqualität (2) Stellen Sie den Gain-Wert (0 bis 255) mit M/ Farbkorrektur m/</, ein und drücken Sie ENTER. Nun erscheint wieder das Menü Zum Reproduzieren natürlicher, kräftiger Farben. “Farbtemperatur”. Wählen Sie mit M/m die Option “Farbkorrektur” Wenn Sie einen neuen Namen für die eingestellte aus und drücken Sie ENTER.
  • Seite 190: Zurücksetzen Der Optionen Im Menü Bild Einstellen Auf Ihre Ursprünglichen Werte

    Einstellen der Bildqualität / Bildvergrößerung Hinweise Bildvergrößerung • Für ein RGB-Signal können Sie Chroma und Phase nicht einstellen. Das Bild wird so vergrößert, dass es je nach • Für ein Farbdifferenzsignal können Sie Phase nicht Bildformat, wie z. B. normale Fernsehsendungen oder einstellen.
  • Seite 191: Einstellen Der Automatischen Breitbildfunktion

    Bildvergrößerung Einstellen der automatischen Stellen Sie den Cursor (gelb) mit M/m auf Breitbildfunktion “Bildschirm einstellen” und drücken Sie ENTER. Das Menü “Bildschirm einstellen” erscheint auf dem Bildschirm. Bei einigen normalen Fernsehsendungen und bei Wide Clear Vision-Sendungen usw. wird zusammen mit dem Videosignal ein Identifikationssteuersignal B i l d s c h i r m e i n s t e l l e n übertragen.
  • Seite 192: Einstellen Des Zoom-Modus

    Bildvergrößerung Wählen Sie mit M/m die Option “4:3-Modus” aus Wählen Sie mit M/m den Zoom-Modus aus. und drücken Sie ENTER. 4/3 erw.: Vergrößert Bilder im Format 4:3 in Das folgende Menü erscheint auf dem Bildschirm. voller Bildschirmgröße auf das Format 16:9. Letterbx: Das Bild wird ganz bis zum linken und rechten Rand des Bildschirms vergrößert.
  • Seite 193: Einstellen Von Bildgröße Und Bildposition

    Einstellen von Bildgröße und Bildposition Einstellen der Bildposition Einstellen von Bildgröße Stellen Sie im Menü Bildschirm einstellen den und Bildposition Cursor (gelb) mit den Tasten M/m auf “Bildschirmposition”, und drücken Sie ENTER. Das folgende Menü erscheint auf dem Bildschirm. Sie können das Bild verschieben, so daß es auf den Bildschirm paßt, bzw.
  • Seite 194: Einstellen Der Pixel

    Einstellen von Bildgröße und Bildposition Einstellen der Pixel Manuelles Einstellen (1) Wählen Sie mit M/m die Option Punktphase oder Pixel H gesamt, und drücken Sie Wenn am Rand von Zeichen und vertikalen Linien zu ENTER. starke Bildstörungen zu sehen sind, können Sie die Das folgende Menü...
  • Seite 195: Einstellen Der Tonqualität

    Einstellen von Bildgröße und Bildposition / Einstellen der Tonqualität So brechen Sie das Zurücksetzen ab Raumklang Drücken Sie MENU, bevor Sie ENTER drücken. Sie können mit M/m auch “Abbruch” auswählen und Wählen Sie je nach Bildtyp den Raumklangmodus dann ENTER drücken. aus.
  • Seite 196: Die Speicherfunktion

    Die Speicherfunktion Stellen Sie den Cursor (gelb) mit den Tasten M/m Die Speicherfunktion auf “Speichern”, und drücken Sie ENTER. Das folgende Menü erscheint auf dem Bildschirm. Mit der Funktion SPEICHERN können Sie die aktuelle Bildeinstellung für die einzelnen B e n u t z e r s p e i c h e r Eingangssignale speichern.
  • Seite 197: Aufrufen Der Gespeicherten Einstellungen

    Die Speicherfunktion Drücken Sie den Cursor (gelb) mit M/m auf Stellen Sie den Cursor mit den Tasten M/m auf die “Name einstellen”, und drücken Sie erneut Speichernummer (01 - 20) der Einstellung, die Sie ENTER. abrufen wollen. Das folgende Menü erscheint auf dem Bildschirm. Der gespeicherte Einstellwert wird abgerufen.
  • Seite 198: Auswählen Der Menüsprache

    Auswählen der Menüsprache / Bildschirmschoner-funktion Stellen Sie den Cursor (gelb) mit M/m auf die Auswählen der gewünschte Sprache, und drücken Sie ENTER. Nun erscheinen die Bildschirmmenüs in der Menüsprache ausgewählten Sprache. : Japanisch ENGLISH: Englisch Sie können als Sprache für die Bildschirmanzeigen DEUTSCH: Deutsch Japanisch, Englisch, Deutsch, Französisch, Spanisch FRANÇAIS: Französisch...
  • Seite 199 Bildschirmschoner-funktion Stellen Sie den Cursor (gelb) mit den Tasten M/m Wenn Sie “Autom.” wählen und ENTER drücken, auf “Benutzerdef. Einstell.”, und drücken Sie erscheint das folgende Menü. ENTER. Das Menü Benutzerdef. Einstell. erscheint auf B e n u t z e r d e f . E i n s t e l l .
  • Seite 200: Automatisches Verschieben Der Bildposition

    Bildschirmschoner-funktion / Einstellen der Farbmatrix Wählen Sie mit M/m die Option Versch.-Bereich Hinweis (Verschiebungsdistanz) oder Versch.-Zyklus Wenn Sie für Startzeit und Endezeit dieselbe Uhrzeit (Verschiebungsdauer) aus, und drücken Sie angeben, hat die Einstellung von Startzeit Priorität vor ENTER. der der Endezeit. Zur Endezeit wird das Bild daher Die folgenden Werte stehen zur Verfügung: nicht wieder wie ursprünglich angezeigt.
  • Seite 201: Automatisches Steuern Des Ein-/Ausschaltens (Ein-/Ausschaltautomatik)

    Einstellen der Farbmatrix / Automatisches Steuern des Ein-/Ausschaltens (Ein-/Ausschaltautomatik) Stellen Sie den Cursor (gelb) mit M/m auf Automatisches Steuern “Benutzerdef. Einstell” und drücken Sie ENTER. Das Menü “Benutzerdef. Einstell” erscheint auf des Ein-/Ausschaltens dem Bildschirm. (Ein-/Ausschaltautomatik) B e n u t z e r d e f . E i n s t e l l .
  • Seite 202: Einstellen Der Uhrzeit

    ü c k s c h a l t e n möglicherweise der eingebaute Akku entladen. Wenden Sie sich bitte an einen autorisierten Sony- Wählen Sie mit M/m die Zeitspanne bis zum Händler, um den Akku austauschen zu lassen.
  • Seite 203: Timer-Funktion Zum Ein-/Ausschalten

    Automatisches Steuern des Ein-/Ausschaltens (Ein-/Ausschaltautomatik) Timer-Funktion zum Ein-/ Drücken Sie ENTER. Ausschalten Nun erscheint wieder das Menü “Ein/Aus-Timer”. Wählen Sie mit M/m die Option“ Timer-Modus” Stellen Sie im Menü Timer/Uhr den Cursor (gelb) aus, und drücken Sie ENTER. mit den Tasten M/m auf “Ein/Aus-Timer”, und Das folgende Menü...
  • Seite 204: Energiesparfunktion

    Automatisches Steuern des Ein-/Ausschaltens (Ein-/Ausschaltautomatik) Stellen Sie mit M/m die Minuten ein, und drücken Sie ENTER. Mit < schalten Sie zurück zum Bildschirm aus Schritt 2. Wenn Sie mit den Tasten am Gerät arbeiten, schließen Sie das Menü mit der Taste MENU und setzen Sie [MENU-Funktion] (Seite 23 (DE)) im Menü...
  • Seite 205: Selbstdiagnosefunktion

    In diesem Fall blinkt die Anzeige zweimal. Ziehen Sie den Netzstecker des Geräts aus der Netzsteckdose. Wenden Sie sich mit der Anzahl des Blinkens an einen autorisierten Sony-Händler. I n d e x n u m m e r 1 1 7 . . .
  • Seite 206 Steuern eines bestimmten Monitors über die Fernbedienung Stellen Sie den Cursor (gelb) mit den Tasten M/m Drücken Sie ID MODE SET. Die Zeichen auf dem ausgewählten Monitor auf “Indexnummer”, und drücken Sie ENTER. werden nun zyan angezeigt, die auf den anderen Das folgende Menü...
  • Seite 207: Verwenden Anderer Fernbedienungsmodelle

    Verwenden anderer Fernbedienungsmodelle Verwenden anderer Fernbedienungsmodelle Folgende Funktionen können Sie mit anderen Fernbedienungsmodellen ausführen. • Ein- und Ausschalten • Eingangswahl • Menüfunktionen • Bildeinstellungen: Kontrast, Phase und Farbe • Bildschirmanzeige ein/aus Je nach Modell Ihrer Fernbedienung stehen nur bestimmte Tasten zur Verfügung, und Sie können nur bestimmte Operationen ausführen.
  • Seite 208: Technische Daten

    Technische Daten AUDIO IN Stereominibuchse Technische Daten 500 m V effektiver Mittelwert, hohe Impedanz Bildverarbeitung COMPOSITE OUT BNC-Durchschleifanschluß (×1) Sicherheitsbestimmungen Voreingestelltes Signal UL1950, CSA Nr. 950 (c-UL), siehe Seite 28 (DE) FCC Klasse B, IC Klasse B, Abtastrate 13,5 MHz bis 140 MHz EN60 950 (NEMKO), CE, C- Bildschirmsystem Plasmabildschirm (Wechselstrom) Anzeigeauflösung 1 365 Punkte (horizontal) ×...
  • Seite 209: Stiftbelegung

    Technische Daten Stiftbelegung Anschluß RGB/YUV (D-Sub, 15polig) Stift Nr. Signal Videosignal Rot oder R-Y oder P Videosignal Grün oder Y oder Grünsignal mit Synchronisation Videosignal Blau oder B-Y oder P Masse Masse Masse Rot Masse Grün Masse Blau Nicht belegt Masse Masse Horizontales oder zusammengesetztes...
  • Seite 210 ADVERTENCIA Para evitar el peligro de incendio o descargas eléctricas, no exponga la unidad a la lluvia ni a la humedad. Presencia de alta tensión peligrosa en el interior de la unidad. No abra el aparato. Solicite asistencia técnica sólo a personal especializado.
  • Seite 211 Índice Precauciones ............. 5 (ES) Características ............6 (ES) Ubicación y función de componentes y controles ............. 7 (ES) Parte frontal / Parte posterior / Lateral derecho ..7 (ES) Sección de indicadores / Interruptor 1 (de espera) ... 8 (ES) Sección de botones de control (parte superior) ..
  • Seite 212 Restauración de los valores originales de los elementos del menú Control pantalla ....39 (ES) Ajuste de la calidad del sonido ......39 (ES) Ajuste de agudos, bajos y balance, etc....39 (ES) Restauración de los elementos del menú de Ajuste sonido a su ajuste original........
  • Seite 213: Precauciones

    En caso contrario, puede Si desea realizar alguna consulta referente a la unidad, aparecer una imagen residual o fantasma en parte del póngase en contacto con un proveedor Sony panel. Utilice la función de protector de pantalla para autorizado.
  • Seite 214: Características

    Características • Se proporciona una ranura de opción para las expansiones futuras. Las unidades de PFM-50C1/50C1E son pantallas de • Función de modo de unidad de cine 16:9 de panel plano de 50 pulgadas. Están equipadas • Conectores de salida para altavoz (I/D) con el panel PDP (Plasma Display Panel), que acepta •...
  • Seite 215: Ubicación Y Función De Componentes Y Controles

    Ubicación y función de componentes y controles 1 Sección de indicadores / interruptor 1 (de Ubicación y función de espera) Para obtener información detallada sobre la sección de componentes y indicadores / interruptor 1 (de espera), consulte “Sección de indicadores / Interruptor 1 (de espera)” en la página 8 controles (ES).
  • Seite 216: Sección De Botones De Control (Parte Superior)

    Ubicación y función de componentes y controles Sección de indicadores / Interruptor Sección de botones de control 1 (de espera) (parte superior) MENU ENTER VOLUME 1 Interruptor 1 (de espera) 1 Botón MENU Púlselo para encender la pantalla. Vuelva a pulsarlo Púlselo para que aparezca el menú.
  • Seite 217: Panel De Conectores

    Este conector permite realizar el control remoto de la pantalla mediante el protocolo RS-232C. Para obtener información detallada, póngase en contacto con un proveedor Sony autorizado. 5 Conectores VIDEO El PFM-50C1E no dispone de conectores VIDEO. En los modelos PFM-50C1E, se pueden introducir la entrada Y/C y la entrada de vídeo compuesta en la...
  • Seite 218 Ubicación y función de componentes y controles Si utiliza el modelo PFM-50C1E con BKM-B10 (no suministrado) y aparecen líneas laterales en la pantalla, elimine el componente que se muestra en la ilustración. Elimine este componente. (ES)
  • Seite 219: Mando A Distancia Rm-971

    Ubicación y función de componentes y controles Mando a distancia RM-971 6 Botón INPUT2 Selecciona la señal introducida desde los conectores INPUT2. MUTING DISPLAY STBY 7 Botón RGB/YUV Púlselo para seleccionar el formato que coincida con POWER INPUT 1 INPUT 2 VIDEO OPTION el de la señal de entrada conectada al conector...
  • Seite 220: Instalación De Pilas

    Ubicación y función de componentes y controles qj Botón ASPECT Instalación de pilas Selecciona la relación de aspecto de la imagen (modo panorámico). Inserte dos pilas de tamaño AA (R6) con la polaridad correcta. qk Botón MENU Púlselo para que aparezca el menú. El menú ya no se muestra cuando pulsa de nuevo este botón.
  • Seite 221: Precaución

    Ubicación y función de componentes y controles Precaución Al montar la pantalla en horizontal Precaución Frontal Proporcionar una gran cantidad de 25 (9 espacio alrededor de la pantalla. • Cuando utilice la pantalla, asegúrese de que el espacio existente a su alrededor es más grande que el que se muestra en la figura que aparece a continuación.
  • Seite 222: Conexiones

    Precaución/Conexiones Notas sobre la retención de imágenes Conexiones Si se muestran las imágenes 1 – 5 (a continuación) durante un período de tiempo prolongado, puede Conexión de los altavoces producirse una retención de la imagen (imagen residual) en un área de la pantalla debido a las Podrá...
  • Seite 223 Conexiones Videograbadora Betacam SP Ordenador a salida de a salida señal de de audio a salida a salida componente de audio de vídeo a RGB/YUV a RGB/YUV a AUDIO a Control S IN a AUDIO a Control S OUT a Control S IN a Control S OUT * a Y/C IN o COMPOSITE IN...
  • Seite 224: Fijación Del Núcleo De Ferrita

    Conexiones Fijación del núcleo de ferrita Al fijarlo a los cables Fije el núcleo de ferrita al extremo del cable más Al fijarlo al cable de alimentación de CA próximo a la unidad y ciérrelo hasta que oiga un “clic”. Fije los núcleos de ferrita a ambos extremos del No superior a 10 mm ( pulgadas)
  • Seite 225 Conexiones Uso de los portacables Puede sujetar los cables de los altavoces de forma eficaz mediante los portacables B (×6) suministrados. Conecte el portacables tal y como se muestra en la siguiente ilustración. Parte posterior Si no utiliza los altavoces, puede usar los portacables A (×2) y B (×2) suministrados para agrupar los cables que no se utilicen.
  • Seite 226: Uso De Los Menús En Pantalla

    Uso de los menús en pantalla Pulse M/m para desplazar el cursor (amarillo) y Uso de los menús en pantalla ENTER para seleccionar un elemento. El menú correspondiente al elemento seleccionado aparece en el panel de visualización. Empleo mediante menús Los ajustes se seleccionan de forma similar cuando se muestra el siguiente menú.
  • Seite 227: Menú Ajuste Imagen

    Uso de los menús en pantalla Reduc ruido Menú Ajuste imagen Ajusta la reducción del nivel de granulación de la imagen y del ruido del color a uno de los cuatro Este menú se emplea para ajustar la imagen. niveles “Apagar”, “Bajo”, “Medio” y “Alto”. La calidad de la imagen puede ajustarse según las Para obtener más detalles, consulte “Reduc ruido”...
  • Seite 228 Uso de los menús en pantalla Caso en que la tecla Menu está ajustada en Nota “Enc/Apa” (el ajuste de fábrica) La calidad del sonido no se puede ajustar si el modo de imagen se ha definido como “Estándar” o C o n t r o l p a n t a l l a “Intenso”.
  • Seite 229 Uso de los menús en pantalla Zoom pantalla DesplazamientoV Ajusta el centrado vertical. Pulse M para desplazar la Amplia la imagen el doble (×2), el triple (×3) y el imagen hacia arriba y m para desplazarla hacia abajo. cuádruple (×4). Nota Menú...
  • Seite 230 Uso de los menús en pantalla Menú Ajuste personalizado A j u s t e p e r s o n a l i z a d o P r o t e c t o r p a n t a l l a Reduce el consumo de energía o establece un I n v e r s .
  • Seite 231 Uso de los menús en pantalla • Con Sync On Green (Sincronización en verde), la Nota imagen no se visualizará si no se ajusta la unidad En este modo no puede llevarse a cabo la para aceptar señales de sincronización. configuración de la tarjeta de opciones.
  • Seite 232 Para obtener más detalles, consulte “Función de ahorro de Selecciona el modo del mando a distancia. energía” en la página 48 (ES). TV: El mando a distancia de la pantalla Sony o TV PJ: el mando a distancia del proyector Sony DES: Desactiva el control remoto.
  • Seite 233 “NG” en rojo, póngase en contacto con el distribuidor a quien compró la unidad o con el Centro de servicio técnico de Sony más cercano. Nombre modelo Si el indicador STANDBY parpadea o aparece la Indica el nombre del modelo.
  • Seite 234: Visualización De La Imagen

    Visualización de la imagen ENTRADA2 (RGB): Selecciona la señal de Visualización de la imagen audio y vídeo introducida desde los conectores INPUT2 cuando la señal de entrada es RVB. Antes de comenzar ENTRADA2 (COMP): Selecciona la señal de • Encienda la pantalla. audio y vídeo introducida desde los •...
  • Seite 235: Información Sobre La Señal De Entrada, El Modo De Imagen Y El Estado De La Visualización

    Visualización de la imagen Información sobre la señal de entrada, el modo de imagen y el estado de la visualización La información sobre la señal de entrada y el modo de imagen aparece en el panel de visualización durante aproximadamente cinco segundos al encender la unidad o cambiar la señal de entrada.
  • Seite 236 • Si el color de la imagen es demasiado claro tras 19 1024×768@70Hz (VESA STD) 56,5kHz 70,1Hz introducir la señal de DVD en el modelo PFM-50C1/ 20 1024×768@75Hz (VESA STD) 60,0kHz 75,0Hz 50C1E, ajuste el color en “Crominancia” en el menú...
  • Seite 237: Conmutación Del Modo De Visualización

    Visualización de la imagen Conmutación del modo de Función de ahorro de energía visualización De este modo, puede ver la pantalla ahorrando Visualización del Subtítulos (títulos) energía. Pulse MENU. Pulse MENU El menú principal aparece en el panel de El menú principal aparece en el panel de visualización.
  • Seite 238: Selección De La Calidad De Imagen

    Visualización de la imagen / Selección de la calidad de imagen Pulse M/m para desplazar el cursor (amarillo) a Notas “Modo imagen” y pulse ENTER. • Si se desconecta el sistema cuando “Ahorro energ.: Aparece el siguiente menú en el panel de Reducir”...
  • Seite 239: Ajuste De La Imagen

    Ajuste de la imagen Fase Ajuste de la imagen Seleccione “Fase” con M/m y pulse ENTER. Mientras visualiza la imagen, puede ajustar el Ajuste la fase con M/m/</, dentro del margen Mín contraste, brillo, crominancia, fase, etc., según sus (–128) a Máx (+127). preferencias.
  • Seite 240 Ajuste de la imagen Unidad cine Temp color (temperatura del color) Detecta automáticamente imágenes capturadas en También es posible ajustar la temperatura del color. película (24 fotogramas) y reproduce dichas imágenes Puede seleccionar Cálido, Neutro o Frío, o bien con el característico movimiento suave de las ajustar cada ganancia de forma más precisa.
  • Seite 241 Ajuste de la imagen (2) Ajuste la ganancia (0 a 255) con M/m/</, Correc. color y pulse ENTER. El menú vuelve al menú Temp color. Permite reproducir un color atractivo y saludable. Para cambiar de nombre la temperatura del color Seleccione “Correc.
  • Seite 242: Restauración De Los Valores Originales De Los Elementos Del Menú Ajuste Imagen

    Ajuste de la imagen / Ampliación de imágenes Notas Ampliación de imágenes • Los controles Crominancia y Fase no funcionan con una señal RVB. Amplia la imagen para cubrir toda la pantalla • El control Fase no funciona con una señal de dependiendo del tipo de imagen, como por ejemplo componente.
  • Seite 243: Ajuste Panorámico Auto

    Ampliación de imágenes Ajuste panorámico auto Pulse M/m para desplazar el cursor (amarillo) a “Control pantalla” y pulse ENTER. El menú Control pantalla aparece en el panel de En algunas emisiones normales de televisión y de visualización. “Wide Clear Vision”, etc., junto con la señal de vídeo, se transmite una señal de control de C o n t r o l p a n t a l l a...
  • Seite 244: Ajuste Del Modo Panorámico

    Ampliación de imágenes Seleccione “Modo 4:3” con M/m y pulse ENTER. Seleccione el modo de zoom con M/m. Aparece el siguiente menú en el panel de Ampl 4/3: Amplía imágenes 4:3 de pantalla visualización. completa a imágenes de 16:9. BUZÓN: Amplía la imagen ocupando toda la pantalla de izquierda a derecha.
  • Seite 245: Cambio Del Tamaño Y Posición De La Imagen

    Cambio del tamaño y posición de la imagen Ajuste de la posición de la imagen Cambio del tamaño y En el menú Control pantalla, pulse M/m para posición de la imagen desplazar el cursor (amarillo) hasta “Desplazamiento pantalla” y pulse ENTER. Aparece el siguiente menú...
  • Seite 246: Ajuste De Los Píxeles

    Cambio del tamaño y posición de la imagen Ajuste de los píxeles Ajuste manual (1) Seleccione Fase de puntos o TOTAL PÍXELES H con M/m y pulse ENTER. Si hay mucho ruido en los bordes de los caracteres o Aparece el siguiente menú en el panel de de las líneas verticales, puede ajustar la fase de puntos visualización.
  • Seite 247: Restauración De Los Valores Originales De Los Elementos Del Menú Control Pantalla

    Cambio del tamaño y posición de la imagen / Ajuste de la calidad del sonido Restauración de los valores Agudos originales de los elementos del menú Control pantalla Seleccione “Agudos” con M/m y pulse ENTER. Ajuste los agudos con M/m/</, entre MÍN (–50) y MÁX (+50).
  • Seite 248: Restauración De Los Elementos Del Menú De Ajuste Sonido A Su Ajuste Original

    Ajuste de la calidad del sonido / Uso de la función de memoria Restauración de los elementos del Almacenamiento del ajuste actual menú de Ajuste sonido a su ajuste original Pulse MENU. El menú principal aparece en el panel de En el menú...
  • Seite 249: Recuperación De Un Ajuste Almacenado

    Uso de la función de memoria Seleccione un número de memoria (01 a 20) con Seleccione un carácter o símbolo de la lista de M/m y pulse ENTER. caracteres mediante M/m/</, y pulse INTRO. Aparece el siguiente menú en el panel de Se seleccionará...
  • Seite 250: Selección Del Idioma En Pantalla

    Selección del idioma en pantalla / Función de protector de pantalla Pulse M/m para desplazar el cursor (amarillo) Selección del idioma en hasta el idioma que desee y pulse ENTER. El idioma en pantalla cambia por el que haya pantalla seleccionado.
  • Seite 251 Función de protector de pantalla Pulse M/m para desplazar el cursor (amarillo) Cuando selecciona Auto y pulsa ENTER, aparece hasta “Ajuste personalizado” y pulse ENTER. el siguiente menú. Aparece el menú Ajuste personalizado en el panel de visualización. A j u s t e p e r s o n a l i z a d o P r o t e c t o r p a n t a l l a...
  • Seite 252: Cambio Automático De La Posición De La Imagen

    Función de protector de pantalla Cambio automático de la posición Seleccione Distancia movim (distancia de desplazamiento) o Ciclo movim (tiempo) con M/m de la imagen y pulse ENTER. Es posible seleccionar los siguientes valores: En el menú Protector de pantalla, pulse Distancia movim: Pequeño, Medio, Grande M/m para desplazar el cursor (amarillo) hasta Ciclo movim: 10seg, 30seg, 1min, 5min...
  • Seite 253: Ajuste De La Matriz De Colores

    Ajuste de la matriz de colores / Control automático de la alimentación (función de control de alimentación) Seleccione el formato de la señal con M/m. Ajuste de la matriz de Aparece el siguiente menú en el panel de visualización. colores A j u s t e p e r s o n a l i z a d o M a t r i z...
  • Seite 254: Ajuste De La Hora

    Si el reloj se atrasa significativamente, es posible que la transcurridos 60 minutos. pila interna se esté agotando. Póngase en contacto con 90 min.: Se desconecta la alimentación un proveedor autorizado de Sony para cambiar la pila. transcurridos 90 minutos. 120 min.: Se desconecta la alimentación transcurridos 120 minutos.
  • Seite 255: Función Temporizador Act/Des

    Control automático de la alimentación (función de control de alimentación) Seleccione Encender con M/m y pulse ENTER. Seleccione el modo de repetición con M/m. Cuando el menú deja de mostrarse, aparece un reloj Apagar: La alimentación se conecta y desconecta en la esquina superior izquierda de la pantalla.
  • Seite 256: Función De Ahorro De Energía

    (página 23 (ES)) del menú Ajuste inicial en [Volver]. Si parpadea el indicador STANDBY, compruebe el De este modo, el botón MENU de la unidad tiene la número de parpadeos y consulte a un proveedor Sony misma función que el botón <. autorizado.
  • Seite 257: Empleo De Una Pantalla Específica Con El Mando A Distancia

    Empleo de una pantalla específica con el mando a distancia Pulse ID MODE SET. Empleo de una pantalla Los caracteres de la pantalla seleccionada se tornan de color cian mientras los demás se específica con el mando vuelven verdes. La activación de la alimentación y del modo de espera también se aplica a las otras a distancia pantallas.
  • Seite 258 Empleo de una pantalla específica con el mando a distancia Pulse M/m para desplazar el cursor (amarillo) hasta “Control remoto” y pulse ENTER. Aparece el menú Control remoto en el panel de visualización. C o n t r o l r e m o t o N Ú...
  • Seite 259: Uso De Otros Modelos De Mando A Distancia

    Uso de otros modelos de mando a distancia Uso de otros modelos de mando a distancia Las siguientes operaciones pueden realizarse con otros modelos de mando a distancia. • Activación y desactivación de la alimentación • Selección de entrada • Operaciones de menú •...
  • Seite 260: Especificaciones

    Especificaciones Y/C IN Tipo mini DIN de 4 pines (×1) Especificaciones Y (luminancia): 1 Vp-p ±2 dB sincronización negativa, Proceso de vídeo terminación de 75 ohmios C (crominancia): Señal subportadora de crominancia Señal preajustada Consulte la página 28 (ES) 0,286 Vp-p ±2 dB (NTSC), Índice de muestreo terminación de 75 ohmios 13,5 MHz a 140 MHz...
  • Seite 261: Asignación De Pines

    Especificaciones Accesorios suministrados Cable de alimentación de CA (1) Portaenchufe de CA (2) Portacables A (2) Portacables B (6) Mando a distancia RM-971 (1) Pilas de tamaño AA (R6) (2) Manual de instrucciones (1) Accesorios opcionales Soporte de pantalla SU-P50C Altavoz SS-SP10A Adaptador de entrada de vídeo BKM-B10...
  • Seite 262 AVVERTENZA Par evitare rischi di incendi o scosse elettriche, non esporre l’apparecchio alla pioggia o all’umidità. Voltaggi molto alti sono presenti all’interno dell’apparecchio. Non aprire il contenitore. Rivolgersi solo a personale qualificato. La presa di corrente deve essere situata vicino all’apparecchio e deve essere facilmente accessibile.
  • Seite 263 Indice Precauzioni ..............5 (IT) Caratteristiche .............6 (IT) Posizione e funzione dei comandi e delle parti ..7 (IT) Parte anteriore / Parte posteriore / Lato destro ..7 (IT) Sezione interruttore / indicatore 1 (attesa) ....8 (IT) Sezione tasti di controllo (Parte superiore) ....8 (IT) Pannello dei connettori ..........
  • Seite 264 Ripristino delle voci del menu Comando schermo alle impostazioni originali ........38 (IT) Regolazione della qualità dell’audio ......39 (IT) Regolazione degli acuti, dei bassi, del bilanciamento e così via........39 (IT) Ripristino delle voci del menu Regola audio sulle impostazioni iniziali..........39 (IT) Utilizzo della funzione di memoria ......
  • Seite 265: Precauzioni

    Per qualsiasi domanda o problema relativo funzionamento. all’apparecchio, contattare un rivenditore Sony • Non visualizzare lo stesso fermo immagine per un autorizzato. lungo periodo, diversamente su una parte dello schermo potrebbe rimanere un’immagine residua.
  • Seite 266: Caratteristiche

    • Controllo ID • Funzione di autodiagnostica • Connettore per il comando a distanza (RS-232C) (D- sub a 9 piedini) • Accetta i telecomandi Sony a raggi infrarossi che utilizzano il codice SIRCS. • Installazione verticale • Decodificatore sottotitoli • Salva schermo per prevenire la formazione di immagini residue.
  • Seite 267: Posizione E Funzione Dei Comandi E Delle Parti

    Posizione e funzione dei comandi e delle parti 1 Sezione interruttore / indicatore 1 (attesa) Posizione e funzione dei Per ulteriori informazioni sulla sezione interruttore / indicatore 1 (attesa), vedere “Sezione interruttore / comandi e delle parti indicatore 1 (attesa)” a pagina 8 (IT). 2 Sezione tasti di controllo Parte anteriore / Parte posteriore / Per ulteriori informazioni sulla sezione tasti di controllo,...
  • Seite 268: Sezione Interruttore / Indicatore 1 (Attesa)

    Posizione e funzione dei comandi e delle parti Sezione interruttore / indicatore 1 Sezione tasti di controllo (Parte (attesa) superiore) MENU ENTER VOLUME 1 Interruttore 1 (attesa) 1 Tasto MENU Premere per attivare il display. Premere di nuovo per Premere per visualizzare il menu. Durante la tornare al modo di attesa.
  • Seite 269: Pannello Dei Connettori

    4 Connettore REMOTE (RS-232C) (D-sub a 9 piedini) Questo connettore consente il controllo a distanza del display mediante il protocollo RS-232C. Per ulteriori informazioni, contattare un rivenditore Sony autorizzato. 5 Connettori VIDEO I modelli PFM-50C1E non dispongono dei connettori VIDEO. Per PFM-50C1E, è possibile inviare al display i segnali di ingresso Y/C e video composito solo se sullo stesso sono installati l’adattatore di...
  • Seite 270 Posizione e funzione dei comandi e delle parti Se si sta utilizzando il modello PFM-50C1E utilizzando l’adattatore BKM-B10 (non in dotazione) e se sullo schermo sono presenti delle strisce laterali, rimuovere la parte indicata nell’illustrazione. Rimuovere la parte indicata. (IT)
  • Seite 271 Posizione e funzione dei comandi e delle parti Telecomando RM-971 6 Tasto INPUT2 Premere per selezionare il segnale immesso dai connettori INPUT2. 7 Tasto RGB/YUV MUTING DISPLAY STBY Premere per selezionare il formato corrispondente a POWER quello del segnale di ingresso collegato al connettore INPUT 1 INPUT 2 VIDEO OPTION...
  • Seite 272: Installazione Delle Pile

    Posizione e funzione dei comandi e delle parti qh Tasti numerici Installazione delle pile Premere per immettere il numero indice. Inserire due pile R6 (formato AA) rispettando la corretta polarità. qj Tasto ASPECT Seleziona il rapporto di formato dell’immagine (Modo ampio).
  • Seite 273: Avvertenza

    Avvertenza Installazione orizzontale del display Avvertenza Parte anteriore Installare il display in un luogo spazioso • Durante l’installazione del display, accertarsi che lo spazio che lo circonda sia maggiore rispetto a quanto indicato nell’immagine sotto riportata. • La temperatura ambiente deve essere compresa tra 0 °C e +35 °C.
  • Seite 274: Collegamenti

    Avvertenza/Collegamenti Note relative al fenomeno dell’immagine Collegamenti residua Se le immagini da 1 a 5, riportate di seguito, Collegamento dei diffusori vengono visualizzate per un lungo periodo, è possibile È possibile ottenere una visione delle immagini più che su parti dello schermo rimanga un’immagine realistica collegando i diffusori (SS-SP10A, non in residua dovuta alle caratteristiche del display al dotazione).
  • Seite 275 Collegamenti Videoregistratore Betacam SP Computer all’uscita all’uscita segnale audio all’uscita all’uscita componente audio video a RGB/YUV a RGB/YUV a AUDIO a Control S IN a AUDIO a Control S OUT a Control S IN a Control S OUT * a Y/C IN o COMPOSITE IN * a AUDIO IN all’uscita...
  • Seite 276: Applicazione Del Nucleo In Ferrite

    Collegamenti Applicazione del nucleo in ferrite Applicazione ai cavi Applicare il nucleo di ferrite all’estremità del cavo Applicazione al cavo di alimentazione CA più vicina all’apparecchio, quindi chiuderlo finché non scatta in posizione. Applicare i nuclei di ferrite a entrambe le Non superiore a 10 mm estremità...
  • Seite 277 Collegamenti Uso dei fermacavi Grazie ai fermacavi B (×6) in dotazione, è possibile avvolgere con praticità i cavi dei diffusori. Applicare i fermacavi come raffigurato di seguito. Parte posteriore Se non vengono impiegati i diffusori, è possibile utilizzare i fermacavi A (×2) e B (×2) forniti per fissare i cavi inutilizzati.
  • Seite 278: Utilizzo Dei Menu A Schermo

    Utilizzo dei menu a schermo Premere M/m per spostare il cursore (giallo), Utilizzo dei menu a schermo quindi premere ENTER per selezionare una voce. Sul pannello del display appare il menu della voce selezionata. Funzionamento tramite i menu Le impostazioni vengono selezionate allo stesso modo, una volta visualizzato il menu successivo.
  • Seite 279 Utilizzo dei menu a schermo Riduz. disturbo Menu Regola immagine Imposta il livello di riduzione del disturbo della Questo menu viene utilizzato per la regolazione granulosità e del colore per ciascuna immagine in dell’immagine. base a uno dei quattro livelli inclusi tra “Disatt”, È...
  • Seite 280 Utilizzo dei menu a schermo Se il tasto Menu è impostato su “Att/Dis” Nota (impostazione predefinita) Non è possibile regolare la qualità audio se Picture Mode è impostato su “Standard” o “Vivido”. C o m a n d o s c h e r m o I m p o s t a z i o n e : 9 C o n t r o l l o i mm a g i n e / a u d i o...
  • Seite 281 Utilizzo dei menu a schermo Zoom schermo Spostamento V Ingrandisce l’immagine rispettivamente del doppio Consente di regolare la centratura verticale. Premere M per spostare l’immagine verso l’alto e premere m (×2), triplo (×3) e quadruplo (×4). per spostarla verso il basso. Nota È...
  • Seite 282 Utilizzo dei menu a schermo Menu Impostazione personalizz. Menu Salva schermo Riduce o previene il fenomeno delle immagini residue Consente di ridurre il consumo energetico o di conseguente alla visualizzazione della stessa impostare uno screen saver e così via. immagine sullo schermo per un periodo prolungato. I m p o s t a z i o n e p e r s o n a l i z z .
  • Seite 283 Utilizzo dei menu a schermo • Con il segnale di sincronismo su verde, se Nota l'apparecchio non è stato impostato per accettare i In questa modalità, non è possibile attivare segnali di sincronizzazione, l'immagine non viene l’impostazione di schede opzionali. visualizzata.
  • Seite 284 Disattiva l’alimentazione automaticamente se nessun Per selezionare il modo del telecomando. segnale viene immesso al display per un periodo di TV: telecomando del display Sony o del televisore tempo determinato. PJ: telecomando di un proiettore Sony Per ulteriori informazioni, vedere “Funzione di risparmio Disatt.: per disattivare l’utilizzo del telecomando.
  • Seite 285 Menu Selezione ingresso adeguatamente ventilata. Se il messaggio non Questo menu viene utilizzato per cambiare il segnale scompare, contattare un rivenditore Sony autorizzato. di ingresso. Se l’indicatore STANDBY lampeggia o l’indicazione NG Per ulteriori dettagli sul cambiamento del segnale di viene visualizzata, vedere “Funzione di autodiagnostica”...
  • Seite 286: Riproduzione Dell'immagine

    Riproduzione dell’immagine Premere M/m per spostare il cursore (giallo) sulla Riproduzione dell’immagine sorgente di ingresso da visualizzare, quindi premere ENTER. INPUT1 (RGB): per selezionare il segnale audio Operazioni preliminari e video immesso tramite i connettori • Accendere il display. INPUT1 se il segnale di ingresso è un •...
  • Seite 287: Informazioni Relative Al Segnale Di Ingresso, Al Modo Immagine E Alle Condizioni Del Display

    Riproduzione dell’immagine Informazioni relative al segnale di Note ingresso, al modo immagine e alle • Come sorgente di ingresso, si consiglia di utilizzare condizioni del display un apparecchio video dotato di TBC (time base corrector). Se il monitor riceve un segnale privo di Le informazioni relative al segnale di ingresso e al TBC, l’immagine potrebbe sparire a causa di disturbi modo immagine vengono visualizzate sul pannello del...
  • Seite 288 Riproduzione dell’immagine a) VGA è un marchio di fabbrica registrato di International Segnali di ingresso preselezionati Business Machines Corporation, USA. Sistema di colore o frequenza Segnale b) VESA è un marchio di fabbrica registrato di Video orizzontale/verticale Electronics Standards Association. Segnali computer c) Mac (Macintosh) è...
  • Seite 289: Modifica Del Modo Di Visualizzazione

    Riproduzione dell’immagine Modifica del modo di visualizzazione Premere MENU. Il monitor torna al menu Impostazione personalizz. Visualizzazione dei sottotitoli Funzione di risparmio energetico Premere MENU. Premere MENU. Sul pannello del display appare il menu principale. Sul pannello del display viene visualizzato il menu principale.
  • Seite 290: Selezione Della Qualità Dell'immagine

    Riproduzione dell’immagine / Selezione della qualità dell’immagine Premere M/m per spostare il cursore (giallo) su Note “Modo immagine”, quindi premere ENTER. • Se si seleziona “Risparmio ener.: Riduci” e si Sul pannello del display viene visualizzato il menu disattiva l’alimentazione, la stessa impostazione riportato di seguito.
  • Seite 291: Regolazione Dell'immagine

    Regolazione dell’immagine Fase Regolazione dell’immagine Selezionare “Fase” tramite M/m, quindi premere ENTER. Durante la visualizzazione dell’immagine è possibile Regolare la fase tramite M/m/</, su un livello regolarne il contrasto, la luminosità, il colore, la fase e compreso tra Rosso (–128) e Verde (+127). così...
  • Seite 292 Regolazione dell’immagine Cinema Drive Temp. colore (temperatura di colore) Per impostare la temperatura di colore è possibile Consente di rilevare automaticamente le immagini selezionare Freddo, Neutro o Basso oppure regolare catturate su film (da 24 fotogrammi) e di riprodurle con maggiore accuratezza ogni guadagno. È possibile con il caratteristico movimento omogeneo delle registrare fino a sei temperature di colore regolate e immagini di film.
  • Seite 293 Regolazione dell’immagine (2) Regolare il guadagno (da 0 a 255) mediante Correz. colore M/m/</,, quindi premere ENTER. Il menu torna al menu Temp. colore. È possibile riprodurre colori brillanti e nitidi. Se si assegna un nuovo nome alla temperatura di Selezionare “Correz.
  • Seite 294: Ripristino Delle Voci Del Menu Regola Immagine Alle Impostazioni Originali

    Regolazione dell’immagine / Picture Enlargement Note Picture Enlargement • Le impostazioni di Colore e Fase non sono disponibili con il segnale RGB. Consente di ingrandire l’immagine in modo da • L’impostazione di Fase non è disponibile con un riempire l’intero schermo in base al tipo di immagine, segnale componente.
  • Seite 295: Impostazione Di Auto Wide

    Picture Enlargement Impostazione di Auto Wide Premere M/m per spostare il cursore (giallo) su “Impostazione 9”, quindi premere ENTER. Sul pannello del display viene visualizzato il Poiché in alcune trasmissioni televisive, Wide Clear seguente menu. Vision e così via, insieme al segnale video viene trasmesso un segnale di controllo di identificazione, la funzione Auto Wide consente di riprodurre immagini C o m a n d o...
  • Seite 296: Impostazione Del Modo Ampio

    Picture Enlargement Selezionare “Modo 4:3” utilizzando M/m, quindi Selezionare il modo zoom utilizzando M/m. premere ENTER. Esp. 4/3: ingrandisce le immagini a schermo Sul pannello del display viene visualizzato il pieno con rapporto di formato 4:3 in immagini seguente menu. con rapporto di formato 16:9.
  • Seite 297: Modifica Delle Dimensioni E Della Posizione Dell'immagine

    Modifica delle dimensioni e della posizione dell’immagine Regolazione della posizione Modifica delle dell’immagine dimensioni e della Nel menu Comando schermo, premere M/m per posizione dell’immagine spostare il cursore (giallo) su “Spostamento schermo”, quindi premere ENTER. Sul pannello del display appare il seguente menu. È...
  • Seite 298: Regolazione Dei Pixel

    Modifica delle dimensioni e della posizione dell’immagine Regolazione dei pixel Regolazione manuale (1) Selezionare Fase punto o Tot pixel orizz tramite M/m, quindi premere ENTER. Se i bordi dei caratteri o delle linee verticali risultano Sul pannello del display appare il seguente eccessivamente disturbati, è...
  • Seite 299: Regolazione Della Qualità Dell'audio

    Modifica delle dimensioni e della posizione dell’immagine / Regolazione della qualità dell’audio Premere M/m per spostare il cursore (giallo) su Bilanciamento “Esegui”, quindi premere ENTER. Le voci del menu Comando schermo vengono Selezionare “Bilanciamento” utilizzando M/m, quindi riportate ai valori iniziali. premere ENTER.
  • Seite 300: Utilizzo Della Funzione Di Memoria

    Utilizzo della funzione di memoria Premere M/m per spostare il cursore (giallo) su Utilizzo della funzione di “Salva”, quindi premere ENTER. Sul pannello del display appare il seguente menu. memoria M e m o r i a u t e n t e È...
  • Seite 301: Richiamo Delle Impostazioni Memorizzate

    Utilizzo della funzione di memoria / Selezione della lingua per le indicazioni a schermo Premere M/m per spostare il cursore (giallo) su Spostare il cursore sul numero di memoria (da 01 “Impostazione nome”, quindi premere di nuovo a 20) dell’impostazione che si desidera richiamare utilizzando i tasti M/m.
  • Seite 302: Funzione Salva Schermo

    Selezione della lingua per le indicazioni a schermo / Funzione salva schermo Premere M/m per spostare il cursore (giallo) su Funzione salva schermo “Lingua”, quindi premere ENTER. Sul pannello del display appare il seguente menu. Se viene visualizzata per un lungo periodo di tempo un’immagine con luminosità...
  • Seite 303 Funzione salva schermo Premere M/m per spostare il cursore (giallo) su (1) Premere M/m per spostare il cursore (giall) su “Salva Schermo”, quindi premere ENTER. “Ora inizio”, quindi premere ENTER. Sul pannello del display appare il seguente menu. Viene visualizzato il seguente menu e lo sfondo dell’ora viene visualizzato in rilievo.
  • Seite 304: Modifica Automatica Della Posizione Dell'immagine Visualizzata

    Funzione salva schermo Modifica automatica della posizione Selezionare Gamma orbit. (distanza di movimento) o Ciclo orbit. (tempo) tramite M/m, dell’immagine visualizzata quindi premere ENTER. È possibile selezionare i seguenti valori: Nel menu Salva schermo, premere M/m per Gamma orbit.: Piccolo, Medio, Grande spostare il cursore (giall) osu “Orbit.
  • Seite 305: Regolazione Della Matrice Di Colore

    Regolazione della matrice di colore Selezionare il formato del segnale mediante M/m. Regolazione della Viene visualizzato il seguente menu sul display. matrice di colore I m p o s t a z i o n e p e r s o n a l i z z . M a t r i c e c o l o r e 4 8 0 p...
  • Seite 306: Controllo Automatico Dell'alimentazione Attivata/Disattivata (Funzione Di Controllo Dell'alimentazione)

    Controllo automatico dell’alimentazione attivata/disattivata (funzione di controllo dell’alimentazione) Premere M/m per spostare il cursore (giallo) su Controllo automatico “Spegnimento”, quindi premere ENTER. Sul pannello del display viene visualizzato il dell’alimentazione seguente menu. attivata/disattivata T i m e r / O r o l o g i o (funzione di controllo S p e g n i m e n t o D i s a t t...
  • Seite 307: Visualizzazione Dell'ora

    . , p r e m e r e ENTER Sony autorizzato. p e r t o r n a r e i n d i e t r o Selezionare Attivato tramite M/m, quindi premere Visualizzazione dell’ora...
  • Seite 308: Funzione Di Risparmio Energetico

    Controllo automatico dell’alimentazione attivata/disattivata (funzione di controllo dell’alimentazione) Selezionare Modo timer tramite M/m, quindi Premere M/m per spostare il cursore (giallo) su premere ENTER. “Ora disattiv.”, quindi premere ENTER. Sul pannello del display viene visualizzato il Effettuare la stessa procedura per impostare l’ora e seguente menu.
  • Seite 309: Funzione Di Autodiagnostica

    N u m e r o i n d i c e 1 1 7 . . . Riferire ad un rivenditore Sony autorizzato il numero di lampeggiamenti. Inserire il numero indice del display che si desidera utilizzare utilizzando i tasti da 0 a 9 sul telecomando.
  • Seite 310 Utilizzo di un display specifico tramite il telecomando Premere M/m per spostare il cursore (giallo) su Premere ID MODE SET. I caratteri sul display selezionato diventano “Numero indice”, quindi premere ENTER. azzurri mentre gli altri caratteri diventano verdi. Il Sul pannello del display appare il seguente menu. modo di accensione/attesa si riferisce anche agli altri display.
  • Seite 311: Utilizzo Di Altri Modelli Di Telecomando

    Utilizzo di altri modelli di telecomando Utilizzo di altri modelli di telecomando Quanto descritto di seguito può essere effettuato utilizzando altri modelli di telecomando. • Attivazione/disattivazione dell’alimentazione • Selezione dell’ingresso • Utilizzo dei menu • Regolazione dell’immagine: contrasto, fase e colore •...
  • Seite 312: Caratteristiche Tecniche

    Caratteristiche tecniche Y/C IN Mini DIN a 4 piedi (×1) Caratteristiche tecniche Y (luminanza): 1 Vp-p ±2 dB sincronismo negativo, con Elaborazione video terminazione a 75 ohm C (crominanza): segnale di sincronizzazione 0,286 Vp-p Segnali preimpostati ±2 dB (NTSC), con terminazione vedere a pagina 28 (IT).
  • Seite 313 Caratteristiche tecniche Accessori in dotazione Cavo di alimentazione CA (1) Ferma spina CA (2) Fermacavo A (2) Fermacavo B (6) Telecomando RM-971 (1) Pile R6 (formato AA) (2) Istruzioni per l’uso (1) Accessori opzionali Supporto SU-P50C per display Diffusore SS-SP10A Adattatore di ingresso video BKM-B10 Il design e le caratteristiche tecniche sono soggetti a...
  • Seite 314 警告 为避免引发意外的火灾或遭受雷击的危险,请勿将 本机置于雨点所及或者潮湿的地方。 输出插座应安装于装置附近使用方便的地方。 (CS)
  • Seite 315 目录 使用前须知 ............5 (CS) 特性 ..............6 (CS) 部件和控制器的位置和功能 ........7 (CS) 前视图/后视图/右视图 ........7 (CS) 1(待机)开关/指示灯部分 ......8 (CS) 控制键部分(顶视图) ........8 (CS) 连接器面板 ............9 (CS) 遥控器 RM-971..........11 (CS) 小心 ..............13 (CS) 连接 ..............14 (CS) 扬声器的连接 ............ 14 (CS) 连接交流电源线...
  • Seite 316 调整像素 ............37 (CS) 恢复画面控制菜单调整值 ........ 37 (CS) 调整音质 ............38 (CS) 调整高音、低音和均衡等 ........ 38 (CS) 将 Adjust Sound(调整音质)菜单项目 恢复到其初始设定 ........38 (CS) 使用存储功能 ............. 39 (CS) 存储当前设定 ........... 39 (CS) 调用存储的设定 ..........40 (CS) 选择屏幕语言 ............. 41 (CS) 屏幕保护功能 ............. 41 (CS) 反转图像的色调...
  • Seite 317: 使用前须知

    分可能出现残影和重影。为避免出现此现象,请使 •保证良好的空气流通以防内部积热。请勿将本机放 用屏幕保护功能以补偿整个屏幕的使用。如果出现 在地毯、毛毯等上面或窗帘、帏幔旁边,否则通风 重影,请使用屏幕保护功能,或使用某些视频软件 孔会受阻。 或图像软件以在屏幕上提供连续的动作。如果出现 •请勿将本机安装在靠近散热器或排气管等热源之 轻微重影(残影),效果可能不明显,一旦出现残 处,以及受阳光直射、多尘、有机械振动或冲击之 影,将不会完全消失。 处。 •为保护等离子显示,在切换至 ON/STANDBY •在本机周围安装多台装置时,根据本机和其他装置 (开/待机)后的一段时间内,本机不从遥控器或 的位置,可能会发生遥控器误操作、图像杂波、噪 本机上的功能键接收指令。操作结束后,请等待大 声等问题。 约 8 秒钟再输入指令。 清洁方面 为保持机壳一往如新,请定期用中性洗涤液进行清 洁。切勿使用诸如稀释剂或汽油等烈性溶剂或研磨 粉,否则会损伤机壳。为安全起见,请在清洁本机 前拔下电源插头。 关于显示屏的使用和清洁 当使用或清洁电视机时应特别当心显示屏特殊的表 面涂层。清洁时,请用干净的软布擦拭,避免直接 接触显示屏。 重新包装方面 请保存原装的纸箱和包装填料,它们是您搬运本机 的理想包装箱。将本机搬运到其他地方时,请按照 纸箱上的图示重新包装。 如果有关于本机的任何问题,请与授权的 Sony 经 销商联系。 (CS)
  • Seite 318 •动态图像功能。 •屏幕菜单用于各种调整和设定 Sony 所拥有的数字高图像质量电路 •六种语言的屏幕显示便于用户使用。(语言∶英 对所有图像信号进行一致的数字处理,实现高质量 语、德语、法语、意大利语、西班牙语和日语) 图像的可靠再现。 •图像尺寸和位置的微调 •存储功能用于存储多达二十个图像设定。 音频放大器扬声器 •ID 控制 此显示器装备高音质数字式放大器,与选购的扬声 •自检功能 器配合使用时,将向您提供更为有效的演示。 •遥控(RS-232C)连接器(D 副 9 芯) •接受使用 SIRCS 代码的 Sony 红外光遥控器。 •直立安装 •封闭字幕解码器 •屏幕保护功能减少残像或重影。 •有一个选择插槽供将来扩展用。 插槽选择的转接器便于快速和方便的系统升级。 电源连接警告 请使用适合当地电源的电源线。 PFM-50C1E 美国、 欧共体 英国、爱尔兰、 日本 加拿大 澳大利亚、新西兰 插头类型...
  • Seite 319: 部件和控制器的位置和功能

    部件和控制器的位置和功能 1 1(待机)开关/指示灯部分 部件和控制器的位置和功能 有关 1 (待机)开关/指示灯部分的详细说明,请参见 第 8 页上的“ 1 (待机)开关/指示灯部分”。 前视图/后视图/右视图 2 控制键部分 有关控制键部分的详细说明,请参见第 8 页上的“控制 前视图 键部分(顶视图)”。 3 - AC IN(交流输入)插座 将附带的交流电源线连接至此插座和墙上插座。一 旦连接了交流电源线,STANDBY 指示灯点亮为红 色,本显示器处于待机模式。 有关电源线的详细说明,请参见第 14 页上的“连接交流 电源线”。 4 SPEAKER OUT(扬声器输出)插座 当将扬声器(未附带)连接至此插座时,则输出显 示于屏幕上的音频分量信号。 后视图 5 支架安装挂钩 用这些挂钩安装支架(未附带)。...
  • Seite 320: 待机)开关/指示灯部分

    部件和控制器的位置和功能 1(待机)开关/指示灯部分 控制键部分(顶视图) MENU ENTER VOLUME 1 MENU(菜单)键 1 1(待机)开关 按此键打开显示器。再按一下回到待机模式。 按此键使菜单出现。再按一次此键,菜单消失。 使用 MENU 键返回到上一级菜单时,请参见第 23 页上 注 的“Initial Setup(初始设定)菜单”。 为保护显示面板,将本机转换为 ON/STANDBY (开/待机)模式需经过一段时间。一项操作结束 2 M/m 键 约 8 秒钟后,再按此键。 按此键在菜单上将光标(黄色)移到某个项目或调 整数值。 2 STANDBY(待机)指示灯 在待机模式下点亮为红色。 3 ENTER(执行)键 当 STANDBY 指示灯闪烁时,请参见第 47 页上的“自 按此键从显示的菜单上选择所需的项目。...
  • Seite 321: 连接器面板

    示器的 CONTROL S OUT 端子和其他装置的 CONTROL S IN 端子、本显示器的 CONTROL S IN 端子和其他装置的 CONTROL S OUT 端子。 4 REMOTE(遥控)(RS-232C)连接器(D 副 9 芯) 此连接器允许用 RS-232C 规程遥控本显示器。有 关详细说明,请与授权的 Sony 经销商联系。 5 VIDEO(视频)连接器 PFM-50C1E 未配备 VIDEO 连接器。对于 PFM- 50C1E,当 BKM-B10 视频输入转接器(未附带) 安装在显示器上时,复合视频和 Y/C 输入信号可以 被输入到显示器。...
  • Seite 322 部件和控制器的位置和功能 若使用配有 B K M - B 1 0 (未附带)的 P F M - 50CIE,并发现屏幕上有横向条纹,请按照插图将 其拆除。 拆除此部分。 (CS)
  • Seite 323: 遥控器 Rm-971

    部件和控制器的位置和功能 7 RGB/YUV 键 遥控器 RM-971 按此键选择连接于 INPUT1 或 INPUT2 连接器的 匹配输入信号的格式。每按一次此键在 RGB 和 YUV 之间转换。 MUTING DISPLAY STBY 8 S/VIDEO(视频)键 POWER INPUT 1 INPUT 2 VIDEO OPTION 从VIDEO 接口 的COMPOSITE IN 接口或Y/C IN 接 口 选 择 信 号 输 入 。 每 按 一 次 此 键 在 COMPOSITE IN 和...
  • Seite 324 部件和控制器的位置和功能 ql CHROMA(色度)键 安装电池 当图像模式设定为“User(用户)1-3”时,用此 按正确的极性装入两节 AA 尺寸(R6)电池。 键调节色度。按此键并用 M/m 或 </, 键 9 调 节色度。 w; H SIZE(水平尺寸)键 调整水平图像尺寸。按此键并用 M/m 键 9 调整水 务必先装入 负极 # 端。 平图像尺寸。 wa V SIZE(垂直尺寸)键 调整垂直图像尺寸。按此键并用 M/m 键 9 调整垂 直图像尺寸。 ws CONTRAST(对比度)+/-键 图像模式为“用户...
  • Seite 325 小心 水平安装显示器时 小心 前视图 在显示器周围留出足够的空间 •使用显示器时,请确保在本机周围有比下列图示尺 寸大的空间。这将保证正常通风。 •环境温度必须在 0°C 至 +35°C 范围中。 •请使用 SU-P50C 显示器支架(未附带)作为支 架。 •有关支架、螺丝和螺栓等硬件的安装,我们无法指 定应使用的规格,因为其安装是由当地经授权的经 侧视图 销店进行的。有关安装的事宜,请与有资格的 Sony 经销店联系。 •本机电源打开时,有些零件可能会发热,引起燃 烧。显示器电源打开时,或刚进入待机状态后,请 勿触摸本机的顶部或背面。 使用支架(未附带)时 单位∶cm 前视图 垂直安装显示器时 前视图 确认 1(待机)开关 位于底部。 侧视图 ;; ;; 侧视图 单位∶cm 单位∶cm (CS)
  • Seite 326: 扬声器的连接

    小心/连接 关于图像残影 连接 如果长时间地显示 1-5 图像(下面),因等离 扬声器的连接 子体显示面板的特点,在屏幕的局部将会产生残影 (重影)。在以下 A-D 步骤可能会减少重影的 产生。 连接扬声器,可欣赏到更有临场感的图像。 务请正确连接扬声器。有关连接扬声器的详细说 可能造成内部烧毁和图像残影的情况 明,请参见扬声器附带的使用说明书。 1 输入宽幅视频时黑色条带出现在顶部和底部 连接交流电源线 (信箱电影) 2 4:3 纵横比视频输入时左侧和右侧出现黑色条带 将交流电源线插入 AC IN 插座。然后,将交流 (正常播放) 插头固定器(附带)装在交流电源线上。 3 输入游戏图像 4 显示 DVD 屏幕菜单 AC IN 插座 5 如 DSS、电缆箱、录像机等的连接装置的屏幕 交流电源线...
  • Seite 327 连接 电脑 Betacam SP 录像机 至分量信号输出 至音频输出 至音频输出 至视频输出 至 RGB/YUV 至 RGB/YUV 至 AUDIO 至 CONTROL S IN 至 AUDIO 至 CONTROL S OUT 至 CONTROL 至 CONTROL S IN S OUT 至 Y/C IN 或 COMPOSITE IN 至 AUDIO IN 至视频输出...
  • Seite 328: 安装铁素体芯

    连接 连接至电缆时 安装铁素体芯 连接至交流电源线时 将铁素体芯连接于靠近本装置的电缆一端,直 至其发出喀嗒声。 10 mm 以内 将铁素体芯安装在交流电线的两端并合上铁素 体芯直至发出喀嗒声。 10 mm 以内 10 mm 以内 将电缆缠绕止动器使得铁素体芯不滑动。 10 mm 以内 将止动器绕在电线上使铁素体芯无法滑动。 10 mm 以内 拉紧制动器并剪除多余部份。 10 mm 以内 注 紧固止动器并将多余部分剪断。 •用 RGB/YUV 连接器将本机连接至装置的各部位 时,请用专用电缆。 SMF-400(D-Sub 15P-5BNC) SMF-410(D-Sub 15P-D-Sub 15P) 当将电缆连接至以下任一接口时,请在使用电缆前...
  • Seite 329 连接 使用电缆夹 可用附带的电缆夹 B(6 个)有效地捆扎扬声器电 缆。请按下图所示的方法安装电缆夹。 后视图 若不使用扬声器,可以用附带的电缆夹 A(× 2)和 电缆夹 B(× 2)将不用的电缆捆扎好。请按插图安 装电缆夹。 后视图 (CS)
  • Seite 330: 使用屏幕菜单

    使用屏幕菜单 按 M/m 键移动光标(黄色)并按 ENTER 键选 使用屏幕菜单 择项目。 所选项目的菜单出现在显示器屏幕上。 通过菜单操作 当显示下一个菜单时,同样会选择该设定。 按 M/m 键调整或选择设定并按 ENTER 键设 菜单操作键 定。 设定被登记而且菜单返回到前面的菜单。 使用显示器或遥控器上的键用于菜单操作。 要返回到普通屏幕时,请按 MENU 键。 遥控器 控制键部分 要在菜单级之间移动时,请使用 </, 键。 若要使用 MENU 键在菜单级之间移动时,请参见第 23 MENU 页上的“菜单功能”。 ENTER MENU ENTER VOLUME 菜单指南 注 本使用说明书用遥控器进行操作说明。遥控器上的...
  • Seite 331 使用屏幕菜单 Noise Reduct.(减噪) Adjust Picture(图像调整)菜单 设定等级以将图像颗粒和色彩噪音减至四个等级 此菜单用于调整图像。 ( “Off” ,“Low” ,“Mid” ,和“High” ) 之一。 可用 User(用户)1-3 菜单调整图像质量以符合您 有关详细说明,请参见第 31 页上的“Noise Reduct.”。 的需要。 Cinema Drive(电影驱动器) 注 当此项目被设为自动时,则会以具有动画特点的平 在 Standard(标准)模式或 Dynamic Picture 滑动作来再现图像。 (动态图像)模式下无法调整图像质量。 有关详细说明,请参见第 31 页上的“Cinema Drive”。 Dynamic Picture(动态图像) P i c t u r e / S o u n d C o n t r o l A d j u s t P i c t u r e ( U s e r 1 )
  • Seite 332 使用屏幕菜单 MENU Function(菜单功能)设为“On/Off” Adjust Sound(调整声音)菜单 (开/关)(出厂设定)时 通过简单处理便可迅速调节声音质量。 S c r e e n C o n t r o l 当图像质量模式被设定为 User(用户)1-3 时,可 W i d e S e t u p 以根据需要调节声音质量。 W i d e M o d e 4 / 3 S c r e e n Z o o m...
  • Seite 333 使用屏幕菜单 Screen Size (画面尺寸)菜单 Adjust Pixel(调整像素)菜单 此菜单用于调整图像尺寸。 此菜单用于调整图像像素。 此菜单仅在 MENU Function(菜单功能)设为 仅在接收到电脑信号时才能调整。 “On/Off (开/关)时才显示。 S c r e e n C o n t r o l A d j u s t P i x e l A u t o A d j u s t D o t P h a s e...
  • Seite 334 使用屏幕菜单 Screen Saver(屏幕保护)菜单 Custom Setup(用户设定)菜单 校正或防止因在屏幕上长时间显示相同图像而导致 减少电源消耗或设定屏幕保护等等。 的重影或残像引起的损坏。 C u s t o m S e t u p C u s t o m S e t u p P o w e r S a v i n g : S t a n d a r d S c r e e n S a v e r...
  • Seite 335 使用屏幕菜单 同步模式 Initial Setup(初始设定)菜单 根据在输入 1 和输入 2 的 RGB/YUV 端子的芯 13 所输入的信号设定模式。信号只能设定为 575/50i 选择菜单显示的语言或信号源、菜单键的功能等 或 480/60i。 等。 H/Comp∶当输入水平信号或复合同步信号*时 I n i t i a l S e t u p Video∶当输入视频信号或复合同步信号*时 L a n g u a g e E n g l i s h *根据复合信号电平,图像显示可能不正常。遇此情...
  • Seite 336 有关详细说明,请参见第 45 页上的“开/关 定时器功 Index Number(索引号码) 能”。 设定显示器的索引号码。 Auto Shutoff(自动关机) 注 显示器在预定的时间内未输入信号时会自动关闭电 设定号码时,使用显示器上的键。无法使用遥控器 源。 设定。 有关详细说明,请参见第 46 页上的“节电功能”。 有关索引号码的详细说明,请参见第 47 页上的“用遥控 器操作指定的显示器”。 User Memory(用户存储)菜单 Remote Mode(遥控模式) 选择 Remote Commander(遥控器)模式。 此菜单用于保存或调用 Picture/Sound Control TV(电视机)∶Sony 显示器或电视机的遥控器 (图像/声音控制)和 Screen Control(画面控 PJ(投影机)∶Sony 投影机的遥控器 制)菜单中的设定。 Off(关)∶遥控器不起作用。 (CS)
  • Seite 337 当内部温度异常时,NG 显示出来,而且此项目以 红色闪烁。1 (待机)开关/指示灯部分上的 注 STANDBY 指示灯也闪烁。 拔下交流电源线或用遥控器打开/关闭显示器时此 项目的设定仍然保留。 注 当通风孔受堵塞或在通风不良的场所使用显示器 时,可能会显示“NG”信息,并闪烁呈红色。这 Input Select Menu(输入选择 时,请检查通风处是否受堵塞,并将显示器安装在 菜单) 通风良好的地方。如果此信息仍然出现,请与授权 的 Sony 经销商联系。 此菜单用于切换输入信号。 当 STANDBY 指示灯闪烁或显示 NG 时,请参见第 47 有关切换输入信号的详细说明,请参见第 26 页上的“切 页上的“自检功能”。 换输入信号”。 Fan(风扇) Unit Status(显示器状态)菜单 冷却风扇内置于本显示器中。此项目表示冷却风扇 是否正常工作。 此菜单用于显示显示器的内部状态。 OK∶正常 NG∶异常...
  • Seite 338: 观看图像

    观看图像 INPUT2 (RGB)∶当输入信号是 RGB 信号时, 观看图像 选择 INPUT2 连接器的音频和视频信号 输入。 开始之前 INPUT2 (COMPONENT)∶当输入信号是分量 •接通显示器的电源。 信号时,选择 INPUT2 连接器的音频和 •接通所连接装置的电源并播放视频源。 视频信号输入。 •若要在接通电源或切换输入时在屏幕上显示输入信 VIDEO (COMPOSITE)∶选择 VIDEO 连接器 号信息和图象模式,将 Custom Setup(用户设 中 COMPOSITE IN 接口和 AUDIO IN 定)菜单中的“Display”项目设定为 ON。 插孔的音频和视频信号输入。 •要选择菜单所使用的语言时,参见第 41 页。 VIDEO (Y/C)∶选择 VIDEO 连接器中 Y/C IN 接口和...
  • Seite 339: 输入信号、图像模式和 显示器状态信息显示

    观看图像 输入信号、图像模式和显示器状态信息 显示 在接通电源或切换输入信号时,输入信号、图像模 式和显示器状态信息在显示器屏幕上显示约 5 秒 钟。 要取消此功能时,按以下步骤操作。 在 Custom Setup(用户设定)菜单上,按 M/m 键将光标(黄色)移到“Display”处并 按 ENTER 键。 以下菜单出现在显示器屏幕上。 C u s t o m S e t u p P o w e r S a v i n g : S t a n d a r d S p e a k e r O u t...
  • Seite 340 观看图像 a) VGA 是美国国际商用机器公司的注册商标。 预设输入信号 b) VESA 是视频电子标准协会的注册商标。 信号名称 彩色制式或水平/垂直频率 c) Mac(Macintosh)是苹果电脑公司的注册商标。 电脑信号 d) 此项目仅在使用 I-O DATA 公司的图形加速器板时有 -1 (VGA 350) 31.5kHz 70.1Hz 效。 2 640×350@85Hz (VESA STD) 37.9kHz 85.1Hz e) 此项目仅在使用 Matrox Graphics 公司的图形卡时有 3 640×400@85Hz (VESA STD) 37.9kHz 85.1Hz 效。...
  • Seite 341: 切换显示模式

    观看图像 切换显示模式 节能功能 此功能可以使您在节能时观看显示器。 显示封闭字幕 按 MENU 键。 按 MENU 键。 主菜单出现在显示器屏幕上。 主菜单出现在显示器屏幕上。 P i c t u r e / S o u n d C o n t r o l P i c t u r e M o d e : S t a n d a r d P i c t u r e / S o u n d...
  • Seite 342: 选择图像质量

    选择图像质量/调整图像 用 M/m 键选择图像模式并按 ENTER 键。 选择图像质量 Standard∶通过适当的对比度和轮廓调整,可 以获得很高的图像质量。 可根据图像类型和环境亮度选择图像质量。 Vivid∶此设定可使图像具有很强的锐度,将图 像轮廓和对比度设为其最大值。 按 MENU 键。 User1-3∶可用 Adjust Picture(调整图像) 主菜单出现在显示器屏幕上。 菜单根据需要设定图像质量。 P i c t u r e / S o u n d C o n t r o l P i c t u r e M o d e : S t a n d a r d...
  • Seite 343 调整图像 Chroma Cinema Drive 用 M/m 键选择“Chroma”并按 ENTER 键。 自动检测取自电源(24 帧)的图像,并用电源图像 用 M/m/</, 键在 MIN(-128)至 MAX 特有的平滑动作再现这些图像。 (+127)的范围中调整色度。 M/,∶增大图像色度 用 M/m 键选择“Cinema Drive”并按 ENTER m/<∶减小图像色度 键。 以下菜单出现在显示器屏幕上。 Phase P i c t u r e / S o u n d C o n t r o l A d j u s t P i c t u r e ( U s e r 1 )
  • Seite 344 调整图像 (2) 用 M/m/</, 键调整增益(0 至 255)并 Color Temp. 按 MENU 键。 您也可以设定色温。可以选择 Cool、Neutral 或 菜单恢复到 Color Temp.(色温)菜单。 Warm、或者更精确地调整各增益。最多可以登记 三个所调整的色温。可以将它们重新命名(长度最 对所调整的色温重新命名时,按以下步骤进 多为六个字符)。 行。 用 M/m 键选择“Color Temp.”并按 ENTER (3) 按 M/m 键将光标(黄色)移到“Name 键。 Set”处并按 ENTER 键。 以下菜单出现在显示器屏幕上。 用 M/m 键选择色温并按 ENTER 键。 Cool(冷)∶将色温设定为高...
  • Seite 345: 将 Adjust Picture 菜单项目 恢复到初始设定

    调整图像 Color Correct. 注 •CHROMA 和 PHASE 控制对 RGB 信号不起作 可以再现美丽而健康的色彩。 用。 •PHASE 控制对分量信号不起作用。 用 M/m 键选择“Color Correct.”并按 ENTER •PHASE 控制对 PAL 或 PAL-M 或 PAL-N 或 键。 或 PAL60 或 SECAM 彩色源不起作用。 以下菜单出现在显示器屏幕上。 •输入黑白(B & W)信号时,无法调整色彩和色调 的深度。 P i c t u r e / S o u n d C o n t r o l A d j u s t P i c t u r e ( U s e r 1 )
  • Seite 346: 图像放大

    图像放大 设定自动宽屏幕 图像放大 在某些普通电视和宽屏幕清晰图像广播等中用视频 根据图像类型(如普通电视广播或宽屏幕清晰图像 信号传送识别控制信号。自动宽屏幕功能将根据此 等)放大图像以覆盖整个屏幕。 识别控制信号如实地再现图像,或无视此识别控制 信号将各种类型的图像放大至最佳尺寸。 对于宽屏幕模式,可进行以下选择。 此外,普通电视广播和卫星电视广播所具有 4:3 的 原图像 放大的图像 纵横比也可放大并以 16:9 的纵横比显示。 (图像种类) Expd. 识别控制信号 此控制信号可在电视屏幕上如实地再现原图像的纵 横比。含有此信号的图像由以下组成∶ • 使原图像具有 4:3 纵横比 图像被自然地放大到整个屏 •宽屏幕清晰图像广播 以设定为宽屏幕变焦(屏 幕大小 幕纵横比:4:3)。 •用包含纵横比信息(ID-1 格式)的摄像机拍摄的 图像。 Letter •包含将纵横比设为 4:3 的信号的电视广播。 Hey! How ya doing? Hey! How ya doing? Hey! How ya doing? Hey! How ya doing?
  • Seite 347: 设定宽屏幕模式

    图像放大 按 M/m 键将光标(黄色)移到“Wide Setup” 按 ENTER 键。 处并按 ENTER 键。 菜单恢复到 Wide Setup 菜单。 以下菜单出现在显示器屏幕上。 设定宽屏幕模式 S c r e e n C o n t r o l W i d e S e t u p A u t o W i d e O f f 4 : 3...
  • Seite 348: 调整图像的尺寸和位置

    调整图像的尺寸和位置 调整图像的位置 调整图像的尺寸和位置 在 Screen Control(画面控制)菜单上,按 可以移动图像的位置以适合屏幕,或分别调整图像 M/m 键将光标(黄色)移到“Picture Shift” 的垂直和水平尺寸。 处并按 ENTER 键。 本使用说明书说明在 MENU Function(菜单功 以下菜单出现在显示器屏幕上。 能)被设为“On/Off”的状态下的操作。 有关 Screen Control(画面控制)的详情,请参阅 “Screen Control (画面控制)菜单”(第 20 页)。 调整图像的尺寸 S h i f t S h i f t 在 Screen Control(画面控制)菜单上,按 M/m 键将光标(黄色)移到“Screen Size”...
  • Seite 349: 调整像素

    调整图像的尺寸和位置 手动调整 调整像素 (1) 用 M/m 键选择 Dot Phase 或 Total H Pixel 并按 ENTER 键。 如果字符边缘有许多杂波或垂直线条,可以调整点 以下菜单出现在显示器屏幕上。(下图为选 相位和水平像素的总数。 择 Dot Phase) 注 此项目依所使用的电脑信号而异。 在 Screen Control(画面控制)菜单上,按 M/m 键将光标(黄色)移到“Adjust Pixel” 处并按 ENTER 键。 D o t P h a s e 以下菜单出现在显示器屏幕上。...
  • Seite 350: 调整音质

    调整音质 Surround 调整音质 根据图像类型选择环绕声模式。 可调整高音等级、低音等级和均衡。还可设定环绕 声模式。 用 M/m 键选择“Surround”并按 ENTER 键。 用 M/m 键选择环绕声模式并按 ENTER 键。 调整高音、低音和均衡等 Off∶无环绕声信号输出 Hall∶使电影和音乐等的立体声更具临场感 按 MENU 键使主菜单出现在显示器屏幕上,然后 Sim∶将普通电视广播和新闻节目的单声变为模 从 Adjust Sound(调整音质)菜单选择 拟立体声,增强其临场感 “Treble” 、“Bass” 、“Balance”或 “Surround” 。 将 Adjust Sound(调整音质)菜单项目 恢复到其初始设定 Treble 在 Adjust Sound(调整音质)菜单上,按 用...
  • Seite 351: 使用存储功能

    使用存储功能 按 M/m 键将光标(黄色)移到“Save”处并按 使用存储功能 ENTER 键。 以下菜单出现在显示器屏幕上。 可以用 MEMORY 功能保存各输入信号的当前图像 设 定 。 保 存 的 设 定 可 以 随 时 恢 复 。 可 以 存 储 U s e r M e m o r y S a v e M E M Picture/Sound Control(图像/声音控制)和...
  • Seite 352: 调用存储的设定

    使用存储功能 当设定名称时,按照下列步骤进行。 U s e r M e m o r y L o a d R e s t o r e 按 M/m 键将光标(黄色)移到“Name Set”并 M E M M E M 按 ENTER 键。 M E M M E M M E M 以下菜单出现在显示器屏幕上。...
  • Seite 353: 选择屏幕语言

    选择屏幕语言/屏幕保护功能 按 M/m 键将光标(黄色)移到所需的语言处并 选择屏幕语言 按 ENTER 键。 屏幕语言切换为所选的语言。 可以从日语、英语、德语、法语、西班牙语或意大 : 日语 利语中选择屏幕语言。 ENGLISH: 英语 DEUTSCH: 德语 按 MENU 键。 FRANÇAIS: 法语 主菜单出现在显示器屏幕上。 ESPAÑOL: 西班牙语 ITALIANO: 意大利语 P i c t u r e / S o u n d C o n t r o l P i c t u r e M o d e...
  • Seite 354 屏幕保护功能 按 M/m 键将光标(黄色)移到“Screen (1) 按 M / m 键将光标(黄色)移到“S t a r t Saver”处并按 ENTER 键。 Time”处并按 ENTER 键。 以下菜单出现在显示器屏幕上。 以下菜单出现,小时的背景显示为蓝色。 C u s t o m S e t u p C u s t o m S e t u p S c r e e n S a v e r S c r e e n...
  • Seite 355: 自动改变图像位置

    屏幕保护功能/调整色彩矩阵 自动改变图像位置 C u s t o m S e t u p S c r e e n S a v e r P i c . O r b i t 在 Screen Saver 菜单上,按 M/m 键将光标(黄 O r b i t O f f O r b i t R a n g e...
  • Seite 356: 自动控制电源开/关(定时器功能

    调整色彩矩阵/自动控制电源开/关(定时器功能) 按 M/m 键将光标(黄色)移动“Color 睡眠功能 Matrix”处并按 ENTER 键。 以下菜单出现在显示器屏幕上。 按 MENU 键。 主菜单出现在显示器屏幕上。 C u s t o m S e t u p C o l o r M a t r i x 4 8 0 p Y / C B / C R P i c t u r e / S o u n d C o n t r o l 1 0 8 0 i...
  • Seite 357: 调整时间

    用 M/m 键选择 On 并按 ENTER 键。 注 以下菜单出现在显示器屏幕上。 如果显示的时间明显变慢,可能是内部电池已耗 尽。请与 Sony 授权的经销商联系以更换电池。 T i m e r / C l o c k O n / O f f T i m e r R e p e a t O f f 显示时间...
  • Seite 358: 节电功能

    自动控制电源开/关(定时器功能) 用 M/m 键选择重复模式。 按 M/m 键设定分钟并按 ENTER 键。 Off∶电源仅开/关一次 按 < 键恢复到步骤 2 中所显示的画面。 On∶电源在预设的每天同一时间开/关。 当 用 装 置 上 的 键 钮 操 作 装 置 时 若 想 要 使 用 MENU 键以关闭菜单,请将 Initial Setup(初 按 ENTER 键。 始设定)菜单上的〔MENU Function〕(第...
  • Seite 359: 自检功能

    输入号码出现在各显示器索引号码的右侧。 本机具有自检功能。 此功能根据 STANDBY 指示灯所示闪烁方式,显 输入号码 示显示器的状态。闪烁的方式提示您显示器当前的 状态。 如果 STANDBY 指示灯闪烁,请检查闪烁的次数 并与授权的 Sony 经销商联系。 I n d e x N u m b e r . 1 1 7 1 1 7 检查 STANDBY 指示灯的闪烁方式。 指示灯闪烁(显示器上显示有图像时)或以 3 秒 钟的间隔闪烁(显示器上无图像显示时)。 按 ID MODE SET 键。...
  • Seite 360 用遥控器操作指定的显示器 按 M/m 键将光标(黄色)移到“Remote”处并 按 ENTER 键。 Remote(遥控)菜单出现在显示器屏幕上。 R e m o t e I n d e x N u m b e r R e m o t e M o d e R e m o t e O n l y S y n c M o d e...
  • Seite 361: 使用其他型号遥控器

    使用其他型号遥控器 使用其他型号遥控器 使用其他型号遥控器可以进行以下操作。 •电源开/关 •输入选择 •菜单操作 •图像调整∶对比度、相位和色度 •屏幕显示开/关 可以进行的操作和各操作中所使用的键受各遥控器 的限制。请参见下表。 遥控器型号 RM-854 RM-921 RM-PJ1001 REMOTE MODE 设定 输入选择 INPUT1 RGB1 INPUT2 RGB2 — VIDEO LINE1 LINE VIDEO 菜单操作 MENU MENU MENU MENU 或 < ENTER ENTER ENTER ENTER 或 , +...
  • Seite 362: Composite Out

    规格 Y(亮度)∶1 Vp-p ±2 dB 同步 规格 负,75 Ω 终端 C(色度)∶脉冲 0.286 Vp-p ±2 dB (NTSC), 视频操作 75 Ω 终端 参见第 28 页。 预设信号 脉冲 0.3 Vp-p ±2 dB 采样率 13.5 至 140 MHz (PAL),75 Ω 终端 面板系统 交流型等离子体显示面板 AUDIO IN 立体声微型插孔...
  • Seite 363 规格 附件 交流电源线(1) 交流插头固定器(2) 电缆夹 A(2) 电缆夹 B(6) 遥控器 RM-971(1) AA 尺寸(R6)电池(2) 使用说明书(1) 选购件 显示器支架 SU-P50C 扬声器 SS-SP10A 视频输入转接器 BKM-B10 (仅限于 PFM-50C1E) 设计和规格若有变更,恕不另行通知。 管脚配置 RGB/YUV 连接器(D 副 15 芯) 管脚号 信号 红色视频或 R-Y 或 P 绿色视频或 Y 或绿色同步 蓝色视频或 B-Y 或 P 接地...
  • Seite 364 Sony Corporation Printed in Japan...

Inhaltsverzeichnis