Herunterladen Inhalt Inhalt Diese Seite drucken
Panasonic WV-Q169A Montageanleitung

Panasonic WV-Q169A Montageanleitung

Ceiling mount bracket

Werbung

Verfügbare Sprachen
  • DE

Verfügbare Sprachen

  • DEUTSCH, seite 15
Operating Instructions
Included Installation Instructions
Ceiling Mount Bracket
WV-Q169A
Model No.
Before attempting to connect or install this product,
please read these instructions carefully and save this manual for future use.
The model number is abbreviated in some descriptions in this manual.

Werbung

Inhaltsverzeichnis
loading

Inhaltszusammenfassung für Panasonic WV-Q169A
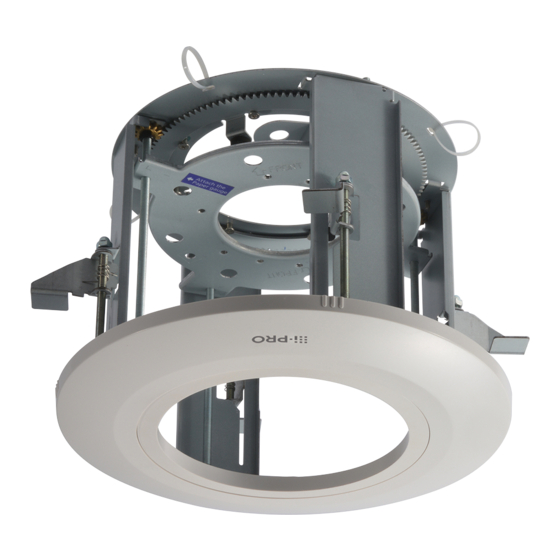
  • Seite 1 Operating Instructions Included Installation Instructions Ceiling Mount Bracket WV-Q169A Model No. Before attempting to connect or install this product, please read these instructions carefully and save this manual for future use. The model number is abbreviated in some descriptions in this manual.
  • Seite 2: Inhaltsverzeichnis

    * It is possible to use WV-Q169A instead of WV-Q169 for the models introducing WV-Q169 as an available optional part.
  • Seite 3: Precautions

    Precautions Refer installation work to the dealer. The measures of protection against a fall Installation work requires technique and experi- of this product shall be taken. ences. Failure to observe this may cause a drop result- Failure to observe this may cause fire, electric ing in injury or accidents.
  • Seite 4: Precautions For Installation

    All work related to the installation of this product should be made by qualified service personal or system installer. Panasonic assumes no responsibility for injuries or property damage resulting from fail- ures arising out of improper installation or operation inconsistent with this documenta- tion.
  • Seite 5 • Locations subject to vibrations, such as on vehicles, marine vessels, or above product lines (This product is not designed for on-vehicle use.) • Locations subject to condensation as the result of severe changes in temperature Mounting method for this product This product is designed to be used as a pendant mount camera.
  • Seite 6: Major Operating Controls

    Major operating controls Mounting chassis Camera mounting stage Ceiling board fixing screw (x4) Camera body Ceiling board fixing bracket (x4) Decorative cover <Installation sample> Roof space Safety wire angle (accessory) Safety wire (accessory) Ceiling mount bracket Camera body Ceiling board Decorative cover...
  • Seite 7: Installations

    Installations Be sure to read “Precautions” (☞ page 3) and “Precautions for installation” (☞ page 4) before instal- lation. Read the operating instructions for the camera to be installed as well. Step 1 Put Template A (accessory) against the ceiling and make a hole. ø12 mm {1/2"} Make 4 holes of 12 mm {1/2 inches} in Ceiling face...
  • Seite 8 IMPORTANT: • The pull-out strength of the anchor bolt shall be more than 5 times of the total weight of the installed devices (including the camera body, ceiling mount bracket, anchor bolts, and all other parts). • When the existing anchor bolt is used as an anchor bolt for connecting the safety wire, make sure that the distance between the anchor bolt and camera mounting position is 1 m {3.28 feet} or less.
  • Seite 9 Double nuts ing chassis) into the mounting hole of the (locally procured) mounting chassis. To adjust the position of the Panasonic logo on Ceiling board the decorative cover, rotate the mounting chas- fixing screw sis. Note that the Panasonic logo will be located at approximately 180 °...
  • Seite 10 Step 8 Note: • The mount bracket supplied with the cam- Follow the procedure according to the model of era is not used. the camera to be installed. Mount the camera enclosure on the camera <Installing WV-NW484S> main body. Use the driver bit supplied with the camera <Installing WV-CW504F, WV-CW504S, to remove the screws that secure the cam- WV-NW502S>...
  • Seite 11 Align the “OPEN” mark of the camera with Use the driver bit (supplied with the camera) the protrusion of the camera attachment. to loosen the screws that secure the cam- era enclosure and remove the enclosure from the camera main body. Protrusion Secure the camera to the camera attach- ment with the camera fixing screw (red).
  • Seite 12 <Installing WV-SFV631L, WV-SFV611L> Align the “OPEN” mark of the camera with the protrusion of the attachment plate . Mount the attachment plate (supplied with Mount the camera by inserting the attach- the camera) to this mounting chassis. Use 4 ment mounting screws into the holes of the M4-L8 screws (supplied with the camera) attachment plate.
  • Seite 13 Loosen 4 enclosure fixing screws using the Step 9 bit (supplied with the camera). Mount the decorative cover on this mount Remove the enclosure from the camera, bracket. and secure the camera using a camera fix- • Align the “I” mark of the decorative cover ing screw.
  • Seite 14: Specifications

    Specifications Ambient temperature: –45 °C to +50 °C {–49 °F to 122 °F} Dimensions: 211.3 mm {8-5/16 inches} in diameter x 133.8 mm {5-9/32 inches} in embedment depth Approx. 870 g {1.92 lbs} Weight: Finish: Main body: Metal Decorative cover: ABS resin with light silver coating Standard accessories Operating Instructions (this book) ........1 pc.
  • Seite 15: Merkmale

    Flächen mit geringer Ausreißfestigkeit wie z.B. Gipsplatten in einer abgehängten Decke verwendet werden. Mit dieser Halterung wird die Kamera in die Decke eingelassen, womit sich der freiliegende Teil des Gehäuses reduziert. * Bei Modellen, für die WV-Q169 als Option angegeben ist, kann WV-Q169A anstelle von WV-Q169 verwendet werden.
  • Seite 16: Vorsichtsmaßregeln

    Vorsichtsmaßregeln Zur Installation an einen Fachhändler wen- Es sind Maßnahmen gegen das den. Herunterfallen des Produkts zu treffen. Installationsarbeiten erfordern Fachkenntnisse Andernfalls besteht die Gefahr des Herunter- und Erfahrung. fallens, was zu Körperverletzungen oder Unfäl- Andernfalls besteht die Gefahr von Brand, elek- len führen kann.
  • Seite 17: Vorsichtshinweise Zur Installation

    Alle mit der Installation dieses Produkts verbundenen Arbeiten von einem qualifiziertem Kundendiensttechniker oder Systeminstallateur vornehmen lassen. Panasonic übernimmt keine Verantwortung für Verletzungen oder Sachschäden, die aus der Installation oder Bedienung resultieren, die nicht wie in dieser Dokumentation beschrieben ausgeführt werden.
  • Seite 18 Montage des Produkts Das Produkt ist für den Einsatz als Hängekamera bestimmt. Montage des Produkts auf einem Tisch oder auf einer Schrägfläche kann zu Funktionsstörungen und vorzeitigem Altern führen. Ankerschrauben bitte getrennt zu beschaffen. Ankerschrauben für die Montage der Deckenmontagehalterung gehören nicht zum Lieferumfang. Die Befestigungsmittel müssen für das Material und die Stärke der Montagefläche des Produkts geeignet sein.
  • Seite 19: Wichtige Bedienungselemente

    Wichtige Bedienungselemente Einbaurahmen Kamera- Montagegestell Deckenplatten- Befestigungsschraube (x4) Kamera Deckenplattenhalterung (x4) Abdeckblende <Installationsbeispiel> Dachraum Fangdraht-Haltewinkel (Zubehör) Fangdraht (Zubehör) Deckenmontagehalterung Kamera Deckenplatte Abdeckblende...
  • Seite 20: Installation

    Installation Vor dem Einbau unbedingt die Abschnitte “Vorsichtsmaßregeln” (☞ Seite 16) und “Vorsichtshinweise zur Installation” (☞ Seite 17) lesen. Auch die Bedienungsanleitung der zu montierenden Kamera lesen. Schritt 1 Schablone A (Zubehör) an die Decke halten ø12 mm (4 Stellen) und einen Durchbruch anbringen.
  • Seite 21 WICHTIG: • Die Ausreißfestigkeit der Ankerschraube muss mindestens dem Fünffachen des insgesamt montierten Gewichts (einschließlich Kamera, Deckenmontagehalterung, Ankerschrauben und sonstige Teile) entsprechen. • Bei Verwendung einer vorhandenen Ankerschraube zum Befestigen des Fangdrahts darauf achten, dass der Abstand zwischen der Ankerschraube und der montierten Kamera höchstens 1 m betragen darf.
  • Seite 22 (vor Ort zu Einbaurahmens) in die Montagebohrung des beschaffen) Einbaurahmens einsetzen. Deckenplatten- Die Einbaurahmens drehen, um das Panasonic- Befestigungs- Logo auf der Abdeckblende in die richtige schraube Position zu bringen. Das Panasonic-Logo ist richtig positioniert, wenn es ca. 180 ° gegen Deckenplat- den Haken auf der gegenüberliegenden Seite...
  • Seite 23 Schritt 8 Anmerkung: • Der mit der Kamera gelieferte Einbaurah- Nach der für das jeweilige Kameramodell men wird nicht verwendet. beschriebenen Verfahrensweise vorgehen. Das Kameragehäuse auf der Kamera mon- <Installation der WV-NW484S> tieren. Die Befestigungsschrauben des Kamerage- <Installation der WV-CW504F, häuses mit dem der Kamera beiliegenden WV-CW504S, WV-NW502S>...
  • Seite 24 Die Markierung “OPEN” an der Kamera mit Die Befestigungsschrauben des Kamerage- dem Haltenasen an der Kamera-Halteplatte häuses mit dem Schraubendrehereinsatz ausrichten. (mit der Kamera geliefert) lösen und das Gehäuse von der Kamera abnehmen. Haltenasen Die Kamera mit der Kamera-Befestigungs- schraube (rot) an der Kamera-Halteplatte sichern.
  • Seite 25 <Installation der WV-SFV631L, Die Markierung “OPEN” an der Kamera mit WV-SFV611L> dem Haltenasen an der Halteplatte aus- richten. Die Halteplatte (mit der Kamera geliefert) Zum Montieren der Kamera die Hal- am Einbaurahmen befestigen. Die Halte- teplatten-Befestigungsschrauben platte gemäß Abbildung mit 4 Schrauben Öffnungen in der Halteplatte einsetzen.
  • Seite 26 Die 4 Gehäuse-Befestigungsschrauben mit Schritt 9 dem (mit der Kamera gelieferten) Einsatz Die Abdeckblende an der Montagehalterung lösen. befestigen. Das Gehäuse von der Kamera abnehmen • Zum Befestigen der mit dem Einbaurahmen und die Kamera mit einer Kamera- gelieferten Abdeckblende die daran befind- Befestigungsschraube sichern.
  • Seite 27: Technische Daten

    Technische Daten Umgebungstemperatur: –45 °C to +50 °C Abmessungen: 211,3 mm Durchmesser x 133,8 mm Einbindtiefe Ca. 870 g Gewicht: Lackierung: Gehäuse: Metall Abdeckblende: ABS-Kunstharz mit hellsilberner Beschichtung Standardzubehör Bedienungsanleitung (vorliegendes Heft) ......1 St. Für die Installation sind folgende Teile erforderlich: Fangdraht ................
  • Seite 28: Caractéristiques Dominantes

    * Il est possible d’utiliser la WV-Q169A au lieu de la WV-Q169 pour les modèles présentant la WV-Q169 comme un élément optionnel disponible.
  • Seite 29: Mesures De Précaution

    Mesures de précaution Confier les travaux d’installation au distri- Des inspections périodiques doivent être buteur. effectuées. Les travaux d’installation exigent des connais- Une formation de rouille sur les parties métalli- sances techniques et de l’expérience. ques ou sur les vis peut engendrer une chute Le fait de ne pas observer ceci peut engendrer du produit ou provoquer des accidents.
  • Seite 30: Précautions D'installation

    Tous les travaux d’installation pour ce produit doivent être réalisés par des techniciens qualifiés ou des installateurs de système confirmés. Panasonic n’assume aucune responsabilité en cas de dommages corporels ou matériels résultant de pannes dues à une installation incorrecte ou à une utilisation contraire à ce qui est indiqué...
  • Seite 31 Méthode d’installation pour ce produit Ce produit est conçu pour être utilisé comme une caméra vidéo à installation en position suspen- due. Si le produit est installé sur un bureau ou en position inclinée, il risque de ne pas fonctionner correctement et sa durée de vie utile de service risque d’être écourtée.
  • Seite 32: Principaux Organes De Commande

    Principaux organes de commande Châssis d’installation Plate-forme d’installation de caméra vidéo Vis de fixation de panneau de plafond (x4) Bloc de caméra vidéo Platine de fixation de panneau de plafond (x4) Couvercle décoratif <Exemple d’installation> Espace de toit Cornière de câble de sécurité (accessoire) Câble de sécurité...
  • Seite 33: Installations

    Installations Faire en sorte de lire les “Mesures de précaution” (☞ page 29) et les “Mesures de précaution pour l’installation” (☞ page 30) avant de procéder à l’installation. Lire également le manuel d’utilisation de la caméra vidéo à installer. Étape 1 Placer le gabarit A (accessoire) contre la surface ø12 mm {1/2pouces} au plafond et percer une ouverture.
  • Seite 34 IMPORTANT: • La résistance à la traction du boulon d’ancrage devrait être supérieure de plus de 5 fois le poids total des appareils installés (ceci comprenant le bloc de caméra vidéo, la platine de fixa- tion au plafond, les boulons d’ancrage et toutes autres pièces utilisées). •...
  • Seite 35 Double écrous tallation du châssis d’installation. de fixation Pour ajuster la position du logo Panasonic sur (à se procurer localement) le couvercle décoratif, faire tourner le châssis d’installation. Noter que le logo Panasonic sera Vis de fixation placé...
  • Seite 36 Étape 8 Remarque: • La platine de fixation d’installation de Suivre la procédure selon le modèle de caméra caméra vidéo fournit avec la caméra vidéo vidéo à installer. n’est pas utilisée. <Installation de WV-NW484S> Installer le coffret de caméra vidéo sur le bloc principal de caméra vidéo.
  • Seite 37 Aligner l’indication “OPEN” de la caméra Se servir du foret de tournevis (fourni avec vidéo avec la partie saillante de l’acces- la caméra vidéo) pour desserrer les vis de soire d’installation caméra vidéo. fixation qui retiennent le coffret de caméra vidéo et séparer le coffret du bloc principal de la caméra vidéo.
  • Seite 38 <Installation de WV-SFV631L, Aligner l’indication “OPEN” de la caméra WV-SFV611L> vidéo avec la partie saillante de la plaque d’installation. Installer la plaque d’installation (fournie Installer la caméra vidéo en insérant les vis avec la caméra vidéo) sur ce châssis d’ins- de fixation d’installation dans les trous de tallation.
  • Seite 39 Desserrer les 4 vis de fixation du coffret en Étape 9 utilisant le foret (fourni avec la caméra Monter le couvercle décoratif sur cette platine vidéo). de fixation. Retirer le coffret de la caméra vidéo et fixer • Aligner le repère “I” du couvercle décoratif la caméra vidéo en utilisant les vis de fixa- fourni avec ce châssis d’installation avec le tion de caméra vidéo.
  • Seite 40: Caractéristiques Techniques

    Caractéristiques techniques Température ambiante: –45°C à +50°C {–49°F à 122°F} Dimensions: 211,3 mm {8-5/16 pouces} de diamètre x 133,8 mm {5-9/32 pouces} dans la profondeur d’encastrement Environ 870 g {1,92 lbs} Poids: Finition: Bloc principal: Métal Couvercle décoratif: Résine ABS avec un revêtement argent clair Accessoires standard Manuel d’utilisation (cette documentation) ........1 él.
  • Seite 41: Características

    * Puede emplearse la WV-Q169A en lugar de la WV-Q169 para los modelos que presentan la WV-Q169 como una parte disponible como accesorio opcional.
  • Seite 42: Precauciones

    Precauciones Solicite el trabajo de instalación al distri- Deberán tomarse medidas de protección buidor. contra la caída de este producto. Es necesario poseer técnica y experiencia para Si no lo hace así, puede producirse una caída realizar el trabajo de instalación. que presentará...
  • Seite 43: Precauciones Para La Instalación

    Todo el trabajo relacionado con la instalación de este producto deberá efectuarlo perso- nal de servicio técnico cualificado o el instalador del sistema. Panasonic no se hace responsable de lesiones o daños a la propiedad que resulten de fallos derivados de una incorrecta instalación o funcionamiento que no se ajuste con esta documentación.
  • Seite 44 Método de montaje para este producto Este producto está diseñado para ser utilizado como una cámara de montaje colgado. Si el pro- ducto se monta en una mesa o inclinado, es posible que no funcione correctamente y que se acorte su vida de servicio. Adquiera pernos de anclaje por separado.
  • Seite 45: Principales Controles De Operación

    Principales controles de operación Chasis de montaje Plataforma de montaje de la cámara Tornillo de fijación de la placa del techo (x4) Cuerpo de la cámara Ménsula de fijación de la placa del techo (x4) Cubierta decorativa <Ejemplo de instalación> Espacio del techo Ménsula angular de cables de seguridad (accesorio)
  • Seite 46: Instalaciones

    Instalaciones Asegúrese de leer las “Precauciones” (☞página 42) y las “Precauciones para la instalación” (☞ página 43) antes de la instalación. Lea también el manual de instrucciones de la cámara que se proponga instalar. Paso 1 Ponga la plantilla A (accesoria) contra el techo y ø12 mm (4 lugares) haga un orificio.
  • Seite 47 IMPORTANTE: • La resistencia al tiro hacia fuera del perno de anclaje deberá ser de más de 5 veces el peso total de los dispositivos instalados (incluyendo el cuerpo de la cámara, la ménsula de montaje en el techo, los pernos de anclaje y todos los demás accesorios). •...
  • Seite 48 Para ajustar la posición del logotipo de placa del techo Panasonic en la cubierta decorativa, gire el chasis de montaje. Tenga presente que el logo- Ménsula de fijación tipo de Panasonic debe quedar situado aproxi- de la placa del techo madamente 180 °...
  • Seite 49 Paso 8 Nota: • La ménsula de montaje suministrada con Siga el procedimiento de acuerdo con el la cámara no se emplea. modelo de la cámara que se proponga instalar. Monte el alojamiento de la cámara en el <Instalación de la WV-NW484S> cuerpo principal de la cámara.
  • Seite 50 Alinee la marca “OPEN” de la cámara con Emplee la broca de destornillador (suminis- el saliente del accesorio de montaje de la trada con la cámara) para aflojar los torni- cámara. llos que fijan el alojamiento de la cámara y extraiga el alojamiento del cuerpo principal de la cámara.
  • Seite 51 <Instalación de las WV-SFV631L y Alinee la marca “OPEN” de la cámara con WV-SFV611L> el saliente de la placa de fijación. Monte la cámara insertando los tornillos de Monte la placa de fijación (suministrada montaje del accesorio en los orificios de la con la cámara) en este chasis de montaje.
  • Seite 52 Afloje los 4 tornillos de fijación del aloja- Paso 9 miento empleando la broca (suministrada Monte la cubierta decorativa en esta ménsula con la cámara). de montaje. Extraiga el alojamiento de la cámara y fije • Alinee la marca “I” de la cubierta decora- la cámara empleando un tornillo de fijación tiva suministrada con este chasis de mon- de la cámara.
  • Seite 53: Especificaciones

    Especificaciones Temperatura ambiental: –45 °C a +50 °C Dimensiones: 211,3 mm de diámetro x 133,8 mm de profundidad de empotramiento Aprox. 870 g Peso: Acabado: Cuerpo principal: Metálico Cubierta decorativa: Resina ABS con revestimiento plateado claro Accesorios estándar Manual de instrucciones (este documento) ....1 pieza Lo siguiente es para la instalación.
  • Seite 54: Caratteristiche

    Accessori standard ........................66 Caratteristiche La WV-Q169A è una staffa per incasso a soffitto progettata esclusivamente per il montaggio di una telecamera a colori TVCC o di una telecamera di rete su un soffitto. Far riferimento al catalogo o al manuale di istruzioni della telecamera per ulteriori informazioni riguardo ai modelli compatibili.
  • Seite 55: Precauzioni

    Precauzioni Rivolgersi al rivenditore per i lavori di Si devono implementare misure di prote- installazione. zione contro la caduta di questo prodotto. I lavori di installazione richiedono tecnica ed La mancata osservanza di questa precauzione esperienza. può causare una caduta e provocare ferite o La mancata osservanza di questa precauzione incidenti.
  • Seite 56: Precauzioni Per L'installazione

    Tutte le procedure relative all’installazione di questo prodotto dovrebbero essere eseguite da personale di assistenza qualificato o installatori di sistema. Panasonic non potrà essere considerata responsabile per danni patrimoniali e/o non patrimoniali a cose e/o persone derivanti da installazione o funzionamento eseguiti in modo non conforme al presente documento.
  • Seite 57 Metodo di montaggio di questo prodotto Questo prodotto è stato progettato per essere utilizzato come telecamera a montaggio sospeso. Se il prodotto viene montato su un piano di lavoro o inclinato, può non funzionare correttamente e la sua durata di vita può accorciarsi. Procurarsi separatamente i bulloni di ancoraggio.
  • Seite 58: Principali Controlli Operativi

    Principali controlli operativi Telaio di montaggio Piastra di montaggio della telecamera Vite di fissaggio al pannello di soffittatura (x4) Corpo della telecamera Staffa di fissaggio al pannello di soffittatura (x4) Coperchio decorativo <Esempio di installazione> Spazio del soffitto Angolare del cavo di sicurezza (accessorio) Cavo di sicurezza (accessorio) Staffa di montaggio a soffitto...
  • Seite 59: Installazioni

    Installazioni Assicurarsi di aver letto “Precauzioni” (☞ pagina 55) e “Precauzioni per l’installazione” (☞ pagina 56) prima dell’installazione. Leggere anche il manuale di istruzioni della telecamera da installare. Passaggio 1 Posizionare la sagoma A (accessorio) contro il soffitto e praticare un foro. ø12 mm (4 posizioni) Superficie del Praticare 4 fori di 12 mm di diametro.
  • Seite 60 IMPORTANTE: • La resistenza alla trazione del bullone di ancoraggio deve essere superiore a 5 volte il peso totale dei dispositivi installati (inclusi il corpo della telecamera, la staffa di montaggio a soffitto, i bulloni di ancoraggio e tutte le altri parti). •...
  • Seite 61 Doppio dado (da procurarsi del telaio di montaggio) nel foro di montaggio localmente) del telaio di montaggio. Per regolare la posizione del logo Panasonic Vite di fissaggio al sul coperchio decorativo, ruotare il telaio di pannello di montaggio. Notare che il logo Panasonic sarà...
  • Seite 62 Passaggio 8 Nota: • La staffa di montaggio fornita con la tele- Seguire la procedura a seconda del modello camera non viene utilizzata. della telecamera da installare. Montare l’involucro della telecamera sul <Installazione della WV-NW484S> corpo principale della telecamera. Utilizzare la punta per cacciavite fornita con <Installazione della WV-CW504F,...
  • Seite 63 Allineare il segno “OPEN” della telecamera Utilizzare la punta per cacciavite (fornita con la sporgenza dell’attacco della teleca- con la telecamera) per allentare le viti che mera. fissano l’involucro della telecamera e rimuovere l’involucro dal corpo principale della telecamera. Sporgenza Fissare la telecamera all’attacco della tele- camera con la vite di fissaggio della teleca- mera (rossa).
  • Seite 64 <Installazione della WV-SFV631L, Allineare il segno “OPEN” della telecamera WV-SFV611L> con la sporgenza della piastra di fissaggio. Montare la telecamera inserendo le viti di Montare la piastra di fissaggio (fornita con montaggio dell’attacco nei fori della piastra la telecamera) su questo telaio di montag- di fissaggio.
  • Seite 65 Allentare le 4 viti di fissaggio dell’involucro Passaggio 9 utilizzando la punta (fornita con la teleca- Montare il coperchio decorativo su questa mera). staffa di montaggio. Rimuovere l’involucro dalla telecamera e • Allineare il segno “I” del coperchio decora- fissare la telecamera utilizzando una vite di tivo fornito con questo telaio di montaggio fissaggio della telecamera.
  • Seite 66: Dati Tecnici

    Dati tecnici Temperatura ambiente: Da –45 °C a +50 °C Dimensioni: 211,3 mm di diametro x 133,8 mm di profondità di incasso Circa 870 g Peso: Finitura: Coperchio decorativo: Metallo Coperchio decorativo: Resina ABS con rivestimento color argento chiaro Accessori standard Manuale di istruzioni (questo documento) ......1 pz.
  • Seite 67: Характеристики

    Этот кронштейн может использоваться для области со слабой прочностью на выдергивание, как например гипсокартон в двойном потолке, также встроенный тип конструкции делает видимую часть камеры меньше. * Можно использовать WV-Q169A вместо WV-Q169 для моделей, представляющих WV-Q169 в каче- стве доступной дополнительной части.
  • Seite 68: Меры Предосторожности

    Меры предосторожности Монтажные работы следует поручить Необходимо принять меры предосторож- дилеру. ности против падения данного прибора. Монтажные работы требуют технических навы- Несоблюдение данного требования может при- ков и опыта. вести к падению прибора, ведущему к травми- Несоблюдение этого требования может приве- рованию...
  • Seite 69: Меры Предосторожности При Монтаже

    Меры предосторожности при монтаже Все работы по установке данного устройства должны выполняться квалифицированным обслуживающим персоналом или специалистом по установке/монтажу системы. Panasonic не несет ответственности за травмы и материальный ущерб, причиненные вслед- ствие неправильной установки или эксплуатации не в соответствии с данной документа- цией.
  • Seite 70 Способ монтажа данного прибора Даный прибор предназначен для использования в подвесном состоянии. Если изделие монтируется на стол или на наклонное место, то оно не может работать правильно, либо его срок службы может сократиться. Анкерные болты следует приобрести отдельно. Анкерный болт для монтажа кронштейна на потолке не поставляется с потолочным монтажным крон- штейном.
  • Seite 71: Основные Органы Управления

    Основные органы управления Монтажная рама Панель для монтажа камеры Крепежный винт для потолочной плиты (x4) Корпус камеры Крепежный кронштейн для потолочной плиты (x4) Декоративная накладка <Образец установки> Несущая Угловой кронштейн для поверхность потолка страховочного троса для предотвращения падения (комплектующая деталь) Cтраховочный...
  • Seite 72: Монтаж

    Монтаж Обязательно прочтите “Меры предосторожности” (☞ стр. 68) и “Меры предосторожности при мон- таже” (☞ стр. 69) перед установкой. Также прочтите инструкции по эксплуатации для монтажа камеры. Шаг 1 Установите шаблон A (комплектующая деталь) на потолок и сделайте отверстие. ø12 mm (4 положения) Сделайте...
  • Seite 73 <Изображение подсоединения страховоч- Шаг 3 ного троса для предотвращения падения> Закрепите угловой кронштейн для страховоч- ного троса для предотвращения падения (ком- плектующая деталь) на анкерном болте (для подсоединения страховочного троса для пре- дотвращения падения) и подсоедините страхо- вочный трос для предотвращения падения (ком- плектующая...
  • Seite 74 (приобретаем. на тажной рамы. месте) Для регулирования положения логотипа Крепежный Panasonic на декоративной накладке поверните винт для монтажную раму. Имейте в виду, что логотип потолочной плиты Panasonic будет расположен приблизительно под углом 180 ° на противоположной стороне от Крепежный кронштейн...
  • Seite 75 Шаг 8 Замечание: • Монтажный кронштейн, поставляемый с Выполняйте процедуру в соответствии с моде- камерой, не используется. лью камеры для установки. Установите сборку камеры на основной кор- <Установка WV-NW484S> пус камеры. Используйте муфту привода, поставляемую <Установка WV-CW504F, WV-CW504S, с камерой, для снятия винтов, которые кре- WV-NW502S>...
  • Seite 76 Совместите метку “OPEN” на камере с высту- Используйте муфту привода (поставляется с пом приспособления для монтажа камеры. камерой) для ослабления винтов, которые крепят сборку камеры, и снимите сборку с основного корпуса камеры. Выступ Закрепите камеру на приспособлении для монтажа камеры винтом крепления камеры (красного...
  • Seite 77 <Установка WV-SFV631L, WV-SFV611L> Совместите метку “OPEN” на камере с высту- пом крепежной планки. Установите крепежную планку (поставля- Установите камеру путем вставки устано- ется в комплекте с камерой) на ее монтаж- вочных винтов крепления в отверстия кре- ную раму. Используйте 4 винта M4-L8 пежной...
  • Seite 78 Ослабьте 4 крепежный винт сборка с помо- Шаг 9 щью привода (поставляется с камерой). Установите декоративную накладку на данный Снимите сборку с камеры и закрепите ее с монтажный кронштейн. помощью винта крепления камеры. • Совместите метку “I” декоративной накладки, поставляемой в комплекте с данной мон- ВАЖНО: тажной...
  • Seite 79: Технические Характеристики

    Технические характеристики Температура окружающей среды: от –45 °C до +50 °C Размеры: 211,3 mm в диаметре x 133,8 mm в глубине забивки Около 870 g Масса: Отделка: Главный корпус: Металл Декоративная накладка: АБС-пластик с легким покрытием из металлического серебра Стандартные аксессуары Инструкция...
  • Seite 80 Winsbergring 15, 22525 Hamburg Germany Panasonic Canada Inc. 5770 Ambler Drive, Mississauga, Ontario, L4W 2T3 Canada (905)624-5010 www.panasonic.ca © Panasonic System Networks Co., Ltd. 2014 Printed in China Gedruckt in China Imprimé en Chine Impreso en China Stampato in Cina Напечатано в Китае...

Inhaltsverzeichnis