Herunterladen Inhalt Inhalt Diese Seite drucken

MAXDATA M-Book 6000 Ausführliches Benutzerhandbuch

Vorschau ausblenden Andere Handbücher für M-Book 6000:
Inhaltsverzeichnis

Werbung

Verfügbare Sprachen
  • DE

Verfügbare Sprachen

  • DEUTSCH, seite 15

Werbung

Inhaltsverzeichnis
loading

Inhaltszusammenfassung für MAXDATA M-Book 6000

  • Seite 2: Inhaltsverzeichnis

    Contents Installation du pilote ................33 Dépannage ..................34 About this Quick Guide ..............1 Spécifications ..................35 System Startup ..................3 System Map: Front View with LCD Panel Open ......4 Contenidos System Map: Front, Left, Right, & Rear Views .......5 System Map: Bottom View ...............6 Acerca de esta guía rápida ...............37 Keyboard &...
  • Seite 3: Trademarks

    About this Concise User Guide This quick guide is a brief introduction to getting your system started. This is a supplement, and not a substitute for the expanded English language User’s Manual in Adobe Acrobat format on the Device Drivers & Utilities + User’s Manual disc supplied with your computer.
  • Seite 4: Instructions For Care And Operation

    Instructions for Care and Operation Safety Information • Only use an AC/DC adapter approved for use with this computer. The computer is quite rugged, but it can be damaged. To prevent • Use only the power cord and batteries indicated in this manual. Do not this, follow these suggestions: dispose of batteries in a fire.
  • Seite 5: System Startup

    System Startup 1. Remove all packing materials. 2. Place the computer on a stable surface. 3. Securely attach any peripherals you want to use with the computer (e.g. keyboard and mouse) to their ports. 4. Attach the AC/DC adapter to the DC-In jack on the left of the computer, then plug the AC power cord into an outlet, and connect the AC power cord to the AC/DC adapter.
  • Seite 6: System Map: Front View With Lcd Panel Open

    System Map: Front View with LCD Panel Open LED Indicators The LED indicators on the computer display helpful infor- mation about the current status of the computer. Icon Color Description Orange DC Power is Plugged In Green The Computer is On Blinking Green The Computer is in Sleep Mode Number Lock (Numeric Keypad)
  • Seite 7: System Map: Front, Left, Right, & Rear Views

    System Map: Front, Left, Right, Rear & Bottom Views 1. LED Indicators 11. S/PDIF-Out Jack Front 2. DC-In Jack 12. Microphone-In Jack 3. External Monitor Port 13. Headphone-Out Jack 4. RJ-45 LAN Jack 14. Optical Device Drive Bay Left 5. e-SATA Port 15.
  • Seite 8: Keyboard & Function Keys

    Keyboard & Function Keys The keyboard has a numeric keypad for easy numeric data input. Pressing the Fn +NumLk keys turns on/off the nu- Function Keys NumLk & meric keypad. It also features function keys to allow you to ScrLk 3.75G/HSPA change operational features instantly.
  • Seite 9: 3.75G/Hspa Module

    3.75G/HSPA Module If you have included an optional 3.75G/HSPA module in your purchase option, follow the instructions below to install the USIM card (which will be provided by your service provider), and then run the appropriate application supplied with your module. USIM Card Insertion 1.
  • Seite 10: Fingerprint Reader

    Fingerprint Reader Enroll your fingerprints as instructed below before use. User Enrollment  1. Click Start > Programs/All Programs > Protector Suite > Fingerprint Enrollment Control Center, or double click the taskbar icon Note that it is strongly rec- 2. On the first run of the program you will be asked to click the ommended that you enroll Accept button to accept the license.
  • Seite 11: Driver Installation

    Driver Installation  The Device Drivers & Utilities + User’s Manual disc contains the drivers and utilities necessary for the proper operation of the computer. This setup will probably have al- Driver Installation General ready been done for you. If this is not the case, insert the disc and click Install Driv- Guidelines ers (button), or Option Drivers (button) to access the Optional driver menu.
  • Seite 12: Troubleshooting

    Troubleshooting  Problem Possible Cause - Solution Wireless Device Operation Aboard The Wireless LAN/ The modules are off. Check the LED indicator and/or function key Aircraft Bluetooth/3.75G/ indicator to see if the WLAN/Bluetooth/3.75G/HSPA module is on or off The use of any portable HSPA modules cannot (see Table 2 on page 4...
  • Seite 13: Specifications

    Specifications Processor Options BIOS Model A: Phoenix™ BIOS (One 32Mb SPI Flash  ROM) Intel® Core™ i7 Processor i7-620M (2.66GHz) Latest Specification Information 4MB L3 Cache & 1066MHz FSB 15.6" HD/ HD+ TFT LCD The specifications listed in this section Intel®...
  • Seite 14 Storage Mini Card Slots Power (Factory Option) One Changeable Slot 1 for WLAN Module Full Range AC/DC Adapter 12.7mm(h) Optical Device Type Drive (Factory Option) Slot 2 for 3.75G/HSPA AC Input: 100 - 240V, 50 - 60Hz (Super Multi Drive Module or Module DC Output: 19V, 3.42A /18V, 3.5A (65W) Blu-Ray Combo Drive Module)
  • Seite 15: Einhaltung Gesetzlicher Vorschriften Und Sicherheitshinweise

    Über das Ausführliche Benutzerhandbuch Diese Kurzanleitung soll einen Überblick über die Schritte geben, die dazu notwendig sind, das System zu starten. Dieses ist nur eine Ergänzung und kein Ersatz für das erweiterte englischsprachige Benutzerhandbuch, das auf der mitgelieferten Disc Device Drivers & Utilities + User's Manual im Adobe-Acrobat-Format vorliegt. Diese Disc enthält auch die Treiber und Utility-Programme, die für einen einwandfreien Betrieb des Computers notwendig sind (Hinweis: Das Unternehmen behält sich das Recht vor, diese Publikation ohne Vorankündigung zu überarbeiten und den Inhalt zu verändern).
  • Seite 16: Sicherheitsinformationen

    Hinweise zu Pflege und Betrieb Sicherheitsinformationen • Verwenden Sie nur einen AC/DC-Adapter, der für die Verwendung mit die- Das Notebook ist zwar sehr stabil, kann aber dennoch beschädigt wer- sem Computer zugelassen ist. den. Damit es nicht dazu kommt, sollten Sie die folgenden Hinweise •...
  • Seite 17: Schnellstart

    Schnellstart 1. Entfernen Sie das gesamte Verpackungsmaterial. 2. Legen Sie den Computer auf eine stabile Unterlage. 3. Schließen Sie alle Peripheriegeräte, die Sie mit dem Computer verwenden wollen (z. B. Tastatur und Maus), an die entsprechenden Schnittstellen an. 4. Schließen Sie den AC/DC-Adapter an die DC- Eingangsbuchse an der linken Seite des Computers an.
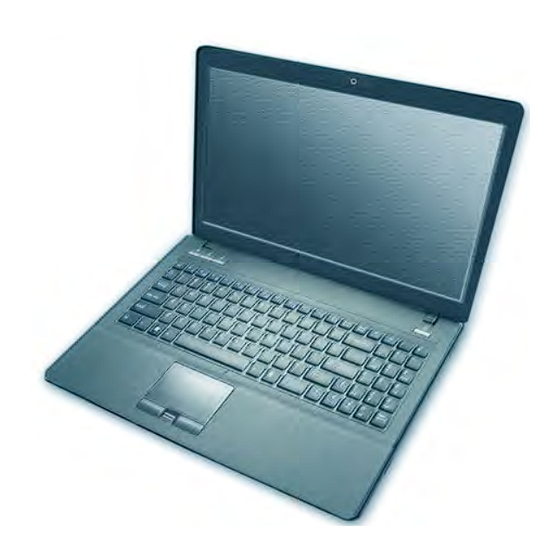
  • Seite 18: Systemübersicht: Ansicht Von Vorne Mit Geöffnetem Lcd-Bildschirm

    Systemübersicht: Ansicht von vorne mit geöffnetem LCD-Bildschirm LED-Anzeigen Die LED-Anzeigen auf dem Computer zeigen wichtige Informationen über den aktuellen Status des Computers. Symbol Farbe Beschreibung Orange Der AC/DC-Adapter ist angeschlossen Grün Der Computer ist angeschaltet Lampe Das System ist im konfigurierten Ener- blinkt grün giesparmodus Die Funktion NumLk (Nummernta-...
  • Seite 19: Systemübersicht: Ansicht Von Vorne, Links, Rechts, Hinten Und Unten

    Systemübersicht: Ansicht von vorne, links, rechts, hinten und unten 1. LED-Anzeigen 11. S/PDIF-Ausgangsbuchse 2. DC-Eingangsbuchse 12. Mikrofon-Eingangsbuchse Vorderseite 3. Schnittstelle für externen 13. Kopfhörer-Ausgangsbuchse Monitor 14. Schacht für optisches Linke Seite 4. RJ-45 LAN-Buchse Laufwerk 5. eSATA Anschluss 15. RJ-11 Modem-Buchse 6.
  • Seite 20: Tastatur & Funktionstasten

    Tastatur & Funktionstasten Numeric Die Tastatur hat eine eingebettete Nummerntastatur für einfache Zahleneingabe. Durch Drücken auf Fn + Num wird die Num & Funktionstasten Rollen Nummerntastatur ein- und ausgeschaltet. Zusätzlich gibt es Funktionstasten, über die Sie direkt zwischen den Funktionen Ein-/Ausschalten des umschalten können.
  • Seite 21: 3.75G/Hspa-Modul

    3.75G/HSPA-Modul Wenn Ihr Modell das optionale 3.75G/HSPA-Modul enthält, folgen Sie den nachfolgenden Anweisungen, um die USIM- Karte zu installieren (Sie erhalten sie von Ihrem Dienstanbieter). Installieren Sie dann die Anwendung. Einsetzen der USIM-Karte 1. Schalten Sie den Computer aus, drehen Sie es herum, und nehmen Sie den Akku heraus (schieben Sie die Riegel in die unten angezeigte Richtung, und ziehen Sie den Akku heraus).
  • Seite 22: Benutzerregistrierung

    Fingerabdruckleser 12. Klicken Sie mit der rechten Maustaste auf das Melden Sie Ihre Fingerabdrücke vor dem Benutzen wie un- Taskleistensymbol , um das Control Center zu starten. Dort ten beschrieben an. können Sie Fingerabdrücke bearbeiten, Anwendungen registrieren, auf das Hilfe-Menü zugreifen usw. Benutzerregistrierung 13.
  • Seite 23: Installation Der Treiber

    Installation der Treiber  Die Disc Device Drivers & Utilities + User's Manual enthält die Treiber und Hilfspro- gramme, die für das einwandfreie Funktionieren des Computers notwendig sind. Mög- Allgemeine Hinweise zur licherweise wurden diese bereits vorinstalliert. Ist das nicht der Fall, legen Sie die Disc ein, Treiberinstallation und klicken Sie auf Install Drivers (Schaltfläche) oder Option Drivers (Schaltfläche), Wenn Sie keine fortgeschrit-...
  • Seite 24: Fehlerbehebung

    Fehlerbehebung  Problem Mögliche Ursache - Lösung Die Benutzung drahtlos angeschlossener Die Module Wireless- Das/Die Modul(e) ist/sind ausgeschaltet. Prüfen Sie anhand der LED- Geräte in Flugzeugen LAN/Bluetooth/ Anzeige und/oder Funktionstastenanzeige, ob das WLAN/Bluetooth/ In der Regel ist die Benut- 3.75G/HSPA können 3.75G/HSPA-Modul ein- oder ausgeschaltet ist (siehe Tabelle 2 auf Seite zung jeglicher tragbarer...
  • Seite 25: Technische Daten

    Technische Daten Prozessor-Optionen Speicher Modell A: Zwei 204-Pin SODIMM-Sockel, Unterstützung von DDR3 1066/1333MHz  Intel® Core™ i7 Prozessor Speicher i7-620M (2,66GHz) Aktualität der technischen Daten Speicher auf bis zu 8GB erweiterbar 4MB L3 Cache & 1066-MHz-FSB BIOS Die in diesem Teil aufgeführten Intel®...
  • Seite 26 Speicher Mini-Card-Steckplätze Umgebungsbedingungen (Werkseitige Option) Ein austauschbares Steckplatz 1 für Wireless-LAN-Modul Temperatur optisches Laufwerk (12,7 mm Höhe) (Super (Werkseitige Option) Steckplatz 2 für In Betrieb: 5ºC – 35ºC Multi-Laufwekrsmodul oder kombiniertes 3.75G/HSPA-Modul Bei Aufbewahrung: -20ºC – 60ºC Blu-Ray-Laufwerksmodul) Relative Luftfeuchtigkeit Kommunikation Eine austauschbare SATA-2,5"-Festplatte In Betrieb: 20 –...
  • Seite 27: Marques Déposées

    A propos de ce Guide Utilisateur Concis Ce guide rapide est une brève introduction à la mise en route de votre système. l s’agit d’un supplément, et non pas d’une alternative au Manuel de l’Utilisateur en Anglais complet au format Adobe Acrobat sur le disque Device Drivers & Utilities + User's Manual fourni avec votre ordinateur.
  • Seite 28: Instructions D'entretien Et D'utilisation

    Instructions d’entretien et d’utilisation Informations de sécurité • Utilisez uniquement un adaptateur AC/DC agréé avec votre ordinateur. L’ordinateur est robuste, mais il peut toutefois être endommagé. • Utilisez uniquement le cordon d’alimentation et les batteries indiqués Afin d’éviter ceci, veuillez suivre ces recommandations : dans ce manuel.
  • Seite 29: Guide De Démarrage Rapide

    Guide de démarrage rapide 1. Enlevez tous les memballages. 2. Posez l’ordinateur sur une surface stable. 3. Connectez fermement les périphériques que vous souhaitez uti- liser avec votre ordinateur (par ex. clavier et souris) à leurs ports respectifs. 4. Branchez l'adaptateur AC/DC à la prise d'entrée DC sur la gauche de l’ordinateur, branchez ensuite le cordon secteur à...
  • Seite 30: Carte Du Système: Vue De Face Avec L'écran Lcd Ouvert

    Carte du système: Vue de face avec l’écran LCD ouvert Indicateurs LED Les indicateurs LED sur votre ordinateur affichent des infor- mations utiles sur l’état actuel de votre ordinateur. Icône Couleur Description Orange L'adaptateur AC/DC est branchée Vert L’ordinateur est allumé Vert Le système est dans le mode de Veille clignotant...
  • Seite 31: Carte Du Système: Vues De Face, Gauche, Droite & Arrière

    Carte du système: Vues de face, gauche, droite, arrière & dessous 1. Indicateurs LED 11. Prise de sortie S/PDIF Face 12. Prise d 'e trée de microphone 2. Prise d’entrée DC 3. Port moniteur externe 13. Prise de sortie haut-parleurs/ casque 4.
  • Seite 32: Clavier & Touches Fonction

    Clavier & touches fonction Le clavier est doté d'un pavé numérique intégré pour une saisie ScrLk Keys des données numériques plus facile. Le fait d'appuyer sur Fn Touches Fonction Verr Num & + Verr Num active ou désactive le pavé numérique. Il est éga- ArrêtDétl lement doté...
  • Seite 33: Module 3.75G/Hspa

    Module 3.75G/HSPA Si votre option d'achat comporte un module 3.75G/HSPA optionnel, suivez les instructions ci-dessous pour installer la carte USIM (qui vous sera fournie par votre fournisseur de service), et installez ensuite l'application. Insérer la carte USIM 1. Eteignez l'ordinateur, retournez-le et retirez la batterie (faites glisser le loquet dans la direction indiquée en dessous et sortez la bat- terie).
  • Seite 34: Lecteur D'empreintes Digitales

    Lecteur d'empreintes digitales Enregistrez vos empreintes digitales comme indiqué ci-des- 13. Si vous passez votre doigt sur le lecteur, à tout moment, vous pouvez accéder au Biomenu pour Verrouiller l'ordinateur, sus avant utilisation. Enregistrer des sites web, accéder aux Enregistrements per- sonnels ou E-Wallet, ouvrir le Centre de contrôle et accéder Enregistrement de l'utilisateur au menu Aide.
  • Seite 35: Installation Du Pilote

    Installation du pilote  Le disque Device Drivers & Utilities + User’s Manual contient les pilotes et les utilitaires nécessaires pour un bon fonctionnement de votre ordinateur. Cette installation aura proba- Directives générales pour blement déjà été faite pour vous. Si ce n'est pas le cas, insérez le disque et cliquez sur Ins- l'installation du pilote tall Drivers (bouton), ou Option Drivers (bouton) pour accéder au menu des pilotes D'une manière générale, sui-...
  • Seite 36: Dépannage

    Dépannage  Problème Cause possible - résolution Utilisation des appareils sans fil à bord d'un avion Les modules LAN sans Le(s) module(s) est (sont) désactivé(s). Vérifiez l'indicateur LED L'utilisation de tout appareil fil/ Bluetooth/3.75G/ et/ou l’indicateur de la touche de fonction pour voir si le module électronique de transmission HSPA ne peuvent pas WLAN/Bluetooth/3.75G/HSPA est activé...
  • Seite 37: Spécifications

    Spécifications Options de processeurs BIOS Modèle A: Phoenix BIOS (SPI Flash ROM de 32Mb)  Processeur Intel® Core™ i7 i7- 620M (2,66GHz) 15,6" (39,62cm) HD/ HD+ TFT LCD Dernières informations de Cache L3 4Mo, bus principal à 1066MHz spécification Mémoire Processeur Intel®...
  • Seite 38 Dispositif de pointage Lecteur de carte Mise en marche Touchpad intégré Lecteur de carte 9-en-1 Adaptateur AC/DC pleine bande MMC (MultiMedia Card) / RS MMC Entrée AC: 100-240V, 50-60Hz Stockage de données SD (Secure Digital) / Mini SD / SDHC Sortie DC: 19V, 3,42A / 18V, 3,5A (65W) (Option d’usine) Un module de lecteur MS (Memory Stick) / MS Pro / MS Duo...
  • Seite 39: Marcas Registradas

    Acerca de esta Guía del Usuario Concisa Esta guía rápida es una breve introducción para poner su sistema en funcionamiento. Es un suplemento y no un sustituto del Manual del usuario completo en inglés en formato Adobe Acrobat del disco Device Drivers & Utilities + User's Manual suministrado con el ordenador.
  • Seite 40: Instrucciones Para El Cuidado Y Funcionamiento

    Instrucciones para el cuidado y funcio- Información de seguridad • Utilice solamente un adaptador de alimentación aprobado para su uso namiento con este ordenador. • Utilice solamente el cable de corriente y las baterías indicados en este El ordenador portátil es muy robusto, pero puede dañarse. Para evi- manual.
  • Seite 41: Guía Rápida Para Empezar

    Guía rápida para empezar 1. Quite todos los materiales del embalaje. 2. Coloque el ordenador en una superficie estable. 3. Conecte en los puertos correspondientes los periféricos que desee utilizar con el ordenador (p. ej. teclado y ratón). 4. Conecte el adaptador AC/DC al conector de entrada DC que está...
  • Seite 42: Mapa Del Sistema: Vista Frontal Con Panel Lcd Abierto

    Mapa del sistema: Vista frontal con panel LCD abierto Indicadores LED Los indicadores LED en su ordenador muestran una valiosa información sobre el estado actual del ordenador. Icono Color Descripción Naranja El adaptador de CA/CC está conectado Verde El ordenador está encendido Verde parpa- El ordenador está...
  • Seite 43: Mapa Del Sistema: Vistas Frontal, Izquierda, Derecha E Posterior

    Mapa del sistema: Vistas frontal, izquierda, derecha, posterior e inferior 1. Indicadores LED 13. Conector de salida de Parte frontal auriculares 2. Conector de entrada DC 14. Bahía de dispositivo óptico 3. Puerto para monitor externo Lateral izquierdo 15. Conector de módem RJ-11 4.
  • Seite 44: Teclado & Teclas De Función

    Teclado & teclas de función El teclado tiene un teclado numérico para una entrada Numeric fácil de datos numéricos. Al presionar Fn + Bloc Num Teclas de función Bloq Num & el teclado numérico se habilita o inhabilita. También Bloq Despl incluye las teclas de función para permitirle cambiar las características operacionales al instante.
  • Seite 45: Módulo 3.75G/Hspa

    Módulo 3.75G/HSPA Si ha incluido un módulo opcional 3.75G/HSPA en su opción de compra, siga las instrucciones siguientes para instalar la tarjeta USIM (suministrada por su proveedor de servicios) y luego instale la aplicación. Insertar la tarjeta USIM 1. Apague el ordenador y gírelo para quitar la batería (deslice los pestillos en la dirección indicada abajo y saque la batería).
  • Seite 46: Lector De Huellas Digitales

    Lector de huellas digitales 13. Si coloca su dedo sobre el lector en cualquier momento, podrá Registre sus huellas digitales como se describe a acceder al Biomenú para bloquear el ordenador, registrar continuación antes de usarlo. sitios de la web, acceder a seguridad personal o E-Wallet, abrir el Centro de control y acceder al menú...
  • Seite 47: Instalación De Controladores

    Instalación de controladores  El disco Device Drivers & Utilities + User’s Manual contiene los controladores y utilitarios necesarios para utilizar el ordenador correctamente. Es probable que esta Directrices generales para la instalación ya haya sido realizada. De no ser así, inserte el disco y haga clic en Install instalación del controlador Drivers (botón) u Option Drivers (botón) para acceder al menú...
  • Seite 48: Solución De Problemas

    Solución de problemas  Problema Posible causa - Solución Uso de dispositivos inalámbricos a bordo Los módulos WLAN, El (Los) módulo(s) está(n) desactivado(s). Compruebe el indicador LED dispositivos Bluetooth y 3.75G/ y/o el indicador de la tecla de función para ver si el módulo WLAN/ electrónicos portátiles HSPA no pueden...
  • Seite 49: Especificaciones

    Especificaciones Opciones de procesadores BIOS Modelo A: Phoenix BIOS (SPI Flash ROM de 32Mb)  Procesador Intel® Core™ i7 i7-620M (2,66GHz) 15,6" HD/ HD+ TFT LCD Información actualizada de Caché de nivel 3 de 4MB, FSB de 1066MHz Memoria especificaciones Procesador Intel®...
  • Seite 50 Dispositivos de almacenamiento Ranuras Mini-Card Alimentación (Opción de fábrica) Una unidad de Ranura 1 para módulo WLAN Adaptador de AC/DC autodetector de dispositivo óptico de 12,7mm(h) corriente (Opción de fábrica) Ranura 2 para módulo intercambiable (módulo unidad Super Multi/ 3.75G/HSPA Entrada AC: 100-240V, 50-60Hz módulo unidad combo Blu-Ray) Salida DC: 19V, 3,42A/18V,3,5A (65W)
  • Seite 51: Informazioni Sulla Guida Rapida Per L'utente

    Informazioni sulla Guida Rapida per l'Utente Questa guida rapida rappresenta un’introduzione rapida all’avvio del sistema. Si tratta di un supplemento e non di una sostituzione del Manuale per l'utente completo in lingua inglese nel formato Adobe Acrobat, memorizzato sul disco Device Drivers &...
  • Seite 52: Istruzioni Per La Custodia E Il Funzionamento

    Istruzioni per la custodia e il funziona- Informazioni di sicurezza • Utilizzare esclusivamente un adattatore approvato per l'utilizzo di questo mento computer. • Utilizzare solo il cavo di alimentazione e le batterie indicate in questo Il computer notebook è abbastanza rigido, ma è possibile che possa manuale.
  • Seite 53: Guida Di Avvio Rapido

    Guida di avvio rapido 1. Eliminare tutti i materiali di imballo. 2. Appoggiare il computer su una superficie stabile. 3. Collegare bene le periferiche che si desidera usare con il computer (per esempio tastiera e mouse) alle porte corrispondenti. 4. Collegare l'adattatore AC/DC al jack di ingresso DC situato alla sinistra del computer, quindi inserire il cavo di alimentazione AC in una presa e collegare il cavo di alimentazione AC all'adattatore AC/DC.
  • Seite 54: Descrizione Del Sistema: Vista Anteriore Con Pannello Lcd Aperto

    Descrizione del sistema: Vista anteriore con pannello LCD aperto Indicatori LED Gli indicatori LED sul computer segnalano importanti infor- mazioni relative allo stato corrente del computer. Icona Colore Descrizione Arancione L'alimentatore è collegato Verde Il computer è acceso Verde lam- Il computer è...
  • Seite 55: Descrizione Del Sistema: Vista Anteriore, Sinistra, Destra E Posteriore

    Descrizione del sistema: Vista anteriore, sinistra, destra, posteriore e inferiore Lato anteriore 1. Indicatori LED 11. Jack uscita S/PDIF 2. Jack di ingresso DC 12. Jack ingresso del microfono 3. Porta per monitor esterno 13. Jack uscita delle cuffie Lato sinistro 4.
  • Seite 56: Tastiera & Tasti Funzione

    Tastiera & tasti funzione Numeric Nella tastiera è stato integrato un tastierino numerico per un facile inserimento dei numeri. Premere Fn + Bloc Num per Tasti funzione Bloc Num & commutare l’attivazione e la disattivazione della tastiera Bloc Scorr numerica. Dispone anche di tasti funzione che consentono di Attiva/disattiva cambiare istantaneamente le funzionalità...
  • Seite 57 Modulo 3.75G/HSPA Se nell'opzione di acquisto è stato incluso un modulo 3.75G/HSPA opzionale, seguire le istruzioni sotto per installare la carta USIM (presumibilmente fornita dal proprio operatore), quindi installare l'applicazione. Inserimento della carta USIM 1. Spegnere il computer, girarlo e rimuovere la batteria (rilasciare i fermi nella direzione indicata sotto e sganciare la batteria facendola scorrere).
  • Seite 58: Lettore D'impronte Digitali

    Lettore d’impronte digitali Registrare le proprie impronte seguendo le istruzioni da poter modificare le impronte digitali, registrare applicazioni, e accedere al menu della Guida, e così via.. seguenti prima dell'uso. 13. Se si fa passare il ditto sul lettore ogni volt ache si può accedere al Biomenu per bloccare il computer, registrare siti web, Registrazione utente accedere a Personal Safe o E-Wallet, aprire il Control Center e...
  • Seite 59: Installazione Driver

    Installazione driver  Il disco Device Drivers & Utilities + User’s Manual contiene i driver e le utilità necessari per il corretto funzionamento del computer. Questa configurazione è stata probabilmente Linee guida generali per già eseguita. In caso contrario, inserire il disco e fare clic sul pulsante Install Drivers l'installazione dei driver (installa driver) o sul pulsante Option Drivers (driver opzionali) per accedere al menu dei Come guida generale, attener-...
  • Seite 60: Risoluzione Dei Problemi

    Risoluzione dei problemi  Problema Possibile causa - Soluzione Funzionamento del dispositivo senza fili a Non è possibile rilevare i II/I modulo/i è/sono disattivato/i. Controllare il LED indicatore bordo di un aereo moduli LAN Wireless, l'indicatore del tasto funzione per vedere se il modulo WLAN/Bluetooth/ Solitamente l’uso Bluetooth e 3.75G/HSPA.
  • Seite 61: Specifiche Tecniche

    Specifiche tecniche Opzioni di processore BIOS Modello A: Phoenix BIOS (SPI Flash ROM da 32Mb)  Processore Intel® Core™ i7 i7- 620M (2,66GHz) 15,6" HD/ HD+ TFT LCD Ultimi aggiornamenti delle Cache L3 da 4MB, FSB a 1066MHz specifiche tecniche Memoria Processore Intel®...
  • Seite 62 Periferiche di memorizzazione Slot Mini-Card Alimentazione (Opzione di fabbrica) Una unità di tipo Slot 1 per il modulo Wireless LAN Adattatore AC/DC a pieno campo ottico sostituibile da 12,7 mm (altezza) (Opzione di fabbrica) Slot 2 per il modulo Ingresso AC: 100-240V, 50-60Hz (modulo unità...

Inhaltsverzeichnis