Werbung
Verfügbare Sprachen
Verfügbare Sprachen
Quicklinks
Werbung

Verwandte Anleitungen für RTW X-series


Inhaltszusammenfassung für RTW X-series
- Seite 1 Bedienungsanleitung/Operating Manual BroadcastMonitor X Serie/Series...
- Seite 2 RTW GmbH & Co. KG 50765 50746 MAN106nX-3U...
- Seite 5 Einführung ..............1-1 Erste Schritte ..............2-1 Tastenfunktionen und Menüs ........3-1 Kalibrierung und Service ..........4-1...
- Seite 6 Introduction ..............5-1 Getting started............... 6-1 Keys and menus ............7-1 Calibration and Service ..........8-1...
- Seite 7 Zeichnungen / Drawings ..........9-1 Anhang A: Technische Daten ........... A-1 Appendix B: Specifications ..........B-1 Anhang C: CE-Konformitätserklärung ......C-1 Appendix C: EC-Declaration of Conformity ....... C-2...
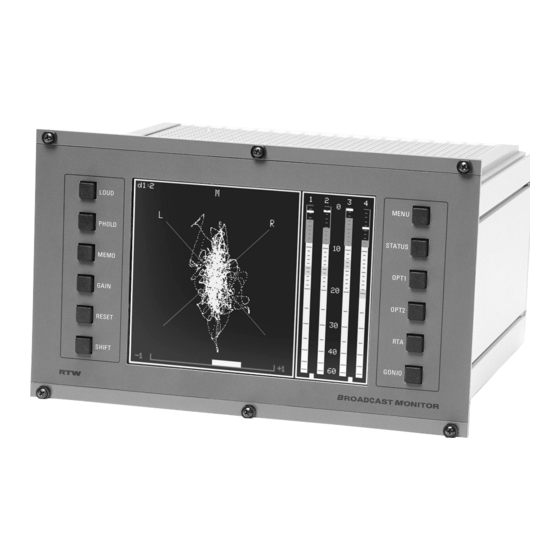
- Seite 9 Bild 1-1: BroadcastMonitor X-Serie (Beispiel: 1067X-3U)
- Seite 11 P i n 1 P i n 1 4 P i n 2 P i n 1 5 P i n 3 P i n 1 6 P i n 4 P i n 1 7 P i n 5 P i n 1 8 P i n 6 P i n 1 9...
- Seite 12 P i n 1 P i n 1 4 P i n 2 P i n 1 5 P i n 3 P i n 1 6 P i n 4 P i n 1 7 P i n 5 P i n 1 8 P i n 6 P i n 1 9...
- Seite 14 Anschlüsse: Seite 2-1 bis 2-3. Anschlüsse: Seite 2-1 bis 2-3. Anschlüsse: Seite 2-1 bis 2-3. Linke Tastenreihe:...
- Seite 15 Rechte Tastenreihe:...
- Seite 17 • Taste „MENU“ Achtung: Beim Verlassen des Menüs durch Anwahl der Betriebsarten „Sta- tus“, „RTA“ und „Gonio“ werden alle Änderungen verworfen.
- Seite 18 • Taste „STATUS“ • Taste „OPT1 • Taste „OPT2“ • Taste „RTA“ • Taste „GONIO“...
- Seite 19 3.4.1. Funktionen in der Grundbetriebsart „Gonio“ • Taste „LOUD“ • Taste „PHOLD“ • Taste „MEMO“ • Taste „GAIN“ • Taste „RESET“ • Taste „SHIFT“ • Tastenkombination „SHIFT“ + „GAIN“...
- Seite 20 3.4.2. Funktionen in der Betriebsart „Menu“ • Taste „Quit“ • Taste „Ret“ • Taste „Up“ • Taste „Dwn“ • Taste „Nxt“ 3.4.3. Funktionen in der Betriebsart „Status“ • Taste „Cha“ • Taste „Dcs“ • Taste „Hws“ • Taste „Bin“ • Taste „Aud“...
- Seite 21 3.4.4. Funktionen in der Betriebsart „RTA“ • Taste „Ref+“ bzw. Taste „Ref-“ • Taste „MNo“ • Taste „Mem“ • Taste „Sto“ • Tasten „Shft“ und „A/P“ • Tasten „Shft“ und „TC“ • Tasten „Shft“ und „Span“ • Tasten „Shft“ und „Gain“ •...
- Seite 22 3.5.1. Hauptmenü Unit-Mode Auswahl der Gerätebetriebsart: „Vectorscope“ („VSC“) oder „Surround“ („Surr/LtRt“) 3.5.2. Untermenü „Input-Routing“...
- Seite 23 3.5.3. Untermenü „General“ 3.5.4. Untermenü „Vectorscope“ (für Betriebsart Gonio) 3.5.5. Untermenü „Correlator nicht...
- Seite 24 3.5.6. Untermenü „PPM-Analog“...
- Seite 25 3.5.7. Untermenü „PPM-Digital“ Digitale (absolute) Skalen: Analoge (äquivalente) Skalen: quasi Digitale Skalen: Quasi-analoge Skalen:...
- Seite 26 3.5.8. Untermenü „Loudness“ 3.5.9. Untermenü „Dig-Errors“...
- Seite 27 3.5.10. Untermenü „Numeric“ 3.5.11. Untermenü „RTA“...
- Seite 28 3.5.12. Untermenü „Surround“...
- Seite 29 Öffnen des Gerätes siehe 4.3. Nur 1063n/1064n On: 110 Ω Ω Ω Ω Ω...
- Seite 30 Hinweis:...
- Seite 31 ( 1 ) ( 2 )
- Seite 32 ca. 5 cm 5 c m 5 c m maximal EINER Die Schrau- ben dürfen nur gelöst, aber keinesfalls herausgedreht werden! Achten Sie darauf, dass die Vierkant-Muttern auf den Befesti- gungsschrauben verbleiben!
- Seite 33 £ 1 x ü £ 1 x ü ( 1 ) ( 2 )
- Seite 35 ü ü...
- Seite 36 ü...
- Seite 37 bis auf ca. 5 cm 5 c m 5 c m...
- Seite 38 ( 2 ) ( 1 )
- Seite 39 Fig. 5-1: BroadcastMonitor X-Series (Example: 1067X-3U)
- Seite 41 P i n 1 P i n 1 4 P i n 2 P i n 1 5 P i n 3 P i n 1 6 P i n 4 P i n 1 7 P i n 5 P i n 1 8 P i n 6 P i n 1 9...
- Seite 42 P i n 1 P i n 1 4 P i n 2 P i n 1 5 P i n 3 P i n 1 6 P i n 4 P i n 1 7 P i n 5 P i n 1 8 P i n 6 P i n 1 9...
- Seite 44 Connections: Page 6-1 to 6-3. Connections: Page 6-1 to 6-3. Connections: Page 6-1 to 6-3. Left handed bank of keys:...
- Seite 45 Right handed bank of keys:...
- Seite 47 • MENU key Quit Please note: When leaving the menus with a function call like i. e. Status, RTA or Gonio all changes that have been made will be discarded!
- Seite 48 • STATUS key • OPT1 key • OPT2 key • RTA key • GONIO key...
- Seite 49 7.4.1. Functions of the main mode Gonio • LOUD key (loudness) • PHOLD key (peak hold) • MEMO key (memory) • GAIN key • RESET key • SHIFT key • SHIFT + GAIN key combination...
- Seite 50 7.4.2. Functions of the Menu mode • Quit key • Ret key • Up key • Dwn key • Nxt key 7.4.3. Functions of the Status mode • Cha key • Dcs key • Hws key • Bin key • Aud key...
- Seite 51 7.4.4. Functions of the RTA mode • Ref+ and Ref- keys • MNo key • Mem key • Sto key • Shft and A/P key combination • Shft and TC key • Shft and Span key combination • Shft and Gain key combination •...
- Seite 52 7.5.1. Main menu Unit-Mode Selection of the unit’s main mode: „Vectorscope“ („VSC“) oder „Surround“ („Surr/LtRt“) 7.5.2. Submenu Input-Routing...
- Seite 53 7.5.3. Submenu General 7.5.4. Submenu Vectorscope (for Gonio mode) 7.5.5. Submenu Correlator...
- Seite 54 7.5.6. Submenu PPM-Analog...
- Seite 55 7.5.7. Submenu PPM-Digital Digital (absolut) scales: Analog (equivalent) scales: quasi Digital scales: Quasi analog scales:...
- Seite 56 7.5.8. Submenu Loudness 7.5.9. Submenu Dig-Errors...
- Seite 57 7.5.10. Submenu Numeric 7.5.11. Submenu RTA...
- Seite 58 7.5.12. Submenu Surround...
- Seite 59 Open the unit see 8.3. 1063n/1064n only On: 110 Ω Ω Ω Ω Ω...
- Seite 60 Important:...
- Seite 61 ( 1 ) ( 2 )
- Seite 62 5 c m 5 c m maximum of ONE turn These screws only must be loosened but in no case they have to be unscrewed! Look after the square nuts, they have to stay at the fastening screws!
- Seite 63 £ 1 x ü £ 1 x ü ( 1 ) ( 2 )
- Seite 65 ü ü...
- Seite 66 ü...
- Seite 67 approx. 5 cm 5 c m 5 c m...
- Seite 68 ( 2 ) ( 1 )
- Seite 70 Weitspannungsnetzteil/ Weitspannungsnetzteil/ 1171-R 1175-R 90 - 264 V AC/24 DC, 630 mA 100 - 240 V AC/24 DC, 2.7 A assendes Netzanschlusskabel • Eurostecker/ • • Kleinspannungsstecker 4-pol./ corresponding power cable • Kleinspannungsstecker 4-pol./ Adapterkabel/ Adapterkabel/ 1186, 4 m 1163, 4 m BroadcastMonitor 106nX-3U •...
- Seite 71 6 x 1 6 5 9 2 8 6 x 1 6 5 9 2 9 4 x 1 6 1 8 0 1 1 6 4 7 5 2 1 1 6 4 7 5 4 1 * * 6 x 1 6 1 2 5 1 6 4 7 5 5 1 * * 6 x 1 6 1 0 6 6...
-
Seite 72: Allgemeine Teile
9.4.1. Allgemeine Teile Best. Nr. Beschreibung Typ/Norm Modelle Mechanische Teile: Allgemeine elektronische Teile: Platinen 9.4.2. Displays... -
Seite 73: Common Parts
9.5.1. Common Parts Part No. Description Type/ Models Standard Mechanical parts: Common electronical parts: PCB’s only only 9.5.2. Displays... - Seite 75 Allgemeine Daten Hinweis: Ω Ω Anzeige Hinweis:...
- Seite 76 Audio Vektorskop Peakmeter Peakmeter analog Peakmeter digital...
- Seite 77 Correlator-Teil AES/EBU Statusmonitor Fernbedienungsschnittstelle Bedien- und Anzeigelemente Lieferumfang BroadcastMonitor 106nX...
- Seite 79 General Note: Ω Ω Display Note:...
- Seite 80 Audio Vectorscope Peakmeter Peakmeter analog Peakmeter digital...
- Seite 81 Correlator section AES/EBU status monitor Remote control Controls and additional display elements Items delivered BroadcastMonitor 106nX-3U...
-
Seite 83: Eg-Konformitätserklärung
Artikel 10.1 der Richtlinie 89/336/EWG und der Richtlinie 73/23/EWG Wir, RTW GmbH & Co. KG erklären in alleiniger Verantwortung, dass das Produkt: RTW BroadcastMonitor X-Serie basierend auf Hardware E540 einschl. aller Optionen auf das sich diese Erklärung bezieht, mit den folgenden Normen bzw. normativen Dokumenten übereinstimmt: 89/336/EWG... - Seite 84 RTW GmbH & Co. KG declare under sole responsibility that the product: RTW BroadcastMonitor X-Series based on hardware E540 incl. all options meets the intend of the Directive 89/336/EEC and Directive 73/23/ECC. Compliance was demonstrated to the following specifications as listed in the official journal of the European...