Inhaltsverzeichnis
Werbung
Verfügbare Sprachen
Verfügbare Sprachen
Quicklinks
Technische und gestalterische Änderungen im Zuge stetiger Produktverbesserungen vorbe
halten.
Sous réserve de modifications techniques et structurelles dans le cadre de l'amélioration
constante des produits.
Su riserva di eventuali modifiche tecniche e strutturali derivate dal costante miglioramento
dei prodotti.
6.2015
CH-Import & Distribution exklusiv durch:
Jumbo-Markt AG, 8305 Dietlikon
BEDIENUNGSANLEITUNG |
MODE D'EMPLOI | ISTRUZIONE D'USO
Wärmewelle
Chau age rayonnant électrique
|
Termoradiatore elettrico
airĕo 2015.4.17
|
Werbung
Inhaltsverzeichnis

Verwandte Anleitungen für Ayce SM-20E


Inhaltszusammenfassung für Ayce SM-20E
- Seite 1 Technische und gestalterische Änderungen im Zuge stetiger Produktverbesserungen vorbe halten. Sous réserve de modifications techniques et structurelles dans le cadre de l‘amélioration constante des produits. BEDIENUNGSANLEITUNG | Su riserva di eventuali modifiche tecniche e strutturali derivate dal costante miglioramento MODE D‘EMPLOI | ISTRUZIONE D‘USO dei prodotti.
-
Seite 2: Erläuterung Der Symbole
02 03 Stellen Sie das Gerät und das Kabel nicht in die Nähe ERLÄUTERUNG DER SYMBOLE von Wärmequellen. Achten Sie darauf, dass das Gerät oder das Kabel nicht durch spitze Gegenstände oder anderes beschädigt wird. Wenn die Netzanschlussleitung dieses Gerätes Entspricht den Europäischen Normen. - Seite 3 04 05 Lassen Sie das Gerät nicht unbeaufsichtigt, wenn es in Stellen Sie stets sicher, dass Ihre Hände trocken sind, Betrieb ist. bevor Sie die Schalter am Gerät, den Stecker oder die Die häufigsten Ursachen einer Überhitzung sind Staub- Steckdose berühren. oder Partikelablagerungen im Gerät.
-
Seite 4: Technische Daten
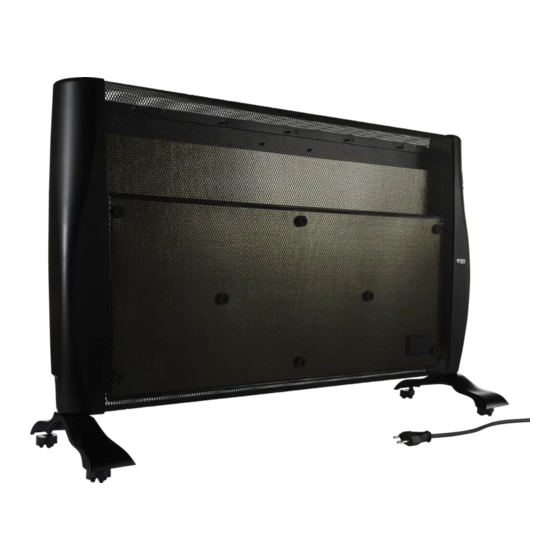
06 07 TECHNISCHE DATEN MONTAGE Nehmen Sie die Wärmewelle und das Zubehör aus der Modell SM-20E Verpackung. Spannung 230-240 V~ Befestigen Sie die Rollen in den Standfuss- Frequenz 50/60 Hz Montagelöchern (Abbildung 2). Leistung 2000W Schutzklasse Fernbedienung Abbildung 2 Befestigen Sie die zwei Standfüsse in der Bodenrille der PRODUKTBESCHREIBUNG Wärmewelle. - Seite 5 08 09 Stellen Sie die Wärmewelle auf eine feste, ebene Fläche. ist eine Lufttemperatur von 7°C. Verbinden Sie das Netzkabel mit einer Netzsteckdose. Drücken Sie die Ein-/Aus-Taste erneut und schalten Drücken Sie den Hauptschalter am Boden des rechten Sie den Betriebsschalter aus, um das Heizgerät Gehäuses (Betriebsschalterposition siehe Abbildung 1).
-
Seite 6: Wartung
10 11 Ausschalt-Timer aktivieren: Drücken Sie zweimal die WARTUNG “ “ Taste oder ”TIMER“-Taste auf der Fernbedienung. WARNUNG : Vor dem Umstellen oder Reparieren stets den Das “ “ Symbol und ”OFF“ beginnen daraufhin zu Netzstecker ziehen. blinken. Sie können nun die “ “-Taste oder “UP+“... - Seite 7 Recht auf Gewährleistung. Zusatzhinweis servicestelle: Während der Garantiezeit können mängelaufweisende Geräte in jeder Jumbo Filiale zurückgebracht werden. Nach Ablauf der Garantiefrist werden die ayce Produkte in jeder Jumbo Filiale angenommen, damit das Produkt entsprechend geprüft werden kann. CH-Import & Distribution exklusiv durch:...
-
Seite 8: Technische Zeichnung
14 15 TECHNISCHE ZEICHNUNG ERSATZTEILLISTE Teilebezeichnung Teilebezeichnung Linker Standfuss Innere Verkabelung Rollenteil Rechter Standfuss Schalter Linkes Gehäuse Thermostat Netzkabel Linke Metallplatte Rechtes Gehäuse Ständer Stütze des Heizelementes Sichtfenster Halterung der Isolatorplatte Silikon-Tastatur Keramikbasis PCB-Bedienfeld PCB-Stator Keramikabdeckung Isolatorplatte Rechte Metallplatte Heizelement Rückseitiges Gitter Frontgitter... -
Seite 9: Description Des Symboles
16 17 Si le câble d’alimentation est endommagé, il doit être DESCRIPTION DES SYMBOLES remplacé par le fabricant, son service après- vente ou des personnes de qualification similaire afin d’éviter un danger. Avant de brancher l’appareil à l’alimentation électrique, Conforme aux réglementations européennes s'appliquant vérifiez que l’interrupteur est sur Arrêt. - Seite 10 18 19 physiques, sensorielles ou mentales réduites ou dénuées Ne mettez pas le radiateur sur un tapis, ne faites pas d’expérience ou de connaissance, s'ils (si elles) sont passer le câble sous un tapis. Placez le câble correctement surveillé(e)s ou si des instructions d’alimentation loin du passage pour qu’il n’entrave pas relatives à...
-
Seite 11: Spécifications Techniques
20 21 ASSEMBLAGE SPÉCIFICATIONS TECHNIQUES Déballez le radiateur et ses accessoires. Modèle SM-20E Assemblez les roues dans les trous de fixation des Tension nominale 230-240 V~ pieds (Image 2). Fréquence nominale 50/60 Hz Puissance nominale 2000W Classe de protection Image 2 Assemblez les 2 pieds dans la rainure inférieure du... - Seite 12 22 23 Régler la Température (Image 2) : Placez le radiateur sur une surface horizontale et rigide. Branchez le cordon d’alimentation dans une prise Pour régler la température désirée dans le mode de électrique adaptée. Appuyez sur l’interrupteur maître en puissance BASSE, MOYENNE ou HAUTE, appuyez sur la bas à...
-
Seite 13: Maintenance
24 25 augmenter ou réduire l’heure. Le minuteur vous MAINTENANCE permet de régler une durée comprise entre 30 minutes AVERTISEMENT: Débranchez toujours l'appareil avant toute et 24 h. Le réglage s’active 3 secondes plus tard, « OFF intervention ou tout déplacement. »... -
Seite 14: Certificat De Garantie
Prénom Nom de famille engagement de qualité inclut également notre service de réparation. Jumbo o re un excellent service de réparation, pour tous les produits ayce. Rue/N° Téléphone Si, contre toute attente, vous rencontrez un problème dû à un défaut de... -
Seite 15: Vue Éclatée
28 29 VUE ÉCLATÉE LISTE DES PIECES Teilebezeichnung Teilebezeichnung N° N° Pied gauche Fil interne Pièce de roue Pied droit Interrupteur Boîtier gauche Thermostat Câble d'alimentation Plaque métallique gauche Boîtier droit Support Support d’élément chau ant Fenêtre transparente Support de plaque isolante Clavier en silicone Base céramique Circuit imprimé... -
Seite 16: Descrizione Dei Simboli
30 31 Tenere l’apparecchio e il cavo lontani da fonti di calore, DESCRIZIONE DEI SIMBOLI oggetti taglienti e qualsiasi altro elemento che possa provocarne il danneggiamento. Se il cavo di alimentazione è danneggiato, esso deve Conforme alle direttive europee applicabili a questo prodotto. essere sostituito dal costruttore o dal suo Servizio Assistenza Tecnica o comunque da una persona con qualifica similare, in modo da prevenire ogni rischio. -
Seite 17: Caratteristiche Tecniche
CARATTERISTICHE TECNICHE I bambini non devono giocare con l’apparecchio. Le operazioni di pulizia e di manutenzione non devono Modello SM-20E essere e ettuate dai bambini senza sorveglianza. Tensione 230-240 V~ I bambini di età inferiore a 3 anni non devono avvicinarsi... -
Seite 18: Funzionamento
34 35 Installare il termoradiatore su una superficie solida e a livello. Nota: inserire 2 batterie da 1,5 V (AAA/LR-03) (non incluse). Tutte le operazioni e ettuabili tramite il telecomando sono identiche a quelle Inserire il cavo di alimentazione in una presa di corrente e ettuabili tramite i controlli manuali. -
Seite 19: Manutenzione
36 37 Impostare la temperatura (figura 2) simbolo “OFF” rimarrà acceso. Allo scadere del timer, il termoradiatore si spegnerà, emetterà 3 segnali sonori e Per impostare la temperatura in modalità BASSA, MEDIA sul display lampeggerà "End". Premere il pulsante “SET” o ALTA potenza, premere il pulsante “... -
Seite 20: Certificato Di Garanzia
Durante il periodo di garanzia, gli apparecchi difettosi possono essere restituiti presso qualsiasi punto vendita jumbo. Dopo la scadenza del periodo di garanzia i prodotti ayce vengono accettati presso tutte le filiali jumbo, a nché il prodotto possa essere di nuovo adeguatamente esaminato. -
Seite 21: Elenco Dei Pezzi Di Ricambio
40 41 SCHEMI TECNICI ELENCO DEI PEZZI DI RICAMBIO Teilebezeichnung Teilebezeichnung Piede sinistro Filo interno Piede destro Parte della rotella Vano sinistro Interruttore Termostato Cavo di alimentazione Piastra in metallo sinistra Statore Vano destro Prop elemento riscaldante Vetro trasparente Supporto della piastra isolante Tastierino in silicone Pannello di controllo PCB Base in ceramica... -
Seite 22: Description Of The Symbols
42 43 If the cord is damaged, it must be replaced by the DESCRIPTION OF THE SYMBOLS Before any use, refer to the corresponding section in this manufacturer, its service agent or similarly qualified persons in order to avoid a hazard. user manual. -
Seite 23: Technical Specifications
44 45 shall not play with the appliance. Cleaning and user TECHNICAL SPECIFICATIONS maintenance shall not be made by children without Model SM-20E supervision. Rated Voltage 230-240 V~ Children of less than 3 years should be kept away unless continuously supervised. -
Seite 24: Operation
36 37 46 47 ASSEMBLY Place the heater on a firm, level surface. Plug the cord set into a fit electrical outlet. Press the main Unpack the heater and the accessories. power switch at the bottom of right housing (Power Fix the caster into the feet mounting hole(Figure 2). - Seite 25 38 39 48 49 MAINTENANCE knob or “DOWN-“on remote control to decrease the desired temperature. WARNING: ALWAYS UNPLUG THE CORD BEFORE MOVING When the air temperature reaches 2°C above the set OR SERVICING temperature, the heater will cut o automatically. CLEANING: IMPORTANT! DO NOT IMMERSE HEATER IN When the air temperature drop 2°C below the set WATER! DO NOT TRY TO DISASSEMBLY THE HEATER.
-
Seite 26: Warranty Certificate
Additional note service center: Defect products can be returned to every Jumbo store during the warranty period. After the warranty period, the ayce products are accepted in any Jumbo store. So the product may be tested in accordance. CH-Import & Distributed exclusively by:... -
Seite 27: Technical Drawing
52 53 TECHNICAL DRAWING SPARE PARTS LIST DESCRIPTION DESCRIPTION Left feet Internal wire Castor part Right feet Switch Left housing Thermostat Power cord Left metal plate Right housing Stator Heating element prop Transparency cut Insulator plate bracket Silicone keypad Ceramic base PCB control panel PCB stator Ceramic cover...