Werbung
Quicklinks
TROUBLESHOOTING
PROBLEM
CAUSE
Main rotor won't move.
ON/OFF switch is set to OFF.
Weak battery.
Suddenly stops and drops while flying.
Battery may be low.
Helicopter may be out of range from controller.
Helicopter is not reacting to the controller.
Helicopter or controller may not be turned ON.
Helicopter is losing control.
May be another infrared (IR) device using the same channel.
Bright lights may be affecting the IR control.
Controller may be too far away from the helicopter.
Helicopter is not holding a charge.
Helicopter might be turned ON while charging.
Controller is low on battery power.
Helicopter will not lift off the ground.
Helicopter may not be fully charged.
Helicopter only turns in one direction.
Helicopter is not trimmed correctly.
NOTE: Helicopter only moves forward and sideways.
Video is not being recorded.
Memory is full. Air Hogs
Hawk Eye™ helicopter LED is
®
flashing orange.
Video and picture buttons were pressed at the
same time.
The helicopter is turned off or is not fully charged during the
video recording period, so the video clip cannot be saved.
Picture is not being taken.
Memory is full. Air Hogs
Hawk Eye™ helicopter LED is
®
flashing orange.
Picture button is being repeatedly pressed too fast.
Helicopter is not charging.
Computer is not turned on.
The Hawk Eye is not properly connected to the Controller AND/
OR the Controller is not properly connected to your computer.
Videos/pictures are blurry.
Video/picture viewing software set to higher than
100% zoom.
Pictures are being taken while the helicopter is
turning/spinning.
NOTE: If normal function of the product is disturbed or interrupted, strong electro-magnetic
interference may be causing the issue. To reset product, turn it completely off, then turn it back on.
For further questions and problems, please visit our website www.airhogs.com.
Safety Precautions:
- Keep hands, hair and loose clothing away from the rotors when power switch is turned ON.
- Turn off controller and helicopter when not in use
- Remove battery from controller when not in use.
- Parental guidance is recommended for the flight.
Care and Maintenance:
- Do not submerge the toy in water. This can damage the
- Always remove batteries from the toy when it is not being
electronic assemblies.
used for a long period of time (controller only).
- Always helicopter and controller in a box away from dirt and
humidity when not being used.
- Wipe the toy gently with a clean damp cloth.
- Keep the toy away from direct heat.
BATTERY SAFETY INFORMATION:
- DO NOT incinerate used batteries.
- Requires 3 x 1.5-V AAA alkaline batteries (not included).
- DO NOT dispose of batteries in fire, as batteries may
- Batteries are small objects.
explode or leak.
- Replacement of batteries must be done by adults.
- DO NOT mix old and new batteries or types of batteries
- Follow the polarity (+/-) diagram in the battery compartment.
(i.e. alkaline/standard).
- DO NOT use rechargeable batteries.
- Promptly remove dead batteries from the toy.
- Dispose of used batteries properly.
- DO NOT recharge non-rechargeable batteries.
- Remove batteries for prolonged storage
- DO NOT short-circuit the supply terminals.
Your Air Hogs
Hawk Eye™ is equipped with a
- Do not allow the batteries or connectors to get wet.
®
Lithium Polymer battery.
- Only charge the batteries with the specified Spin Master™
battery charger.
SPECIAL LiPO BATTERY INSTRUCTIONS:
- Only use the batteries in the device specified by Spin Master™.
- Never charge battery unattended.
- Only use the USB cable specified by Spin Master™.
- Charge battery in isolated area. Keep away from flammable
materials.
Only use the cable which is provided with this product.
- Carefully read the instruction guide and use the batteries
- Do not expose to direct sunlight. There is a risk of the
correctly.
batteries exploding, overheating, or igniting.
- In the unlikely event of leakage or explosion use sand or a
- Do not disassemble, modify heat, or short circuit the
chemical fire extinguisher for the battery.
batteries. Do not place them in fires or leave them in hot places.
- Do not drop or subject to strong impacts.
- Batteries must be recycled or disposed of properly.
Note:
- Parental guidance is recommended when installing or replacing batteries.
CAUTION:
In an environment with electrostatic discharge, the toy may malfunction. This requires the user to reset the toy by unplugging
then re-plugging the USB Cable.
Imported by:
SPIN MASTER INTERNATIONAL, S.A.R.L.,
16 AVENUE PASTEUR, L-2310, LUXEMBOURG
www.spinmaster.com
Air Hogs
, related trademarks & © 2011 Spin Master Ltd. All rights reserved. This
®
product conforms to safety requirements of EN71. • Please retain this information for
future reference. • Please remove all packaging materials before giving to children.
• An adult should periodically check this toy to ensure no damage or hazards exist, if so,
remove from use. • Children should be supervised during play. • Keep addresses and
phone numbers for future reference. • The item inside this package may vary from the
photographs and/or illustrations. MADE IN CHINA.
20041833, 20041834 EML English REV 0
T44382_0006_20041833_EML_IS_R1
HOW TO INSTALL YOUR BATTERIES
BATTERY INSTALLATION – IR CONTROLLER
1. Open the battery door with a screwdriver (pic.1). 2. If used batteries are present, remove these batteries from the unit by pulling up on one end of each
battery. 3. Install new batteries as shown in the polarity diagram (+/-) inside the battery compartment (pic.2). 4. Replace battery door securely (pic.3).
5. Check your local laws and regulations for correct recycling and/or battery disposal.
pic.1
pic.1
HOW TO CHARGE YOUR AIR HOGS
STEP ONE
STEP TWO
Turn the controller off.
Turn the helicopter to
Carefully connect the helicopter
the charge position.
docking port to the controller
docking port. The front of the
helicopter is nearest to the IR
Emitter. Ensure they are properly
connected. Ensure the helicopter
docking port is free of dirt,
especially when you are not using
it. Store it carefully and avoid
getting wet. The charging
connection will be affected if the
connection is rusted or full of dirt.
CONNECTING TO YOUR COMPUTER:
Ask your parents or legal guardian to help you with the next steps.
• Connect the larger end of the provided USB cord to your computer and the smaller end to the controller.
Ensure your computer is ON.
• Once your computer detects the Air Hogs
®
Hawk Eye™ it will recognize it as a drive and start charging its
battery through your computer. You will see the Air Hogs
®
Hawk Eye's™ LED flashing green and
red alternatively.
• When the charge is complete, the Air Hogs
Hawk Eye's™ LED will start flashing green only.
®
Hawk Eye™ from your computer, DO NOT simply un-plug the USB cable from your
• To disconnect the Air Hogs
®
computer and/or from the controller. Safely remove the USB drive as per your computer operating system's
recommendation. For example, in Windows Me
, XP
, 2000
, Vista
or Windows 7
®
®
®
®
Hardware feature; in Apple OS X™ eject the drive.
Things to remember:
1. The helicopter will have 4-5 minutes of flight time after a 35-55 minute charge.
2. Before you recharge the battery or take the next flight, wait 10-15 minutes to let the battery cool down.
TAKING VIDEOS OR PICTURES AFTER CHARGING
• Turn on your Air Hogs
Hawk Eye™ helicopter. Turn on your controller. You are now
®
capable of taking videos or pictures, even before you start flying!
• To take videos, press the video button (left) once (pic.1). The Air Hogs
®
Hawk Eye™
LED will turn from its green standby color to a solid red indicating that video is
recording (pic.2). To stop video recording, press the video button again. The Air Hogs
Hawk Eye™ LED will turn back to green stand-by mode.
NOTE: Do not turn off helicopter while the red light is on for video recording or else the
video cannot be saved. Be sure to stop the video recording by pressing the video button
again in order to save it.
• To take a picture, press the picture button (right) (pic.3). The Air Hogs
®
Hawk Eye™ will
automatically adjust focus, ISO setting and shutter speed to take your image. This
pic.1
LED INDICATIONS
Air Hogs
Hawk Eye™ Helicopter:
®
• Off – LED off
• On – LED solid green
• Video recording mode – LED solid red
• Picture recording mode – LED red for approximately 1.5 seconds
• Charging mode on controller – LED flashing alternatively between
red and green
• Full charge reached – LED flashing green
• Low Air Hogs
®
Hawk Eye™ battery – LED solid orange
• Memory full – LED flashing orange
SOLUTION
Set switch to ON.
Re-charge the helicopter using the charging port OR check batteries in the controller.
Re-charge helicopter or check battery power in controller.
Move closer to the helicopter with the controller or fly heli higher than controller.
Turn helicopter and/or controller ON.
Avoid these if possible, or choose another place to operate the helicopter.
Avoid flying near windows or bright lights or choose another place to operate the
helicopter.
Move closer to the helicopter with the controller.
Turn the Helicopter's switch to OFF.
Replace batteries in the controller.
Charge helicopter fully, until green light starts flashing.
Refer to the TRIMMING section in the instruction sheet.
Ensure there is sufficient memory left in the Air Hogs
Hawk Eye™ by removing older
®
videos and pictures. Refer to "Accessing your video(s) and picture(s)".
Press only the video button.
Make sure to stop video recording by pressing the video button. Do not turn off the
helicopter during video recording or the video clip will not be saved into memory.
Ensure there is sufficient memory left in the Air Hogs
Hawk Eye™ by removing older
®
videos and pictures. Refer to "Accessing your video(s) and picture(s)".
Wait approximately 1.5 seconds or until the Air Hogs
®
Hawk Eye™ LED turns back green
before taking the next picture.
Ensure your computer is turned on. If on, try a different USB port on your computer.
Ensure the helicopter is properly docked on the controller and the USB cord is well
connected to the controller and computer.
Consult your video/picture viewing software manual or online help section to ensure you
are viewing the pictures/videos at 100% zoom. The resolution of the pictures/videos is
QVGA (320 x 240 pixels).
Ensure your helicopter is properly trimmed. Try taking pictures when the helicopter is flying
straight.
If normal operation does not resume, move the product to another location and try again. To
ensure normal performance, change the batteries, as low batteries may not allow full function.
- Keep your helicopter in your sight so that you can supervise it all the time.
- New alkaline batteries are recommended for use in controller to obtain maximum performance.
- Users should keep strict accordance with the instruction manual while operating the product.
- Your controller is tailor-made for the Li-Poly rechargeable battery used in your Air Hogs
®
Hawk Eye™. Do not use it to charge any battery other than that in the helicopter.
Special Note to Adults:
- Regularly examine for damage to the plug, enclosure and other parts. In the
event of any damage, the toy must not be used with the controller until the
damage has been repaired.
- This toy is not intended for children under 3 years old.
- This toy must only be used with the recommended controller.
- Do not try to charge other batteries with the controller.
Battery requirement for Air Hogs
®
Hawk Eye™:
Power Supply :
USB Rating
: Input/Output rating: DC 5V, 1A
Batteries
: 1 x 3.7 V Li-Poly Rechargeable Battery Pack
Requires 1 x 3.7 V Li-Poly Rechargeable Battery Pack (included)
Battery requirement for Controller:
Power Supply :
Rating
: DC 4.5 V, 0.45 W
Requires 3 x 1.5 V "AAA" size batteries (not included)
PRODUCT BATTERY REMOVAL INSTRUCTIONS: Internal battery is factory
installed, product disassembly and battery removal must be performed by an
adult. Do not puncture, cut, tear, compress or deform product during
disassembly. Ensure product is turned off, then use a screw driver to remove all
screws. Separate product body halves to expose internal electronics. When
battery is visible in its entirety use scissors to cut a single battery wire,
immediately wrap the cut wire end with tape to isolate it, repeat until all battery
wires are cut and isolated, and the battery is free from the rest of the product.
Dispose of battery in accordance with your local battery recycling or disposal
laws. NOTE: Opening of product and/or removal of battery will render product
inoperative and voids manufacturer warranties, dispose of remaining product
components in accordance with local laws.
Contains LiPo battery pack. • Battery pack must be recycled or disposed of properly.
• If at any time in the future you should need to dispose of this product please note
that Waste Electrical Products should NOT be disposed of with household waste.
Please recycle where facilities exist. Check with your Local Authority or retailer for
recycling advice. (Waste Electrical and Electronic Equipment Directive).
4
pic.2
pic.2
pic.3
pic.3
HAWK EYE™
®
STEP THREE
STEP FOUR
Connect the small end of the
provided USB cord to the
small USB port located at the
bottom of the controller.
use the Safely Remove
®
takes about 1.5 seconds, during which time the LED will turn from green to red (pic.2).
Once the LED has turned green again, you're ready to take your next picture.
NOTE: If the picture button is pressed while a video is recording, the video is stopped
and a picture is taken. You can start the video recording again by pressing the video button.
• For best picture quality try to keep the helicopter flying straight and steady.
®
• Video quality is also best during straight flight. Keep turns to a minimum.
• Please respect the privacy of others. Proper consent of others and parents should be
taken before taking and/or distributing pictures and videos of other people.
• Ensure there is enough light in the room when you are taking videos or pictures. This
can affect the quality of the videos or pictures. Because of the size of the camera, it
cannot capture a lot of light in a dim room.
pic.2
IR Controller:
• Off/Download/Charging mode – LED off
• On – LED solid red
• Low controller battery – LED flashing red
2
®
VIDEO CAMERA HELICOPTER
+
12
YRS
EXPERT
Air Hogs
Hawk Eye™
®
AIR HOGS
HAWK EYE™
®
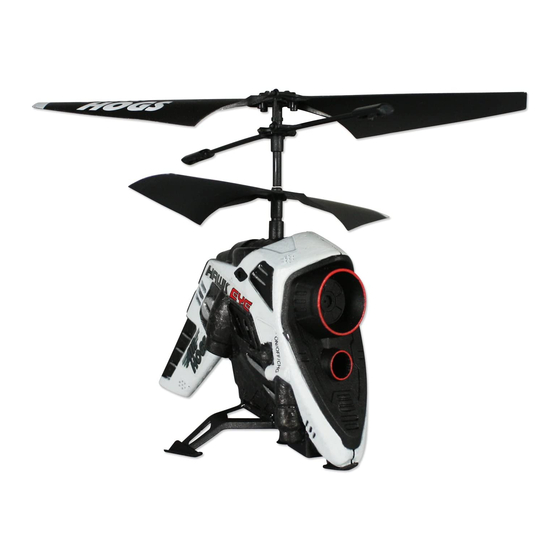
Fly Bar
Connecting Shaft
Lower
Rotor Blade
Power Switch
(ON/OFF/CHG)
WARNING:
STRANGULATION HAZARD
– USB cable can be
a strangulation hazard. Not for children under 3 years.
BECOMING FAMILIAR WITH YOUR IR CONTROLLER
IR CONTROLLER
Throttle stick
(UP/DOWN)
Power Indicator
Power Switch
(ON/OFF)
Controller USB Port
TM
1. TRIMMING YOUR HELICOPTER
STEP
Gently push the throttle up to raise your helicopter .5 m to 1 m high off the ground.
ONE
If your helicopter turns CLOCKWISE, continue to turn the trim to the left until the turning stops
and the helicopter flies straight.
STEP
TWO
Spiral clockwise
If your helicopter turns COUNTERCLOCKWISE, continue to turn the trim button to the right until the turning stops
and the helicopter flies straight.
STEP
THREE
Spiral counterclockwise
2. FLYING INDOORS
Location – Fly in a wide-open room [ideally over 3 m (W) x 5 m (L) x 2.5 m (H)] , away from breakable items. Avoid flying near vents and/or fans, as these may
overpower the Air Hogs
®
Hawk Eye™ and make it difficult to control. NOTE: Always get permission to fly your Air Hogs
CAUTION: Never fly near your face. Keep propeller away from your fingers, hair, eyes and other body parts. Always lift from a flat surface. Never hold the
flying toy in your hand when lifting off. Do not launch flying toy at people or animals.
WARNING: If rotor(s) become damaged or broken, do not fly. Flying with broken rotor(s)
may cause damage or lead to injury.
3. FLIGHT CONTROL (After Trimming)
• Put the helicopter on a smooth surface. Uneven floor surface will affect its lifting off.
• Slowly increase the throttle. NOTE: Once the helicopter leaves the ground it automatically flies forward slowly.
• DO NOT look at the controller but focus on the helicopter.
• As soon as the helicopter leaves the ground, reduce throttle slightly (in the worst case scenerio, the helicopter will drop back
to the floor, but that is better than crashing against the ceiling).
• VERY gently add throttle if the helicopter goes down.
• VERY gently reduce throttle if helicopter goes up.
• For turning, give short and small inputs to the direction stick (most beginners will easily over control the helicopter).
Hover up and down:
When the helicopter flies steadily, you can slowly push the throttle stick up
to make the helicopter fly higher, or release the stick a bit to make the
helicopter fly lower. Only small amounts of stick position change are required
for smooth flying (pic.1 & pic.2).
Hover up
Hover down
pic.1
Flying forward:
The helicopter will fly forward automatically to record your video and will accelerate when given a slight amount of throttle.
pic.3
• With parental supervision, follow the steps for charging your
Air Hogs
®
Hawk Eye™ until your computer recognizes your Air Hogs
Hawk Eye™ as a drive.
NOTE: You can charge and access your picture and video files at the
same time.
• Once your computer detects the Air Hogs
can access this drive to copy the picture(s) and/or video(s) you have
taken. The files will be in standard JPEG format for the pictures and
standard AVI format for videos. You can view the pictures in this drive
using your preferred software.
• If you wish to save your pictures to your computer, you can copy the
files to your computer. Afterwards, to free up memory space on your
TM
INSTRUCTION GUIDE
CONTENTS LIST AND PARTS IDENTIFICATION
IR Controller
Custom USB Cable
Upper Rotor Blade
Camera
LED
DANGER!
ELECTRIC TOY.
NEVER INSERT ANY SHARP OBJECTS,
PINS OR SCREWS INTO THE
Not recommended for children under 12 years of
HELICOPTER AS THIS MAY PUNCTURE
age. As with all electrical products, precaution
THE INTERNAL BATTERY!
should be observed during the handling and use
to prevent electrical shock.
IR Emitter
Direction Stick
(LEFT/RIGHT)
Trimmer Knob
Video Capture
Controller
Docking Port
1
HOW TO FLY YOUR AIR HOGS
HAWK EYE™
®
or
Keep turning clockwise
or
Keep turning counterclockwise
Turn counterclockwise and clockwise:
Hold the helicopter at a height. Push the direction stick toward the left to
turn counterclockwise (pic.3), or push the direction stick toward the right
to turn clockwise (pic.4). Only a small amount of direction stick change is
required for turns.
pic.2
pic.3
ACCESSING YOUR VIDEO(S) AND/OR PICTURE(S)
Air Hogs
Hawk Eye™ for your next mission, you will have to remove the
®
®
files that are on the Air Hogs
®
Hawk Eye™ by transferring the files to
your computer.
• Once you have finished accessing your picture(s) and/or video(s) and the
Air Hogs
Hawk Eye™ is fully charged you may disconnect the Air Hogs
®
Hawk Eye™ as per the charging instructions.
Hawk Eye™ as a drive you
®
• Please note that the Air Hogs
®
Hawk Eye™ does not record sound.
CAUTION: It is rare but possible for a seizure to be triggered by
light flashes or patterns such as those on the computer screen. To reduce
exposure to this potential hazard, sit in a well-lit room, sit an appropriate
distance from the screen and take 10 to 15 minute breaks every hour.
3
FREE
FREE
Access the
Access the
Air Hogs
Air Hogs
Video Editor!
Video Editor!
®
®
Easily add cool images,
Easily add cool images,
sounds and words to
sounds and words to
your videos and pictures
your videos and pictures
and share them with
and share them with
your friends.
your friends.
Visit:
Visit:
www.airhogs.com
www.airhogs.com
to register and access
to register and access
the Video Editor.
the Video Editor.
Instruction Guide
Helicopter
Docking Port
CAUTION:
Picture Capture
Button
Button
Minimum Throttle Position
®
Hawk Eye™ indoors.
pic.4
®
Werbung

Verwandte Anleitungen für Air Hogs HAWK EYE

Inhaltszusammenfassung für Air Hogs HAWK EYE
- Seite 1 Ask your parents or legal guardian to help you with the next steps. overpower the Air Hogs ® Hawk Eye™ and make it difficult to control. NOTE: Always get permission to fly your Air Hogs ® Hawk Eye™ indoors. • Connect the larger end of the provided USB cord to your computer and the smaller end to the controller.
-
Seite 2: Dépannage
Pour voler vers la gauche pour virer dans le sens inverse des aiguilles d’une Pour arrêter la vidéo, appuie une deuxième fois sur le bouton. La DEL du Hawk Eye moins souvent possible. - Seite 3 BEDIENUNGSANLEITUNG das Video-Bearbeitungsprogramm das Video-Bearbeitungsprogramm das Video-Bearbeitungsprogramm zuzugreifen. zuzugreifen. zuzugreifen. AUFLISTUNG DES INHALTS UND BEZEICHNUNG DER TEILE UNG DER TEILE Air Hogs ® Hawk Eye™ IR-Fernbedienung Spezielles USB-Kabel Bedienungsanleitung ® AIR HOGS HAWK EYE™ Oberes Rotorblatt Stabilisatorstange Verbindungswelle Unteres Rotorblatt...
- Seite 4 Computer angeschaltet ist. ® • Sobald dein Computer den Air Hogs Hawk Eye™ erkannt hat, akzeptiert er ihn als ein Laufwerk und beginnt, seinen Akku über deinen ® Computer aufzuladen. Du siehst dabei die LED-Anzeige des Air Hogs Hawk Eye™...
- Seite 5 Örtlichkeit – Nur in einem großen Raum (idealerweise über 3 m breit, 5 m lang und 2,5 m hoch) mit ausreichend Abstand zu zerbrechlichen Gegenständen ® fliegen lassen. Bitte nicht in der Nähe von Belüftungen und/oder Ventilatoren fliegen lassen, da diese Turbulenzen erzeugen können, in denen der Air Hogs Hawk Eye™ schwierig zu kontrollieren ist.
-
Seite 6: Problemlösung
Der Speicher ist voll. Die LED-Anzeige des Air Hogs Hawk Eye™ Achte darauf, dass im Air Hogs Hawk Eye™ ausreichend Speicherplatz übrig ist, ist, indem du blinkt orange. ältere Videos und Bilder entfernst. Lies dir hierzu den Abschnitt „Zugriff auf dein(e) Video(s) und Foto(s)”... - Seite 7 • Per scattare una foto, premere il pulsante foto (a destra) (fig. 3). Lo Hawk Eye™ Air • Assicurarsi che la stanza sia abbastanza luminosa quando si effetuano riprese video Hogs regolerà...
- Seite 8 • Verifica se existe luz suficiente no local onde vais tirar as fotos ou obter as imagens de • Para tirares uma foto, prime o botão (à direita) (imagem 3). O helicóptero Air Hogs ®...
- Seite 9 Hawk Eye™ alleen groen knipperen. WAARSCHUWING: Indien rotor(en) beschadigd of gebroken is/zijn, niet laten vliegen. Vliegen met gebroken rotor(en) kan schade of letself veroorzaken. • De USB-kabel NIET zonder meer uit de computer en/of bediening halen om de Air Hogs ®...