
Verwandte Anleitungen für Kawai ES100


Inhaltszusammenfassung für Kawai ES100
- Seite 1 English Deutsch ES100/ES110 Français F-350 Assembly Instructions F-350 Aufbauanleitung Instructions d’assemblage du F-350 Español Instrucciones de montaje del F-350 Istruzioni di assemblaggio F-350 Italiano...
-
Seite 2: Included Parts
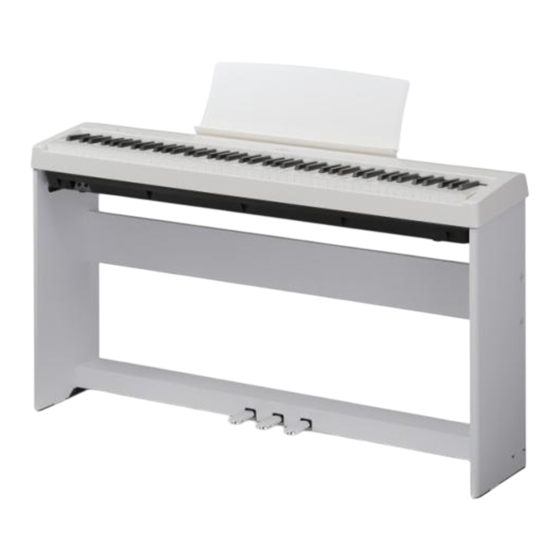
7. When moving the piano, raise the Adjuster Bolt and readjust after moving. Included parts Before attempting to assemble the ES100/ES110 digital piano stand, please ensure that all parts below are included. A Phillips- head screwdriver (not included) will also be required in order to assemble the stand. - Seite 3 3. Mounting the ES100/ES110 digital piano 4. Attaching the ES100/ES110 digital piano onto the stand to the stand Carefully lift the ES100/ES110 digital piano onto the Ensure that all four screws provided with HML-1 are firmly assembled stand. tightened. 5. Connecting the pedal cable...
- Seite 4 7. Wenn Sie das Instrument bewegen, stellen Sie vorher die Pedalstütze etwas höher ein (ohne Bodenkontakt). Beiliegende Teiles Vergewissern Sie sich vor dem Aufbau des ES100/ES110, dass alle nachfolgend aufgelisteten Teile vollständig vorhanden sind. Für den Aufbau benötigen Sie einen Kreuzschraubendreher, welcher nicht im Lieferumfang enthalten ist.
- Seite 5 3. Positionierung des ES100/ES110 auf dem 4. Befestigung des ES100/ES110 auf dem Ständer Ständer Heben Sie das ES100/ES110 vorsichtig auf den aufgebauten Stellen Sie sicher, dass alle vier mit dem HML-1 gelieferten Ständer. Schrauben fest angezogen sind. 5. Verbinden des Pedalkabels 5- 1 Verlegen Sie das Pedalkabel hinter der Rückwand...
- Seite 6 7. Lorsque vous déplacez le piano, montez le boulon régulateur puis réajustez-le une fois le piano en place. Pièces Avant de commencer le montage du le ES100/ES110 stand de piano numérique, assurez-vous que toutes les pièces ci-dessous sont présentes. Prévoyez également un tournevis cruciforme (non inclus) pour le montage de le stand.
- Seite 7 3. Montage du piano numérique ES100/ 4. Fixation du piano numérique ES100/ES110 ES110 sur le stand au stand Posez avec précaution le piano sur le dessus du socle Veillez à ce que les quatre vis fournies avec le HML-1 soient monté.
- Seite 8 7. Al mover el piano, levante el tornillo de ajuste y reajústelo después de moverlo. Piezas incluidas Antes de montar el soporte de piano digital ES100/ES110, asegúrese de que todas las piezas mostradas más abajo vienen incluidas. Un destornillador Phillips (no incluido) también será necesario para montar el soporte.
- Seite 9 3. Colocación del piano digital ES100/ES110 4. Conexión del piano digital ES100/ES110 a en el soporte la base Coloque con cuidado el piano digital ES100/ES110 en el Asegúrese de que los cuatro tornillos suministrados con el soporte ya montado. HML-1 estén bien apretados.
- Seite 10 7. In caso di spostamento dello strumento, alzare la manopola regolatrice e regolarla nuovamente dopo aver riposizionato il pianoforte. Parti Prima di procedere con l’assemblaggio del supporto ES100/ES110 assicurarsi che tutte le parti siano presenti. Per montare il supporto è necessario anche un avvitatore Phillips. Viti (5x25mm) x 4...
- Seite 11 3. Montare il pianoforte digitale ES100/ 4. Fissare il pianoforte digitale ES100/ES110 ES110 sul supporto al supporto Appoggiare con delicatezza il pianoforte digitale ES100/ Verificare che tutte e quattro le viti fornite in dotazione con ES110 sul supporto assemblato. HML-1 siano fissate saldamente.
- Seite 12 F-350 Assembly Instructions 817877 KPSZ-0660 R101 OW1100EGFSI-S1607 Copyright © 2016 Kawai Musical Instruments Mfg. Co.,Ltd. All Rights Reserved. Printed in China...