Herunterladen Inhalt Inhalt Diese Seite drucken
Inhaltsverzeichnis

Werbung

Verfügbare Sprachen

Verfügbare Sprachen

Dampflokomotive
Steam locomotive
Locomotive vapeur
72124.indd 1
Rh 38, ÖBB
Rh 38, ÖBB
Rh 38, ÖBB
72124
PluX
1
72125
Handbuch
Manual
Manuel
www.roco.cc
05.04.2019 12:24:01

Werbung

Inhaltsverzeichnis
loading

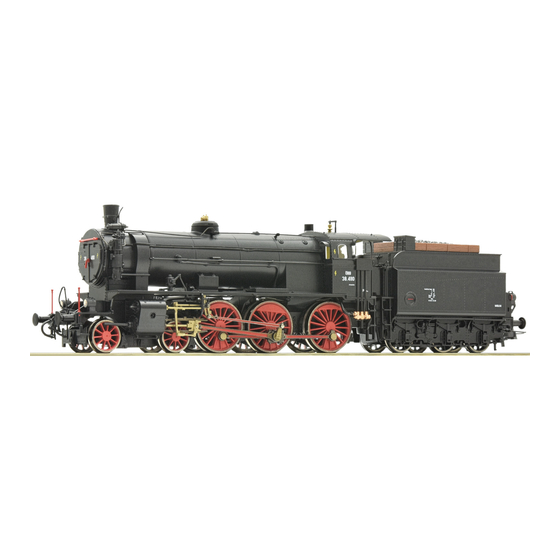
Inhaltszusammenfassung für roco Rh 38 Serie

  • Seite 1 Dampflokomotive Rh 38, ÖBB Steam locomotive Rh 38, ÖBB Locomotive vapeur Rh 38, ÖBB 72124 PluX 72125 Handbuch Manual Manuel www.roco.cc 72124.indd 1 05.04.2019 12:24:01...
  • Seite 2 Auspacken des Modells! / Unwrap model!/ Disimballaggio del modello! 72124.indd 2 05.04.2019 12:24:03...
  • Seite 3 Auspacken des Modells! / Unwrap model!/ Disimballaggio del modello! 72124.indd 3 05.04.2019 12:24:05...
  • Seite 4: Inhaltsverzeichnis

    Inhaltsverzeichnis Einleitung ................5 Der Sounddecoder (für Artikel 72125) ▪ Funktionstastenbelegung der Rh 38 ......18 – 19 Inbetriebnahme ihrer Lokomotive ▪ Lokeinstellungen ............... 20 ▪ Vor der ersten Inbetriebnahme ..........7 ▪ CV-Liste der Rh 38 ............20 – 21 ▪ Einfahren des Modells ............7 ▪...
  • Seite 5: Einleitung

    Lieber Modellbahnfreund, vielen Dank für den Kauf unseres Modells der Rh 38.4110. Die vorliegende Betriebsanleitung soll Ihnen helfen, die umfangreichen Funktionen Ihrer Rh 38.4110 zu nutzen. Wir wünschen viel Vergnügen und eine Gute Fahrt! Ihr Roco-Team 72124.indd 5 05.04.2019 12:24:05...
  • Seite 6 Zum Vorbild Dampflokomotive Reihe 109 / 209 / 38 Von der privaten Österreichischen Südbahn Gesellschaft wurde diese formschöne Dampflokomotive ab 1910 für die immer schwe- rer werdenden Schnellzüge auf deren Hauptstrecke Wien – Triest beschafft. Von 1910 bis 1914 wurden für das österreichische Netz der Südbahn insgesamt 44 Lokomotiven von der Lokomotivfabrik der StEG (Österreichisch-Ungarische Staatseisenbahnge- sellschaft) in Wien, der Lokomotivfabrik Wiener Neustadt und der Wiener Lokomotivfabrik Floridsdorf geliefert.
  • Seite 7: Inbetriebnahme Ihrer Lokomotive

    ▪ Vor der ersten Inbetriebnahme Um schlechte Laufeigenschaften oder Schäden zu vermeiden müssen die Kuppelstangenlager vor der ersten Inbetriebnahme an Ihrer Lokomo- tive geölt werden. Hierzu empfehlen wir den ROCO-Öler 10906. ▪ Einfahren des Modells Es empfiehlt sich, die Lok 30 Minuten vorwärts und 30 Minuten rückwärts ohne Belastung einlaufen zu lassen, damit Ihr Modell einen opti- malen Rundlauf und beste Zugkraft bekommt.
  • Seite 8: Betriebsbedingungen

    ▪ Betriebsbedingungen Der kleinste befahrbare Radius für dieses Modell ist R3 (419,6 mm) des ROCO-Gleissystems Modell mit Kolbenschutzrohre). Radius R2 (358 mm) ist nur bedingt und ohne Kolbenschutz- rohre befahrbar. Der einwandfreie Lauf Ihrer Lokomotive ist nur auf sauberen Schienen gewährleistet. Hierzu empfehlen wir den ROCO-Schienenreinigungswagen Art.
  • Seite 9 ▪ Aufrüstung 1./7. 2./6. Im beigelegten Zurüstbeutel finden Sie auch kleine vorbildgetreue Steckteile für eine erweiterte Aufrüstung Ihrer Lokomo- tive, die Sie bitte vorsichtig montieren. Kleben nur mit audrücklichen Hinweis! Wahlweise 72124.indd 9 05.04.2019 12:24:07...
  • Seite 10: Nachrüsten Eines Seuthe Dampfgenerators

    ▪ Nachrüsten eines Seuthe-Dampfgenerators Zuerst den Rauchfang abnehmen und dann den Seuthe Dampfgenerator Nr. 10 (für den analogen DC-Betrieb oder Nr. 11 (für Digitalen DC-Betrieb) einbauen. Bei einem eingebauten Dampfgenerator im Digitalbetrieb mit einem nachgerüsteten Decoder 10880 ist mit der F1 Taste das Ein- und Ausschalten des Dampfgenerators möglich.
  • Seite 11: Nachrüsten Eines Plux Decoders (Nur Für Artikel 72124)

    ▪ Nachrüsten eines PluX (nur für Artikel 72124) Den Brückenstecker aus der Schnittstelle entfernen (sorgsam Aufbewahren). Zuletzt den Stecker des Steuerbausteines lagerichtig einsetzen. Decoder 16-pin 72124.indd 11 05.04.2019 12:24:08...
  • Seite 12: Wartung Und Pflege Des Modells

    Wartung und Pflege des Modells Damit Ihnen Ihre Lokomotive lange Freude bereitet, sind regelmäßig (ca. alle 30 Betriebsstunden) gewisse Servicearbeiten zweckmäßig. Bevor Sie mit der Pflege und Wartung des Modells beginnen entkuppeln Sie zuerst die Lokomotive vom Tender. ▪ Entkuppeln von Lok und Tender 72124.indd 12 05.04.2019 12:24:08...
  • Seite 13: Reinigung Der Radstromkontakte

    ▪ Reinigung der Radstromkontakte Radstromkontakte können auf unsauberen Schienen leicht verschmutzen. Bitte entfernen Sie vorsichtig mit einem kleinen Pinsel den Schmutz an den gekennzeichneten Stellen. 72124.indd 13 05.04.2019 12:24:08...
  • Seite 14: Schmierung

    ▪ Schmierung Versehen Sie die im Schmierplan gekennzeichneten Stellen mit nur kleinen Öltropfen. Wir empfehlen den ROCO-Öler Art. Nr 10906. Zur Schmierung der Getriebeteile (Zahnräder, Schnecke) empfehlen wir das ROCO-Spezialfett 10905. Im Falle der Schmierung diese Teile bitte nicht ölen.
  • Seite 15 Spurkränze der Vorlauf- und Tenderachsen aus den Schienen springen. Zur Abhilfe bieten wir Ihnen unter der Art.-Nr. 135685 einen Achsensatz mit höheren Spurkränzen an, den Sie auf dem Ersatzteilweg entgeltlich bei Ihrem ROCO-Fachhändler erwerben können. 72124.indd 15 05.04.2019 12:24:09...
  • Seite 16: Haftreifenwechsel

    ▪ Haftreifenwechsel Zuerst den Getriebeboden abnehmen. Achten Sie vor der Herausnahme von Achsen auf die ursprüngliche Lage der Radkontakte! Die Haftreifen mit einer Nadel oder mit einem feinen Schraubendre- her abziehen. Beim Aufziehen der neuen Haftreifen bitte darauf ach- ten, dass dieser sich nicht verdreht. 72124.indd 16 05.04.2019 12:24:09...
  • Seite 17: Kohlebüstenwechsel

    ▪ Kohlebürstenwechsel Tendergehäuse abnehmen: siehe Kapitel Schmierung. Danach wird der Motor ausgebaut und die Kohlebürsten ausgewechselt. ▪ Zusammenbau Achten Sie beim Zusammenbau wieder auf die richtige Lage der Kontakte! 72124.indd 17 05.04.2019 12:24:09...
  • Seite 18: Der Sounddecoder (Für Artikel 72125)

    Der Sounddecoder ▪ Funktionstastenbelegung der RH 38 (Auslieferungszustand) Die Lok ist ab Werk auf die Adresse 03 eingestellt F-Taste Funktion für 72125 Spitzenlichter Sound Pfiff kurz Pfiff lang Schaffnerpfiff Kuppeln Rangiergang Kurvenquietschen (nur bei F1 und Fahrt) Sanden Luftpumpe Injektor 1 Kohleschaufeln 72124.indd 18 05.04.2019 12:24:09...
  • Seite 19: Funktionstastenbelegung Der Rh 38 Im Motorola

    F-Taste Funktion für 72125 F-Taste Injektor 2 Pfiff kurz Entwässern Pfiff lang Mute-Taste Wasserfassen Lichtmaschine Lautstärke + Hilfsbläser Lautstärke - Abschlammen ▪ Funktionstastenbelegung der RH 38 im Motorola ® Betrieb. Die Lok ist ab Werk auf die Adresse 03 eingestellt F-Taste Funktion für Motorola Adresse 1 F-Taste Funktion für Motorola Adresse 2 Spitzenlichter...
  • Seite 20: Lokeinstellungen

    ▪ Lokeinstellungen Der in dieser Lok enthaltene Sounddecoder der Firma ZIMO wurde optimal auf die Lok eingestellt. Dennoch können Sie viele Decoder-Eigenschaf- ten Ihren Wünschen anpassen. Dazu lassen sich bestimmte Parameter (die so genannten CVs – Configuration Variable – oder Register) verändern. Prüfen Sie aber vor jeder Programmierung, ob diese tatsächlich notwendig ist.
  • Seite 21: Einstellungen

    Name Werte Default Werte Mittengeschwindigkeit (bei mittlerer Fahrstufe) - Wert 1 entspricht 1/3 von Vmax. (CV5) 00 – 252 Decoderversionsnummer (nur lesen! Lesbar nur an lesefähigen Verstärkern/Zentralen). Wichtig! Für die Nutzung der MULTIMAUS® zum Erreichen von CV´s größer als CV255: Mit der kurzfristigen Programmierung der CV7 wird nur der anschließende Programmierzugriff mit dem Wert 10 um 100 CV-Plätze erhöht (also CV166 greift dann z.B.
  • Seite 22: Betrieb Mit Dcc-Zentrale (Multimaus®)

    ▪ Betrieb mit DCC-Zentrale (MULTIMAUS®) Da die (MULTIMAUS®) über 20 Funktionstasten und einer Lichttaste verfügt, ist die Bedienung besonders komfortabel. Programmierarten Wir empfehlen: Direkt CV-Programmierung (byteweise) oder POM-Modus (Programmierung am Hauptgleis). Das Programmieren ist im Handbuch der (MULTIMAUS®) beschrieben. Auslesen: Mit einer entsprechenden Ausrüstung (z.B.
  • Seite 23 Table of Content Introduction ................ 24 The Sounddecoder (for 72125) ▪ Rh 38 function key allocation (delivery state) ....37 – 38 Starting locomotive operation ▪ Locomotive Settings ............39 ▪ Prior to initial commissioning ..........26 ▪ CV- list for the Rh 38 ..........39 – 40 ▪...
  • Seite 24: Introduction

    Thank you very much for purchasing our Rh 38 model. These operating instructions will help you to take advantage of the com- prehensive functions of your Rh 38. We hope that you enjoy your product and wish you a pleasant journey! Your Roco Team 72124.indd 24 05.04.2019 12:24:10...
  • Seite 25 The Original Steam locomotive series 109 / 209 / 38 This elegantly-designed steam locomotive was procured by the private Österreichische Südbahn Gesellschaft from 1910 for the increasingly heavy express trains on their main route from Vienna to Trieste. From 1910 to 1914, a total of 44 locomotives were supplied for the Austrian Südbahn (south) railway network by the locomotive factories StEG (Österreichisch-Ungarische Staats- eisenbahngesellschaft) in Vienna, Lokomotivfabrik Wiener Neustadt and the Lokomotivfabrik Floridsdorf (Vienna).
  • Seite 26: Starting Locomotive Operation

    Prior to initial commissioning In order to prevent poor running characteristics or damage from occurring, the coupling rod bearings on your locomotive must be oiled prior to undertaking the initial commissioning. We recommend using the ROCO oiler 10906 ▪ Running the model in During the first five minutes the locomotive should run at medium speed.
  • Seite 27: Operating Instructions

    The smallest radius this model should run is R3 or rather R2 of the Track system (model wit- hout tubes protecting pistons). Your locomotive will run smoothly on clean tracks only. For this purpose we recommend using item no. 46400, Roco track cleaning van, or item no. 10002, Roco track cleaning rubber, for removing heavy dirt.
  • Seite 28: Fittings

    ▪ Fittings In the enclosed accessory bag you will 1./7. find small kits to be fitted on your loco- motive. please mount them cautiously. 2./6. Use glue only if indicated! Optional 72124.indd 28 05.04.2019 12:24:11...
  • Seite 29: Retrofitting A Seuthe Steam Generator

    ▪ Retrofitting a Seuthe steam generator First remove the chimney hood and then install the Seuthe steam generator no. 10 (for analogue DC operation) or no. 11 (for digital DC operation). When dealing with a steam generator installed in digital mode complete with a retrofitted 10880 decoder, it is possible to switch the steam generator on and off via the F1 key.
  • Seite 30: Retrofitting A Plux (Only For Item 72124)

    ▪ Retrofitting a Plux 10880 decoder (only for Item 72124) Decoder 16-pin 72124.indd 30 05.04.2019 12:24:11...
  • Seite 31: Maintenance Of The Model

    Maintenance of the model In order to ensure that your locomotive provides you with many years of pleasure, certain service work at regular intervals (approx. every 30 operating hours) is advisable. Before commencing care and maintenance work on the model, first uncouple the locomotive from the tender. ▪...
  • Seite 32: Cleaning Of Wheel Contact

    ▪ Cleaning of the wheel-current contacts Wheel contacts easily get dirty on tracks which are not entirely clean. Use a small brush to remove dirt from spots after having removed the Loco body or gear cover. 72124.indd 32 05.04.2019 12:24:11...
  • Seite 33: Lubrication

    ▪ Lubrication Only apply small oil Droplets onto the positions as marked in the lubrication plan. We recommend ROCO oiler Art. No. 10906. In order to lubricate the transmission parts (gear wheel, screw), we recommend using ROCO special grease 10905. If lubricated, do not oil these parts.
  • Seite 34 This problem can be remedied with an axle set with high wheel flanges which have the Art. No. 135685 and can be purchased through your ROCO dealer. 72124.indd 34 05.04.2019 12:24:11...
  • Seite 35: Replacement Of Traction Tyres

    ▪ Replacement of traction tyres Pay attention to the original position of the wheel contacts prior to removing the axles. Remove gear box cover. Remove the traction tyres using a needle or a thin screwdriver. When applying the new traction tyres, please ensure that they do not rotate.
  • Seite 36: Replacement Of The Carbon Brushes

    ▪ Carbon Brush Changing First remove tender body see chapter: Lubrication ▪ Assembly Pay attention to the correct position of the contacts during assembly. 72124.indd 36 05.04.2019 12:24:12...
  • Seite 37: The Sounddecoder (For 72125)

    The Sounddecoder ▪ Rh 38 function key allocation (delivery state) The factory-set default address of the lok is 03. F-Key Function for 72125 Light on/off Sound on/off Whistle short Whistle long Conductor whistle Coupling noise Shunting gear Curve squeaking (only with F1 and whilst driving) Sanding Air pump Injector 1...
  • Seite 38 F-Taste Funktion für 72125 F-Taste Injector 2 Whistle short Drain Whistle long Mute-Key Water drum Generator Volume + Blower Volume - Blow-down ▪ Rh 38 function key allocation for Motorola ® The factory-set default adress of the lok is 03. F-Key Function for Motorola address 1 F-Key...
  • Seite 39: Locomotive Settings

    ▪ Locomotive Settings The Sounddecoder has been optimally adjusted to this locomotive. You can still adapt numerous decoder properties to your wishes however. Certain parameters (referred to as CVs – Configuration Variable – or register) can be amended. Please check before each programming if this is really necessary. Incorrect settings can result in the decoder not reacting correctly. The decoder is preprogrammed with 128/28 speed steps at the factory for a high level of comfort.
  • Seite 40 Name Value Default Value Medium speed (at medium running step) - Value 1 corresponds to 1/3 of Vmax. (CV 5) 00 – 252 Decoder Version Number (only read! Readable only on reading-capable amplifiers/centres). Important! Please note when using the MULTIMAUS® in order to achieve CVs greater than CV255: when undertaking a short-term programming of CV7, only the subsequent programming access with the value 10 is increased by 100 CV places (meaning CV166 then accesses CV266 for example).
  • Seite 41: Operation With A Dcc Command Station (Multimaus®)

    ▪ Operation with a DCC Command Station (MULTIMAUS®) As the (MULTIMAUS®) has 20 function keys and a light button, can be especially comfortably operated. Programming modes: The locomotive and carriages react to all DCC programming modes. We recommend: direct CV programming (byte by byte) or POM mode (programming on main track). The programming is described in the MULTIMAUS®...
  • Seite 42 Indice Introduzione ............... 45 Messa in funzione della locomotiva Il Sounddecoder (Solo per articolo 72159) ▪ Prima della prima messa in funzione ......... 45 ▪ Disposizione dei tasti funzione ▪ Rodaggio del modello ............45 della Locomotiva Rh38 (Stato della fornitura) ...56 – 57 ▪...
  • Seite 43 Grazie infinite per aver acquistato il nostro modellino della Rh 38.4110. Queste istruzioni per l‘uso sono state pensate per aiutarla a utilizzare le moltissime funzioni del Suo Rh 38.4110. Le auguriamo buon divertimento e buon viaggio! Il team Roco 72124.indd 43 05.04.2019 12:24:12...
  • Seite 44 Riguardo al modello Locomotiva a vapore serie 109 / 209 / 38 L‘azienda privata Österreichische Südbahn Gesellschaft ha costruito nel 1910 questa elegante locomotiva a vapore per i sempre più pesanti treni espressi della tratta principale Vienna – Trieste. Dal 1910 al 1914 per la rete austriaca della Ferrovia Meridionale la fabbrica locomotive di StEG (Österreichisch-Ungarische Staatseisenbahngesellschaft) di Vienna, la fabbrica locomotive di Wiener Neustadt e la fabbrica locomotive viennese di Floridsdorf hanno prodotto un totale di 44 locomotive.
  • Seite 45: Introduzione

    ▪ Avant la première mise en marche Per prevenire proprietà di scorrimento errati o danni è necessario che prima della prima messa in funzione vengano lubrificati sulla locomotiva i cuscinetti delle aste di giunzione. A tal fine consigliamo l’oleatore ROCO 10906. ▪...
  • Seite 46: Condizioni Di Funzionamento

    Roco. Il funzionamento perfetto della locomotiva è garantito solo su binari puliti Consigliamo a tal fine di usare l’automotrice per la pulizia dei binari ROCO Nr. art. 46400 ed in caso di maggiori impurità la gomma per la pulizia dei binari ROCO N. art. 10002. ▪...
  • Seite 47: Equipaggiamento

    ▪ Equipaggiamento Nel sacchetto degli elementi aggiuntivi compreso nella fornitura sono presenti anche dei piccoli elementi ad 1./7. innesto fedeli agli originali per un’aggiunta supple- mentare alla locomotiva i quali devono essere montati con attenzione. 2./6. Incollare solo se è presente un apposito avviso! A scelta 47 47...
  • Seite 48: Riattrezzaggio Di Un Generatore Di Vapore Seuthe

    ▪ Riattrezzaggio di un generatore di vapore Seuthe Per prima cosa è necessario rimuovere il fumaiolo, quindi montare il generatore di vapore Seuthe n. 10 (per il funzionamento CC analogico o n. 11 (per il funzionamen- to CC digitale). Con un generatore di vapore integrato in modalità di funzionamento digitale e de- coder 10880 riattrezzato, premendo il tasto F1 è...
  • Seite 49: Aggiunta Di Un Decoder Plux (Solo Per Articolo 72124)

    ▪ Aggiunta di un decoder PluX (solo per articolo 72124) Decoder 16-pin 72124.indd 49 05.04.2019 12:24:13...
  • Seite 50: Manutenzione E Cura Del Modello

    Manutenzione e cura del modello Affinché la locomotiva vi possa dare delle soddisfazioni per molto tempo è necessario sottoporla regolarmente (ca. ogni 30 ore di funzio- namento) a determinati interventi di manutenzione. Prima di procedere con la cura e la manutenzione del modello, sganciare prima la locomotiva dal tender. ▪...
  • Seite 51: Pulizia Dei Contatti Per La Corrente Delle Ruote

    ▪ Pulizia dei contatti per la corrente delle ruote I contatti si possono sporcare facilmente in presenza di binari poco puliti. Usando un piccolo pennello, rimuovere con cura lo sporco sui punti contrassegnati. 51 51 72124.indd 51 05.04.2019 12:24:14...
  • Seite 52: Lubrificazione

    ▪ Lubrificazione Applicare poche gocce d’olio sui punti contrassegnati nello schema di lubrificazione. Consigliamo l’utilizzo dell’oleatore ROCO N. art. 10906. Per la lubrificazione dei componenti di trazione (ruote dentate, coclea) consigliamo di usare il grasso speciale Roco 10905. In caso di lubrificazione, non applicare olio su questi componenti.
  • Seite 53 Per eliminare questo problema, Vi offriamo – con il numero di articolo 135685 – una serie di assi con bordini più alti. Questo set potrà essere acquistato come pezzo di ricambio presso il Vostro rivenditore ROCO. 53 53 72124.indd 53...
  • Seite 54: Sostituzione Delle Ruote Aderenti

    ▪ Sostituzione delle ruote aderenti Per prima cosa rimuovere il copricarrello. Rimuovere le ruote aderenti con un ago o un cacciavite sottile. Quando si montano nuove ruote aderenti, si prega di accertarsi che non si spostino. 54 54 72124.indd 54 05.04.2019 12:24:14...
  • Seite 55: Sostituzione Delle Spazzole Di Carbone

    ▪ Sostituzione delle spazzole di carbone Rimuovere l’alloggiamento del tender (vedi capitolo: Lubrificazione) Quindi smontare il motore e sostituire le spazzole di carbone. ▪ Assemblaggio Durante l’assemblaggio accertarsi che i contatti si trovino nella giusta posizione! 55 55 72124.indd 55 05.04.2019 12:24:14...
  • Seite 56: Il Sounddecoder (Solo Per Articolo 72159)

    Il Sounddecoder ▪ Disposizione dei tasti funzione della Locomotiva Rh 38 (Stato della fornitura) Di serie la locomotiva è impostata all’indirizzo 03 F-Tasti Funzione per 72125 Luce on/off Romore della corsa on/off Fischio Fischio Fischio del controllore Aggancio respingenti Manovra Stridio curva Sabbiatura Pompa dell‘aria...
  • Seite 57: Disposizione Dei Tasti Funzione

    F-Tasti Funzione per 72125 F-Tasti Iniettore 2 Fischio Drenaggio (solo con Tasti F1) Fischio Mute-tasti Carico acqua Dinamo Volume + Soffiante Volume - Svuotamento caldaia ▪Disposizione dei tasti funzione della Motorola ® Di serie la locomotiva è impostata all’indirizzo 03 F-Tasti Funzione per Motorola Adresse 1 F-Tasti...
  • Seite 58: Impostazioni Della Locomotiva

    ▪ Impostazioni della locomotiva Il Sounddecoder compreso nella locomotiva della ditta ZIMO è stato impostato in modo ottimale sulla locomotiva. Ciononostante è possibile adattare alle proprie esigenze diverse proprietà del decoder. A tal fine è possibile modificare determinati parametri (i cosiddetti CV – Configuration Variable –...
  • Seite 59 Valori Valori predefiniti Velocità massima 00 – 252 Velocità media (con livello di marcia medio) Il valore 1 corrisponde a 1/3 di Vmax. (CV5) 00 – 252 Codice versione del decoder (solo lettura! Leggibile solo su amplificatori / centrali con capacità di lettura). Importante! Per l’utilizzo della multiMAUS per il raggiungimento di CV superiori a CV255: Con la breve programmazione del CV7 viene aumentato solo il successivo accesso di programmazione con il valore 10 di 100 posizioni CV (quindi CV166 accede ad es.
  • Seite 60: Funzionamento Con Centrale Dcc (Multimaus®)

    Valori Valori predefiniti Indirizzo lungo (Presupposto: In CV29 è attivato l’indirizzo lungo) 100 – 9999 Impostazioni Livello di rumorosità complessivo di tutti i rumori 00 – 255 ▪ Funzionamento con centrale DCC (MULTIMAUS®) Poiché il MULTIMAUS® dispone di 20 tasti funzione ed un tasto luminoso, il funzionamento è particolarmente semplice. Tipi di programmazione Consigliamo Programmazione diretta CV (a byte) o modalità...
  • Seite 61 72124.indd 61 05.04.2019 12:24:15...
  • Seite 62 Ersatzteilliste / Replacement parts / Liste des pièces de rechange Symbolische Darstellung / Symbolic Illustration 72124.indd 62 05.04.2019 12:24:16...
  • Seite 63 Pos. Nr. / Pos.no. Beschreibung / Description Art.-Nr. / Art.no. Preisgruppe /Price bracket Kessel kpl. Betr.Nr. 38.4110 / Boiler ass. 38.4110 142838 Führerhaus komplett / Drivers cab assembly 142839 TS - Rauchfang... / Part set chimney ... 133568 TS - Domring... / Part set dome ring... 135739 Ventil / Valve 121868...
  • Seite 64 Symbolische Darstellung / Symbolic Illustration 72124.indd 64 05.04.2019 12:24:17...
  • Seite 65 Pos. Nr. / Pos.no. Beschreibung / Description Art.-Nr. / Art.no. Preisgruppe /Price bracket TS - Luftpumpe / Part set air pump 122730 Luftpumpe / Air pump 122731 Stellhebel / Lever 133618 TS - Kesselgewicht... / Part set weight... 135738 Umlauf komplett / Running board assembly 135736 TS - Injektoren / Part set injectors 133581...
  • Seite 66 Symbolische Darstellung / Symbolic Illustration 72124.indd 66 05.04.2019 12:24:17...
  • Seite 67 Pos. Nr. / Pos.no. Beschreibung / Description Art.-Nr. / Art.no. Preisgruppe /Price bracket Loklampe / Loco lamp / Lampe de locomotive 135728 SK-Schraube M2x5 / SK-Screw M2x5 / SK-Vis M2x5 115205 Pufferbohle / Buffer beams / Butoirs 135720 Lok-Radkontaktplatine / Loco wheel-contact printed circuit / Roue de loco circuit de contact 133958 Puffer flach / Buffer flat / Tampon plat 131058...
  • Seite 68 Symbolische Darstellung / Symbolic Illustration 72124.indd 68 05.04.2019 12:24:18...
  • Seite 69 Pos. Nr. / Pos.no. Beschreibung / Description Art.-Nr. / Art.no. Preisgruppe /Price bracket TS - Bremsgestänge,... / Part set brake linkage,... 133576 TS - Lokboden,... / Part set loco bottom,... 133566 TS - Bremsgestänge,... / Part set brake linkage,... 135713 Ansatzschraube / Screw / 133797 Zugfeder / Spring...
  • Seite 70 Symbolische Darstellung / Symbolic Illustration 72124.indd 70 05.04.2019 12:24:19...
  • Seite 71 Pos. Nr. / Pos.no. Beschreibung / Description Art.-Nr. / Art.no. Preisgruppe /Price bracket Tendergehäuse / Tender body 142836 Tenderplatine komplett / Printed circuit assembly for tender 134102 Brückenstecker 16 Plux / Connector 16plux 129630 TS - Handgriff,... / Part set handrail,... 133573 TS - Leiter,...
  • Seite 72 Symbolische Darstellung / Symbolic Illustration 72124.indd 72 05.04.2019 12:24:20...
  • Seite 73 Pos. Nr. / Pos.no. Beschreibung / Description Art.-Nr. / Art.no. Preisgruppe /Price bracket Getriebesatz 4tlg. / Gear set 4-parts / Engrenage set 4 pcs. 133589 Schneckenzahnrad doppelt / Worm gear doubled / Réducteur à deux reprises 86400 Zahnrad Z=13 / Gear Z=13 / équipement Z=13 86518 Zahnrad Z=14 / Gear Z=14 / équipement Z=14 133605...
  • Seite 74 o. Abb. / no ill. Glasbox Oberteil Glass box upper part Boîte de verre partie supérieure o. Abb. / no ill. Box Unterteil Box bottom Fond de boîte 72124.indd 74 05.04.2019 12:24:20...
  • Seite 75 Pos. Nr. / Pos.no. Beschreibung / Description Art.-Nr. / Art.no. Preisgruppe /Price bracket Steckteilesatz / Part set / Jeu de 108322 Steckteilesatz / Part set / Jeu de 107808 Zurüstbeutel / Bag with accessories / Sac avec 136703 TS-Verpackung / Part set packaging / Jeu de conditionnement 96317 TS-Austauschradsatz / Part set replacement wheelset / Jeu de roues de remplacement 135685...
  • Seite 76 Cela implique le risque de perte de ces composants. Dans ce cas, vous pouvez commander ces pièces aux S.A.V. ROCO; nous ne pouvons cependant pas donner suite à une réclamation èventuelle à cause de ces pièces perdues.

Diese Anleitung auch für:

Rh 38.4110

Inhaltsverzeichnis