Inhaltsverzeichnis
Werbung
Verfügbare Sprachen
Verfügbare Sprachen
Quicklinks
Bedienungsanleitung
Owner's Manual
Manuel de l'utilisateur
Manuale d'istruzioni
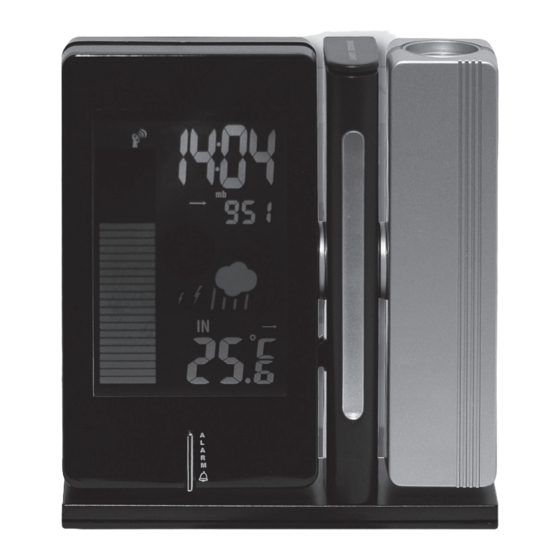
Funkwetterstation mit Farbanzeige und Radio
Wireless color weather station with radio
Station météorologique en coleur, sans fi l, avec radio
Stazione meteo wireless a colori con radio
313510_W164_Manual.indd 1
25.11.09 10:12
Werbung
Inhaltsverzeichnis

Verwandte Anleitungen für Unitec Climate W164


Inhaltszusammenfassung für Unitec Climate W164
- Seite 1 Bedienungsanleitung Owner’s Manual Manuel de l’utilisateur Manuale d’istruzioni Funkwetterstation mit Farbanzeige und Radio Wireless color weather station with radio Station météorologique en coleur, sans fi l, avec radio Stazione meteo wireless a colori con radio 313510_W164_Manual.indd 1 25.11.09 10:12...
- Seite 2 Deutsch 313510_W164_Manual.indd 2 25.11.09 10:12...
- Seite 3 Funkwetterstation W164 mit Farbprojektionsuhr Bedienungsanleitung Vielen Dank für den Kauf dieser Farbprojektionsuhr. Das Gerät wurde mit akteller Technologie und moderns- ten Bauteilen hergestellt; es bietet Ihnen eine genaue und zuverlässige, funkgesteuerte Zeitanzeige, eine Wettervorhersage, den barometrischen Druck, die Innen- und Außentemperatur sowie eine Nachtbeleuch- tung und eine Zeitanzeige-Projektionsfunktion.
- Seite 4 EINSETZEN DER BATTERIEN/ANSCHLUSS • Drücken Sie die Taste Tx an der Rückseite des DES ADAPTERS Fernsensors, um das Funksignal zu übertragen. • Wenn die Funkverbindung eingerichtet ist, werden Projektionsuhr: Temperatur und Luftfeuchtigkeit für den gewähl- Hauptstromquelle: 4,5 V-Adapter in die Buchse ten Kanal am Hauptgerät angezeigt.
- Seite 5 Einstellung der Höhe. Drücken Sie „s“ oder „t“, stant regnerisches oder stürmisches Wetter anzeigt um zunächst die Druckeinheit einzustellen, und und nicht das tatsächliche Wetter wiedergibt, muss drücken Sie dann „PRESSURE“, um die Höhe folgende Feinabstimmung der Wettervorhersage- Ihres Wohnortes einzugeben. genauigkeit durchgeführt werden: Drücken Sie auf „PRESSURE“, um die Einstellung 1) Prüfung der tatsächlichen Wetteraußenbedin-...
- Seite 6 BLAUER LICHTBALKEN (NACHTLICHT) Drücken und halten Sie die Taste „CLOCK “, um zum Uhreinstellmodus zu wechseln. Drücken Sie die Schieben Sie den Schalter „LIGHT BAR” auf die Tasten „s“ bzw „t“ zur Einstellung und „CLOCK” Position „ON”, um den blauen Lichtbalken (Nacht- zur Bestätigung;...
- Seite 7 Wireless color weather station W164 with projection clock Instruction Manual Thank you for purchasing the new generation of color projection clock. Designed and engineered with the state-of-art technology and components, this instrument will provide accurate and reliable radio-controlled time, weather forecast, barometric pressure & In/Out temperature readings as well as night-light and time projection features.
-
Seite 8: Radio-Controlled Clock
BATTERY & ADAPTER INSTALLATION RADIO-CONTROLLED CLOCK The unit will start synchronizing the clock after Projection Clock: battery/adapter installation or reset. In normal mode, Main Power Source: Plug in the 4.5V adapter into press “ “ in the battery compartment to enforce the adapter socket at the back casing searching of radio-controlled clock signal. -
Seite 9: Important Note
IMPORTANT NOTE Press “C/F“ button to select temperature unit C/ F. Different geographical location such as inland area Press “CHANNEL” button to select indoor, Ch1 and or coastal region has different weather forecasting auto-channel scrolling display modes. response. In case your weather forecast always Hold “CHANNEL”... -
Seite 10: Specifications
BATTERY DISPOSAL alarm. Bell icon “ ” appears when alarm is enabled. Replace only with the same or equivalent type Hold “ALARM” to enter alarm time setting mode. recommended by the manufacturer. Press “s” or “t” to enter the desired Hr/ Min valu- es and press “ALARM“... - Seite 11 Station météorologique W164 en couleur, sans fil, avec horloge à projection en couleur Mode d‘emploi Merci d’avoir acheté la nouvelle génération d‘horloge à projection en couleur. Conçu et développé avec une technologie et des composants de pointe, cet instrument vous fournira des informations précises et fiables sur l‘heure radio pilotée, les prévisions du temps, la pression barométrique, la température intérieure/extérieu-...
- Seite 12 INSTALLATION DES PILES ET DE • Lorsque la connexion RF est établie, la tempéra- L‘ADAPTATEUR ture et l‘humidité correspondant au canal sélecti- onné apparaissent sur l‘unité principale. Horloge à projection : Source d‘alimentation principale : branchez HORLOGE RADIO PILOTÉE l‘adaptateur de 4,5 V dans la prise d‘adaptateur au dos du boîtier L‘unité...
-
Seite 13: Remarque Importante
Appuyez sur le bouton «PRESSURE» pour sélection- 1) Vérifiez, dehors, les conditions météorologiques ner l‘unité de pression : hPa, inHg ou mb. actuelles 2) Accédez au mode de paramétrage de l‘altitude et réglez l‘altitude correctement. Augmentez ou REMARQUE IMPORTANTE diminuez le paramètre altitude de 20 m et quitter. Certaines zones géographiques telles que l‘intérieur Recommencez cette opération jusqu‘à... -
Seite 14: Barre Lumineuse Bleue (Veilleuse)
HEURE LOCALE, FUSEAU HORAIRE PROJECTION DE L‘IMAGE Maintenez «ZONE» pour accéder au mode réglage Pour projeter l‘image de l‘heure sur le mur ou le du fuseau horaire. Appuyez sur «s» ou «t» pour plafond, appuyez sur «SNOOZE/LIGHT» ou mettez saisir la valeur du décalage horaire souhaité de –12 le commutateur à... - Seite 15 Stazione meteo W164 wireless e a colori e orologio con proiezione Manuale d‘istruzioni Grazie per aver acquistato l’orologio con proiezione a colori di nuova generazione. Progettato e realizzato con tecnologie e componenti allo stato dell’arte, questo strumento garantisce valori precisi e affidabili di: ora radio- controllata, previsioni meteo, pressione barometrica e temperatura interna/esterna nonché...
- Seite 16 INSTALLAZIONE DELLA BATTERIA E DELL’ADATTATORE OROLOGIO RADIOCONTROLLATO Orologio a proiezione: L’unità inizia a sincronizzare l’orologio dopo l’installazione della batteria/dell’adattatore o del loro Fonte di alimentazione principale: inserire l’adattatore reset. In modalità normale, premere « » all’interno da 4,5 V nella presa dell’adattatore situata sul retro del vano batterie al fine di avviare la ricerca del seg- del dispositivo nale emesso dall’orologio radiocontrollato.
-
Seite 17: Nota Importante
SOLEGGIATO PARZIALMENTE NUVOLOSO PIOGGIA TEMPORALI NUVOLOSO NOTA IMPORTANTE: 2) Accedere alla modalità di impostazione dell’altitudine e regolarla di conseguenza. Aumen- Località geografiche diverse come ad esempio zone tare o ridurre l’impostazione dell’altitudine di 20 dell’entroterra o costiere presentano una diversa m (o 60ft) alla volta poi uscire. - Seite 18 INDICATORE DEL TREND DELLA Per attivare la retroilluminazione, premere «SNOO- TEMPERATURA ZE/LIGHT» oppure portare l’interruttore a scorrimen- to «BACKLIGHT» in posizione «ON». L’icona indica In aumento, Stabile e In calo se la variazione della temperatura è superiore a 1 grado C NOTA: la funzione di retroilluminazione continua è...
-
Seite 19: Smaltimento Della Batteria
SMALTIMENTO DELLA BATTERIA Unità interna: da 0°C a + 50°C (da +32°F a +122°F) Sensore remoto: da –20°C a +60°C (da –4°F a +140°F) Trasmissione: fino a 30 m (98 ft.) in spazi aperti, RF434 MHz Risoluzione temp.: 0,1°C (o 0,2°F) Orologio: DCF77 radiocontrollato, backup al quarzo Alimentazione: adattatore da 4,5 V e 3 batterie AAA per l’orologio a proiezione... - Seite 20 Humidité atmosphérique ou température intérieur / extérieur Umiditá atmosferica o temperatura interno / esterno Aussentemperatur Outdoor temperature Température extérieure Temperatura esterna Luftfeuchtigkeit Humidity Humidité atmosphérique Umiditá atmosferica W164 - 313510.00 Tegro AG CH-8603 Schwerzenbach 313510_W164_Manual.indd 20 25.11.09 10:12...