
Verwandte Anleitungen für Cameo Light PIXBAR 600 PRO IP65


Inhaltszusammenfassung für Cameo Light PIXBAR 600 PRO IP65
- Seite 1 USER´S MANUAL BEDIENUNGSANLEITUNG MANUEL D`UTILISATION MANUAL DE USUARIO INSTRUKCJA OBSŁUGI MANUALE D‘ USO PIXBAR 600 PRO IP65 PROFESSIONAL OUTDOOR RGBWA+UV LED BAR CLPIXBAR600PROIP65...
-
Seite 2: Preventive Measures
Questo dispositivo è stato sviluppato e prodotto in conformità con elevati standard qualitativi che ne garantiscono il regolare funzionamento per molti anni. Leggete attentamente questo manuale d‘uso per utilizzare al meglio il vostro nuovo prodotto Cameo Light. Per maggiori informazioni su Cameo Light consultare la nostra pagina Web WWW.CAMEOLIGHT.COM. -
Seite 3: Sicherheitshinweise
25. Do not step on the power cord. Make certain that the power cable does not become kinked, especially at the mains outlet and/or power adapter and the equipment connector. 26. When connecting the equipment, make certain that the power cord or power adapter is always freely accessible. Always disconnect the equip- ment from the power supply if the equipment is not in use or if you want to clean the equipment. -
Seite 4: Bei Geräten Mit Netzanschluss
brennbaren Materialien, Flüssigkeiten oder Gasen in Berührung. 12. Sorgen Sie dafür, dass kein Tropf- oder Spritzwasser in das Gerät eindringen kann. Stellen Sie keine mit Flüssigkeit gefüllten Behältnisse wie Vasen oder Trinkgefäße auf das Gerät. 13. Sorgen Sie dafür, dass keine Gegenstände in das Gerät fallen können. 14. -
Seite 5: Mesures Préventives
VORSICHT! WICHTIGE HINWEISE IN BEZUG AUF LICHT-PRODUKTE! 1. Das Produkt ist für den professionellen Einsatz im Bereich der Veranstaltungstechnik entwickelt worden und ist nicht für die Raumbeleuchtung in Haushalten geeignet. 2. Blicken Sie niemals, auch nicht kurzzeitig, direkt in den Lichtstrahl. 3. -
Seite 6: Medidas De Seguridad
34. Respectez une distance minimale de 0,5m par rapport à des matériaux inflammables. 35. Si vous désirez alimenter plusieurs projecteurs simultanément, les conducteurs du câble secteur doivent posséder une section minimale de 1,5 mm². Dans l’Union Européenne, les câbles électriques doivent être de type H05VV-F ou équivalent. Adam Hall propose des câbles secteur adaptés. De tels câbles permettent d’alimenter plusieurs appareils par renvoi secteur de l’un à... - Seite 7 PARA LOS EQUIPOS CON TOMA ELÉCTRICA: 22. ADVERTENCIA: Si el cable eléctrico está provisto de un contacto de protección, debe conectarse a una toma eléctrica con conexión a tierra. No desactivar nunca esta conexión de protección a tierra del cable eléctrico. 23.
-
Seite 8: Środki Ostrożności
ŚRODKI OSTROŻNOŚCI 1. Należy dokładnie przeczytać niniejszą instrukcję. 2. Wszystkie informacje i instrukcje przechowywać w bezpiecznym miejscu. 3. Należy przestrzegać zaleceń. 4. Należy przestrzegać wszystkich wskazówek ostrzegawczych. Nie wolno usuwać wskazówek bezpieczeństwa ani innych informacji znajdujących się na urządzeniu. 5. Używać urządzenia wyłącznie w sposób zgodny z jego przeznaczeniem. 6. -
Seite 9: Misure Precauzionali
Trójkąt równoboczny z symbolem błyskawicy sygnalizuje nieizolowane, niebezpieczne napięcie we wnętrzu urządzenia, które może spowodować porażenie prądem. Trójkąt równoboczny z wykrzyknikiem oznacza ważne wskazówki dotyczące obsługi i konserwacji. Ostrzeżenie! Ten symbol ostrzega przed gorącymi powierzchniami. Podczas użytkowania niektóre elementy mogą się nagrzać. Urządzenie można dotykać... - Seite 10 25. Non calpestare il cavo di rete. Accertarsi che i cavi sotto tensione, in particolare della presa di rete o dell‘adattatore di rete, non vengano pizzicati. 26. Durante il cablaggio del dispositivo, verificare sempre che il cavo di rete e l‘adattatore di rete siano costantemente accessibili. Staccare sempre il dispositivo dall‘alimentazione di rete quando non è...
-
Seite 11: Operation
INTRODUCTION / EINFÜHRUNG / INTRODUCTION / INTRODUCCIÓN / WPROWADZENIE / INTRODUZIONE Introduction PROFESSIONAL OUTDOOR RGBWA+UV LED BAR CLPIXBAR600PROIP65 CONTROL FUNCTIONS: 2-channel, 6-channel 1, 6-channel 2, 8-channel, 12-channel, 74-channel, 78-channel DMX control Master / Slave mode Standalone Function FEATURES: Ultra-bright 6in1 RGBWA + UV 12 W LEDs, flicker-free operation, Single Pixel Control,7 DMX modes, DMX 512 control, RDM enabled, Master/Slave operation, standalone programs, silent operation by convection cooling, 2 diffuser discs included, screen, adjustable mounting/support bracket included, Neutrik 5-pin X-HD DMX connections, Neutrik powerCON TRUE1 input and output, operating voltage 100 - 240 V AC / 50 - 60 Hz, power consumption 160 W... - Seite 12 Introducción BARRA DE LED PROFESIONAL RGBWA+UV DE EXTERIOR CLPIXBAR600PROIP65 MODOS DE CONTROL: Modo DMX de 2 canales, 6 canales (1), 6 canales (2), 8 canales, 12 canales, 74 canales y 78 canales Modo Maestro/Esclavo Modo Autónomo CARACTERÍSTICAS: LED ultrabrillantes RGBWA+UV de 12 W 6 en 1, funcionamiento sin parpadeo, control individual de píxeles, 7 modos DMX, control por DMX512, compatible con RDM, modo Maestro/Esclavo, modo Autónomo, funcionamiento silencioso gracias a la refrigeración por convección, 2 difusores y un panel incluidos, pie/soporte de montaje ajustable incluido, conectores Neutrik de 5 pines X-HD para DMX, conectores Neutrik powerCON TRUE1 de entrada y salida, alimentación eléctrica de 100-240 VAC, 50/60 Hz, consumo de 160 W...
- Seite 13 CONNECTIONS, CONTROLS AND INDICATORS / ANSCHLÜSSE, BEDIEN- UND ANZEIGEELEMENTE / CONNECTEURS, CONTRÔLES ET INDICATEURS / CONEXIONES, CONTROLES E INDICADORES / PRZYŁĄCZA, ELEMENTY OBSŁUGI I WSKAŹNIKI POWER IN Neutrik powerCON TRUE1 power input socket with rubber sealing cap. Operating voltage 100 - 240 V AC / 50 - 60 Hz. Connection via the supplied powerCON TRUE1 power cable (when not in use, always put the rubber sealing cap back on).
- Seite 14 DMX IN Cable with a 5-pin Neutrik X-HD male plug for connecting a DMX controller (e.g. DMX console). Kabel mit männlichem 5-Pol Neutrik X-HD Stecker zum Anschließen eines DMX-Kontrollgeräts (z.B. DMX-Pult). Câble avec connecteur XLR X-HD 5 points mâle, pour branchement d’un contrôleur DMX (par exemple, pupitre DMX). Cable con conector Neutrik X-HD macho de 5 pines para conectar un equipo de control DMX (como una mesa DMX).
- Seite 15 Element wyrównujący ciśnienie, dzięki któremu możliwe jest uniknięcie gromadzenia się wody wewnątrz obudowy. Element ten należy chronić przed zabrudzeniem w celu zapewnienia prawidłowego działania urządzenia. Elemento di compensazione della pressione per evitare la formazione di acqua di condensa all’interno della cassa. Per assicurare il funzionamento corretto, l’elemento deve essere protetto dallo sporco.
-
Seite 16: Internal Programs
OPERATION / BEDIENUNG / UTILISATION / OPERACIÓN / OBSŁUGA / UTILIZZO NOTE: When the spotlight is properly connected to the mains, the following information appears successively on the display during the startup process: “Update Wait ...” (only for service purposes), “WELCOME TO cameo” and the software version “SOFTWARE V1.xx”. After this operation, the spotlight is ready for use and changes to the mode that was previously selected. - Seite 17 Dimmer curves linear The light intensity increases linearly with the DMX value. square / exponential Adjustment of the light intensity is finer in the lower DMX value range and coarser in the upper DMX value range. I. square / logarithmic The light intensity can be adjusted coarsely in the lower DMX value range, and finely in the upper DMX value range.
-
Seite 18: Interne Programme
HINWEIS: Sobald der Scheinwerfer korrekt am Stromnetz angeschlossen ist, werden während des Startvorgangs nacheinander verschiedene Informationen im Display angezeigt: „Update Wait...“ (nur für Servicezwecke), „WELCOME TO cameo“ und die Softwareversion „SOFTWARE V1.xx“. Nach diesem Vorgang ist der Scheinwerfer betriebsbereit und wechselt in die Betriebsart, die zuvor angewählt war. INTERNE PROGRAMME Drücken Sie die MODE-Taste so oft, bis im Display eines der 15 internen Programme erscheint. -
Seite 19: Dmx Startadresse Und Dmx-Modus
Dimmerkurven linear Die Lichtintensität steigt linear mit dem DMX-Wert an square / exponentiell Die Lichtintensität lässt sich im unteren DMX-Wertbereich fein und im oberen DMX-Wertbereich grob einstellen I. square / logarithmisch Die Lichtintensität lässt sich im unteren DMX-Wertbereich grob und im oberen DMX-Wertbereich fein einstellen S-Curve Die Lichtintensität lässt sich im unteren und oberen DMX-Wertbereich fein und im mittleren DMX-Wertbereich grob einstellen... - Seite 20 AUTOLOCK Neben der Möglichkeit, den Scheinwerfer manuell vor versehentlicher und unbefugter Bedienung zu schützen, kann diese Funktion auch automa- tisch erfolgen. Drücken Sie die MODE-Taste so oft, bis in der oberen Zeile des Displays „AUTOLOCK“ erscheint. Drücken Sie ENTER und wählen mit Hilfe der Tasten UP und DOWN den gewünschten Betriebszustand „ON“...
- Seite 21 COURBE DE DIMMER (DIMCURVE) Appuyez plusieurs fois sur la touche MODE, jusqu’à ce que la mention «DIMCURVE» apparaisse dans la ligne supérieure de l’écran. l’affichage ; vous pouvez alors choisir, via les touches UP et DOWN, l’une des quatre courbes de dimmer disponibles. Validez votre choix en appuyant sur la touche ENTER.
-
Seite 22: Fonction De Verrouillage
FONCTION DE VERROUILLAGE Pour protéger le projecteur de toute manipulation accidentelle ou non autorisée, vous pouvez verrouiller ses commandes. Pour ce faire, maintenez enfoncées les touches UP et DOWN pendant environ 5 secondes. La mention LOCKED apparaît alors à l’écran, et il est impossible de modifier les valeurs de paramètres via les touches. - Seite 23 Utilice ahora los botones UP y DOWN para cambiar el número de repeticiones del programa (FQN: 01 = una sola repetición, FQN: 99 = los programas se repetirán 99 veces). Pulse ENTER para confirmar. CURVA DE ATENUACIÓN (DIMCURVE) Pulse el botón MODE hasta que aparezca en pantalla «DIMCURVE». Pulse ENTER y, con los botones UP y DOWN, seleccione una de las 4 curvas de atenuación.
- Seite 24 Ahora la pantalla mostrará «LOCKED» y ya no podrá realizar cambios en la configuración del foco con los botones de control. Para desbloquear, mantenga pulsados durante unos 5 segundos los botones UP y DOWN simultáneamente. La pantalla mostrará el texto que había previamente. AUTOBLOQUEO Además de la función de bloqueo manual del foco contra la operación accidental y no autorizada, también existe la posibilidad de bloquear automá- ticamente.
- Seite 25 AUTO RUN W trybie AUTO RUN różne programy są odtwarzane jeden po drugim. Naciskać przycisk MODE, dopóki na wyświetlaczu nie pojawi się napis „AUTO RUN”. Nacisnąć przycisk ENTER, aby przesunąć kursor do dolnego wiersza, gdzie pojawi się on w polu „Dimmer”. Za pomocą przycisków UP i DOWN ustawić...
-
Seite 26: Funkcja Blokady
TRYB SLAVE Naciskać przycisk MODE, dopóki na wyświetlaczu nie pojawi się napis „SLAVE MODE”. Połączyć jednostki Slave i Master (taki sam model) za pomocą kabla DMX i aktywować w jednostce Master jeden z trybów pracy Standalone (programy wewnętrzne, Auto). Jednostka Slave jest podrzędna w stosunku do jednostki Master. - Seite 27 Premendo nuovamente il pulsante ENTER, si conferma l’inserimento e il cursore si sposta nel campo “Fxx”. Con i tasti UP e DOWN è ora possibile attivare la velocità stroboscopica da 00 a 99 (F00 = effetto stroboscopico disattivato, F00 = circa 1 Hz, F00 = circa 20 Hz). Confermare con ENTER. Esempio: AUTO RUN Nella modalità...
-
Seite 28: Modalità Slave
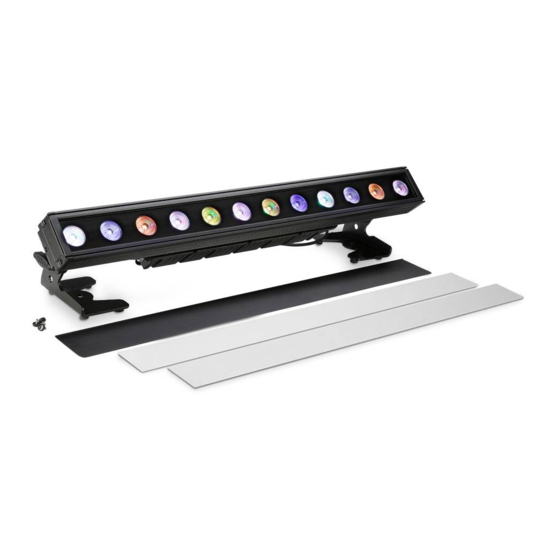
MODALITÀ SLAVE Premere più volte il tasto MODE finché sul display non appare “SLAVE MODE”. Collegare le unità slave e master (stesso modello) utilizzando un cavo DMX; sull’unità master attivare una delle modalità standalone (programmi interni, Auto). Ora l’unità slave segue l’unità master. FUNZIONE DI BLOCCO Per evitare che il faro venga utilizzato senza autorizzazione o venga attivato involontariamente, è... - Seite 29 Con la barra PIX BAR 600 PRO IP65 de Cameo se suministran dos difusores extraíbles que ofrecen dos tipos de dispersión diferentes: 1. difusor con un ángulo de dispersión amplio, 2. difusor con un ángulo de dispersión muy amplio. La luz con el difusor montado tiene una dispersión más amplia y homogénea, mientras que sin difusor tiene mayor iluminancia.
- Seite 30 SETTING UP AND MOUNTING / AUFSTELLUNG UND MONTAGE / MISE EN PLACE ET MONTAGE / INSTALACIÓN Y MONTAJE / USTAWIENIE I MONTAŻ / INSTALLAZIONE E MONTAGGIO Thanks to the integrated rubber feet, the spotlight can be placed in a suitable location on a flat surface.Mounting on a truss is performed using suitable truss clamps (not included) fixed to the mounting brackets;...
- Seite 31 DMX CONTROL / DMX STEUERUNG / PILOTAGE DMX / CONTROL DMX / STEROWANIE DMX / CONTROLLO DMX 2-CH Mode Dimmer Master Dimmer 0-100% Colour off Amber Yellow warm Yellow Green Turquoise Cyan Blue Colour Macro Lavender Mauve Magenta Pink Warm White White Cold White Colour Jumping Stop...
- Seite 32 6-CH Mode 1 Dimmer Master Dimmer 0-100% Strobe open Strobe closed Strobe Strobe slow -> fast 0Hz - 20Hz Strobe open Colour off Amber Yellow warm Yellow Green Turquoise Cyan Blue Colour Macro Lavender Mauve Magenta Pink Warm White White Cold White Colour Jumping Stop Colour Jumping Speed slow ->...
- Seite 33 8-CH Mode Dimmer Master Dimmer Strobe open Strobe closed Puls Random, slow -> fast Ramp up Random, slow -> fast Strobe Ramp down Random, slow -> fast Random Strobe Effect, slow fast Strobe Break Effekt, 5s…..1s (Very Short Flash) Strobe slow -> fast 0Hz - 20Hz Strobe open red dimmer Green...
- Seite 34 Colour off Amber Yellow warm Yellow Green Turquoise Cyan Blue Colour Macro (override RGB and Lavender Auto) Mauve Magenta Pink Warm White White Cold White Colour Jumping Stop Colour Jumping Speed slow -> fast / Colour 1 -> 12 Colour Fading Speed slow -> fast / Colour 1 -> 12 Colour Temperature Correction (add to CH10...
- Seite 35 74-CH Mode Dimmer Master Dimmer Strobe open Strobe closed Puls Random, slow -> fast Ramp up Random, slow -> fast Strobe Ramp down Random, slow -> fast Random Strobe Effect, slow fast Strobe Break Effekt, 5s…..1s (Very Short Flash) Strobe slow -> fast 0Hz - 20Hz Strobe open red dimmer green dimmer...
- Seite 36 CH39 red dimmer CH40 green dimmer CH41 blue dimmer Pixel 7 CH42 white dimmer CH43 amber dimmer CH44 UV dimmer CH45 red dimmer CH46 green dimmer CH47 blue dimmer Pixel 8 CH48 white dimmer CH49 amber dimmer CH50 UV dimmer CH51 red dimmer CH52...
- Seite 37 78-CH Mode Dimmer Master Dimmer Strobe open Strobe closed Puls Random, slow -> fast Ramp up Random, slow -> fast Strobe Ramp down Random, slow -> fast Random Strobe Effect, slow fast Strobe Break Effekt, 5s…..1s (Very Short Flash) Strobe slow -> fast 0Hz - 20Hz Strobe open red dimmer green dimmer...
- Seite 38 CH39 red dimmer CH40 green dimmer CH41 blue dimmer Pixel 7 CH42 white dimmer CH43 amber dimmer CH44 UV dimmer CH45 red dimmer CH46 green dimmer CH47 blue dimmer Pixel 8 CH48 white dimmer CH49 amber dimmer CH50 UV dimmer CH51 red dimmer CH52...
- Seite 39 Colour off Amber Yellow warm Yellow Green Turquoise Cyan Blue Colour Macro CH75 (override RGB Lavender and Auto) Mauve Magenta Pink Warm White White Cold White Colour Jumping Stop Colour Jumping Speed slow -> fast / Colour 1 -> 12 Colour Fading Speed slow ->...
-
Seite 40: Dmx Connection
DMX TECHNOLOGY / DMX-TECHNIK / TECHNIQUE DMX / TECNOLOGÍA DMX / TECHNIKA DMX / TECNOLOGIA DMX DMX-512 DMX (Digital Multiplex) is the designation for a universal transmission protocol for communications between corresponding devices and controllers. A DMX controller sends DMX data to the connected DMX device(s). -
Seite 41: Dmx-Verbindung
DMX-512 DMX (Digital Multiplex) ist die Bezeichnung für ein universelles Übertragungsprotokoll für die Kommunikation zwischen entsprechenden Geräten und Controllern. Ein DMX-Controller sendet DMX-Daten an das/die angeschlossene(n) DMX-Gerät(e). Die DMX-Datenübertragung erfolgt stets als serieller Datenstrom, der über die an jedem DMX-fähigen Gerät vorhandenen DMX IN- und DMX OUT- Anschlüsse (XLR-Steckverbinder) von einem angeschlossenen Gerät an das nächste weitergeleitet wird, wobei die maximale Anzahl der Geräte 32 nicht überschreiten darf. -
Seite 42: Protocole Dmx
DMX-512 Le terme DMX (Digital Multiplex) désigne un protocole de transport universel permettant la communication entre des appareils et des contrôleurs à ce format. Un contrôleur DMX envoie des données DMX aux appareils DMX qui lui sont connectés. Les données DMX sont transportées sous forme d'un flux série, renvoyé... - Seite 43 DMX512 DMX (Digital Multiplex) es el nombre de un protocolo universal utilizado como medio de comunicación entre dispositivos y controladores. El controlador DMX envía datos DMX a los equipos DMX conectados. Los datos DMX se envían como datos serie que se transmiten de equipo a equipo a través de los conectores XLR «DMX IN»...
- Seite 44 DMX-512 DMX (Digital Multiplex) to nazwa uniwersalnego protokołu transmisji do komunikacji między odpowiednimi urządzeniami a kontrolerami. Kontroler DMX wysyła dane DMX do podłączonych urządzeń DMX. Transmisja danych DMX następuje zawsze w formie szeregowego strumienia danych, który jest przekazywany z jednego urządzenia do następnego przez znajdujące się w każdym urządzeniu obsługującym standard DMX złącza „DMX IN”...
-
Seite 45: Collegamento Dmx
DMX512 DMX (Digital Multiplex) è la sigla di un protocollo di trasmissione universale per la comunicazione tra dispositivi e controller. Un controller DMX invia dati DMX ai dispositivi DMX collegati. I dati DMX vengono sempre trasmessi come flusso di dati seriale, che viene inoltrato da un dispositivo collegato al successivo attraverso le connessioni (connettori XLR) DMX IN e DMX OUT presenti per ogni dispositivo DMX compatibile, per un massimo di 32 dispositivi. - Seite 46 SPECIFICATIONS / TECHNISCHE DATEN / CARACTÉRISTIQUES TECHNIQUES / CARACTERÍSTICAS TÉCNICAS / PRZYŁĄCZA, WYMIARY I MONTAŻ / DATI TECNICI Model Name: CLPIXBAR600PROIP65 Product Type: LED bar Type: Outdoor Washer LED Colour Spectrum: RGBWA + UV Number of LEDs: LED Type: 12 W (6 in 1) Refresh Rate: 3,600 Hz Viewing Angle (without diffuser disc):...
- Seite 47 Leistungsaufnahme: 160W Beleuchtungsstärke (@ 1m): 7200 lx Lichtstrom (RGBWAU): 2600 lm Stromversorgungsanschluss: Neutrik powerCON TRUE1 Ein- und Ausgang Betriebstemperatur: -15°C - +45°C Gehäusematerial: Metall Gehäusefarbe: schwarz Gehäusekühlung: Konvektion Schutzklasse: IP65 Abmessungen 854 x 130 x 90mm (B x H x T, ohne Montagebügel): Gewicht: 8,7kg Weitere Eigenschaften:...
- Seite 48 Nombre del modelo: CLPIXBAR600PROIP65 Tipo de producto: Barra LED Tipo: Washer de exterior Colores de LED: RGBWA + UV Número de LED: Tipo de LED: 12 W (6 en 1) Frecuencia de refresco: 3600 Hz Ángulo de dispersión (sin difusor): 22°...
- Seite 49 Pobór mocy: 160 W Natężenie oświetlenia (w odległości 1 m): 7200 lx Strumień świetlny (RGBWAU): 2600 lm Złącze zasilania: wejście i wyjście Neutrik powerCON TRUE1 Temperatura pracy: od −15°C do +45°C Materiał obudowy: metal Kolor obudowy: czarny Chłodzenie obudowy: konwekcyjne Klasa ochrony: IP65 Wymiary...
- Seite 50 MANUFACTURER´S DECLARATIONS / HERSTELLERERKLÄRUNGEN / DECLARATIONS / DECLARACIÓN DEL FABRICANTE / DEKLARACJE PRODUCENTA / DICHIARAZIONI DEL PRODUTTORE MANUFACTURER‘S WARRANTY & LIMITATIONS OF LIABILITY You can find our current warranty conditions and limitations of liability at: http://www.adamhall.com/media/shop/downloads/documents/manufactur- ersdeclarations.pdf. To request warranty service for a product, please contact Adam Hall GmbH, Daimler Straße 9, 61267 Neu Anspach / Email: Info@adamhall.com / +49 (0)6081 / 9419-0.
- Seite 51 GWARANCJA PRODUCENTA I OGRANICZENIE ODPOWIEDZIALNOŚCI Nasze aktualne warunki gwarancji i informacje dotyczące ograniczenia odpowiedzialności znajdą Państwo na stronie: http://www.adamhall.com/me- dia/shop/downloads/documents/manufacturersdeclarations.pdf. W razie konieczności skorzystania z serwisu proszę skontaktować się z firmą Adam Hall GmbH, Daimlerstraße 9, 61267 Neu Anspach / e-mail Info@adamhall.com / +49 (0)6081 / 9419-0. W celu uzyskania aktualnej wersji deklaracji zgodności proszę...
- Seite 52 WWW.CAMEOLIGHT.COM Adam Hall GmbH | Daimlerstrasse 9 | 61267 Neu-Anspach | Germany Tel. +49(0)6081/9419-0 | Fax +49(0)6081/9419-1000 web : www.adamhall.com | e-mail : mail@adamhall.com REV: 01...