Inhaltsverzeichnis
Werbung
Quicklinks
Copyright Notice:
Copyright Notice:
Copyright Notice:
Copyright Notice:
Copyright Notice:
No part of this installation guide may be reproduced, transcribed, transmitted, or trans-
lated in any language, in any form or by any means, except duplication of documen-
tation by the purchaser for backup purpose, without written consent of ASRock Inc.
Products and corporate names appearing in this guide may or may not be registered
trademarks or copyrights of their respective companies, and are used only for identifica-
tion or explanation and to the owners' benefit, without intent to infringe.
Disclaimer:
Disclaimer:
Disclaimer:
Disclaimer:
Disclaimer:
Specifications and information contained in this guide are furnished for informational
use only and subject to change without notice, and should not be constructed as a
commitment by ASRock. ASRock assumes no responsibility for any errors or omissions
that may appear in this guide.
With respect to the contents of this guide, ASRock does not provide warranty of any kind,
either expressed or implied, including but not limited to the implied warranties or
conditions of merchantability or fitness for a particular purpose. In no event shall
ASRock, its directors, officers, employees, or agents be liable for any indirect, special,
incidental, or consequential damages (including damages for loss of profits, loss of
business, loss of data, interruption of business and the like), even if ASRock has been
advised of the possibility of such damages arising from any defect or error in the guide
or product.
This device complies with Part 15 of the FCC Rules. Operation is subject to the
following two conditions:
(1) this device may not cause harmful interference, and
(2) this device must accept any interference received, including interference that
may cause undesired operation.
CALIFORNIA, USA ONLY
The Lithium battery adopted on this motherboard contains Perchlorate, a toxic
substance controlled in Perchlorate Best Management Practices (BMP) regulations
passed by the California Legislature. When you discard the Lithium battery in
California, USA, please follow the related regulations in advance.
"Perchlorate Material-special handling may apply, see
www.dtsc.ca.gov/hazardouswaste/perchlorate"
ASRock Website: http://www.asrock.com
Copyright©2009 ASRock INC. All rights reserved.
ASRock
Published February 2009
K10N78M
Motherboard
1 1 1 1 1
Werbung
Inhaltsverzeichnis

Verwandte Anleitungen für ASROCK K10N78M


Inhaltszusammenfassung für ASROCK K10N78M
- Seite 1 ASRock. ASRock assumes no responsibility for any errors or omissions that may appear in this guide. With respect to the contents of this guide, ASRock does not provide warranty of any kind, either expressed or implied, including but not limited to the implied warranties or conditions of merchantability or fitness for a particular purpose.
-
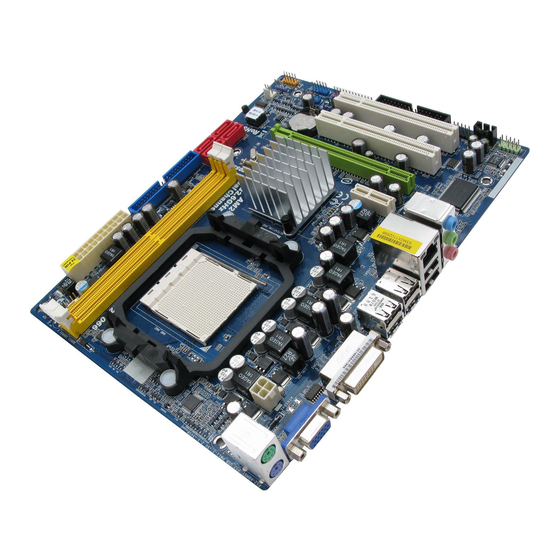
Seite 2: Motherboard-Layout
SATAII Connector (SATAII_3 (PORT 2), Red) PCI Slots (PCI1- 2) SPI BIOS Chip PCI Express x16 Slot (PCIE2, Green) Clear CMOS Jumper (CLRCMOS1) PCI Express x1 Slot (PCIE1, White) Chassis Fan Connector (CHA_FAN1) NVIDIA GeForce 8100 Chipset 2 2 2 2 2 ASRock K10N78M Motherboard... - Seite 3 Set “Speaker Configuration” to “Quadraphonic” or “Stereo”. Click “Device advanced settings”, choose “Make front and rear output devices playbacks two different audio streams simultaneously”, and click “ok”. Then reboot your system. 3 3 3 3 3 ASRock K10N78M Motherboard...
- Seite 4 In case any modifications of this manual occur, the updated version will be available on ASRock website without further notice. You may find the latest VGA cards and CPU support lists on ASRock website as well. ASRock website http://www.asrock.com If you require technical support related to this motherboard, please visit our website for specific information about the model you are using.
-
Seite 5: Specifications
- Gigabit LAN 10/100/1000 Mb/s - Giga PHY Realtek RTL8211CL - Supports Wake-On-LAN Rear Panel I/O I/O Panel - 1 x PS/2 Mouse Port - 1 x PS/2 Keyboard Port - 1 x VGA/D-Sub Port 5 5 5 5 5 ASRock K10N78M Motherboard... - Seite 6 - CPU Frequency Stepless Control (see CAUTION 12) - ASRock U-COP (see CAUTION 13) - Boot Failure Guard (B.F.G.) - ASRock AM2 Boost: ASRock Patented Technology to boost memory performance up to 12.5% (see CAUTION 14) Hardware - CPU Temperature Sensing...
- Seite 7 64-bit compliant Certifications - FCC, CE, WHQL * For detailed product information, please visit our website: http://www.asrock.com WARNING Please realize that there is a certain risk involved with overclocking, including adjusting the setting in the BIOS, applying Untied Overclocking Technology, or using the third-party overclocking tools.
- Seite 8 10. It is a user-friendly ASRock overclocking tool which allows you to surveil your system by hardware monitor function and overclock your hardware devices to get the best system performance under Windows ® environment. Please visit our website for the operation procedures of ASRock OC Tuner.
- Seite 9 A. Right-click the main page of CyberLink PowerDVD Ultra program. B. Click “Configuration”. C. Select “Video”. D. Click “Enable hardware acceleration (nVidia PureVideo)” to remove the “V” mark in this item. E. Click “OK” to save the change. 9 9 9 9 9 ASRock K10N78M Motherboard...
- Seite 10 Configurations AMD Athlon X2 4000+ Onboard VGA with DVI-D port Memory Dual Channel DDR2 667, 1GB x 2 Windows ® Vista or Windows ® Vista Playback Software CyberLink PowerDVD Ultra DVD Player Blu-ray-DVDRW-LG-GBW-H10N (BD) HD DVD-HP-TOSD-H802A-01 (HD-DVD) ASRock K10N78M Motherboard...
- Seite 11 When placing screws into the screw holes to secure the motherboard to the chassis, please do not over-tighten the screws! Doing so may damage the motherboard. ASRock K10N78M Motherboard...
-
Seite 12: Cpu Installation
Then connect the CPU fan to the CPU FAN connector (CPU_FAN1, see Page 2, No. 6). For proper installation, please kindly refer to the instruction manuals of the CPU fan and the heatsink. ASRock K10N78M Motherboard... -
Seite 13: Installing A Dimm
2.3 Installation of Memor y Modules (DIMM) K10N78M motherboard provides two 240-pin DDR2 (Double Data Rate 2) DIMM slots, and supports Dual Channel Memory Technology. For dual channel configuration, you always need to install two identical (the same brand, speed, size and chip-type) memory modules in the DDR2 DIMM slots to activate Dual Channel Memory Technology. -
Seite 14: Installing An Expansion Card
Step 4. Align the card connector with the slot and press firmly until the card is completely seated on the slot. Step 5. Fasten the card to the chassis with screws. Step 6. Replace the system cover. ASRock K10N78M Motherboard... - Seite 15 Suggested OS Windows Vista or Windows Vista HybridPower AMD Athlon X2 3800+ CPU Memory Dual Channel DDR2 667, 1024MB x 2 256MB or 512MB shared memory for motherboard GPU Suggested OS Windows ® Vista or Windows ® Vista ASRock K10N78M Motherboard...
- Seite 16 C. Switch your monitor cable to the connector on the I/O shield. After reboot your system, you are allowed to switch between GeForce ® Boost mode (Boost Performance) and HybridPower mode (Save Power) according to your request. ASRock K10N78M Motherboard...
- Seite 17 CD to your system. Hybrid SLI driver is in the following path of ASRock support CD: (There are two ASRock support CD in the motherboard gift box pack, please ® choose the one for Windows Vista / Vista 64-bit.)
- Seite 18 CD to your system. Hybrid SLI driver is in the following path of ASRock support CD: (There are two ASRock support CD in the motherboard gift box pack, please ® choose the one for Windows Vista / Vista 64-bit.)
- Seite 19 HD-DVD disc, the content will be displayed only in one of the two monitors instead of both monitors. 2. This motherboard does not support dual monitor feature under DOS because in this situation, the VGA/DVI-D output is not available. There ® is no such limitation under Windows ASRock K10N78M Motherboard...
- Seite 20 ® For Windows Vista / Vista 64-bit OS: Right click the desktop, choose “Personalize”, and select the “Display Settings” tab so that you can adjust the parameters of the multi-monitor according to the steps below. ASRock K10N78M Motherboard...
- Seite 21 HDTV set-top-boxes, as well as few entertain- ment PCs requires a secure connection to a compliant display. Due to the increase in manufacturers employing HDCP in their equipment, it is highly recommended that the HDTV or LCD monitor you purchase is compatible. ASRock K10N78M Motherboard...
- Seite 22 B. Set the option “OnBoard HDMI HD Audio” to [Auto]. Step 2: Install HDMI audio driver to your system. Install “Onboard HDMI HD Audio Driver” from ASRock Support CD to your system. Step 3: Reboot your system. After you reboot the system, the HDMI audio function is available.
- Seite 23 5 seconds. However, please do not clear the CMOS right after you update the BIOS. If you need to clear the CMOS when you just finish updating the BIOS, you must boot up the system first, and then shut it down before you do the clear- CMOS action. ASRock K10N78M Motherboard...
- Seite 24 SATA power cable to the power connector on each drive. Then (Optional) connect to the SATA connect the white end of SATA HDD power connector power cable to the power connect to the power connector of the power supply. supply ASRock K10N78M Motherboard...
- Seite 25 2. If you use AC’97 audio panel, please install it to the front panel audio header as below: A. Connect Mic_IN (MIC) to MIC2_L. B. Connect Audio_R (RIN) to OUT2_R and Audio_L (LIN) to OUT2_L. C. Connect Ground (GND) to Ground (GND). ASRock K10N78M Motherboard...
- Seite 26 (see p.2, No. 15) ground pin. CPU Fan Connector Please connect the CPU fan cable to this connector and (4-pin CPU_FAN1) match the black wire to the (see p.2, No. 6) ground pin. ASRock K10N78M Motherboard...
- Seite 27 (4-pin ATX12V1) ATX 12V plug to this connector. (see p.2, No. 2) Failing to do so will cause power up failure. Serial port Header This COM1 header supports a serial port module. (9-pin COM1) (see p.2, No.23) ASRock K10N78M Motherboard...
- Seite 28 64-bit OS on your system. Using SATA / SATAII HDDs with NCQ and Hot Plug functions STEP 1: Set Up BIOS. Enter BIOS SETUP UTILITY Advanced screen IDE Configuration. Set the “SATA Operation Mode” option to [AHCI]. ASRock K10N78M Motherboard...
- Seite 29 / Windows Vista 64-bit OS on your system. When you see “Where do you want to install Windows? ” page, please insert the ASRock Support CD into your optical drive, and click the “Load ® ® Driver” button on the left on the bottom to load the NVIDIA AHCI drivers.
- Seite 30 Main Menu automatically if “AUTORUN” is enabled in your computer. If the Main Menu does not appear automatically, locate and double-click on the file “ASSETUP. EXE” from the “BIN” folder in the Support CD to display the menus. ASRock K10N78M Motherboard...
- Seite 31 1. Einführung 1. Einführung 1. Einführung Wir danken Ihnen für den Kauf des ASRock K10N78M Motherboard, ein zuverlässiges Produkt, welches unter den ständigen, strengen Qualitätskontrollen von ASRock gefertigt wurde. Es bietet Ihnen exzellente Leistung und robustes Design, gemäß der Verpflichtung von ASRock zu Qualität und Halbarkeit.
-
Seite 32: Spezifikationen
® - NVIDIA PureVideo betriebsbereit Audio - 5.1 CH Windows ® Vista Premium Level HD Audio (ALC662 Audio Codec) - Chipsatz eingebettetes HDMI Audio - Gigabit LAN 10/100/1000 Mb/s - Giga PHY Realtek RTL8211CL - Unterstützt Wake-On-LAN ASRock K10N78M Motherboard... - Seite 33 - JumperFree-Modus - SMBIOS 2.3.1 - Unterstützt Smart BIOS Support-CD - Treiber, Dienstprogramme, Antivirussoftware (Probeversion) Einzigartige - ASRock OC Tuner (siehe VORSICHT 10) Eigenschaft - Intelligent Energy Saver (Intelligente Energiesparfunktion) (siehe VORSICHT 11) - Sofortstart - Hybrid Booster: - Schrittloser CPU-Frequenz-Kontrolle...
- Seite 34 - ASRock AM2 Boost: ASRocks patentgeschützte Technologie zur Erhöhung der Arbeitsspeicherleistung um bis zu 12,5% (siehe VORSICHT 14) Hardware Monitor - CPU-Temperatursensor - Motherboardtemperaturerkennung - Drehzahlmessung für CPU-Lüfter - Drehzahlmessung für Gehäuselüfter - CPU-Lüftergeräuschdämpfung - Spannungsüberwachung: +12V, +5V, +3.3V, Vcore Betriebssysteme - Unterstützt Microsoft...
- Seite 35 Vista 64-Bit / Vista / XP 64-Bit / XP SP1 oder SP2 einwandfrei. 10. Es ist ein benutzerfreundlicher ASRock Übertaktenswerkzeug, das erlaubt, dass Sie Ihr System durch den Hardware-Monitor Funktion zu überblicken und Ihre Hardware-Geräte übertakten, um die beste ®...
- Seite 36 14. Dieses Motherboard unterstützt die ASRock AM2 Boost Übertaktungstechnologie. Wenn Sie diese Funktion im BIOS-Setup aktivieren, wird die Arbeitsspeicherleistung um bis zu 12,5% gesteigert. Die Wirkung hängt aber von der verwendeten AM2 CPU ab. Diese Funktion übertaktet die Standardfrequenz des Chipsatz und der CPU.
-
Seite 37: Installation
Wenn Sie Komponenten ausbauen, legen Sie sie immer auf eine antistatische Unterlage, oder zurück in die Tüte, mit der die Komponente geliefert wurde. Wenn Sie das Motherboard mit den Schrauben an dem Computergehäuse befestigen, überziehen Sie bitte die Schrauben nicht! Das Motherboard kann sonst beschädigt werden. ASRock K10N78M Motherboard... - Seite 38 Kontakt zueinander haben. Verbinden Sie dann den CPU- Lüfter mit dem CPU-LÜFTER-Anschluss (CPU_FAN1, siehe Seite 2, Nr. 6). Beziehen Sie sich für eine richtige Installation auf die Handbücher des CPU- Lüfters und des Kühlkörpers. ASRock K10N78M Motherboard...
-
Seite 39: Installation Der Speichermodule (Dimm)
2.3 Installation der Speichermodule (DIMM) 2.3 Installation der Speichermodule (DIMM) 2.3 Installation der Speichermodule (DIMM) Das K10N78M Motherboard bietet zwei 240polige DDR2 (Double Data Rate 2) DIMM- Steckplätze und unterstützt Zweikanal-Speichertechnologie. Es müssen immer zwei identische Speichermodule (selbe Marke, Geschwindigkeit, Größe und Chip-Art) in den DDR2 DIMM-Steckplätzen installiert werden, um die Zweikanal-... -
Seite 40: Einbau Einer Erweiterungskarte
Express Express -Steckplätze) -Steckplätze) -Steckplätze) -Steckplätze) Es gibt einen 2 PCI-Steckplätze und 2 PCI Express-Steckplätze am K10N78M Motherboard. PCI-Slots: PCI-Slots werden zur Installation von Erweiterungskarten mit dem 32bit PCI-Interface genutzt. PCI Express-Slots: PCIE1 (PCIE x1-Steckplatz; Weiß) wird für PCI Express-Karten mit x1 Lane-Breite-Karten verwendet, z.B. -
Seite 41: Einstellung Der Jumper
CMOS gelöscht wurde. Bitte vergessen Sie nicht, den Jumper wieder zu entfernen, nachdem das CMOS gelöscht wurde. Wenn Sie den CMOS- Inhalt gleich nach dem Aktualisieren des BIOS löschen müssen, müssen Sie zuerst das System starten und dann wieder ausschalten, bevor Sie den CMOS-Inhalt löschen. ASRock K10N78M Motherboard... - Seite 42 S.2 - No. 12) 3,0 Gb/s. (SATAII_4 (PORT 3): siehe S.2 - No. 10) Serial ATA- (SATA-) SJedes Ende des SATA Datenkabel Datenkabels kann an die SATA / SATAII Festplatte oder das (Option) SATAII Verbindungsstück auf dieser Hauptplatine angeschlossen werden. ASRock K10N78M Motherboard...
- Seite 43 (CD1: siehe S.2, Punkt 24) MPEG-Karten mit Ihrem System zu verbinden. Anschluss für Audio auf Dieses Interface zu einem der Gehäusevorderseite Audio-Panel auf der Vorderseite Ihres Gehäuses, ermöglicht (9-Pin HD_AUDIO1) Ihnen eine bequeme (siehe S.2, Punkt 25) Kontrolle über Audio-Geräte. ASRock K10N78M Motherboard...
- Seite 44 Bedienfeld auf. Klicken Sie auf “Set Default Device” (Standardgerät einstellen), um das vorderseitige Mikrofon als Standard- Aufnahmegerät zu übernehmen. System Panel Anschluss Dieser Anschluss ist für die verschiedenen Funktionen der (9-Pin PANEL1) Gehäusefront. (siehe S.2, Punkt 17) ASRock K10N78M Motherboard...
- Seite 45 Beachten Sie bitte, dass Sie eine 12V-ATX-Netzteil Stromversorgung mit ATX 12- Volt-Stecker mit diesem (4-pin ATX12V1) Anschluss verbinden müssen, (siehe S.2, Punkt 2) damit ausreichend Strom geliefert werden kann. Andernfalls reicht der Strom nicht aus, das System zu starten. ASRock K10N78M Motherboard...
-
Seite 46: Installation Von Windows
64-Bit 64-Bit 64-Bit 64-Bit ® ohne RAID-Funktionen ohne RAID-Funktionen ohne RAID-Funktionen ohne RAID-Funktionen ohne RAID-Funktionen ® Wenn Sie Windows Vista / Vista 64-Bit ohne RAID-Funktionalität auf Ihren SATA / SATAII-Festplatten installieren, gehen Sie bitte wie folgt vor. ASRock K10N78M Motherboard... - Seite 47 / Vista 64-Bit Betriebssystem auf Ihrem System zu installieren. Wenn die Frage “Wo möchten Sie Windows installieren?” erscheint, legen Sie bitte die ASRock Support CD in Ihr optisches Laufwerk ein. Klicken Sie anschließend die ® “Treiber laden”-Schaltfläche links unten, um die NVIDIA AHCI-Treiber zu ®...
- Seite 48 EXE im BIN-Verzeichnis der Support-CD, um die Menüs aufzurufen. Das Setup- Programm soll es Ihnen so leicht wie möglich machen. Es ist menügesteuert, d.h. Sie können in den verschiedenen Untermenüs Ihre Auswahl treffen und die Programme werden dann automatisch installiert. ASRock K10N78M Motherboard...
- Seite 49 1. Introduction 1. Introduction Merci pour votre achat d’une carte mère ASRock K10N78M, une carte mère très fiable produite selon les critères de qualité rigoureux de ASRock. Elle offre des performances excellentes et une conception robuste conformément à l’engagement d’ASRock sur la qualité...
- Seite 50 Prepration ® Audio - 5.1 Son haute définition de première qualité CH Windows Vista (codec audio ALC662) - HDMI Audio avec Chipset enclave - Gigabit LAN 10/100/1000 Mb/s - Giga PHY Realtek RTL8211CL - Support du Wake-On-LAN ASRock K10N78M Motherboard...
- Seite 51 - Support SMBIOS 2.3.1 - Prise en charge du Smart BIOS CD d’assistance - Pilotes, utilitaires, logiciel anti-virus (Version d’essai) Caractéristique - Tuner ASRock OC (voir ATTENTION 10) unique - Économiseur d’énergie intelligent (voir ATTENTION 11) - l'Instant Boot - L’accélérateur hybride: - Contrôle direct de la fréquence CPU...
- Seite 52 - Garde d’échec au démarrage (B.F.G.) - ASRock AM2 Boost: Technologie brevetée par ASRock pour augmenter les performances mémoire jusqu’à 12,5% (voir ATTENTION 14) Surveillance - Contrôle de la température CPU système - Mesure de température de la carte mère - Tachéomètre ventilateur CPU...
- Seite 53 64-bit/ Vista / XP 64-bit / XP SP1; SP2. 10. Il s’agit d’un usage facile ASRock overclocking outil qui vous permet de surveiller votre système en fonction de la monitrice de matériel et overclocker vos périphériques de matériels pour obtenir les meilleures performances du système sous environnement...
- Seite 54 CPU le dissipateur lors de l’installation du PC. 14. Cette carte mère prend en charge la technologie d’overbooking ASRock AM2 Boost. Si vous activez cette fonction dans la configuration du BIOS, les performances de la mémoire d’améliorent jusqu’à 12,5%, lais l’effet dépend du CPU AM2 que vous adoptez.
- Seite 55 5. Lorsque vous placez les vis dans les orifices pour vis pour fixer la carte mère sur le châssis, ne serrez pas trop les vis ! Vous risquez sinon d’endommager la carte mère. ASRock K10N78M Motherboard...
- Seite 56 Ensuite, connectez le ventilateur du CPU à la prise du VENTILATEUR DU CPU (CPU_FAN1, reportez-vous en page 2, No. 6). Pour une bonne installation, veuillez vous référer aux manuels d’instruction sur le ventilateur du CPU et le dissipateur. ASRock K10N78M Motherboard...
- Seite 57 2.3 Installation des modules mémoire (DIMM) 2.3 Installation des modules mémoire (DIMM) La carte mère K10N78M possède deux emplacements DIMM DDR2 (Double Débit de données 2) 240 broches, et prend en charge la technologie Dual Channel Memory. Pour la configuration Double canal, vous devez toujours installer deux modules de mémoire identiques (mêmes marque, vitesse, dimensions et type de chip) dans les...
- Seite 58 Slot d’extension (Slots PCI et Slots PCI Express) Slot d’extension (Slots PCI et Slots PCI Express) Il y a 2 ports PCI et 2 ports PCI Express sur la carte mère K10N78M. Slots PCI: Les slots PCI sont utilisés pour installer des cartes d’extension dotées d’une interface PCI 32 bits.
- Seite 59 BIOS à jour. Si vous avez besoin d’effacer la CMOS lorsque vous avez fini de mettre le BIOS à jour, vous devez d’abord initialiser le système, puis le mettre hors tension avant de procéder à l’opération d’effacement de la CMOS. ASRock K10N78M Motherboard...
- Seite 60 3,0 Go/s. voir p.2 fig. 10) Câble de données Toute cote du cable de data SATA Série ATA (SATA) peut etre connecte au disque dur SATA / SATAII ou au connecteur (en option) SATAII sur la carte mere. ASRock K10N78M Motherboard...
- Seite 61 Go/s. fil. Connecteurs audio internes Ils vous permettent de gérer des entrées audio à partir de sources (CD1 br. 4) stéréo comme un CD-ROM, (CD1: voir p.2 fig. 24) DVD-ROM, un tuner TV ou une carte MPEG. ASRock K10N78M Motherboard...
- Seite 62 Vista / Vista 64 bits : Allez à l’onglet «Front Mic» ( Mic. Avant) dans le panneau de commandes Realtek. Cliquez sur «Configurer le dispositif par défaut» pour faire du Mic Avant le dispositif d’enregistrement par défaut. ASRock K10N78M Motherboard...
- Seite 63 ATX 24 broches, elle peut encore fonctionner si vous adopter une alimentation traditionnelle ATX 20 broches. Pour utiliser une alimentation ATX 20 broches, branchez à l’alimentation électrique ainsi qu’aux broches 1 et 13. 20-Installation de l’alimentation électrique ATX ASRock K10N78M Motherboard...
- Seite 64 A. Entrez dans UTILITAIRE DE CONFIGURATION BIOS écran Avancé Configuration IDE. B. Réglez l’option “SATA Operation Mode”« Mode de fonctionnement SATA » sur [IDE]. ® ETAPE 2: Installer le système d’exploitation Windows XP / XP 64-bit sur votre système. ASRock K10N78M Motherboard...
- Seite 65 AHCI NVIDIA . Les pilotes AHCI NVIDIA sont sous le chemin suivant du CD Support: (IL y a deux ASRock Support CD dans le paquet de boite de cadeau de la carte mere, ® veuilliez selectionner un pour Windows Vista / Vista 64-bit.)
- Seite 66 CD-ROM. Le Menu principal s’affiche automatiquement si “AUTORUN” est activé dans votre ordinateur. Si le Menu principal n’apparaît pas automatiquement, localisez dans le CD technique le fichier “ASSETUP.EXE” dans le dossier BIN et double-cliquez dessus pour afficher les menus. ASRock K10N78M Motherboard...
- Seite 67 1. Introduzione Grazie per aver scelto una scheda madre ASRock K10N78M, una scheda madre affidabile prodotta secondo i severi criteri di qualità ASRock. Le prestazioni eccellenti e il design robusto si conformano all’impegno di ASRock nella ricerca della qualità e della resistenza.
- Seite 68 - NVIDIA ® PureVideo Ready ® Audio - 5.1 Audio HD CH Windows Vista Premium Level (ALC662 Audio Codec) - Chipset HDMI Audio incorporato - Gigabit LAN 10/100/1000 Mb/s - Giga PHY Realtek RTL8211CL - Supporta Wake-On-LAN ASRock K10N78M Motherboard...
- Seite 69 - Supporta SMBIOS 2.3.1 - Smart BIOS supportato CD di - Driver, utilità, software antivirus (Versione dimostrativa) supporto Caratteristica - Sintonizzatore ASRock OC (vedi ATTENZIONE 10) speciale - Intelligent Energy Saver (Risparmio intelligente dell’energia) (vedi ATTENZIONE 11) - Instant Boot - Booster ibrido:...
- Seite 70 64 bit Certificazioni - FCC, CE, WHQL * Per ulteriori informazioni, prego visitare il nostro sito internet: http://www.asrock.com AVVISO Si prega di prendere atto che la procedura di overclocking implica dei rischi, come anche la regolazione delle impostazioni del BIOS, l’applicazione della tecnologia Untied Overclocking Technology, oppure l’uso di strumenti di overclocking forniti da terzi.
- Seite 71 64-bit / Vista / XP 64 bit / XP SP1; SP2. 10. Si tratta di uno strumento di sicronizzazione ASRock di face uso in grado di implementare il controllo del sistema tramite la funzione di hardware monitor e sincronizzare le Vostre unita‘ hardware per ottenere la migliore prestazione in Windows ®...
- Seite 72 14. Questa scheda madre supporta la tecnologia di overclocking ASRock AM2 Boost. Se si abilita questa funzione nel Setup del BIOS, le prestazioni della memoria miglioreranno fino al 12,5%, per gli effetti dipendono sempre dalla CPU AM2 che si adotta.
- Seite 73 5. Nell’usare i giraviti per fissare la scheda madre al telaio non serrare eccessivamente le viti! Altrimenti si rischia di danneggiare la scheda madre. ASRock K10N78M Motherboard...
- Seite 74 Quindi collegare la ventolina CPU al connettore CPU FAN (CPU_FAN1, fare riferimento a pagina 2, Numero 6). Per eseguire un’installazione appropriata, fare riferimento al manuale d’istruzioni della ventolina CPU e del dispersore di calore. ASRock K10N78M Motherboard...
- Seite 75 2.3 Installazione dei moduli di memoria (DIMM) 2.3 Installazione dei moduli di memoria (DIMM) La motherboard K10N78M dispone di due slot DIMM DDR2 (Double Data Rate 2) a 240 pin e supporta la tecnologia Dual Channel Memory. Per attivare la configurazione Dual Channel Memory bisogna installare sempre due moduli di memoria identici (stessa marca, velocità, dimensioni e tipo di chip) negli slot DIMM.
- Seite 76 Slot di espansione (Slot PCI ed Slot PCI Express) Slot di espansione (Slot PCI ed Slot PCI Express) Sulla scheda madre K10N78M c’è 2 slot PCI ed 2 slot PCI Express. Slot PCI: Sono utilizzati per installare schede di espansione con Interfaccia PCI a 32-bit.
- Seite 77 Non cancellare la CMOS subito dopo aver aggiornato il BIOS. Se è necessario cancellare la CMOS una volta completato l’aggiornamento del BIOS, è necessario riavviare prima il sistema, e poi spegnerlo prima di procedere alla cancellazione della CMOS. ASRock K10N78M Motherboard...
- Seite 78 3.0 Gb/s. Cavi dati Serial ATA (SATA) Una o altra estremità del cavo di dati SATA può essere (Opzionale) collegata al disco rigido SATA / SATAII o al connettore di SATAII su questa cartolina base. ASRock K10N78M Motherboard...
- Seite 79 ROM,TV tuner, o schede MPEG. Connettore audio sul È un’interfaccia per il cavo del pannello frontale pannello audio. Che consente connessione facile e controllo pin HD_AUDIO1) dei dispositivi audio. (vedi p.2 Nr. 25) ASRock K10N78M Motherboard...
- Seite 80 Andare alla scheda “Microfono anteriore” nel pannello di controllo d i Realtek. Fare clic su “Imposta dispositivo predefinito” per impostare il microfono anteriore come dispositivo predefinito per la registrazione. Connettore del panello Questo connettore accoglie frontale diverse funzioni del pannello frontale. (9-pin PANEL1) (vedi p.2 item 17) ASRock K10N78M Motherboard...
- Seite 81 Installazione dell’alimentatore ATX a 20 pin Connettore ATX 12V È necessario collegare una alimentazione con spinotto da (4-pin ATX12V1) 12V ATX a questo connettore (vedi p.2 item 2) in modo che possa fornire energia sufficiente. In caso contrario l’unità non si avvia. ASRock K10N78M Motherboard...
- Seite 82 Se si desidera installare Windows ® Vista / Windows ® Vista 64 bit sui dischi rigidi SATA / SATAII senza funzioni RAID, seguire le istruzioni in basso. Utilizzo dei dischi rigidi SATA / SATAII privi di funzioni NCQ e Hot Plug ASRock K10N78M Motherboard...
- Seite 83 64-bit sul sistema. Quando si vede la pagina “Where do you want to install Windows?” (Dove si vuole eseguire l’istallazione di Windows), inserire il CD di supporto ASRock nell’unità ottica e fare clic sul pulsante “Carica driver” , in ®...
- Seite 84 Inserire il CD di supporto nel lettore CD-ROM. Se la funzione “AUTORUN” è attivata nel computer, apparirà automaticamente il Menù principale. Se il Menù principale non appare automaticamente, posizionarsi sul file ASSETUP.EXE nel CESTINO del CD di supporto e cliccare due volte per visualizzare i menù. ASRock K10N78M Motherboard...
- Seite 85 1. Introducción 1. Introducción Gracias por su compra de ASRock K10N78M placa madre, una placa de confianza producida bajo el control de calidad estricto y persistente. La placa madre provee realización excelente con un diseño robusto conforme al compromiso de calidad y resistencia de ASRock.
- Seite 86 ® PureVideo ® Audio - Sonido HD de Nivel Superior 5.1 Canales Windows Vista (Códec de sonido ALC662) - Chipset encajado en HDMI Audio - Gigabit LAN 10/100/1000 Mb/s - Giga PHY Realtek RTL8211CL - Soporta Wake-On-LAN ASRock K10N78M Motherboard...
- Seite 87 - Compatible con Smart BIOS CD de soport - Controladores, Utilerías, Software de Anti Virus (Versión de prueba) Característica - Sintonizador de ASRock OC (vea ATENCIÓN 10) Única - Administrador de energía inteligente (vea ATENCIÓN 11) - Instant Boot - Amplificador Híbrido: - Stepless control de frecuencia de CPU (vea ATENCIÓN 12)
- Seite 88 - ASRock AM2 Boost: tecnología patentada de ASRock que permite mejorar el rendimiento de la memoria hasta en un 12,5% (vea ATENCIÓN 14) Monitor - Sensibilidad a la temperatura del procesador Hardware - Sensibilidad a la temperatura de la placa madre - Taquímetros de los ventiladores del procesador y del...
- Seite 89 64 bits / Vista / XP 64 bits / XP SP1; SP2. 10. Es una herramienta de overclocking de ASRock de usuario-fácil que le permite a supervisar su sistema por la función de monitor de hardware y overclock sus dispositivos de hardware para obtener el mejor funcionamiento del sistema bajo el entorno de Windows ®...
- Seite 90 PC. 14. Esta placa base admite la tecnología ASRock AM2 Boost para aumento de la velocidad del reloj. Si habilita esta función en la configuración del BIOS, el rendimiento de la memoria mejorará...
-
Seite 91: Instalación
4. Ponga cualquier componente deslocalizado sobre la bolsa anti-estástica que viene con la placa madre. 5. Al colocar los tornillos en sus agujeros para fijar la placa madre en el chasis, no los apriete demasiado. Eso podría dañar la placa madre. ASRock K10N78M Motherboard... - Seite 92 Conecte entonces el ventilador de la CPU al conector CPU FAN (CPU_FAN1, consulte Página 2, N. 6). Para realizar la instalación correctamente, consulte el manual de instrucciones del ventilador de la CPU y el radiador. ASRock K10N78M Motherboard...
- Seite 93 2.3 Instalación de Memoria 2.3 Instalación de Memoria La placa base K10N78M proporciona dos ranuras DIMM DDR2 (Double Data Rate 2, es decir, Tasa doble de datos) de 240 contactos y es compatible con la Tecnología de memoria de canal dual. Para la configuración de canal dual, siempre es necesario instalar dos módulos de memoria idénticos (la misma marca, velocidad, tamaño y tipo...
- Seite 94 Express) Express) Express) Express) La placa madre K10N78M cuenta con 2 ranuras PCI y 2 ranuras PCI Express. Ranura PCI: Para instalar tarjetas de expansión que tienen 32-bit Interface PCI. Ranura PCI Express: PCIE1 (ranura PCIE x1; Blanco) se utiliza para tarjetas PCI Express con tarjetas gráficas con una anchura de 1 carriles,...
- Seite 95 COMS. Si necesita borrar la CMOS cuando acabe de finalizar la actualización de la BIOS, debe arrancar primero el sistema y, a continuación, apagarlo antes de realizar la acción de borrado de CMOS. ASRock K10N78M Motherboard...
- Seite 96 Cable de datos de Cualquier extremo del cable de serie ATA (SATA) los datos de SATA puede ser conectado con el disco duro (Opcional) de SATA / SATAII o el conectador de SATAII en esta placa base. ASRock K10N78M Motherboard...
- Seite 97 (vea p.2, N. 24) tarjeta MPEG. Conector de audio de Este es una interface para panel frontal cable de audio de panel frontal que permite conexión y control (9-pin HD_AUDIO1) conveniente de apparatos de (vea p.2, N. 25) Audio. ASRock K10N78M Motherboard...
- Seite 98 Haga clic en «Establecer dispositivo predeterminado» para convertir el micrófono central en el dispositivo de grabación predeterminado. Conector del Panel del Este conector acomoda varias systema funciones de panel frontal del systema. (9-pin PANEL1) (vea p.2, No. 17) ASRock K10N78M Motherboard...
- Seite 99 Tenga en cuenta que es necesario conectar este (4-pin ATX12V1) conector a una toma de corriente (vea p.2, No. 2) con el enchufe ATX 12V, de modo que proporcione suficiente electricidad. De lo contrario no se podrá encender. ASRock K10N78M Motherboard...
- Seite 100 Si desea instalar Windows Vista / Vista 64 bits en sus HDDs SATA / SATAII sin funciones RAID, por favor siga los pasos siguientes. 1 0 0 1 0 0 1 0 0 1 0 0 1 0 0 ASRock K10N78M Motherboard...
- Seite 101 Los controladores AHCI de NVIDIA se encuentran en la siguiente ruta de nuestro CD de soporte: (Hay dos CD del Apoyo de ASRock en el paquete de la caja del regalo de la placa ® base, por favor elige uno para Windows...
- Seite 102 Menú Principal automáticamente si «AUTORUN» está habilitado en su computadora. Si el Menú Principal no aparece automáticamente, localice y doble-pulse en el archivo ASSETUP.EXE para iniciar la instalación. 1 0 2 1 0 2 1 0 2 1 0 2 1 0 2 ASRock K10N78M Motherboard...
- Seite 103 Gratos por comprar nossa placa–mãe K10N78M, um produto confiável feito com ASRock um estrito controle de qualidade consistente. Com um excelente desempenho, essa placa é dotada de um projeto robusto que atende a ASRock de compromisso com a qualidade e durabilidade.
- Seite 104 (Codec de áudio ALC662) - Chipset encravado HDMI Audição - Gigabit LAN 10/100/1000 Mb/s - Giga PHY Realtek RTL8211CL - Suporta Wake-On-LAN 1 2 2 1 2 2 1 2 2 1 2 2 1 2 2 ASRock K10N78M Motherboard...
- Seite 105 - Suporte para Smart BIOS CD de suporte - Controladores, utilitários, software antivírus (Experimentacao Versao) Funcionalidade - Sintonizador ASRock OC (veja o AVISO 10) Única - Poupança de Energia Inteligente (veja o AVISO 11) - Instant Boot - Booster híbrido - Frequência da CPU com controle contínuo...
- Seite 106 - ASRock U-COP (veja o AVISO 13) - B.F.G. (Boot Failure Guard) - ASRock AM2 Boost: Tecnologia patenteada da ASRock para melhorar o desempenho da memória até 12,5% (veja o AVISO 14) Monitor do HW - Sensores de temperature do procesador - Medição de temperatura da placa-mãe...
- Seite 107 / XP de 64 bits / XP SP1; SP2. 10. É uma ferramenta de overclocking da ASRock fácil de utilizar que lhe permite vigiar i seu sistema via a função de monitorização de hardware e proceder ao overclock dos dispositivos de hardware para obter o melhor desempenho em ambiente Windows ®...
- Seite 108 14. Esta placa principal suporta a tecnologia de overclocking ASRock AM2 Boost. Se activar esta função na configuração do BIOS, o desempenho da memória sofrerá...
- Seite 109 2. Instalação 2. Instalação K10N78M é uma Micro ATX forma factor (9.6-in x 7.5-in, 24.4 cm x 19.1 cm) tábua principal. Antes de instalar a tábua principal, estude a configuração do seu chassi para assegurar que a tábua principal apropria a isto.
- Seite 110 E depois ligue o ventilador de CPU e o ligador de CPU_FAN (CPU_FAN1, veja p.2 No.6). Para a instalação apropriada, Refera ao manual da instrução de CPU ventilador e heatsink. 1 2 8 1 2 8 1 2 8 1 2 8 1 2 8 ASRock K10N78M Motherboard...
- Seite 111 2.3 Instalação dos Módulos de Memória (DIMM) 2.3 Instalação dos Módulos de Memória (DIMM) A placa-mãe K10N78M possui dois slots DIMM DDR2 (taxa de dados dupla) de 240 pinos e suporta a tecnologia de memória de duplo canal. Para a configuração de duplo canal, instale sempre dos módulos de memória idênticos (mesma marca,...
- Seite 112 2.4 Slots de Expansão (Slots de PCI e PCI Express) 2.4 Slots de Expansão (Slots de PCI e PCI Express) Há 2 slots de PCI e 2 slots de PCI Express na placa–mãe do K10N78M. Slots PCI: Os slots PCI se usam para instalar placas de expansão com uma interface de PCI de 32 bit.
- Seite 113 CMOS ao concluir a atualização do BIOS, deverá reiniciar o sistema primeiro e, em seguida, desligá-lo antes de executar a ação de limpeza o CMOS. 1 3 1 1 3 1 1 3 1 1 3 1 1 3 1 ASRock K10N78M Motherboard...
- Seite 114 Tanto a saída do cabo de Serial ATA (SATA) dados SATA pode ser conectado ao disco rígido (opcional) SATA / SATAII quanto o conector SATAII na placa mãe. 1 3 2 1 3 2 1 3 2 1 3 2 1 3 2 ASRock K10N78M Motherboard...
- Seite 115 áudio em estéreo de fontes (CD1: veja a floha 2, No. 24) de áudio como CD-ROM, DVD-ROM, placa sintonizadora de TV ou placa MPEG. 1 3 3 1 3 3 1 3 3 1 3 3 1 3 3 ASRock K10N78M Motherboard...
- Seite 116 Realtek. Clique em “Set Default Device” (Definir Dispositivo como Predefinido) para fazer com que o Microfone Frontal seja o dispositivo de gravação predefinido. 1 3 4 1 3 4 1 3 4 1 3 4 1 3 4 ASRock K10N78M Motherboard...
- Seite 117 Pino 1 e o Pino 13. Instalação da Fonte de alimentação ATX de 20 Pinos 1 3 5 1 3 5 1 3 5 1 3 5 1 3 5 ASRock K10N78M Motherboard...
- Seite 118 Defina a opção “SATA Operation Mode” (Modo de funcionamento SATA) para [IDE]. ® ETAPA 2: Instalar o Windows XP / XP de 64 bits OS no seu sistema. 1 3 6 1 3 6 1 3 6 1 3 6 1 3 6 ASRock K10N78M Motherboard...
- Seite 119 AHCI da NVIDIA ® Os controladores AHCI da NVIDIA encontram-se nos seguintes caminhos no CD de suporte: (Há dois ASRock Suporta CD no pacote de caixa de presente de tábua maderna, ® escolha um de Windows Vista / Vista 64-bit.)
- Seite 120 “AUTORUN” esteja ativado. Se o menu principal não aparecer automaticamente, ex- plore o CD e execute o “ASSETUP.EXE” localizado na pasta “BIN”. 1 3 8 1 3 8 1 3 8 1 3 8 1 3 8 ASRock K10N78M Motherboard...
- Seite 121 1 3 9 1 3 9 1 3 9 1 3 9 1 3 9 ASRock K10N78M Motherboard...
- Seite 122 ‘ ’ ® ® ® ® ® 1 4 0 1 4 0 1 4 0 1 4 0 1 4 0 ASRock K10N78M Motherboard...
- Seite 123 1 4 1 1 4 1 1 4 1 1 4 1 1 4 1 ASRock K10N78M Motherboard...
- Seite 124 ® “ ” ® ® ® ® ® 1 4 2 1 4 2 1 4 2 1 4 2 1 4 2 ASRock K10N78M Motherboard...
- Seite 125 “ ” “ ” ® 1 4 3 1 4 3 1 4 3 1 4 3 1 4 3 ASRock K10N78M Motherboard...
- Seite 126 1 4 4 1 4 4 1 4 4 1 4 4 1 4 4 ASRock K10N78M Motherboard...
- Seite 127 1 4 5 1 4 5 1 4 5 1 4 5 1 4 5 ASRock K10N78M Motherboard...
- Seite 128 1 4 6 1 4 6 1 4 6 1 4 6 1 4 6 ASRock K10N78M Motherboard...
- Seite 129 ® ® ® ® ® ® ® ® 1 4 7 1 4 7 1 4 7 1 4 7 1 4 7 ASRock K10N78M Motherboard...
- Seite 130 “ ” “ ” “ ” “ ” 1 4 8 1 4 8 1 4 8 1 4 8 1 4 8 ASRock K10N78M Motherboard...
- Seite 131 1 4 9 1 4 9 1 4 9 1 4 9 1 4 9 ASRock K10N78M Motherboard...
- Seite 132 1 5 0 1 5 0 1 5 0 1 5 0 1 5 0 ASRock K10N78M Motherboard...
- Seite 133 ® ® ® ® “ ” “ ” “ ” “ ” ® “ ” “ ” 1 5 1 1 5 1 1 5 1 1 5 1 1 5 1 ASRock K10N78M Motherboard...
- Seite 134 1 5 2 1 5 2 1 5 2 1 5 2 1 5 2 ASRock K10N78M Motherboard...
- Seite 135 ® ® ® ® ® ® ® ® ® ® ® 1 5 3 1 5 3 1 5 3 1 5 3 1 5 3 ASRock K10N78M Motherboard...
- Seite 136 ® ® ® ® ® ® ® ® ® ® ® 1 5 4 1 5 4 1 5 4 1 5 4 1 5 4 ASRock K10N78M Motherboard...
- Seite 137 “ ” “ ” 1 5 5 1 5 5 1 5 5 1 5 5 1 5 5 ASRock K10N78M Motherboard...
- Seite 138 1 5 6 1 5 6 1 5 6 1 5 6 1 5 6 ASRock K10N78M Motherboard...
- Seite 139 ‘ ’ ® ® ® ® ® 1 5 7 1 5 7 1 5 7 1 5 7 1 5 7 ASRock K10N78M Motherboard...
- Seite 140 1 5 8 1 5 8 1 5 8 1 5 8 1 5 8 ASRock K10N78M Motherboard...
- Seite 141 ® ® ® “ ” ® ® ® ® ® 1 5 9 1 5 9 1 5 9 1 5 9 1 5 9 ASRock K10N78M Motherboard...
- Seite 142 ® ® ® 1 6 0 1 6 0 1 6 0 1 6 0 1 6 0 ASRock K10N78M Motherboard...
- Seite 143 1 6 1 1 6 1 1 6 1 1 6 1 1 6 1 ASRock K10N78M Motherboard...
- Seite 144 1 6 2 1 6 2 1 6 2 1 6 2 1 6 2 ASRock K10N78M Motherboard...
- Seite 145 1 6 3 1 6 3 1 6 3 1 6 3 1 6 3 ASRock K10N78M Motherboard...
- Seite 146 1 6 4 1 6 4 1 6 4 1 6 4 1 6 4 ASRock K10N78M Motherboard...
- Seite 147 ® ® ® ® ® ® ® ® 1 6 5 1 6 5 1 6 5 1 6 5 1 6 5 ASRock K10N78M Motherboard...
- Seite 148 1 6 6 1 6 6 1 6 6 1 6 6 1 6 6 ASRock K10N78M Motherboard...
- Seite 149 1 6 7 1 6 7 1 6 7 1 6 7 1 6 7 ASRock K10N78M Motherboard...
- Seite 150 ® 1 6 8 1 6 8 1 6 8 1 6 8 1 6 8 ASRock K10N78M Motherboard...
- Seite 151 ® ® ® ® 1 6 9 1 6 9 1 6 9 1 6 9 1 6 9 ASRock K10N78M Motherboard...
- Seite 152 ® ® 1 7 0 1 7 0 1 7 0 1 7 0 1 7 0 ASRock K10N78M Motherboard...
- Seite 153 ® ® ® ® ® ® ® ® ® ® ® 1 7 1 1 7 1 1 7 1 1 7 1 1 7 1 ASRock K10N78M Motherboard...
- Seite 154 ® ® ® ® ® ® 1 7 2 1 7 2 1 7 2 1 7 2 1 7 2 ASRock K10N78M Motherboard...
- Seite 155 ® ® 1 7 3 1 7 3 1 7 3 1 7 3 1 7 3 ASRock K10N78M Motherboard...
- Seite 156 1 7 4 1 7 4 1 7 4 1 7 4 1 7 4 ASRock K10N78M Motherboard...
- Seite 157 ‘ ’ ™ ® ® ® ® ® 1 7 5 1 7 5 1 7 5 1 7 5 1 7 5 ASRock K10N78M Motherboard...
- Seite 158 1 7 6 1 7 6 1 7 6 1 7 6 1 7 6 ASRock K10N78M Motherboard...
- Seite 159 ® ® ® ® ® ® ® 1 7 7 1 7 7 1 7 7 1 7 7 1 7 7 ASRock K10N78M Motherboard...
- Seite 160 ® ® 1 7 8 1 7 8 1 7 8 1 7 8 1 7 8 ASRock K10N78M Motherboard...
- Seite 161 1 7 9 1 7 9 1 7 9 1 7 9 1 7 9 ASRock K10N78M Motherboard...
- Seite 162 1 8 0 1 8 0 1 8 0 1 8 0 1 8 0 ASRock K10N78M Motherboard...
- Seite 163 1 8 1 1 8 1 1 8 1 1 8 1 1 8 1 ASRock K10N78M Motherboard...
- Seite 164 ® ® ® ® ® ® ® ® 1 8 2 1 8 2 1 8 2 1 8 2 1 8 2 ASRock K10N78M Motherboard...
- Seite 165 1 8 3 1 8 3 1 8 3 1 8 3 1 8 3 ASRock K10N78M Motherboard...
- Seite 166 1 8 4 1 8 4 1 8 4 1 8 4 1 8 4 ASRock K10N78M Motherboard...
- Seite 167 1 8 5 1 8 5 1 8 5 1 8 5 1 8 5 ASRock K10N78M Motherboard...
- Seite 168 ® ® ® ® 1 8 6 1 8 6 1 8 6 1 8 6 1 8 6 ASRock K10N78M Motherboard...
- Seite 169 1 8 7 1 8 7 1 8 7 1 8 7 1 8 7 ASRock K10N78M Motherboard...
- Seite 170 ® ® ® ® ® ® ® ® ® ® ® ® ® 1 8 8 1 8 8 1 8 8 1 8 8 1 8 8 ASRock K10N78M Motherboard...
- Seite 171 ® ® ® ® ® ® ® ® ® ® ® ® ® ® 1 8 9 1 8 9 1 8 9 1 8 9 1 8 9 ASRock K10N78M Motherboard...
- Seite 172 ® ® 1 9 0 1 9 0 1 9 0 1 9 0 1 9 0 ASRock K10N78M Motherboard...
- Seite 173 1 9 1 1 9 1 1 9 1 1 9 1 1 9 1 ASRock K10N78M Motherboard...