Herunterladen Inhalt Inhalt Diese Seite drucken
auna Columbia Bedienungsanleitung

auna Columbia Bedienungsanleitung

Dab-radio mit cd-player und usb-aufnahmefunktion

Werbung

Verfügbare Sprachen
  • DE

Verfügbare Sprachen

  • DEUTSCH, seite 1

Werbung

Inhaltsverzeichnis
loading

Inhaltszusammenfassung für auna Columbia

  • Seite 3: Inhaltsverzeichnis

    Sehr geehrter Kunde, wir gratulieren Ihnen zum Erwerb Ihres Geräts. Lesen Sie die folgenden Hinweise sorgfältig durch und befolgen Sie diese, um möglichen Schäden vorzubeugen. Für Schäden, die durch Missachtung der Hinweise und unsachgemäßen Gebrauch entstehen, übernehmen wir keine Haftung. Scannen Sie den QR-Code, um Zugriff auf die aktuellste Bedienungsanleitung und weitere Informationen rund um das Produkt zu erhalten.
  • Seite 4: Technische Daten

    TECHNISCHE DATEN Artikelnummer 10032958 100 - 240 V~ 50/60 Hz Stromversorgung 87,5 - 108 MHz FM-Radio Band III DAB-Radio AUX IN, BT, USB Anschlüsse SICHERHEITSHINWEISE Lesen Sie vor der Verwendung des Geräts die Bedienungsanleitung vollständig durch. Befolgen Sie alle Sicherheitshinweise, um Schäden durch unsachgemäßen Gebrauch vorzubeugen.
  • Seite 5 • Kleine Kinder müssen beaufsichtigt werden, so dass sie mit dem Gerät nicht spielen. • Halten Sie das Gerät von heißen Flächen und offenen Flammen fern. • Stellen Sie keine Gegenstände auf das Gerät. Stellen Sie keine Gegenstände mit offenen Flammen (wie Kerzen) auf das Gerät oder daneben auf.
  • Seite 6: Geräteübersicht

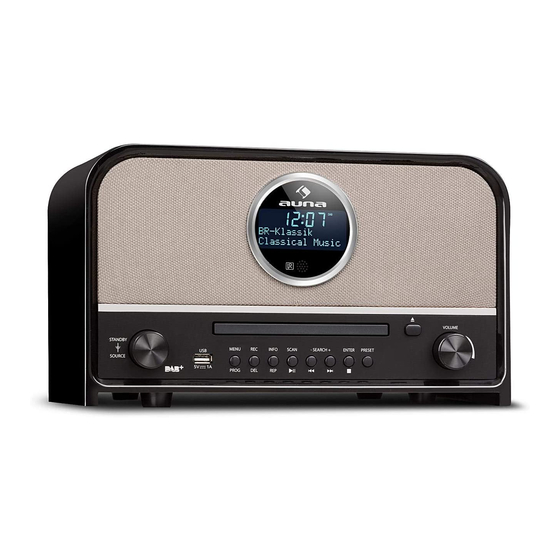
    GERÄTEÜBERSICHT Display Titel zurück/Schnellvorlauf Drehknopf Stand-by/Quelle Titel vor/Schnellrücklauf USB-Ladeanschluss 10 Eingabe/Stopp Menü/Programm Voreinstellung Aufnahme/Löschen 12 Öffnen/Schließen Wiederholen/Info 13 Lautstärke Scan/Wiedergabe/Pause 14 Aufhängelöcher auf der Rückseite 15 Ein/Aus-schalter 16 Wechselstromkabel 17 AUX in (r) 18 AUX in (l) 19 DAB/FM-Antenne 20 Kopfhöreranschluss...
  • Seite 7 Fermbedienung Ein/Aus-Schalter 13 Skip+ Taste/ CD-Fach auf/Zu-Taste Schnellrücklauftaste Aufnahmetaste 14 Zahlentastatur Löschtaste Modus Taste 16 Eingabe/Wiederholungstaste Stopp-Taste (DAB/FM) Lautstärke Taste + 17 Menü (DAB/FM) Lautstärke Taste - 18 EQ Wiedergabe/Pause-Taste 19 Voreinstellung (DAB/FM) 10 DAB Scan/Programm-Taste 20 Timer Info 12 Skip- Taste/Schnellvorlauftaste...
  • Seite 8: Inbetriebnahme Und Bedienung

    INBETRIEBNAHME UND BEDIENUNG Einlegen der Batterien (Fernbedienung) Die Infrarot-Fernbedienung benötigt 2 St. LR03, AAA (3 V) Batterien. Anschluss an die Stromversorgung Vergewissern Sie sich vor dem Einschalten, dass die Spannung Ihres Stromnetzes mit der auf dem Typenschild angegebenen übereinstimmt. Lesen Sie sich zu Ihrer eigenen Sicherheit die folgenden Anweisungen sorgfältig durch, bevor Sie versuchen, das Gerät an das Stromnetz anzuschließen.
  • Seite 9: Im Standby-Modus

    4. Halten Sie die Stopp-Taste(10) gedrückt, bis Sie TIME und SET 12/24 HOURS wählen können. Drücken Sie die Skip+ und Skip- Taste und drücken Sie die STOP-Taste zur Bestätigung. 5. Wiederholen Sie den beschriebenen Vorgang 2-4 und wählen Sie eine der folgenden Optionen: SET TIME/DATE oder AUTO UPDATE.
  • Seite 10: Radio (Fm)

    RADIO (FM) Für den UKW- und DAB-Empfang befindet sich auf der Rückseite des Gerätes ein Antennenanschluss (75 Ohm). Schließen Sie eine externe Antenne an, um das beste Empfangssignal zu erhalten. Funktionsweise 1. Drücken Sie den Statndby-Modus (2), das Display (1) leuchtet auf. 2.
  • Seite 11: Cd-Player

    MANUELLE SENDERWAHL 1. Drücken Sie die MENÜ-Taste (4), dann die Skip+ und Skip- Tasten, um MANUELLE SENDERWAHL zu wählen. 2. Drücken Sie die Skip+ und Skip- Taste, um den gewünschten Sender manuell einzustellen. 3. Wenn Sie einen DAB-Stereo-Sender eingestellt haben, wird "Stereo" auf dem Display angezeigt.
  • Seite 12: Usb-Wiedergabe

    Wenn Sie die Taste / während der CD/MP3 Wiedergabe gedrückt halten, wird der Titel schnell vor- oder zurückgespult, bis die Taste losgelassen wird. Um 10 Titel zu überspringen (nach vorne oder zurück), drücken Sie die Taste TRACK +10 oder TRACK -10 auf der Fernbedienung. Wiederholung/Zufallswiedergabe-Modus Drücken Sie die Taste PLAY Rep/Info (6), um diese Funktion zu aktivieren.
  • Seite 13: Bt-Einrichtung

    1. Drehen Sie den Source-Drehknopf (2), um den BT-Modus auszuwählen. 2. Wählen Sie von Ihrem Mobilgerät (Smartphone, Tablet) die BT-Kennung "Columbia" aus und bestätigen Sie die Verbindung. 3. Jetzt können Sie die Musik auf das Gerät übertragen und alle Funktionen können nur noch von Ihrem Mobilgerät aus bedient werden.
  • Seite 14 Kodierung von CD-MP3 Stecken Sie den USB-Stick in die USB-Buchse. Im MP3-Wiedergabemodus drücken Sie einmal die Taste REC/DEL (5), im Display erscheint "REC-ONE", danach drücken Sie die Taste REC/DEL (5) zur Bestätigung, "REC" blinkt und beginnt nach 5 Sekunden mit der Aufnahme; oder drücken Sie einmal die Taste, um alle Dateien im Abspielordner aufzunehmen, und "REC-ONE"...
  • Seite 15: Usb-Ladeanschluss

    USB-LADEANSCHLUSS Drehen Sie den Source-Drehknopf (2), um das Gerät einzuschalten, dann wird die USB-Buchse (3) 5V 1000 mA zum Laden ausgegeben. Wenn der USB-Stick mit Musikdokument im USB-Modus angeschlossen wird und Musik abspielt, dann wird der Ladevorgang automatisch gestoppt. AUX-EINGANG Drehen Sie den Source-Drehknopf (2) um in den Aux-Modus zu wechseln, legen Sie ein 300-800mv-Signal für die Aux-L/R-Kanal-Buchse ein, Sie können den Lautstärkeregler (13) drehen, wenn Sie Musik abspielen.
  • Seite 16: Hinweise Zur Entsorgung

    HINWEISE ZUR ENTSORGUNG Befindet sich die linke Abbildung (durchgestrichene Mülltonne auf Rädern) auf dem Produkt, gilt die Europäische Richtlinie 2012/19/EU. Diese Produkte dürfen nicht mit dem normalen Hausmüll entsorgt werden. Informieren Sie sich über die örtlichen Regelungen zur getrennten Sammlung elektrischer und elektronischer Gerätschaften.
  • Seite 17 Dear Customer, Congratulations on purchasing this equipment. Please read this manual carefully and take care of the following hints to avoid damages. Any failure caused by ignoring the items and cautions mentioned in the instruction manual are not covered by our warranty and any liability. Scan the QR code to get access to the latest user manual and other information about the product.
  • Seite 18: Technical Data

    TECHNICAL DATA Item number 10032958 100-240 V~ 50/60 Hz Power supply 87,5 - 108 MHz FM Radio Band III DAB Radio AUX IN, BT, USB Connections SAFETY INSTRUCTIONS Please read this instruction manual thoroughly before using this appliance! Follow all the safety instructions to avoid damage cause by improper use. Keep the instruction manual for future reference.
  • Seite 19 flames(such as candles) on or next to the appliance .Never put items containing liquid(such as vases) on or next to the appliance. • Do not expose the appliance to direct sunlight. • Do not use the appliance if it is damaged. To avoid hazards, defective components must only be replaced by the manufacturer, his customer service or similar qualified persons.
  • Seite 20: Device Description

    DEVICE DESCRIPTION DISPLAY SCAN/PLAY/PAUSE FUNCTION /POWER SKIP- BUTTON/FAST STANBY FORWARD BUTTON 3.USB/CHARGING SKIP+ BUTTON/REWIND 4. MENU/PRGO BUTTON 5.REC/DELETE 10 ENTER/STOP 6.REPEAT/INFO PRESET 12 OPEN /CLOSE 13 VOLUME 14 Reverse phase hols 15 POWER SWITCH 16 AC CORAD 17 AUX IN(R) 18 AUX IN(L) 19 DAB/FM ANT 20 EARPHONE JACK...
  • Seite 21: Power On/Off

    Remote control POWER ON/OFF 12 SKIP- BUTTON/FAST FORWARD CD DOOR OPEN/CLOSE BUTTON BUTTON 13 SKIP+ BUTTON/REWIND RECORD BUTTON BUTTON DELETE BUTTON 14 NUMER KEYBOARD MODE BUTTON 15 +10 STOP BUTTON 16 (DAB/FM) ENTER/REPEAT VOLUME UP BUTTON BUTTON VOLUME DOWN BUTTON 17 (DAB/FM) MENU PLAY/PAUSE BUTTON 18 EQ...
  • Seite 22: Getting Started And Operation

    GETTING STARTED AND OPERATION REMOTE BATTERY INSTALLATION The infrared remote control requires 2 PCS UM-4 R03, AAA (3V) Battery. CONNECTING TO POWER Before switching on make sure that the voltage of your electricity supply is the same as that indicated on the rating plate. For your own safety read the following instructions carefully before attempting to connect this unit to the mains.
  • Seite 23: Fm Radio

    Minutes, then press the stop KNOB to confirm the operation. 7. To set the Auto-Updating, follow the above procedure 2-6 and select AUTO UPDATE. From this menu, move the to select one of the following skip+ and skip- KNOB options: FROM ANY / FROM DAB / FROM FM / NO UPDATE.
  • Seite 24: Automatic Tuning

    AUTOMATIC TUNING 1. During FM working mode, press the MENU BUTTON (4), then press skip+ and skip- knob until select the “SCAN SETTING” 2. Press the SCAN BUTTON (7) and the unit will scan all of the FM stations. 3. RADIO DATA SYSTEM INFORMATIONS 4.
  • Seite 25: Cd Player

    CD PLAYER To start 1. Turn the source knob (2) to select “CD“ mode. 2. Press “open/close” button (12) to open the CD door . 3. Place a CD with the printed side facing up inside the tray & then close the co door.
  • Seite 26: Usb Operation

    necessary. 5. When all the desired tracks have been programmed, press PLAY/PAUSE BUTTON (7) to play the disc in assigned order. 6. To cancel the programmed file, press STOP button(10). USB OPERATION PLAYBACK OF MP3/WMA SONG VIA USB STORAGE MEDIA The system is able to decode and playback all mp3 /wma file which stored in the memory media with USB connecting port.
  • Seite 27: Digital Recording To Usb

    DIGITAL RECORDING TO USB ENCODING FROM DAB Plug USB Disk into USB socket. During DAB playing mode, press hold on the REC/DEL BUTTON (5) one time, the “USB” on the display will flash after 5 seconds and the recording is starting. Press the PLAY/PAUSE BUTTON (7) one time to stop the recording and “USB”...
  • Seite 28: Usb Charging

    EQ OPERATION During playing mode, press the remote handset the EQ key(18) one time, the sound will not be heard from the speakers and “ show on the display; During playing mode, press the EQ BUTTON (remote handset 18) to choose from different sound effect among FLAT/ POP/ CLASSIC/ ROCK/ JAZZ.
  • Seite 29: Disposal Considerations

    DISPOSAL CONSIDERATIONS According to the European waste regulation 2012/19/EU this symbol on the product or on its packaging indicates that this product may not be treated as household waste. Instead it should be taken to the appropriate collection point for the recycling of electrical and electronic equipment.
  • Seite 31 Chère cliente, cher client, Toutes nos félicitations pour l’acquisition de ce nouvel appareil. Veuillez lire attentivement et respecter les instructions de ce mode d’emploi afin d’éviter d’éventuels dommages. Nous ne saurions être tenus pour responsables des dommages dus au non-respect des consignes et à...
  • Seite 32: Fiche Technique

    FICHE TECHNIQUE Artikelnummer 10032958 100 - 240 V~ 50/60 Hz Stromversorgung 87,5 - 108 MHz FM-Radio Band III DAB-Radio AUX IN, BT, USB Anschlüsse CONSIGNES DE SÉCURITÉ Lisez entièrement le mode d'emploi avant d'utiliser l'appareil. Suivez toutes les instructions de sécurité pour éviter les dommages causés par une mauvaise utilisation.
  • Seite 33 • Ne placez aucun objet sur l'appareil. Ne placez pas d'objets avec des flammes nues (telles que des bougies) sur ou à proximité de l'appareil. Ne placez jamais d'objets avec des liquides (tels que des vases) sur ou à proximité de l'appareil. •...
  • Seite 34: Aperçu De L'appareil

    APERÇU DE L'APPAREIL Ecran Titre précédent/retour Bouton rotatif veille/source rapide Port de charge USB Titre suivant /avance rapide Menu/Programme 10 Saisie /Stop Enregistrement /effacer Préréglage Répétition /Info 12 Ouvrir /fermer Scan/ Lecture /Pause 13 Volume 14 Trous de fixation à l'arrière 15 Interrupteur de marche/arrêt 16 Câble d'alimentation en courant alternatif 17 AUX in (r)
  • Seite 35 Télécommande Interrupteur de marche/arrêt 12 Bouton Skip /recherche avant Ouverture/fermeture du lecteur rapide 13 Bouton Skip+ / retour rapide Bouton d'enregistrement 14 Clavier numérique Bouton effacer Bouton mode 16 Bouton d'entrée/répétition Bouton stop 17 Menu (DAB/FM) Bouton volume + 18 EQ Bouton volume - 19 Préréglage (DAB/FM) Lecture/Pause...
  • Seite 36: Mise En Marche Et Utilisation

    MISE EN MARCHE ET UTILISATION Installation des piles (télécommande) La télécommande infrarouge nécessite 2 piles LR03, AAA (3 V). Connexion à l'alimentation Avant de mettre l'appareil en marche, assurez-vous que la tension de votre alimentation est conforme à celle indiquée sur la plaque signalétique. Pour votre propre sécurité, lisez attentivement les instructions suivantes avant de connecter l'appareil au secteur.
  • Seite 37 5. Répétez la procédure 2-4 et sélectionnez l'une des options suivantes : SET TIME / DATE ou AUTO UPDATE. 6. Lorsque vous avez sélectionné SET TIME / DATE, utilisez les boutons Skip + et Skip- pour définir les heures et les minutes, puis appuyez sur le bouton Stop pour confirmer.
  • Seite 38: Radio (Fm)

    RADIO (FM) Pour la réception FM et DAB, il y a un connecteur d'antenne (75 Ohm) à l'arrière de l'appareil. Connecter une antenne externe pour obtenir le meilleur signal de réception. Fonctionnement 1. Appuyez sur le mode veille (2), l'écran (1) s'allume. 2.
  • Seite 39: Lecteur Cd

    RECHERCHE MANUELLE DES STATIONS 1. Appuyez sur le bouton MENU (4) puis sur les boutons Skip+ et Skip pour choisir RECHECHE MANUELLE DES STATIONS. 2. Appuyez sur les boutons Skip + et Skip- pour définir manuellement la station souhaitée. 3. Si vous avez configuré une station stéréo DAB, "Stéréo" sera affiché à l'écran.
  • Seite 40: Lecture Par Usb

    Lorsque vous maintenez les boutons / pendant la lecture de CD/MP3, le titre est rembobiné rapidement vers l'avant ou l'arrière jusqu'à ce que vous relâchiez le bouton. Pour sauter 10 titres à la fois (vers l'avant ou l'arrière), appuyez sur le bouton TRACK +10 ou TRACK -10 de la télécommande.
  • Seite 41: Installation Bt

    Tournez le bouton Source (2) pour sélectionner le mode BT. Depuis votre appareil mobile (smartphone, tablette), sélectionnez l'identifiant BT "Columbia" et confirmez la connexion Vous pouvez maintenant transférer la musique sur l'appareil et toutes les fonctions ne peuvent être utilisées qu'à partir de votre appareil mobile.
  • Seite 42 Encodage de CD MP3 Insérez la clé USB dans le port USB. En mode de lecture MP3, appuyez une fois sur le bouton REC/DEL (5), "REC-ONE" apparaît à l'écran, puis appuyez sur le bouton REC/DEL (5) pour confirmer. "REC" clignote et commence l'enregistrement au bout de 5 secondes ;...
  • Seite 43: Port De Charge Usb

    PORT DE CHARGE USB Tournez le bouton Source (2) pour allumer l’alimentation. La prise USB (3) 5V 1000 mA est alors chargée. Si la clé USB contenant un document musical est connectée en mode USB et que la musique est en cours de lecture, le processus de chargement est automatiquement arrêté.
  • Seite 44: Informations Sur Le Recyclage

    INFORMATIONS SUR LE RECYCLAGE Vous trouverez sur le produit l’image ci-contre (une poubelle sur roues, barrée d‘une croix), ce qui indique que le produit se trouve soumis à la directive européenne 2012/19/UE. Renseignez-vous sur les dispositions en vigueur dans votre région concernant la collecte séparée des appareils électriques et électroniques.
  • Seite 45 Estimado cliente: Le felicitamos por la adquisición de este producto. Lea atentamente el siguiente manual y siga cuidadosamente las instrucciones de uso con el fin de evitar posibles daños. La empresa no se responsabiliza de los daños ocasionados por un uso indebido del producto o por haber desatendido las indicaciones de seguridad.
  • Seite 46: Datos Técnicos

    DATOS TÉCNICOS Número de artículo 10032958 100-240 V~ 50/60 Hz Suministro eléctrico 87.5 - 108 MHz Radio FM Banda III Radio DAB AUX IN, BT, USB Conexiones INDICACIONES DE SEGURIDAD Antes de utilizar el aparato, lea el manual de instrucciones. Siga todas las indicaciones de seguridad para evitar daños provocados por un uso inadecuado •...
  • Seite 47 • Mantenga el aparato lejos de superficies calientes y llamas abiertas. • No coloque ningún objeto sobre el aparato. No coloque ningún objeto que genere llamas abiertas, como velas, sobre el aparato ni junto a él. No coloque ningún objeto con líquidos (como jarrones) sobre el aparato ni cerca de él.
  • Seite 48: Visión General Del Aparato

    VISIÓN GENERAL DEL APARATO Display Pista anterior/retroceso Botón giratorio standby/ rápido fuente Pista siguiente/avance Cable de carga USB rápido Menú/programa 10 Introducción de Grabar/eliminar información/Stop Repetir/info Ajuste predeterminado Escanear/Reproducción/ 12 Abrir/cerrar pausa 13 Volumen 14 Orificio para colgar en la parte trasera 15 Interruptor on/off 16 Cable de corriente alterna 17 AUX in (r)
  • Seite 49 Mando a distancia Interruptor on/off 13 Botón Skip+/botón de avance Botón para abrir/cerrar el rápido compartimento de CD 14 Teclado numérico Botón de grabación 15 15 +10 Botón para eliminar 16 Introducir información/botón Botón Modo de repetición (DAB/FM) Botón stop 17 Menú...
  • Seite 50: Puesta En Marcha Y Uso

    PUESTA EN MARCHA Y USO Colocar las pilas (mando a distancia) La télécommande infrarouge nécessite 2 piles LR03, AAA (3 V). Connexion à l'alimentation Antes de encender el aparato, asegúrese de que la tensión de la toma de corriente coincida con la indicada en la placa técnica del mismo. Por su propia seguridad, lea detenidamente las siguientes instrucciones antes de conectar el aparato a la red eléctrica.
  • Seite 51 botón Stop para confirmar. 5. Repita el proceso descrito en 2-4 y elija una de las siguientes opciones: SET TIME/DATE o AUTO UPDATE. 6. Si ha seleccionado SET TIME/DATE, utilice los botones Skip+ y Skip- para configurar las horas y los minutos y a continuación presione el botón Stop para confirmar el proceso.
  • Seite 52: Radio (Fm)

    RADIO (FM) Para la recepción de FM y DAB hay un conector de antena (75 Ohm) en la parte posterior de la unidad. Conecte una antena externa para obtener la mejor señal de recepción. Funcionamiento 1. Pulse el botón standby (2), el display (1) se ilumina. 2.
  • Seite 53: Reproductor De Cd

    BÚSQUEDA MANUAL DE EMISORAS 1. Pulse el botón MENU (4) y a continuación los botones skip+ y skip- hasta que pueda elegir "BÚSQUEDA MANUAL DE EMISORAS". 2. Utilice los botones SKIP+/- para seleccionar la emisora deseada. 3. Cuando haya sintonizado una emisora estéreo DAB, aparecerá "estéreo" en el display.
  • Seite 54: Reproducción Usb

    Modo Repetición / reproducción aleatoria Pulse el botón PLAY Rep/Info (6) para activar la función. Todas las pistas se pueden reproducir en otro modo como sigue: Repetir reproducción: Con esta función se pueden repetir las pistas o carpetas deseadas. Reproducción aleatoria: Con esta función se pueden repetir las pistas o carpetas deseadas en orden aleatorio Programación de pistas Se pueden guardar hasta 99 pistas en formato MP3 (20 en CD) y se pueden...
  • Seite 55: Instalación Bt

    Gire el regulador de fuente (2) para seleccionar el modo "BT". Seleccione en su dispositivo móvil (smartphone/tablet) la identificación BT "columbia" y confirme la conexión. Ahora puede transferir la música al aparato y todas las funciones se pueden controlar desde su dispositivo móvil.
  • Seite 56 Codificación desde CD-MP3 Conecte el dispositivo USB a la toma USB. En el modo de reproducción MP3, pulse una vez el botón REC/DEL (5), en el display aparece "REC-ONE", a continuación pulse el botón REC/DEL (5) para confirmar, "REC" parpadea y comienza con la grabación a los 5 segundos;...
  • Seite 57: Cable De Carga Usb

    CABLE DE CARGA USB Gire el regulador de fuente (2) para encender el aparato, a continuación la toma USB (3) emite carga 5V 1000 mA para cargar. Si el dispositivo USB con archivos de música se conecta modo USB y se reproduce la música, se detiene automáticamente el proceso de carga.
  • Seite 58: Retirada Del Aparato

    RETIRADA DEL APARATO Si el aparato lleva adherida la ilustración de la izquierda (el contenedor de basura tachado) entonces rige la normativa europea, directiva 2012/19/UE. Estos productos no pueden depositarse en los contenedores destinados a la basura común. Infórmese sobre las leyes territoriales que regulan la recogida separada de aparatos eléctricos y electrónicos.
  • Seite 59 Gentile Cliente, La ringraziamo per aver acquistato il dispositivo. La preghiamo di leggere attentamente le seguenti istruzioni per l’uso e di seguirle per evitare possibili danni tecnici. Non ci assumiamo alcuna responsabilità per danni scaturiti da una mancata osservazione delle avvertenze di sicurezza e da un uso improprio del dispositivo.
  • Seite 60: Dati Tecnici

    DATI TECNICI Numero Articolo 10032958 100 - 240 V~ 50/60 Hz Alimentazione 87,5 - 108 MHz Radio FM Banda III Radio DAB AUX IN, BT, USB Connessioni AVVERTENZE DI SICUREZZA Leggere l’intero manuale d’uso prima di utilizzare il dispositivo Seguire tutte le avvertenze di sicurezza per evitare danni dovuti a un uso improprio.
  • Seite 61 • Non poggiare oggetti sopra al dispositivo. Non posizionare sopra o vicino al dispositivo oggetti con fiamme libere (come candele). Non poggiare mai sopra o vicino al dispositivo oggetti con liquidi (come vasi). • Non posizionare il dispositivo nella luce solare diretta. •...
  • Seite 62: Descrizione Del Dispositivo

    DESCRIZIONE DEL DISPOSITIVO Display Titolo successivo/Avanzare Manopola Standby/Fonte rapidamente Connessione di carica USB 10 Inserire/Stop Menu/Programma Impostazione predefinita Registrare/Cancellare 12 Aprire/Chiudere Ripetere/Info 13 Volume Scan/Play/Pausa Titolo precedente/ riavvolgimento rapido 14 Fori sul retro per appendere il dispositivo 15 Interruttore On/Off 16 Cavo corrente alternata 17 AUX in (r) 18 AUX in (l)
  • Seite 63 Telecomando Interruttore On/Off 13 Skip+/Avanzare rapidamente Aprire/Chiudere vano CD 14 Tasti numerici Registrare 15 +10 Cancellare 16 Inserire/Ripetere (DAB/FM) Modalità 17 Menu (DAB/FM) Stop 18 EQ Volume+ 19 Impostazione predefinita (DAB/ Volume- Play/Pausa 20 Timer 10 Scan/Programma DAB Info 12 Skip-/Tornare indietro rapidamente...
  • Seite 64: Messa In Funzione E Utilizzo

    MESSA IN FUNZIONE E UTILIZZO Inserire le batterie (telecomando) Il telecomando a infrarossi necessita di 2 batterie AAA (3 V) LR03. Collegamento all’alimentazione Assicurarsi prima di accendere il dispositivo, che la tensione della rete elettrica corrisponda a quella indicata sulla targhetta. Per garantire la sicurezza, leggere attentamente le seguenti indicazioni, prima di cercare di collegare il dispositivo alla rete elettrica.
  • Seite 65 opzioni: SET TIME/DATE o AUTO UPDATESET TIME/DATE o AUTO UPDATE. 6. Se si seleziona SET TIME/DATE, utilizzare Skip+ e Skip- per impostare ore e minuti e premere Stop per confermare. 7. Per impostare l’aggiornamento automatico, procedere come descritto in precedenza e selezionare AUTO UPDATE. Selezionare in questo menu una delle opzioni dei tasti Skip+ e Skip-: DA UNO A PIACERE/DA DAB/ DA FM/NESSUN AGGIORNAMENTO.
  • Seite 66: Radio (Fm)

    RADIO (FM) Per la ricezione FM e DAB, sul retro del dispositivo si trova un attacco per l´antenna. Collegare un´antenna esterna per ottenere una ricezione ottimale. Funzionamento 1. Premere la modalità Standby (2) e il display (1) si accende. 2. Ruotare la manopola SOURCE (2) per selezionare la modalità FM. SELEZIONE MANUALE DELLE EMITTENTI Tenere premuti Skip+ e Skip-.
  • Seite 67: Lettore Cd

    1. Premere MENU (4) e poi Skip+ e Skip- per selezionare SELEZIONE MANUALE DELLE EMITTENTI. 2. Premere Skip+ e Skip- per impostare manualmente l’emittente desiderata. 3. Una volta impostata un’emittente DAB, sullo schermo compare “Stereo”. 4. Premere INFO (6) durante la ricezione DAB per mostrare sul display informazioni sull’emittenti DAB in riproduzione.
  • Seite 68: Riproduzione Usb

    Premere PLAY Rep/Info (6) per attivare questa funzione. Tutti i titoli possono essere riprodotti in un’altra modalità come descritto di seguito: Ripetere la riproduzione: con questa funzione è possibile ascoltare in ripetizione un titolo o una cartella. Ripetizione casuale: con questa funzione è possibile ascoltare in sequenza casuale tutti i titoli o tutte le cartelle.
  • Seite 69: Impostazione Bt

    Ruotare la manopola SOURCE (2) per selezionare la modalità BT. Selezionare dal dispositivo mobile (smartphone, tablet) il nome BT “Columbia” e confermare il collegamento. Ora è possibile trasmettere la musica al dispositivo e gestire tutte le funzioni solo dal dispositivo mobile.
  • Seite 70 Codifica di CD MP3 Inserire la chiavetta USB nell’apposito ingresso. In modalità di riproduzione MP3, premere una volta REC/DEL (5) e sul display compare “REC-ONE”. Premere poi REC/DEL (5) per confermare, sullo schermo lampeggia “REC” e, dopo 5 secondi, inizia la registrazione; oppure premere una volta , per registrare tutti i file nella cartella e sul display compare “REC-ONE”;...
  • Seite 71: Connessione Di Carica Usb

    CONNESSIONE DI CARICA USB Ruotare la manopola SOURCE (2) per accendere il dispositivo, poi viene emesso l’ingresso USB (5) DA 5 v 1000 Ma per la ricarica. Se la chiave USB con file musicali viene collegata in modalità USB e viene riprodotta musica, la procedura di carica viene automaticamente fermata INGRESSO AUX Ruotare la manopola SOURCE (5) per passare in modalità...
  • Seite 72: Smaltimento

    SMALTIMENTO Se sul prodotto è presente la figura a sinistra (il bidone dei rifiuti con le ruote), si applica la direttiva europea 2012/19/ UE. Questi prodotti non possono essere smaltiti con i rifiuti normali. Informarsi sulle disposizioni vigenti per la raccolta di dispositivi elettrici ed elettronici.

Inhaltsverzeichnis