Inhaltsverzeichnis
Werbung
Verfügbare Sprachen
Verfügbare Sprachen
Werbung
Kapitel
Inhaltsverzeichnis

Verwandte Anleitungen für Skandika Fitness HOME RUN SF-1500


Inhaltszusammenfassung für Skandika Fitness HOME RUN SF-1500
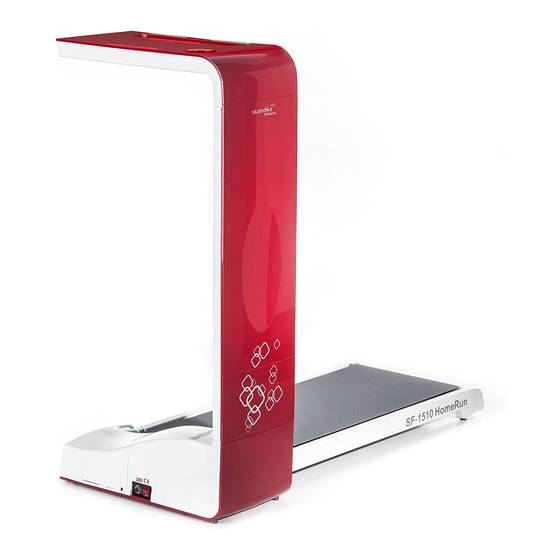
- Seite 1 Art.-Nr. SF-1500 (schwarz) / SF-1510 (rot)
-
Seite 2: Willkommen
WILLKOMMEN Bevor Sie beginnen Herzlichen Glückwunsch zum Kauf Ihres Skandika Home Run Laufbands! Skandika Trainingsgeräte sind leistungsfähige Qualitätsprodukte, die durch hochwertige Materialien und professionelle Verarbeitung überzeugen. Sie sind optimal geeignet für Ihr Fitnesstraining im pri- vaten Umfeld. Sicherheitshinweise Sportliches Training kann die Gesundheit gefährden. Konsultieren Sie vor Beginn eines Trainingsprogramms mit diesem Gerät einen Arzt. -
Seite 3: Inhaltsverzeichnis
INHALTSVERZEICHNIS Inhaltsverzeichnis Aufklappen/Zusammenklappen des Laufbands ................... 4 Netzkabel.............................. 5 Höhenanpassung ..........................6 Transport .............................. 6 Umbau ..............................6 Schmieranweisungen ........................... 7 Justierung des Bandes ......................... 7 Der Sicherheitsschlüssel ........................9 Bedienung des Computers ......................... 10 Explosionszeichnung .......................... 11 Teileliste .............................. 12 Garantiebedingungen ......................... 13 Besuchen Sie auch unsere Webseite Scannen Sie den QR-Code für weitere Informationen... -
Seite 4: Aufklappen Des Laufbands
AUFBAUANLEITUNG Aufklappen des Laufbands A. Drücken Sie die Taste (A) oben rechts von der rechten rückwärtigen Endabdeckung (21) vorsichtig, wie in der Abbildung unten gezeigt. Das Laufdeck (2) senkt sich langsam. Halten Sie das Laufdeck (2) mit zwei Händen, bis Sie ein Klicken hören, um sicherzustellen, dass das Laufband vollständig auf den Boden abgesenkt wurde. -
Seite 5: Netzkabel
AUFBAUANLEITUNG Netzkabel Bedienungsanweisung A. Öffnen Sie die Lagerfachtür (13). B. Wickeln Sie das Netzkabel (61) aus dem La- Lagerfach gerfach des Geräts ab. C. Vergewissern Sie sich vor dem Einstecken des Netzkabels (61) in eine Netzsteckdose, dass die Versorgungsspannung den Span- nungswerten auf dem Typenschild (an der Gerätefront angebracht) entspricht. -
Seite 6: Höhenanpassung
AUFBAUANLEITUNG Anweisungen zur Höhenanpassung A. Nachdem Sie das Gerät am gewünschten Standort aufgestellt haben, überprüfen Sie, ob es eben auf dem Boden steht. Um das Gerät auszurichten, folgen Sie bitte diesen Anweisungen: B. Kippen Sie das Gerät nach links/rechts. Dann sehen Sie die Nivelliervorrichtungen (23). -
Seite 7: Schmieranweisungen
AUFBAUANLEITUNG Schmieranweisungen A. Schmieren Sie das Laufband nach Bedarf oder alle 6 Monate, um die optimale Funkti- on zu erhalten. Hinweis: Schmiermittel ist optional, bitte wenden Sie sich an Ihren Händler. B. Fügen Sie die Sprühdüse (B) in den Sprüh- kopf der Ölkanne (A) ein. - Seite 8 AUFBAUANLEITUNG JUSTIERUNG DES BANDES: 1. Falls das Laufband leicht aus der Mitte verschoben ist, lassen Sie das Laufband zuerst ohne Personen für 5-10 Minuten bei einer Geschwindigkeit von 10 km/h (6 mph) laufen, um zu überprüfen, ob das Laufband den Riemen automatisch ausrichten kann.
-
Seite 9: Der Sicherheitsschlüssel
AUFBAUANLEITUNG Wiederholen Sie das aufgeführte Verfahren zur Bandjustierung, bis das Laufband zentriert ist. Es ist evtl. erforderllich, die Spannung des Laufbands zu überprüfen, nachdem Sie das Band justiert haben, da das Band sonst beim Laufen zu rutschen beginnen kann. Siehe die Anweisungen zum “Rutschen des Laufbands” auf dieser Seite. RUTSCHEN DES LAUFBANDS: Falls das Laufband beim Gebrauch rutscht 1. -
Seite 10: Bedienung Der Konsole
COMPUTER | BEDIENUNG Bedienung der Konsole Nehmen Sie sich ein paar Minuten, um den Aufbau der Konsole kennenzulernen. Nachfolgend fin- den Sie einen Überblick über die Konsolenmerkmale und -funktionen. Wir empfehlen die Verwendung der Konsole, um Ihre Trainingsroutine zu variieren, damit Sie sich weiter auf Ihre Fortschritte in Richtung Ihrer Fitnessziele konzentrieren können. Die Konsole kann zu einer wichtigen Motivationsquelle werden, damit Sie Ihr Programm durchhalten. -
Seite 11: Explosionszeichnung
EXPLOSIONSZEICHNUNG Bei mechanischen Schwierigkeiten jeg- licher Art nutzen Sie bitte nachfolgende Explosionszeichnung. Hier sind alle Teile mit einer spezifischen Nummer gekennzeichnet. Bitte nennen Sie uns diese Nummer,um das Teil gegebenen- falls im Laufe der Garantiezeit kosten- los zu ersetzen. Auch die Versandkos- ten werden von Skandika getragen. Nutzen Sie zur exakten Bestimmung der Teile, falls notwendig, bitte das kostenlose Benutzerhandbuch im... -
Seite 12: Teileliste
TEILELISTE Nr. Beschreibung Menge Nr. Beschreibung Menge Hauptrahmen Schraube (M2,6 × 8 mm) Laufdeck Schraube (M4 × 12 mm) Obere Konsolentischabdeckung Becherschraube (M4 × 20 mm) Konsole Flachkopfschraube (M4 × 20 mm) Rutschfreies Laufband Schraube (M5 × 18 mm) Untere Konsolentischabdeckung Schraube (M8 ×... -
Seite 13: Garantiebedingungen
GARANTIEBEDINGUNGEN Für unsere Geräte leisten wir Garantie gemäß nachstehenden Bedingungen: 1. Wir beheben kostenlos nach Maßgabe der folgenden Bedingungen (Nummern 2-5) Schäden oder Män- gel am Gerät, die nachweislich auf einen Fabrikationsfehler beruhen, wenn Sie uns unverzüglich nach Feststellung und innerhalb von 24 Monaten nach Lieferung an den Endabnehmer gemeldet werden. Die Garantie erstreckt sich nicht auf leicht zerbrechliche Teile, wie z. B. Glas oder Kunststoff. Eine Garantiepflicht wird nicht ausgelöst: durch geringfügige Abweichungen der Soll-Beschaffenheit, die für Wert und Gebrauchstauglichkeit des Gerätes unerheblich sind;... - Seite 26 noTiZen | noTeS ________________________________________________________________________________ ________________________________________________________________________________ ________________________________________________________________________________ ________________________________________________________________________________ ________________________________________________________________________________ ________________________________________________________________________________ ________________________________________________________________________________ ________________________________________________________________________________ ________________________________________________________________________________ ________________________________________________________________________________ ________________________________________________________________________________ ________________________________________________________________________________ ________________________________________________________________________________ ________________________________________________________________________________ ________________________________________________________________________________ ________________________________________________________________________________ ________________________________________________________________________________ ________________________________________________________________________________ ________________________________________________________________________________ ________________________________________________________________________________ ________________________________________________________________________________...
- Seite 27 noTiZen | noTeS ________________________________________________________________________________ ________________________________________________________________________________ ________________________________________________________________________________ ________________________________________________________________________________ ________________________________________________________________________________ ________________________________________________________________________________ ________________________________________________________________________________ ________________________________________________________________________________ ________________________________________________________________________________ ________________________________________________________________________________ ________________________________________________________________________________ ________________________________________________________________________________ ________________________________________________________________________________ ________________________________________________________________________________ ________________________________________________________________________________ ________________________________________________________________________________ ________________________________________________________________________________ ________________________________________________________________________________ ________________________________________________________________________________ ________________________________________________________________________________ ________________________________________________________________________________...
- Seite 28 20141209...