Herunterladen Inhalt Inhalt Diese Seite drucken
BFT IANUS BT 300 KIT Bedienungsanleitung
Vorschau ausblenden Andere Handbücher für IANUS BT 300 KIT:
Inhaltsverzeichnis

Werbung

Verfügbare Sprachen

Verfügbare Sprachen

IANUS BT
300 KIT
500 KIT
ATTUATORE PER CANCELLI SCORREVOLI A CREMAGLIERA - ISTRUZIONI D'USO E DI INSTALLAZIONE
ACTUATOR FOR RACK SLIDING GATES - INSTALLATION AND USER'S MANUAL
ACTIONNEUR POUR PORTAILS COULISSANTS A CREMAILLERE - INSTRUCTIONS D'UTILISATION ET D'INSTALLATION
ANTRIEB FÜR ZAHNSTANGEN-SCHIEBETORE - INSTALLATIONS-UND GEBRAUCHSANLEITUNG
Attenzione! Leggere attentamente le "Avvertenze" all'interno! Caution! Read "Warnings" inside carefully!
Attention! Veuillez lire attentivement les Avertissements qui se trouvent à l'intérieur! Achtung! Bitte lesen Sie aufmerksam die „Hinweise" im Inneren!

Werbung

Inhaltsverzeichnis
loading

Inhaltszusammenfassung für BFT IANUS BT 300 KIT

  • Seite 1 IANUS BT 300 KIT 500 KIT ATTUATORE PER CANCELLI SCORREVOLI A CREMAGLIERA - ISTRUZIONI D’USO E DI INSTALLAZIONE ACTUATOR FOR RACK SLIDING GATES - INSTALLATION AND USER’S MANUAL ACTIONNEUR POUR PORTAILS COULISSANTS A CREMAILLERE - INSTRUCTIONS D’UTILISATION ET D’INSTALLATION ANTRIEB FÜR ZAHNSTANGEN-SCHIEBETORE - INSTALLATIONS-UND GEBRAUCHSANLEITUNG Attenzione! Leggere attentamente le “Avvertenze”...
  • Seite 2: Inhaltsverzeichnis

    VERIFICHE FINALI E MANUTENZIONE ������������������������������������������������������������������������������������������������������������������������������������ 21 MANUALE D’USO: MANOVRA MANUALE �������������������������������������������������������������������������������������������������������������������������������� 22 SOSTITUZIONE BATTERIA �������������������������������������������������������������������������������������������������������������������������������������������������������� 22 SOSTITUZIONE FUSIBILE ���������������������������������������������������������������������������������������������������������������������������������������������������������� 22 AVVERTENZE PER L'UTILIZZATORE ������������������������������������������������������������������������������������������������������������������������������������������ 23 REGISTRO DI MANUTENZIONE ������������������������������������������������������������������������������������������������������������������������������������������������ 24 - IANUS BT 300 KIT - IANUS BT 500 KIT...
  • Seite 3: Avvertenze

    Conservare le istruzioni per allegarle al fascicolo tecnico e per consultazioni future� Le dichiarazioni di conformità sono consultabili nel sito web http://www�bft-automation�com/CE� Le istruzioni di montaggio e d'uso sono consultabili nella sezione download� Questo prodotto è stato progettato e costruito esclusivamente per l’utilizzo indicato in questa documentazione�...
  • Seite 4: Descrizione Del Prodotto

    DESCRIZIONE DEL PRODOTTO - IANUS BT 300 KIT - IANUS BT 500 KIT...
  • Seite 5 MITTO B RCB 02 R1 (Blue) BASE MOTORE MANOPOLA DI SBLOCCO FINE CORSA MECCANICO TRASFORMATORE VITE TRILOBATA TE M6X30 RONDELLA D�6,4-12-1,6 UNI6592 TASSELLO TIPO FISCHER SC 6X30 NYLON VITE AUTOFOFILETTANTE TC+4,8X32 UNI6954/DIN7981 ZN IANUS BT 300 KIT - IANUS BT 500 KIT...
  • Seite 6: Dimensioni

    Grado di protezione IP55 Temperatura di esercizio -20/+55°C Tipo di utilizzo intensivo Portata Utile 30 m (ridotta in caso di nebbia-pioggia) Condizioni ambientali da -20°C a + 55°C Grado di protezione IP24 - IANUS BT 300 KIT - IANUS BT 500 KIT...
  • Seite 7: Attrezzi Necessari

    ATTREZZI NECESSARI IANUS BT 300 KIT - IANUS BT 500 KIT...
  • Seite 8: Operazioni Preliminari

    Dimensione delle recinzione ed anta maglie della rete ≤ 120mm d ≤18,5mm ≤ 300mm 18,5mm < d ≤ 29mm ≤ 500mm 29mm < d ≤ 44mm 850mm d > 44mm - IANUS BT 300 KIT - IANUS BT 500 KIT...
  • Seite 9: Sicurezza Durante L'installazione

    70 mm Allineare con bolla la piastra in modo che il motore sia in piano, quindi posizionare il motore sulla piastra� > 10mm > 25mm 85mm IANUS BT 300 KIT - IANUS BT 500 KIT...
  • Seite 10: Montaggio Cremagliera

    I fermi meccanici devono essere già montati POSIZIONAMENTO CORRETTO POSIZIONAMENTO DEL MOTORE DEL MOTORE SU CREMAGLIERA Spostare il motore sotto la cremagliera come indicato in figura� 210mm 210mm 210mm - IANUS BT 300 KIT - IANUS BT 500 KIT...
  • Seite 11: Montaggio Fotocellule

    IN CASO DI PASSAGGIO CAVO DA PARETE rompere il IN CASO DI PASSAGGIO CAVO SU CANALETTA ESTERNA foro posteriore Non in dotazione PG11 max 24 mm In entrambi i casi , piegare ora i gommini per chiudere i fori: IANUS BT 300 KIT - IANUS BT 500 KIT...
  • Seite 12: Montaggio Fotocellule Su Muro

    Ø 6 Ø 6 *Non in dotazione *Non in dotazione In caso di parete IRREGOLARE, inserire UNA SOLA vite (inferiore)� ATTENZIONE: LA VITE VA FISSATA NELLA PARTE DI PARETE PIÙ PLANARE� - IANUS BT 300 KIT - IANUS BT 500 KIT...
  • Seite 13: Montaggio Fotocellule Su Ferro

    MONTAGGIO FOTOCELLLULE SU FERRO: Ø 22 Solo per PG ingresso cavo Ø 6 Ø 4 dal basso *Non in dotazione *Non in dotazione avvitare IANUS BT 300 KIT - IANUS BT 500 KIT...
  • Seite 14: Collegamento Alla Rete Elettrica

    Il conduttore di terra deve essere l’ultimo a tendersi in caso di allentamento del dispositivo di fissaggio del cavo� - IANUS BT 300 KIT - IANUS BT 500 KIT...
  • Seite 15: Messa In Servizio Rapida

    Al fine di migliore la sicurezza in uso, se ne raccomanda comunque l'installazione� 1 2 3 4 5 6 7 8 9 10 1 2 3 4 5 6 7 8 9 10 1 2 3 4 5 6 7 8 9 10 IANUS BT 300 KIT - IANUS BT 500 KIT...
  • Seite 16: Regolazione Finecorsa (Motore Installato A Sinistra)

    Ribloccare il motore� Impostare DIP SWITCH n� 4 come in figura sotto: 1 2 3 4 5 6 7 8 9 10 1 2 3 4 5 6 7 8 9 10 - IANUS BT 300 KIT - IANUS BT 500 KIT...
  • Seite 17: Regolazione Finecorsa (Motore Installato A Destra)

    Ribloccare il motore� Impostare DIP SWITCH n� 4 come in figura sotto: 1 2 3 4 5 6 7 8 9 10 1 2 3 4 5 6 7 8 9 10 IANUS BT 300 KIT - IANUS BT 500 KIT...
  • Seite 18: Autoset

    AUTOSET ATTENZIONE! durante l'autoset la funzione antischiacciamento e' disabilitata� premere per 5 sec� AUTO CLOSE AUTO OPEN AUTO CLOSE AUTO OPEN AUTO CLOSE AUTO OPEN - IANUS BT 300 KIT - IANUS BT 500 KIT...
  • Seite 19: Memorizzazione Telecomando Come Start (Apertura Totale)

    120 sec 1 2 3 4 5 6 7 8 9 10 Attenzione! L'abilitazione del tempo di chiusura automatico richiede necessariamente il collegamento della fotocellula principale (vedi paragrafo COLLEGAMENTI FOTOCELLULA)� IANUS BT 300 KIT - IANUS BT 500 KIT...
  • Seite 20: Seconda Fotocellula Opzionale

    1 2 3 4 5 6 7 8 9 10 LAMPEGGIANTE OPZIONALE SCHEMA ELETTRICO 1 2 3 4 5 6 7 8 9 10 F2: 3,15 AT F1: 800 mAT - IANUS BT 300 KIT - IANUS BT 500 KIT...
  • Seite 21: Movimenti Cancello

    - La manutenzione come sopra descritta deve essere ripetuta con frequenza almeno annuale o ad intervalli di tempo minori qualora le caratteristiche del sito o dell’installazione lo richiedessero� IANUS BT 300 KIT - IANUS BT 500 KIT...
  • Seite 22: Manuale D'uso: Manovra Manuale

    I ter- minali delle batterie non devono essere cortocircuitati o toccati con le mani� 23A 12V Rimuovere e smaltire le bat- terie separatamente secondo quanto prescritto dalle norme vigenti� - IANUS BT 300 KIT - IANUS BT 500 KIT...
  • Seite 23: Avvertenze Per L'utilizzatore

    - La rottura o l’usura di organi meccanici della porta (parte guidata), quali ad esempio cavi, molle, sup- IANUS BT 300 KIT - IANUS BT 500 KIT...
  • Seite 24: Registro Di Manutenzione

    REGISTRO DI MANUTENZIONE    Ubicazione:    Motore/azionamento:      Proprietario:    Fotocellule:    Dimensioni e peso:    Radiocomando:    Materiale (PVC, alluminio):    Lampeggiante:    Data di installazione:    Altro:      Data  Descrizione dell’intervento  Nome e firma                             ...
  • Seite 25 WIRING DIAGRAM ��������������������������������������������������������������������������������������������������������������������������������������������������������������������� 43 GATE MOVEMENTS ������������������������������������������������������������������������������������������������������������������������������������������������������������������� 44 FINAL CHECKS AND MAINTENANCE���������������������������������������������������������������������������������������������������������������������������������������� 44 USER GUIDE: MANUAL OPERATION����������������������������������������������������������������������������������������������������������������������������������������� 45 BATTERY REPLACEMENT ���������������������������������������������������������������������������������������������������������������������������������������������������������� 45 FUSE REPLACEMENT ����������������������������������������������������������������������������������������������������������������������������������������������������������������� 45 USER WARNINGS ����������������������������������������������������������������������������������������������������������������������������������������������������������������������� 46 MAINTENANCE REGISTER �������������������������������������������������������������������������������������������������������������������������������������������������������� 47 IANUS BT 300 KIT - IANUS BT 500 KIT...
  • Seite 26: Warnings

    Keep hold of instructions so that you can attach them to the technical file and keep them handy for future reference� Declarations of conformity can be found at web http://www�bft-automation�com/CE� Instructions for use and assembly can be found in the download section�...
  • Seite 27: Product Description

    PRODUCT DESCRIPTION IANUS BT 300 KIT - IANUS BT 500 KIT...
  • Seite 28 MITTO B RCB 02 R1 (Blue) MOTOR BASE RELEASE KNOB MECHANICAL LIMIT SWITCH TRANSFORMER THREAD ROLLING SCREW TE M6X30 WASHER D�6�4-12-1�6 UNI6592 FISCHER TYPE DOWEL SC 6X30 NYLON SELF-TAP� SCREW TC+4�8X32 UNI6954/DIN7981 GALV� - IANUS BT 300 KIT - IANUS BT 500 KIT...
  • Seite 29: Dimensions

    Knob-operated mechanical release Protection rating IP55 Operating temperature -20/+55°C Type of use intensive Operating range 30 m (less in case of fog/rain) Environmental conditions from -20°C to 55°C Protection rating IP24 IANUS BT 300 KIT - IANUS BT 500 KIT...
  • Seite 30: Necessary Tools

    NECESSARY TOOLS - IANUS BT 300 KIT - IANUS BT 500 KIT...
  • Seite 31: Preliminary Operations

    The distance between Mesh dimensions the gate and leaf ≤ 120mm d ≤18�5mm ≤ 300mm 18�5mm < d ≤ 29mm ≤ 500mm 29mm < d ≤ 44mm 850mm d > 44mm IANUS BT 300 KIT - IANUS BT 500 KIT...
  • Seite 32: Safety During Installation

    70 mm deep� Align the plate with a level so that the motor is even, then place the motor on the plate� > 10mm > 25mm 85mm - IANUS BT 300 KIT - IANUS BT 500 KIT...
  • Seite 33: Fitting The Rack

    Close the gate and secure the other rack modules until the entire gate length is covered� Make sure the mechanical stops are installed mechanical stops must already be installed CORRECT MOTOR POSITION MOTOR POSITIONING ON RACK Move the motor under the rack and illustrated� 210mm 210mm 210mm IANUS BT 300 KIT - IANUS BT 500 KIT...
  • Seite 34: Fitting The Photocells

    TO PASS WIRES FROM THE WALL break the back hole TO PASS WIRE THROUGH THE EXTERNAL RACEWAY Not provided PG11 max 24 mm In both cases, now fold the plugs to close the holes: - IANUS BT 300 KIT - IANUS BT 500 KIT...
  • Seite 35: Fitting The Photocells On The Wall

    Ø 6 *Not provided *Not provided In the event of an UNEVEN wall, insert A SINGLE screw (bottom)� WARNING: THE SCREW SHOULD BE SECURED TO THE MOST EVEN PART OF THE WALL IANUS BT 300 KIT - IANUS BT 500 KIT...
  • Seite 36: Fitting The Photocells On Iron

    FITTING THE PHOTOCELLS ON IRON: Ø 22 Only for PG wire inlet from Ø 6 Ø 4 the bottom *Not provided *Not provided screw in - IANUS BT 300 KIT - IANUS BT 500 KIT...
  • Seite 37: Connecting To Mains Power Supply

    During installation, the power cable must be stripped to allow the earth wire to be connected to the relevant terminal, while leaving the live wires as short as possible� The earth wire must be the last to be pulled taut in the event the cable's fastening device comes loose� IANUS BT 300 KIT - IANUS BT 500 KIT...
  • Seite 38: Quick Start

    1 2 3 4 5 6 7 8 9 10 1 2 3 4 5 6 7 8 9 10 1 2 3 4 5 6 7 8 9 10 - IANUS BT 300 KIT - IANUS BT 500 KIT...
  • Seite 39: Limit Switch Adjustments (Motor Installed On The Left)

    Open the gate and secure the other OPEN limit switch rod� Lock the motor� Set DIP SWITCH no� 4 as illustrated: 1 2 3 4 5 6 7 8 9 10 1 2 3 4 5 6 7 8 9 10 IANUS BT 300 KIT - IANUS BT 500 KIT...
  • Seite 40: Limit Switch Adjustments (Motor Installed On The Right)

    Lock the motor� Set DIP SWITCH no� 4 as illustrated: 1 2 3 4 5 6 7 8 9 10 1 2 3 4 5 6 7 8 9 10 - IANUS BT 300 KIT - IANUS BT 500 KIT...
  • Seite 41: Autoset

    AUTOSET WARNING! during autoset, the anti-crush feature is disabled� press and hold down for 5 sec� AUTO CLOSE AUTO OPEN AUTO CLOSE AUTO OPEN AUTO CLOSE AUTO OPEN IANUS BT 300 KIT - IANUS BT 500 KIT...
  • Seite 42: Saving The Remote Control As Start (Total Open)

    120 sec 1 2 3 4 5 6 7 8 9 10 Warning! The main photocell must be connected to enable automatic close time (see paragraph CONNECTING THE PHOTOCELL)� - IANUS BT 300 KIT - IANUS BT 500 KIT...
  • Seite 43: Second Optional Photocell

    1 2 3 4 5 6 7 8 9 10 OPTIONAL FLASHING LIGHT WIRING DIAGRAM 1 2 3 4 5 6 7 8 9 10 F2: 3,15 AT F1: 800 mAT IANUS BT 300 KIT - IANUS BT 500 KIT...
  • Seite 44: Gate Movements

    - The maintenance described above must be repeated at least once yearly or at shorter intervals where site or install- ation conditions make this necessary� - IANUS BT 300 KIT - IANUS BT 500 KIT...
  • Seite 45: User Guide: Manual Operation

    The battery terminals should never be short circuited or touched with your hands� Remove the batteries and dis- 23A 12V pose of them separately ac- cording to local regulations� IANUS BT 300 KIT - IANUS BT 500 KIT...
  • Seite 46: User Warnings

    Have the system checked by qualified, expert per- sonnel (professional installer) at regular intervals according to the instructions issued by the installer or manufacturer of the door� - When cleaning the outside, always cut off mains power� - IANUS BT 300 KIT - IANUS BT 500 KIT...
  • Seite 47: Maintenance Register

    MAINTENANCE REGISTER Position: Motor/operating: Owner: Photocells: Weight and size: Transmitter: Material (PVC, aluminium): Flashing light: Installation date: Other: Date Description of the intervention Name and signature...
  • Seite 48 MOUVEMENTS PORTAIL ����������������������������������������������������������������������������������������������������������������������������������������������������������� 67 VÉRIFICATIONS FINALES ET ENTRETIEN ��������������������������������������������������������������������������������������������������������������������������������� 67 MANUEL D'UTILISATION : MANŒUVRE MANUELLE ��������������������������������������������������������������������������������������������������������������� 68 REMPLACEMENT BATTERIE ������������������������������������������������������������������������������������������������������������������������������������������������������ 68 REMPLACEMENT FUSIBLE �������������������������������������������������������������������������������������������������������������������������������������������������������� 68 AVERTISSEMENTS POUR L’UTILISATEUR ��������������������������������������������������������������������������������������������������������������������������������� 69 REGISTRE D'ENTRETIEN ������������������������������������������������������������������������������������������������������������������������������������������������������������ 70 - IANUS BT 300 KIT - IANUS BT 500 KIT...
  • Seite 49: Avertissements

    Conservez les instructions pour les joindre au dossier technique et pour d'ultérieures consultations� Les déclarations de conformité peuvent être consultées sur le site web http://www�bft-automation� com/CE� Les instructions de montage et d'utilisation peuvent être consultées dans la section download�...
  • Seite 50: Description Du Produit

    DESCRIPTION DU PRODUIT - IANUS BT 300 KIT - IANUS BT 500 KIT...
  • Seite 51 MITTO B RCB 02 R1 (Blue) BASE MOTEUR MOLETTE DE DÉVERROUILLAGE FIN DE COURSE MÉCANIQUE TRANSFORMATEUR VIS TRILOBÉE TE M6X30 RONDELLE D�6,4-12-1,6 UNI6592 CHEVILLE TYPE FISCHER SC 6X30 NYLON VIS AUTOTARAUDEUSE TC+4,8X32 UNI6954/DIN7981 GALV� IANUS BT 300 KIT - IANUS BT 500 KIT...
  • Seite 52: Dimensions

    IP55 Température de service -20/+55 °C Type d'utilisation intensive Portée Utile 30 m (réduite en cas de brouillard ou de pluie) Conditions ambiantes de -20 °C à 55 °C Degré de protection IP24 - IANUS BT 300 KIT - IANUS BT 500 KIT...
  • Seite 53: Outils Nécessaires

    OUTILS NÉCESSAIRES IANUS BT 300 KIT - IANUS BT 500 KIT...
  • Seite 54: Opérations Préliminaires

    Dimension des mailles clôture et vantail de la grille ≤ 120 mm d ≤18,5 mm ≤ 300 mm 18,5 mm < d ≤ 29 mm ≤ 500 mm 29 mm < d ≤ 44 mm 850 mm d ≤44 mm - IANUS BT 300 KIT - IANUS BT 500 KIT...
  • Seite 55: Sécurité Pendant L'installation

    Aligner la plaque en utilisant un niveau à bulle de façon à ce que le moteur soit à plat, puis positionner le moteur sur la plaque� > 10mm > 25mm 85mm IANUS BT 300 KIT - IANUS BT 500 KIT...
  • Seite 56: Montage De La Crémaillère

    être montées POSITIONNEMENT CORRECT POSITIONNEMENT DU MOTEUR DU MOTEUR SUR LA CRÉMAILLÈRE Déplacer le moteur sous la crémaillère de la façon indiquée 210mm sur la figure� 210mm 210mm - IANUS BT 300 KIT - IANUS BT 500 KIT...
  • Seite 57: Montage Des Photocellules

    EN CAS DE PASSAGE DU CÂBLE SUR UNE GOULOTTE EXTERNE arrière Pas fournis PG11 max 24 mm Dans les deux cas, plier à présent les plots en caoutchouc pour fermer les orifices : IANUS BT 300 KIT - IANUS BT 500 KIT...
  • Seite 58: Montage Des Photocellules Sur Le Mur

    * Pas fournis * Pas fournis En cas de mur IRRÉGULIER, n'introduire qu'UNE SEULE vis (inférieure)� ATTENTION : LA VIS DOIT ÊTRE FIXÉE DANS LA PARTIE LA PLUS PLATE DU MUR� - IANUS BT 300 KIT - IANUS BT 500 KIT...
  • Seite 59: Montage Des Photocellules Sur Le Fer

    MONTAGE DES PHOTOCELLULES SUR LE FER : Ø 22 Seulement pour PG entrée câble Ø 6 Ø 4 depuis le bas * Pas fournis * Pas fournis visser IANUS BT 300 KIT - IANUS BT 500 KIT...
  • Seite 60: Branchement Au Réseau Électrique

    Le conducteur de terre doit être le dernier à se tendre en cas de relâchement du dispositif de fixation du câble� - IANUS BT 300 KIT - IANUS BT 500 KIT...
  • Seite 61: Mise En Service Rapide

    Afin d'améliorer la sécurité, nous recommandons de toute façon son installation� 1 2 3 4 5 6 7 8 9 10 1 2 3 4 5 6 7 8 9 10 1 2 3 4 5 6 7 8 9 10 IANUS BT 300 KIT - IANUS BT 500 KIT...
  • Seite 62: Réglage Fin De Course (Moteur Installé À Gauche)

    Régler le COMMUTATEUR DIP nº 4 comme sur la figure ci-après : 1 2 3 4 5 6 7 8 9 10 1 2 3 4 5 6 7 8 9 10 - IANUS BT 300 KIT - IANUS BT 500 KIT...
  • Seite 63: Réglage Fin De Course (Moteur Installé À Droite)

    Régler le COMMUTATEUR DIP nº 4 comme sur la figure ci-après : 1 2 3 4 5 6 7 8 9 10 1 2 3 4 5 6 7 8 9 10 IANUS BT 300 KIT - IANUS BT 500 KIT...
  • Seite 64: Configuration Automatique

    AUTOCONFIGURATION ATTENTION ! pendant l'autoconfiguration, la fonction anti-écrasement est désactivée� appuyer pendant 5 s AUTO CLOSE AUTO OPEN AUTO CLOSE AUTO OPEN AUTO CLOSE AUTO OPEN - IANUS BT 300 KIT - IANUS BT 500 KIT...
  • Seite 65: Mémorisation De La Télécommande Comme Start (Ouverture Totale)

    1 2 3 4 5 6 7 8 9 10 Attention ! L'activation du temps de fermeture automatique exige nécessairement le raccordement de la photocellule principale (voir paragraphe BRANCHEMENTS DE LA PHOTOCELLULE)� IANUS BT 300 KIT - IANUS BT 500 KIT...
  • Seite 66: Deuxième Photocellule En Option

    1 2 3 4 5 6 7 8 9 10 CLIGNOTANT EN OPTION SCHÉMA ÉLECTRIQUE 1 2 3 4 5 6 7 8 9 10 F2: 3,15 AT F1: 800 mAT - IANUS BT 300 KIT - IANUS BT 500 KIT...
  • Seite 67: Mouvements Portail

    à pouvoir accomplir l'ouverture et la fermeture manuelles du portail� - L’entretien décrit plus haut doit être répété au moins une fois par an ou plus fréquemment si les caractéristiques du site ou de l’installation le demandent� IANUS BT 300 KIT - IANUS BT 500 KIT...
  • Seite 68: Manuel D'utilisation : Manœuvre Manuelle

    être remplacées� Les bornes des batteries ne doivent pas être court-circuitées ou tou- 23A 12V chées avec les mains� Retirer et éliminer les batteries séparément conformément aux prescriptions des normes en vigueur� - IANUS BT 300 KIT - IANUS BT 500 KIT...
  • Seite 69: Avertissements Pour L'utilisateur

    AVERTISSEMENTS POUR L’UTILISATEUR ( I ) ment s’il est usé ou cassé� - La rupture ou l’usure des organes mécaniques de la ATTENTION ! Importantes instructions de sécu- porte (partie guidée), tels que les câbles, les ressorts, rité� Veuillez lire et suivre attentivement tous les les supports et les gonds, etc�...
  • Seite 70: Registre D'entretien

    REGISTRE D’ENTRETIEN Emplacement : Moteur / actionnement : Propriétaire : Photocellules : Dimensions et poids : Radiocommande : Matériel (PVC, aluminium): Clignotant : Date d’installation : Autre : Date Description de l’intervention Nom et signature...
  • Seite 71 BEWEGUNG TOR ����������������������������������������������������������������������������������������������������������������������������������������������������������������������� 90 ABSCHLIESSENDE ÜBERPRÜFUNGEN UND WARTUNG ���������������������������������������������������������������������������������������������������������� 90 BEDIENUNGSHANDBUCH: MANUELLES MANÖVER ��������������������������������������������������������������������������������������������������������������� 91 AUSWECHSELN DER BATTERIE ������������������������������������������������������������������������������������������������������������������������������������������������ 91 AUSWECHSELN DER SICHERUNG �������������������������������������������������������������������������������������������������������������������������������������������� 91 HINWEISE FÜR DEN BENUTZER ����������������������������������������������������������������������������������������������������������������������������������������������� 92 WARTUNGSREGISTER ��������������������������������������������������������������������������������������������������������������������������������������������������������������� 93 IANUS BT 300 KIT - IANUS BT 500 KIT...
  • Seite 72: Hinweise

    Schäden, die auf die Nichtbeachtung der Hinweise im vorliegenden Handbuch zurückzuführen sind� Unter Beibehaltung der wesentlichen Eigenschaften des Produktes kann die Firma jederzeit und ohne Verpflichtung zur Aktualisierung des vorliegenden Handbuches Änderungen zur technischen, konstruktiven oder handelstechnischen Verbesserung vornehmen� - IANUS BT 300 KIT - IANUS BT 500 KIT...
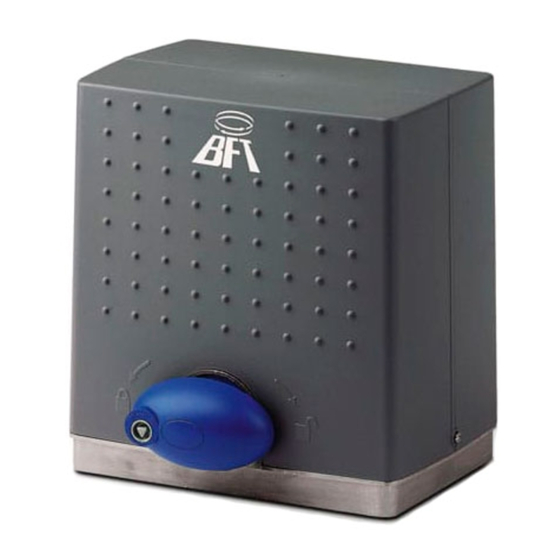
  • Seite 73: Beschreibung Des Produkts

    BESCHREIBUNG DES PRODUKTS IANUS BT 300 KIT - IANUS BT 500 KIT...
  • Seite 74: Beschreibung

    KUNSTSTOFF-ZAHNSTANGE L=33 DESME A�15 PAAR FOTOZELLEN MITTO B RCB 02 R1 (Blue) BASIS MOTOR ENTRIEGELUNGSKNAUF ANSCHLAG TRANSFORMATOR SECHSKANT-WIRBELSCHRAUBE M6X30 SCHEIBE D�6,4-12-1,6 UNI6592 FISCHER-DÜBEL SC 6X30 NYLON SELBSTSCHNEIDENDE SECHSKANTKOPFSCHRAUBE +4,8X32 UNI6954/DIN7981 VERZ� - IANUS BT 300 KIT - IANUS BT 500 KIT...
  • Seite 75: Abmessungen

    RX: 7 mA Standby / max� 20 mA Leistung Kontakte 30 V, 1 A Manuelles Manöver Mechanische Entsperrung mit Knauf Schutzgrad IP 55 Benutzungstyp intensiv Betriebstemperatur - 20���+ 55 °C Umgebungsbedingungen von - 20 °C bis + 55 °C Reichweite 30 m (geringer im Falle von Nebel/Regen) Schutzgrad IP 24 IANUS BT 300 KIT - IANUS BT 500 KIT...
  • Seite 76: Erforderliches Werkzeug

    ERFORDERLICHES WERKZEUG - IANUS BT 300 KIT - IANUS BT 500 KIT...
  • Seite 77: Vorarbeiten

    Zaun Schlitze aufweist; beachten Sie dabei die Angaben der folgenden Tabelle� Abstand zwischen Maschengröße des Zaun und Torflügel Netzes ≤ 120 mm d ≤ 18,5 mm ≤ 300 mm 18,5 mm < d ≤ 29 mm ≤ 500 mm 29 mm < d ≤ 44 mm 850 mm d ≤ 44 mm IANUS BT 300 KIT - IANUS BT 500 KIT...
  • Seite 78: Sicherheit Während Der Installation

    70 mm aufweisen� Richten Sie die Platte mit der Wasserwaage so aus, dass der Motor eben ist, und blockieren Sie dann den Motor auf der Platte� > 10mm > 25mm 85mm - IANUS BT 300 KIT - IANUS BT 500 KIT...
  • Seite 79: Montage Der Zahnstange

    Anschläge installiert worden sind� Anschläge müssen bereits montiert sein� KORREKTE POSITIONIERUNG POSITIONIERUNG DES MOTORS DES MOTORS AUF DER ZAHNSTANGE Bewegen Sie den Motor unter der Zahnstange, wie auf der 210mm Abbildung gezeigt� 210mm 210mm IANUS BT 300 KIT - IANUS BT 500 KIT...
  • Seite 80: Montage Der Fotozellen

    FALLS DAS KABEL DURCH EINEN EXTERNEN KANAL EINGEFÜHRT WIRD� KABEL VON DER WAND DURCHGEFÜHRT WIRD nicht mitgeliefert PG11 max 24 mm Verwenden Sie in beiden Fällen jetzt die Gummistopfen, um die Bohrungen zu verschließen: - IANUS BT 300 KIT - IANUS BT 500 KIT...
  • Seite 81: Montage Der Fotozellen An Der Mauer

    Ø 6 Ø 6 * nicht mitgeliefert * nicht mitgeliefert Bei UNREGELMÄSSIGER Wand NUR EINE Schraube (die untere) einsetzen� ACHTUNG: DIE SCHRAUBE MUSS IM EBENEREN TEIL DER WAND BEFESTIGT WERDEN� IANUS BT 300 KIT - IANUS BT 500 KIT...
  • Seite 82: Montage Der Fotozellen Auf Eisen

    MONTAGE DER FOTOZELLEN AUF EISEN: Ø 22 Nur für PG Eingang Kabel Ø 6 Ø 4 von unten * nicht mitgeliefert * nicht mitgeliefert anschrauben - IANUS BT 300 KIT - IANUS BT 500 KIT...
  • Seite 83: Anschluss An Das Stromnetz

    Klemme angeschlossen werden kann, Dabei sollten die beiden anderen Leiter so kurz wie möglich gelassen werden� Der Erdungsleiter muss der letzte sein, der sich löst, falls das Kabel Zug ausgesetzt wird� IANUS BT 300 KIT - IANUS BT 500 KIT...
  • Seite 84: Schnelle Inbetriebnahme

    1 2 3 4 5 6 7 8 9 10 1 2 3 4 5 6 7 8 9 10 1 2 3 4 5 6 7 8 9 10 - IANUS BT 300 KIT - IANUS BT 500 KIT...
  • Seite 85: Einstellung Der Endschalter (Motor Links Installiert)

    Den Motor wieder blockieren� DIP-SWITCH Nr� 4 wie auf der folgenden Abbildung gezeigt einstellen: 1 2 3 4 5 6 7 8 9 10 1 2 3 4 5 6 7 8 9 10 IANUS BT 300 KIT - IANUS BT 500 KIT...
  • Seite 86: Einstellung Der Endschalter (Motor Rechts Installiert)

    Den Motor wieder blockieren� DIP-SWITCH Nr� 4 wie auf der folgenden Abbildung gezeigt einstellen: 1 2 3 4 5 6 7 8 9 10 1 2 3 4 5 6 7 8 9 10 - IANUS BT 300 KIT - IANUS BT 500 KIT...
  • Seite 87: Autoset

    AUTOSET ACHTUNG! Während des Autoset ist die Quetschschutz-Funktion deaktiviert� für 5 Sekunden drücken AUTO CLOSE AUTO OPEN AUTO CLOSE AUTO OPEN AUTO CLOSE AUTO OPEN IANUS BT 300 KIT - IANUS BT 500 KIT...
  • Seite 88: Abspeicherung Der Fernbedienung Als Start (Vollständige Öffnung)

    120 sec 1 2 3 4 5 6 7 8 9 10 Achtung! Wenn die Zeit automatische Schließung aktiviert wird, muss die Hauptfotozelle angeschlossen werden (siehe Abschnitt ANSCHLÜSSE FOTOZELLE)� - IANUS BT 300 KIT - IANUS BT 500 KIT...
  • Seite 89: Zweite Optionale Fotozelle

    5 6 7 8 9 10 1 2 3 4 5 6 7 8 9 10 OPTIONALE BLINKLEUCHTE SCHALTPLAN 1 2 3 4 5 6 7 8 9 10 F2: 3,15 AT F1: 800 mAT IANUS BT 300 KIT - IANUS BT 500 KIT...
  • Seite 90: Bewegung Tor

    Leerlauf zu setzen und so das Öffnen und Schließen von Hand zu ermöglichen� - Die oben beschriebene Wartung muss zumindest einmal pro Jahr oder mit kürzeren Abständen vorgenommen wer- den, falls die Eigenschaften des Standorts oder der Installation dies erforderlich machen� - IANUS BT 300 KIT - IANUS BT 500 KIT...
  • Seite 91: Auswechseln Der Batterie

    Die Kontakte der Batterien dürfen nicht kurzgeschlossen oder mit den Händen berührt werden� 23A 12V Bauen Sie die Batterien aus und entsorgen Sie sie separat gemäß den geltenden Bestimmungen� IANUS BT 300 KIT - IANUS BT 500 KIT...
  • Seite 92: Hinweise Für Den Benutzer

    - Die Aktivierung der manuellen Entsperrung könnte Verbesserung vornehmen� bei mechanischen Defekten oder Ungleichgewi- chtssituationen zu unkontrollierten Bewegungen der Tür führen� - Bei Rollladenöffner: Überwachen Sie den Rollladen - IANUS BT 300 KIT - IANUS BT 500 KIT...
  • Seite 93: Wartungsregister

    WARTUNGSREGISTER Position: Motor/Antrieb: Eigentümer: Fotozellen: Abmessungen und Ge- Fernbedienung wicht: Material (PVC, Aluminium): Blinkleuchte: Datum der Installation: Sonstiges: Datum Beschreibung des Eingriffes Name und Unterschrift...
  • Seite 96 BFT USA www.bftbenelux.be CZECH REPUBLIC 69800 Saint Priest BFT CZ S.R.O. Boca Raton POLAND www.bft-france.com Praha www.bft-usa.com BFT POLSKA SP. Z O.O. www.bft.it GERMANY 05-091 ZąBKI CHINA BFT TORANTRIEBSSYSTEME Gmb H BFT CHINA www.bft.pl TURKEY 90522 Oberasbach BFT OTOMATIK KAPI SISTEMELERI...

Diese Anleitung auch für:

Ianus bt 500 kit

Inhaltsverzeichnis