Herunterladen Inhalt Inhalt Diese Seite drucken
Klarstein 10030104 Bedienungsanleitung
Vorschau ausblenden Andere Handbücher für 10030104:

Werbung

Verfügbare Sprachen
  • DE

Verfügbare Sprachen

  • DEUTSCH, seite 1
Kühlschrank
10030104 10030105

Werbung

Inhaltsverzeichnis
loading

Inhaltszusammenfassung für Klarstein 10030104

  • Seite 1 Kühlschrank 10030104 10030105...
  • Seite 2: Inhaltsverzeichnis

    Bedienung 7 Fehlersuche und Fehlerbehebung 10 Hinweise zur Entsorgung 11 Konformitätserklärung 11 Technische Daten Artikelnummer 10030104, 10030105 Stromversorgung 220-240 V ~ 50-60 Hz Sicherheitshinweise Allgemeine Hinweise • Kinder, physisch und körperlich eingeschränkte Menschen sollten das Gerät nur benutzen, wenn sie vorher von einer Aufsichtsperson ausführlich mit den Funktionen und den Sicherheitsvorkehrungen vertraut ge-...
  • Seite 3 • Stellen Sie das Gerät so auf, dass der Stecker jederzeit frei zugänglich ist. • Ziehen Sie nicht am Netzkabel. • Stecken Sie den Stecker nicht in lose Steckdosen. • Betreiben Sie das Gerät nicht ohne Birne. • Nehmen Sie keine Lebensmittel mit feuchten Händen in den Kühlschrank und entfernen Sie auch keine Lebensmittel mit nassen oder feuchten Händen, damit die mit ihren Händen nicht an kalten Gegenständen haften bleiben und sich Erfrierungen zuziehen.
  • Seite 4: Geräteübersicht

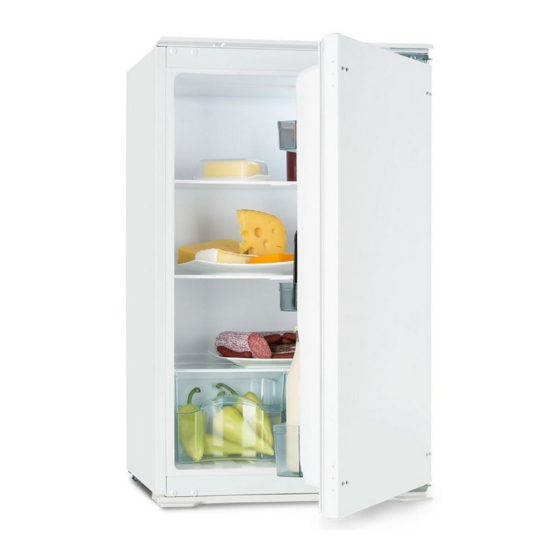
    Geräteübersicht 1 Thermostat und Licht 2 Glasregale 4 Gemüsefach-Abdeckung 5 Gemüsefach 6 Türfächer Türaufhängung drehen • Benötigte Werkzeuge: Kreuzschlitzschraubenzieher und flacher Schraubenzieher • Versichern Sie sich, dass das Gerät leer ist und ziehen Sie den Stecker aus der Steckdose. • Wenn Sie die Tür entfernen müssen Sie das Gerät zurückneigen. Lehnen Sie das Gerät an eine stabile Wand, von der es nicht wegrutschen kann.
  • Seite 5: Installation

    Schritt 4 Drehen Sie die obere Aufhängung um, und befestigen Sie sie unten auf der linken Seite. Schritt 5 Befestigen Sie die Tür wieder. Versichern Sie sich, dass die Tür horizontal und ver- tikal richtig ausgerichtet ist, so dass die Dichtung an allen Seiten schließt. Drehen Sie dann die untere Aufhängung um und befestigen Sie sie links oben.
  • Seite 6 Einbauanleitung Schritt 1: Versichern Sie sich, dass der Einbauschrank groß genug ist und ausreichende Belüftung bietet. Schritt 2 Schieben Sie das Gerät vorsichtig in den Einbauschrank. Stellen Sie sicher, dass die Öffnungsseite so nah wie möglich an der Schrankwand ist. Schritt 3 Falls sich Schrauben an der Fronttür befinden entfernen Sie sie.
  • Seite 7 Schritt 4 Öffnen Sie die Gerätetür und die Holztür gemeinsam und markieren Sie die Position des Gleiters bei komplett geöffneter und fast geschlossener Tür. Nehmen Sie den Gleiter aus der Führung und befestigen Sie ihn mit 2 Schrauben an der Holztür. Befestigen Sie dann die Abedeckung auf dem Gleiter.
  • Seite 8: Bedienung

    Schritt 8 Benutzen Sie die Gummidichtung, um den Spalt zwischen Kühlschrank und Einbauschrank auf der Seite, auf der sich die Tür öffnet, abzudichten. Standort Stellen Sie das Gerät an einem Standort auf, der mit der angegeben Klimaklasse übereinstimmt. Die Angaben finden Sie auf der Geräteplakette: Klimaklasse Raumtemperatur...
  • Seite 9: Reinigung Und Pflege

    Herausnehmbare Regale An den Innenwänden befinden sich verschiedene Schienen, so dass Sie die einzelnen Regale wie gewünscht verteilen können. Position der Türfächer Die Türfächer nehmen Verpackungen in diversen Größen auf. Sie können die Fächer in der Höhe verstellen und in der gewünschten Höhe anbringen. Nehmen Sie das Fach ab, indem Sie es, wie auf dem Bild abgebildet, nach oben schieben und abnehmen.
  • Seite 10: Fehlersuche Und Fehlerbehebung

    Birne auswechseln Bei der Lampe handelt es sich um eine LED-Birne. Lassen Sie die Birne von einem Techniker oder einer ähnlich qualifizierten Person ersetzen. Fehlersuche und Fehlerbehebung Problem Mögliche Ursache Lösung Das Gerät läuft nicht. Der Temperaturregler ist auf 0 Stellen Sie den Regler auf eine andere gesetzt.
  • Seite 11: Hinweise Zur Entsorgung

    Hinweise zur Entsorgung Befindet sich die linke Abbildung (durchgestrichene Mülltonne auf Rädern) auf dem Pro- dukt, gilt die Europäische Richtlinie 2002/96/EG. Diese Produkte dürfen nicht mit dem normalen Hausmüll entsorgt werden. Informieren Sie sich über die örtlichen Regelungen zur getrennten Sammlung elektrischer und elektronischer Gerätschaften. Richten Sie sich nach den örtlichen Regelungen und entsorgen Sie Altgeräte nicht über den Hausmüll.
  • Seite 12: Technical Data

    Troubleshooting 20 Hints on Disposal 21 Declaration of Conformity 21 Technical Data Item number 10030104, 10030105 Power supply 220-240 V ~ 50-60 Hz Safety Instructions General Hints • This product is not designed for use by persons (including children) who have reduced physical, sensory or mental capacities or persons with no experience or knowledge, unless they are instructed and supervised in the use of the appliance by a person responsible for their safety.
  • Seite 13 • The aooliance is not designed for commercial use. It is intended for use in domestic households and in simi- lar working and residential environments. • Power cord must not be lengthened. • Make sure that the power plug is not squashed or damaged by the back of the appliance. A squashed or damaged power plug may overheat and cause a fire.
  • Seite 14: Product Description

    Product Description 1 Thermostat and Light 2 Glass Shelves 4 Crisper Cover 5 Crisper 6 Balconies Reverse Door • Tool required: Philips screwdriver, Flat bladed screwdriver. • Ensure the unit is unplugged and empty. • To take the door off, it is necessary to tilt the unit backwards. You should rest the unit on something solid so that it will not slip during the door reversing process.
  • Seite 15: Installation

    Step 4 Turn over the top hinge and install it at bottom of left side. Step 5 Place the door back on. Ensure the door is aligned horizontally and vertically so that the seal are closed on all sides before finally tightening the hinge. Then turn over removed bottom hinge and inert it and screw it to the top front of the unit.
  • Seite 16 Install the Appliance Step 1: Ensure the size of cabinet and ventilation are enough. Step 2 Slowly and carefully push the appliance into the cabinet. Ensure the opening side is as close to the cabinet wall as possible. Step 3 If screws in front of door are present, remove them first.
  • Seite 17 Step 4 Open appliance door and wooden door together and mark the position of sli- der when the slider can function well at all angle during door closes or opens. Take slider out of guide and fix slider with wooden door by two screws. Then fix slider cover onto the slider.
  • Seite 18: Use And Operation

    Step 8 Attached rubber seal to the gap between unit and wooden cabinet at door open side. Positioning Install this appliance at a location where the ambient temperature corresponds to the climate class indicated on the rating plate of the appliance: Climate class Ambient temperature +10 °C - +32 °C...
  • Seite 19: Cleaning And Care

    Movable shelves The walls of the refrigerator are equipped with a series of runners so that the shelves can be positioned as desired. Positioning the door balconies To permit storage of food packages of various sizes, the door balconies can be placed at different heights.
  • Seite 20: Troubleshooting

    Replace the lamp The internal light is a LED type. To replace the lamp, please contact qualified technician. Troubleshooting Problem Possible Cause Solution Appliance does not Temperature regulation knob is set Set the knob at other number to switch on work.
  • Seite 21: Hints On Disposal

    Hints on Disposal According to the European waste regulation 2002/96/EG this symbol on the product or on its packaging indicates that this product may not be treated as household waste. Instead it should be taken to the appropriate collection point for the recycling of electrical and electronic equipment.
  • Seite 22: Fiche Technique

    Identification et résolution des problèmes 30 Information sur le recyclage 31 Déclaration de conformité 31 Fiche technique Numéro d’ a rticle 10030104, 10030105 Alimentation électrique 220-240 V ~ 50-60 Hz Consignes de sécurité Consignes générales • Les enfants ainsi que les personnes aux capacités physiques et mentales réduites ne doivent pas utiliser l’...
  • Seite 23 • Installer l’ a ppareil de telle sorte à ce que la prise de courant soit à tout moment accessible. • Ne pas tirer sur le cordon d’ a limentation. • Ne pas brancher une fiche d’ a limentation dans une prise de courant mal fixée. •...
  • Seite 24: Aperçu De L' A Ppareil

    Aperçu de l’ a ppareil 1 Thermostat et lumière 2 Étagères en verre 3 Couvercle du bac à légumes 4 Bac à légumes 5 Compartiments de porte Interversion du sens d’ o uverture de porte • Outils requis : tournevis cruciforme et tournevis plat. •...
  • Seite 25: Installation

    Étape 4 Retourner la charnière du haut et la fixer en bas sur le côté gauche. Étape 5 Réinstaller la porte. S’ a ssurer que la porte est correctement fixée, tant sur un plan horizontal que vertical, de sorte à ce que le joint d’ é tanchéité ferme de tous les côtés.
  • Seite 26 Instructions pour l’encastrement Étape 1 : s’ a ssurer que le meuble d’ e ncastrement est suffisamment grand et offre une circulation de l’ a ir suffisante. Étape 2 Avec précaution, faire glisser l’ a ppareil dans le meuble d’ e ncastrement. S’ a ssurer que le côté...
  • Seite 27 Étape 4 Ouvrir la porte de l’ a ppareil en même temps que la porte en bois et marquer la position de la glissière lorsque la porte est entièrement ouverte et presque entièrement fermée. Sortir la glissière du pont de fixation et la fixer à la porte en bois à...
  • Seite 28: Utilisation

    Étape 8 Utiliser le joint en caoutchouc pour rendre étanche la bande entre le réfri- gérateur et le meuble d’ e ncastrement sur le côté d’ o uverture de la porte. Emplacement Placer l’ a ppareil à un endroit adapté à sa classe climatique. Les valeurs sont indiquées sur la plaque signalétique de l’...
  • Seite 29: Nettoyage Et Entretien

    Étagères amovibles Les parois internes sont équipées de différentes glissières permettant de régler le niveau de chaque étagère. Position des compartiments de porte Les portes peuvent accueillir des compartiments de tailles diverses. Il est possible d’ a juster les compartiments dans la hauteur et de les monter au niveau souhaité. Enlever le compartiment comme illustré...
  • Seite 30: Identification Et Résolution Des Problèmes

    Changer l’ampoule L’ a mpoule est une ampoule LED. Faire remplacer l’ a mpoule par un technicien ou toute autre personne de qualification similaire. Identification et résolution des problèmes Problème Cause possible Solution L’ a ppareil ne Le thermostat est sur 0. Mettre le thermostat sur un autre chiffre pour fonctionne pas.
  • Seite 31: Information Sur Le Recyclage

    Information sur le recyclage Vous trouverez sur le produit l’image ci-contre (une poubelle sur roues, barrée d‘une croix), ce qui indique que le produit se trouve soumis à la directive européenne 2002/96/CE. Renseignez-vous sur les dispositions en vigueur dans votre région concernant la collecte séparée des appareils électriques et électroniques.
  • Seite 32: Dati Tecnici

    Ricerca e risoluzione degli errori 40 Smaltimento 41 Dichiarazione di conformità 41 Dati tecnici Articolo numero 10030104, 10030105 Alimentazione 220-240 V ~ 50-60 Hz Avvertenze di sicurezza Avvertenze di sicurezza generali • I bambini, le persone con capacità fisiche e mentali ridotte devono utilizzare il dispositivo solo se un super- visore ha prima spiegato loro le avvertenze di sicurezza e come utilizzare il dispositivo.
  • Seite 33 • Impostare il dispositivo in modo che la spina sia facilmente accessibile. • Non tirare il cavo di alimentazione. • Non inserire la spina in una presa danneggiata. • Non utilizzare il dispositivo senza lampadina. • Non introdurre o rimuovere alimenti nel frigorifero con le mani bagnate o umide per evitare ustioni da con- gelamento.
  • Seite 34: Descrizione Del Prodotto

    Descrizione del prodotto 1 Termostato e luce 2 Ripiani in vetro 4 Coperchio scomparto verdure 5 Scomparto verdure 6 Scomparti sportello Modificare il lato di apertura dello sportello • Utensili necessari: cacciavite a croce e cacciavite piatto. • Svuotare il frigorifero e staccare la spina dalla presa di corrente. •...
  • Seite 35: Installazione

    Fase 4 Rimuovere il cardine superiore e fissarlo nella parte inferiore sul lato sinistro. Fase 5 Installare di nuovo lo sportello. Assicurarsi che lo sportello sia allineato corret- tamente in orizzontale e in verticale, in modo che la guarnizione chiuda su ogni lato.
  • Seite 36 Istruzioni per l’installazione Fase 1: assicurarsi che il mobile per l’incasso sia abbastanza grande e che ci sia un’ a reazione adeguata. Fase 2 Inserire con cautela il dispositivo nel mobile da incasso. Assicurarsi che il lato di apertura sia il più vicino possibile alla parete del mobile. Fase 3 Rimuovere eventuali viti sullo sportello frontale.
  • Seite 37 Fase 4 Aprire lo sportello del dispositivo insieme allo sportello in legno e segnare la posizione del binario per verificare se il binario funziona correttamente du- rante la chiusura o apertura dello sportello. Rimuovere il binario dalla guida e fissare il binario con 2 viti allo sportello in legno. Svitare di nuovo la guida dallo sportello del dispositivo e ripetere la procedura con l’...
  • Seite 38: Utilizzo

    Fase 8 Utilizzare una guarnizione in gomma per sigillare lo spazio tra il frigorifero e il mobile da incasso sul lato di apertura dello sportello. Collocazione Collocare il dispositivo in un luogo che corrisponda alla classa climatica indicata. Le indicazioni sono contenute sulla targhetta identificativa: Classe climatica Temperatura stanza...
  • Seite 39: Pulizia E Manutenzione

    Ripiani rimovibili Le pareti interne sono munite di diversi binari che permettono di distribuire i ripiani a piacimento. Posizione degli scomparti dello sportello Gli scomparti dello sportello possono conservare confezioni di varie dimensioni. È pos- sibile regolare l'altezza degli scomparti. Rimuovere lo scomparto facendolo prima scor- rere e poi estrarlo come mostrato nella figura.
  • Seite 40: Ricerca E Risoluzione Dei Problemi

    Cambiare la lampadina La lampadina interna è a LED. Far sostituire la lampadina da un tecnico qualificato. Ricerca e risoluzione dei problemi Problema Causa possibile Soluzione Il dispositivo non La manopola della temperatura è Impostare la manopola su un altro valore per funziona.
  • Seite 41: Smaltimento

    Smaltimento Se sul prodotto è presente la figura a sinistra (il cassonetto dei rifiuti mobile sbarrato), si applica la direttiva europea 2002/96/CE. Questi prodotti non possono essere smaltiti con i rifiuti normali. Informarsi sulle disposizioni vigenti in merito alla raccolta separata di dis- positivi elettrici ed elettronici.
  • Seite 42: Datos Técnicos

    Detección y resolución de problemas 50 Indicaciones para la retirada del aparato 51 Declaración de conformidad 51 Datos técnicos Número de artículo 10030104, 10030105 Suministro eléctrico 220-240 V ~ 50-60 Hz Indicaciones de seguridad Indicaciones generales • Los niños mayores de 8 años y las personas con discapacidades físicas o psíquicas solamente podrán utilizar el aparato si han sido previamente instruidas sobre su uso y conocen las indicaciones de seguridad.
  • Seite 43 • Asegúrese de que el enchufe no queda atrapado. Un enchufe deteriorado puede sobrecalentarse o provocar un incendio. • Coloque el aparato de tal manera que el enchufe sea fácilmente accesible. • No tire del cable de alimentación. • No conecte el enchufe a tomas de corriente sueltas. •...
  • Seite 44: Descripción Del Aparato

    Descripción del aparato 1 Botón del termostato y luz 2 Baldas de cristal 4 Tapa del compartimento para las verduras 5 Compartimento para las verduras 6 Compartimentos de la puerta Revertir la orientación de apertura de la puerta • Herramientas necesarias: destornillador de estrella y destornillador plano •...
  • Seite 45: Instalación

    Paso 4 Invierta la bisagra superior y fíjela en la parte inferior del lado izquierdo. Paso 5 Fije la puerta de nuevo. Asegúrese de que la puerta está colocada correctamen- te con respecto al marco horizontal y vertical para que la junta pueda cerrar en todos los lados.
  • Seite 46 Instrucciones de montaje Paso 1: asegúrese de que el mueble en donde empotrará el frigorífico es lo suficientemente grande y ofrece suficiente ventilación. Paso 2 Introduzca el frigorífico con cuidado dentro del mueble. Asegúrese de que el lado de abertura está lo más cerca posible de la pared del mueble. Paso 3 Si existen tornillos en la puerta delantera, retírelos.
  • Seite 47 Paso 4 Abra la puerta del aparato y la puerta de madera simultáneamente y marque la posición del deslizador con la puerta completamente abierta y casi cerrada. Retire el deslizador de la guía y fíjela a la puerta de madera con dos tornil- los.
  • Seite 48: Utilización

    Paso 8 Utilice las juntas de goma para sellar el espacio entre el frigorífico y el mueble en el lado de abertura de la puerta. Lugar de instalación Coloque el aparato en un lugar que se adecue a la clase climática. Encontrará información en la placa técnica del aparato.
  • Seite 49: Limpieza Y Cuidado

    Baldas extraíbles En las paredes interiores del aparato encontrará rieles para poder distribuir como desee cada una de las baldas. Posición de los compartimentos de la puerta Los compartimentos de la puerta pueden albergar envases de distintos tamaños. Puede ajustar la altura de los compartimentos como desee. Retire el compartimento despla- zándolo hacia arriba, tal y como se muestra en la ilustración.
  • Seite 50: Detección Y Resolución De Problemas

    Sustituir la bombilla El tipo de lámpara es LED. Contacte con un técnico o una persona igualmente cualificada para su sustitución. Detección y resolución de problemas Problema Posible causa Solución El aparato no funciona. El regulador de temperatura se ha Coloque el regulador en otro número para colocado en 0.
  • Seite 51: Indicaciones Para La Retirada Del Aparato

    Indicaciones para la retirada del aparato Si el aparato lleva adherida la ilustración de la izquierda (el contenedor de basura tachado) entonces rige la normativa europea, directiva 2002/96/CE. Este producto no debe arro- jarse a un contenedor de basura común. Infórmese sobre las leyes territoriales que regulan la recogida separada de aparatos eléctricos y electrónicos.

Diese Anleitung auch für:

1003010510030106

Inhaltsverzeichnis