Herunterladen Diese Seite drucken

Werbung

Verfügbare Sprachen

Verfügbare Sprachen

Beistellbett - Bedienungsanleitung
Side Crib - Assembly Instructions
Lit de Bébé - Instructions de Montage
WICHTIG:
FÜR SPÄTEREN GEBRAUCH
AUFBEWAHREN.
SORGFÄLTIG LESEN.
IMPORTANT:
RETAIN FOR FUTURE REFERENCE.
READ CAREFULLY.
IMPORTANT:
GARDER POUR UTILISATION
ULTÉRIEURE.
LIRE ATTENTIVEMENT.
BabyGO Baby Products GmbH
Am Bahndamm 1-3
33378 Rheda-Wiedenbrück
Germany
Side Crib
1

Werbung

loading

Inhaltszusammenfassung für BabyGo Side Crib

  • Seite 1 Side Crib Beistellbett - Bedienungsanleitung Side Crib - Assembly Instructions Lit de Bébé - Instructions de Montage WICHTIG: FÜR SPÄTEREN GEBRAUCH AUFBEWAHREN. SORGFÄLTIG LESEN. IMPORTANT: RETAIN FOR FUTURE REFERENCE. READ CAREFULLY. IMPORTANT: GARDER POUR UTILISATION ULTÉRIEURE. LIRE ATTENTIVEMENT. BabyGO Baby Products GmbH Am Bahndamm 1-3 33378 Rheda-Wiedenbrück...
  • Seite 2 Side Crib Baby-Beistellbett Bedienungsanleitung Side Cot Instruction manual Lit de Bébé Manuel d‘utilisation...
  • Seite 3 Side Crib Baby-Beistellbett Bedienungsanleitung Baby-Beistellbett Bedienungsanleitung...
  • Seite 4 Side Crib BEDIENUNGSANLEITUNG Liebe Eltern: Wir bedanken uns für den Kauf dieses Beistellbetts. Lesen Sie diese Anleitung bitte aufmerksam, bevor Sie das Beistellbett verwenden. WARNUNG! Die Anleitungen vor dem Gebrauch gut durchlesen und für ein späte- res Nachschlagen gut aufbewahren.
  • Seite 5 Side Crib WARNUNGEN: 1. ENTFERNEN UND ENTSORGEN SIE VOR DEM GEBRAUCH ALLE PLASTIKTÜTEN UND VERPACKUNGSMATERIALIEN UND BEWAHREN SIE DIESE FÜR KINDER UNZUGÄNLICH AUF. 2. Das Produkt ist erst gebrauchsfertig, wenn alle Verriegelungsmechanismen eingerastet sind. Überprüfen Sie dies vor der Inbetriebnahme des Produkts.
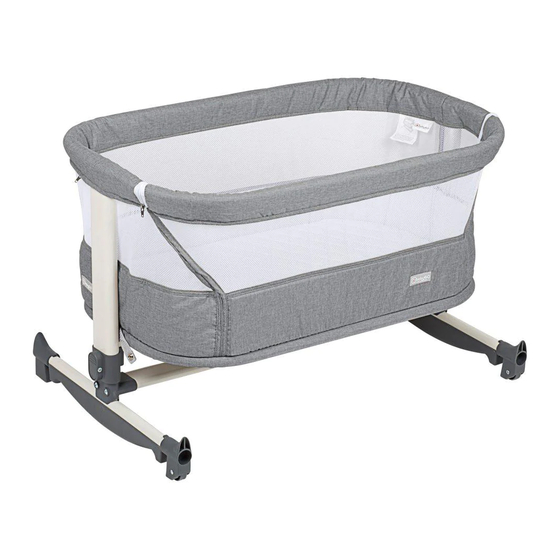
  • Seite 6 Side Crib Teileübersicht Bettaufsatz Matratze Seitenständer Stützleiste Riemen Innensechs- 4x Schraube kantschlüssel Installationsanleitungen 1. Stecken Sie die Stange „C“ in den linken Seitenständer „A“ (Abb. 1) und sichern Sie die Verbindung mit 2 Schrauben (Abb. 2). Ziehen Sie die Schrauben mit dem Innensechskantschlüssel im Uhrzeigersinn fest (Abb. 3).
  • Seite 7 Side Crib 2. Befestigen Sie das Verbindungsstück des Handlaufs oben an der Stange des Seitenständers; stecken Sie den Riegel (a) wie dargestellt in die Öffnung (b). Der Federstift rastet hörbar ein. Gehen Sie an der rechten Seite genauso vor. Legen Sie die Matratze in das Bett.
  • Seite 8 Side Crib 4. Verschließen Sie das Gitter, indem Sie die seitlichen Reißverschlüsse voll- ständig zuziehen (Abb. 8). Das Babybett kann nun freistehend verwendet werden. Abb. 8 Anleitungen für die Einstellung der Räder, Beine und Höhe 1. An der Vorderseite der Beine des Gestells befinden sich Räder für das bequeme Umstellen des Betts.
  • Seite 9 Side Crib 2. Das Babybett verfügt über 6 unterschiedliche Höheneinstellungen. Um die Höhe zu verstellen, drücken Sie die Einstellungstaste nach unten und bringen Sie das Bett dann in die gewünschte Position (Abb. 10). Gehen Sie an der anderen Seite genauso vor. Die Unterseite des Betts kann leicht geneigt werden, indem Sie die beiden Füße unterschiedlich hoch einstellen.
  • Seite 10 Side Crib Anleitungen für die Befestigung am Elternbett 1. Öffnen Sie das Gitterfenster an der Seite vollständig mit den Reißver- schlüssen. Abb. 12 2. Lösen Sie die Stifte im Rohr (Abb. 13) und ziehen Sie die Rohre leicht aus- einander. Klappen Sie die Seite des Betts nach der Trennung der Rohre an beiden Seiten nach unten und befestigen Sie das Gitter mit den Stiften an der Unterseite des Betts (Abb.
  • Seite 11 Side Crib 3. Stellen Sie das Babybett neben das Elternbett und richten Sie die Höhe des Babybetts mit der Matte des Betts aus (Abb. 15). WARNUNG! Die Matratze des Elternbetts muss genauso hoch oder höher sein als das aufgeklappte Seitenteil in niedrigster Position.
  • Seite 12 Side Crib 5. Um das Babybett am Elternbett zu sichern, ziehen Sie erneut an den Riemen, um zu gewährleisten, dass das Babybett sicher und fest am Eltern- bett befestigt ist (Abb. 18). WARNUNG! Der Höhenunterschied zwischen Babybett und Elternbett darf maximal 2 cm betragen.
  • Seite 13 Side Crib...
  • Seite 14 Side Crib Side Crib Instruction manual Side Crib Instruction manual...
  • Seite 15 Instruction manual Dear Parents: Thank you for purchasing the Side Crib. Please read and follow all instructions before using the Side Crib. WARNING! Read the Instruction carefully before use and keep them for future reference. INSTRUCTIONS FOR BED SIDE CRIB IMPORTANT: READ CAREFULLY AND RETAIN FOR FUTURE REFERENCE This product complies with EN 1130-1:1996.
  • Seite 16 Side Crib WARNINGS: 1. BEFORE USE, REMOVE AND DISPOSE OF ALL PLASTIC BAGS AND PACKAGING MATERIALS AND KEEP THEM OUT OF REACH OF CHILDREN. 2. The product is ready for use only when all locking mechanisms are engaged. Check carefully that these are engaged before use.
  • Seite 17 Side Crib Components crib body matress side frame stand support bar a pair of strap allen wrench 4x screw Instruction for Assembly 1. Insert support bar “C” to left side frame stand “A”(fig 1) and secure with 2 screws (fig 2).
  • Seite 18 Side Crib 2. Attach the handrail joint to the top of the frame stand tubing,insert bolt(a) into (b) as illustrated. The spring pin will click into place once secure. Repeat for the right side of frame. Insert mattress into the crib.
  • Seite 19 Side Crib 4. Fasten the side of the crib with the mesh window using the side zips and close them completely (fig 8). Your crib is now ready to be used as a stand alone crib. fig. 8 Instruction for Wheels, Leg & Height adjustment 1.
  • Seite 20 Side Crib 2. The crib can be adjusted to 6 different height positions. In order to adjust the height, press the top of the adjustment button down and adjust the crib to the desired position (fig 10). Repeat this operation on the opposite side.
  • Seite 21 Side Crib Instruction for fixing to parents‘ bed 1. Open the side of the crib with the mesh window using the side zips. Open them completely. fig. 12 2. Release the studs from the tubing (fig 13) and partially remove the tubes.
  • Seite 22 Side Crib 3. Move the crib close to the parents bed and check the height of the crib compared with the mattress of the bed (fig 15). WARNING! The mattress of parent‘s bed shall be aligned to or over the height of the drop side in the lowest position.
  • Seite 23 Side Crib 5. To secure the crib to the parents’ bed, pull the straps once again to make sure the crib is properly and firmly secured to the parents’ bed (fig 18). WARNING! The maximum distance between the crib and the parent’s bed should be 2cm.
  • Seite 24 Side Crib...
  • Seite 25 Side Crib Lit de bébé Manuel d‘utilisation Lit de bébé Manuel d‘utilisation...
  • Seite 26 Side Crib Installation et mode d‘emploi Chers parents: Nous vous remercions d‘avoir acheté le lit de bébé. S‘il vous plaît lire et suivre toutes les instructions avant d‘utiliser le lit de bébé. Avertissement! Lisez les instructions attentivement avant toute utilisation et conserver-les pour toute référence ultérieure.
  • Seite 27: Avertissements

    Side Crib AVERTISSEMENTS: Pour le lit de bébé en mode indépendant et le mode couplé au lit des parents 1. AVANT DE L’UTILISER, RETIREZ ET JETEZ TOUS LES SACS EN PLASTIQUE ET LES MATÉRIAUX D‘EMBALLAGE ET GARDEZ-LES HORS DE LA PORTÉE DES ENFANTS.
  • Seite 28 Side Crib Composants Corps du berceau matelas Support de Barre de Une paire de Clé hexagonale 4x Vis cadre latéral support sangle Instruction d’assemblage 1. Insérez la barre de support „C“ sur le support de cadre gauche „A“ (fig. 1) et fixez avec 2 vis (fig.
  • Seite 29 Side Crib 2. Fixez les jointures de la main courante à la partie supérieure du tube du support de cadre, insérez-y un boulon (a) dans le support latéral (b) comme illustré. La goupille élastique se mettra en place une fois sécurisé.
  • Seite 30 Side Crib 4. Fixez le côté du berceau avec la fenêtre en filet à l‘aide des fermetures éclaires latérales et fermez-les complètement (fig. 8). Votre berceau est maintenant prêt à être utilisé comme un berceau indépendant. fig. 8 Instructions pour l‘ajustement des roues, des pieds et de la hauteur 1.
  • Seite 31 Side Crib 2. Le berceau peut être réglé en 6 positions de hauteur différentes. Pour régler la hauteur, appuyez sur le haut du bouton de réglage vers le bas et réglez le berceau à la position désirée (fig. 10). Répétez cette opération sur le côté...
  • Seite 32 Side Crib Instruction pour la fixation au lit des parents 1. Ouvrez le côté du berceau avec la fenêtre en filet à l‘aide des fermetures éclaires latérales. Ouvrez-les complètement. fig. 12 2. Libérez les jointures en plastique du tube (fig. 13) et enlevez partielle- ment les tubes.
  • Seite 33 Side Crib 3. Déplacez le berceau près du lit des parents et vérifiez la hauteur du berceau par rapport au matelas du lit (fig. 15). ATTENTION ! Le matelas du lit des parents doit être aligné à hauteur égale ou au-dessus de la hauteur du côté ouvert dans sa position la plus basse.
  • Seite 34 Side Crib 5. Pour sécuriser le berceau au lit des parents, tirez de nouveau les sangles pour vous assurer que le berceau soit correctement et fermement fixé au lit des parents (fig. 18). ATTENTION ! La distance maximale entre le berceau et le lit des parents doit être de 2 cm.
  • Seite 35 Side Crib...
  • Seite 36 Impressum: BabyGO Baby Products GmbH Tel.: 0049 5242 418 86 81 Am Bahndamm 1-3 Fax: 0049 5242 418 86 80 D-33378 Rheda-Wiedenbrück e-mail: info@babygo.eu Germany web: www.babygo.eu...