Mitsubishi Electric PAC-MK51BC Installationshandbuch
Inhaltsverzeichnis
Quicklinks
Air-Conditioners Indispensable Optional Parts
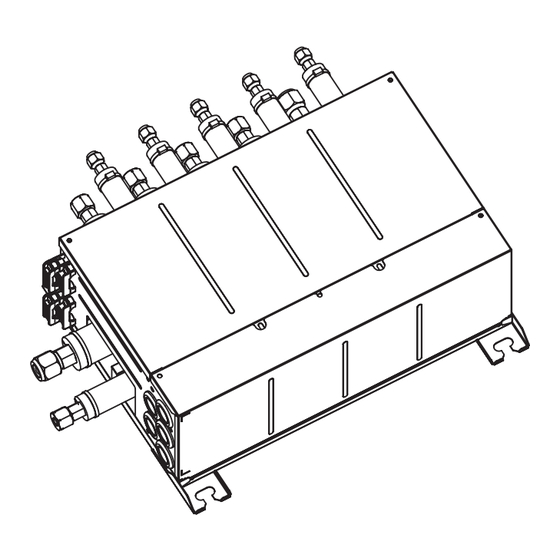
BRANCH BOX
PAC-MK51BC
PAC-MK31BC
INSTALLATION MANUAL
For safe and correct use, please read this installation manual thoroughly before installing the air-conditioner
unit.
INSTALLATIONSHANDBUCH
Zum sicheren und ordnungsgemäßen Gebrauch der Klimaanlage das Installationshandbuch gründlich
durchlesen.
MANUEL D'INSTALLATION
Veuillez lire le manuel d'installation en entier avant d'installer ce climatiseur pour éviter tout accident et vous
assurer d'une utilisation correcte.
INSTALLATIEHANDLEIDING
Voor een veilig en juist gebruik moet u deze installatiehandleiding grondig doorlezen voordat u de aircondi-
tioner installeert.
MANUAL DE INSTALACIÓN
Para un uso seguro y correcto, lea detalladamente este manual de instalación antes de montar la unidad de
aire acondicionado.
MANUALE DI INSTALLAZIONE
Per un uso sicuro e corretto, leggere attentamente questo manuale di installazione prima di installare il con-
dizionatore d'aria.
ΕΓΧΕΙΡΙΔΙΟ ΟΔΗΓΙΩΝ ΕΓKATAΣTAΣHΣ
Για ασφάλεια και σωστή χρήση, παρακαλείστε διαβάσετε προσεχτικά αυτό το εγχειρίδιο εγκατάστασης πριν
αρχίσετε τηv εγκατάσταση της μονάδας κλιματισμού.
MANUAL DE INSTALAÇÃO
Para segurança e utilização correctas, leia atentamente este manual de instalação antes de instalar a uni-
dade de ar condicionado.
INSTALLATIONSMANUAL
Læs venligst denne installationsmanual grundigt, før De installerer airconditionanlægget, af hensyn til sikker
og korrekt anvendelse.
INSTALLATIONSMANUAL
Läs denna installationsmanual noga för säkert och korrekt bruk innan luftkonditioneringen installeras.
MONTAJ ELKİTABI
Emniyetli ve doğru biçimde nasıl kullanılacağını öğrenmek için lütfen klima cihazını monte etmeden önce bu
elkitabını dikkatle okuyunuz.
РУКОВОДСТВО ПО УСТАНОВКЕ
Для осторожного и правильного использования прибора необходимо тщательно ознакомиться с данным руководс-
твом по установке до выполнения установки кондиционера.
ONLY FOR R410A OUTDOOR UNIT
ONLY FOR INDOOR USE
FOR INSTALLER
FÜR INSTALLATEURE
POUR L'INSTALLATEUR
VOOR DE INSTALLATEUR
PARA EL INSTALADOR
PER L'INSTALLATORE
ΓΙA AYΤΟΝ ΠΟΥ ΚΑΝΕΙ ΤΗΝ ΕΓΚΑTAΣΤAΣΗ
PARA O INSTALADOR
TIL INSTALLATØREN
FÖR INSTALLATÖREN
MONTÖR İÇİN
ДЛЯ УСТАНОВИТЕЛЯ
HFC
utilized
R410A
English
Deutsch
Français
Nederlands
Español
Italiano
Ελληνικά
Português
Dansk
Svenska
Türkçe
Русский
Inhaltsverzeichnis

Verwandte Anleitungen für Mitsubishi Electric PAC-MK51BC


Inhaltszusammenfassung für Mitsubishi Electric PAC-MK51BC
- Seite 1 Air-Conditioners Indispensable Optional Parts BRANCH BOX PAC-MK51BC PAC-MK31BC utilized R410A ONLY FOR R410A OUTDOOR UNIT ONLY FOR INDOOR USE INSTALLATION MANUAL FOR INSTALLER English For safe and correct use, please read this installation manual thoroughly before installing the air-conditioner unit.
-
Seite 2: Inhaltsverzeichnis
• The terminal block cover panel of the unit must be fi rmly attached. pipe is installed incorrectly, water leakage and damage to the ceiling, fl oor, • Use only accessories authorized by Mitsubishi Electric and ask a dealer or furniture, or other possessions may result. -
Seite 3: Confi Rming Supplied Accessories
ø15.88 F Rubber bush G Terminal block (to indoor unit on control board) H Terminal block (to outdoor unit) PAC-MK51BC (5-branches type) J Terminal block (for communication cable) (mm) K Cable clamp * Ensure that the branch box is installed as shown on the below drawing. - Seite 4 4. Dimensions and required servicing space of Branch Box PAC-MK31BC (3-branches type) PAC-MK31BC (Fig.4-3) (mm) Suspension bolt: W3/8 (M10) Refrigerant pipe fl ared connection To outdoor unit Liquid pipe ø6.35 ø6.35 ø6.35 ø9.52 Gas pipe ø9.52 ø9.52 ø9.52 ø15.88 Fig. 4-3 4.1.
- Seite 5 4. Dimensions and required servicing space of Branch Box Fasten the screws in each part. Install the service panel on the opposite surface. Service panel Fasten the screws. Install the electric cover on the opposite surface. Electric cover Fasten the screws. Fig.
-
Seite 6: Refrigerant Piping
4. Dimensions and required servicing space of Branch Box (mm) (mm) 180-200 Fig. 4-6 Fig. 4-7 (mm) Fig. 4-13 4.2. Space required for installation and servicing Fig. 4-8 1. The space when installing with the suspension bolts. (1) Front View (Fig. 4-6) (mm) Branch box On the side of piping... -
Seite 7: Mounting The Branch Box
6. Mounting the Branch Box (mm) (1) Install the suspension bolts (procure locally) at the specifi ed pitch (Fig. 4-2, 4-3). (2) Fit the washers and nuts (1, 2, procure locally) to the suspension bolts. (Fig. 6-1) D ( E ) (3) Hang the unit on the suspension bolts. - Seite 8 7. Installing refrigerant piping Note: A special fl are nut (optional or attached to the indoor unit) is needed to some indoor units. Please refer to the installation manual of outdoor unit and indoor unit for details. F Band 9 G Pipe covers 3456 H Tighten J Refrigerant piping...
-
Seite 9: Electrical Work
8. Electrical work ► Cautions for electrical work. Warning: • Always use dedicated circuits with breakers, and at the rated voltage. Power supply circuits with insuffi cient capacity, and bad workmanship during installation, may result in electric shock or fi re. Caution: •... - Seite 10 8. Electrical work 8.2. External wiring procedure (Fig. 8-8, Fig 8-9) Supply power separately to branch box and outdoor unit Power supply from Outdoor unit Circuit breaker M-NET Branch BOX #1 (5-branches type) Outdoor unit Circuit breaker M-NET Branch BOX #1 Indoor unit * Refer to installation manual of the outdoor unit (5-branches type)
- Seite 11 8. Electrical work Note: M-NET Branch BOX Connect the lines (B), (C) in accordance with the terminal block names to (5-branches type) ensure correct polarity. Indoor unit As for lines (C), S1 and S2 are for connecting the power source. And S2 and S3 are for signals.
- Seite 12 8. Electrical work Minimum wire thickness (mm²) Breaker for wiring Total operating current of the indoor unit Capacity (A) Fuse (A) Ground-fault interrupter *1 (NFB) Main cable Branch Ground F0 = 16A or less *2 20A current sensitivity *3 F0 = 25A or less *2 30A current sensitivity *3 F0 = 32A or less *2 40A current sensitivity *3...
-
Seite 13: Switch Setting
8. Electrical work 8.3. Switch setting SW12 SW11 Address setting Indoor unit Indoor unit Model selection Address setting setting connections ONES DIGIT TENS DIGIT Dip switch setting (Effective only before turning on the power) Switch Indoor Unit A SW1-1 Not connected Connected (Example) Indoor Unit B... -
Seite 14: Test Run
9. Test run • Refer to the “Test run” section of the installation manual of the indoor units and outdoor unit. • When the branch box and outdoor power source are separate, turn on the power of the branch box fi rst, and then turn on the outdoor unit power. •...