Herunterladen Inhalt Inhalt Diese Seite drucken
Inhaltsverzeichnis

Werbung

Verfügbare Sprachen

Verfügbare Sprachen

CDP-460A
Dual-CD-Player
©
COPYRIGHT
Nachdruck verboten!
All rights reserved!
Réproduction interdite!
Prohibida toda reproducción!
BEDIENUNGSANLEITUNG
BEDIENUNGSANLEITUNG
BEDIENUNGSANLEITUNG
BEDIENUNGSANLEITUNG
USER'S MANUAL
USER'S MANUAL
USER'S MANUAL
USER'S MANUAL
MODE D'EMPLOI
MODE D'EMPLOI
MODE D'EMPLOI
MODE D'EMPLOI
MANUAL DEL USUARIO
MANUAL DEL USUARIO
MANUAL DEL USUARIO
MANUAL DEL USUARIO
Für weiteren Gebrauch aufbewahren!
Keep this manual for further needs!
Gardez ces instructions pour des utilisations ultérieurs!
Guarde este manual para posteriores usos.

Werbung

Inhaltsverzeichnis
loading

Inhaltszusammenfassung für Omnitronic CDP-460A

  • Seite 1 MODE D'EMPLOI MODE D'EMPLOI MODE D'EMPLOI MODE D'EMPLOI MANUAL DEL USUARIO MANUAL DEL USUARIO MANUAL DEL USUARIO MANUAL DEL USUARIO CDP-460A Dual-CD-Player © COPYRIGHT Für weiteren Gebrauch aufbewahren! Nachdruck verboten! All rights reserved! Keep this manual for further needs! Réproduction interdite! Gardez ces instructions pour des utilisations ultérieurs!
  • Seite 4: Inhaltsverzeichnis

    MULTI-LANGUAGE-INSTRUCTIONS Inhaltsverzeichnis Table of contents Sommaire Contenido 1. EINFÜHRUNG ............................... 6 2. SICHERHEITSHINWEISE ..........................6 3. BESTIMMUNGSGEMÄSSE VERWENDUNG....................7 4. GERÄTEBESCHREIBUNG ........................... 8 4.1 Features ..............................8 4.2 Abspieleinheit ............................8 4.3 Steuereinheit............................. 9 5. INSTALLATION ............................11 6. BEDIENUNGSHINWEISE ........................... 12 6.1 Inbetriebnahme............................
  • Seite 5 1. INTRODUCTION ............................29 2. INSTRUCTIONS DE SÉCURITÉ......................... 29 3. EMPLOI SELON LES PRÉSCRIPTIONS ....................30 4. DESCRIPTION............................. 31 4.1 Features ..............................31 4.2 Bloc des lecteurs ............................ 31 4.3 Bloc de commande..........................32 5. INSTALLATION ............................34 6. UTILISATION............................... 35 6.1 Mise en marche ............................
  • Seite 6: Einführung

    - diese Betriebsanleitung genau beachten. 1. EINFÜHRUNG Wir freuen uns, dass Sie sich für einen OMNITRONIC CDP-460-A entschieden haben. Wenn Sie nachfolgende Hinweise beachten, sind wir sicher, dass Sie lange Zeit Freude an Ihrem Kauf haben werden. Nehmen Sie den OMNITRONIC CDP-460-A aus der Verpackung.
  • Seite 7: Bestimmungsgemässe Verwendung

    Den Netzstecker immer als letztes einstecken. Vergewissern Sie sich, dass der Netzschalter auf „OFF“ steht, wenn Sie das Gerät ans Netz anschließen. Halten Sie das Gerät von Hitzequellen wie Heizkörpern oder Heizlüftern fern. Das Gerät darf nicht in Betrieb genommen werden, nachdem es von einem kalten in einen warmen Raum gebracht wurde.
  • Seite 8: Gerätebeschreibung

    Reinigen Sie das Gerät niemals mit Lösungsmitteln oder scharfen Reinigungsmitteln, sondern verwenden Sie ein weiches und angefeuchtetes Tuch. Soll das Gerät transportiert werden, verwenden Sie bitte die Originalverpackung, um Transportschäden zu vermeiden. Beachten Sie bitte, dass eigenmächtige Veränderungen an dem Gerät aus Sicherheitsgründen verboten sind.
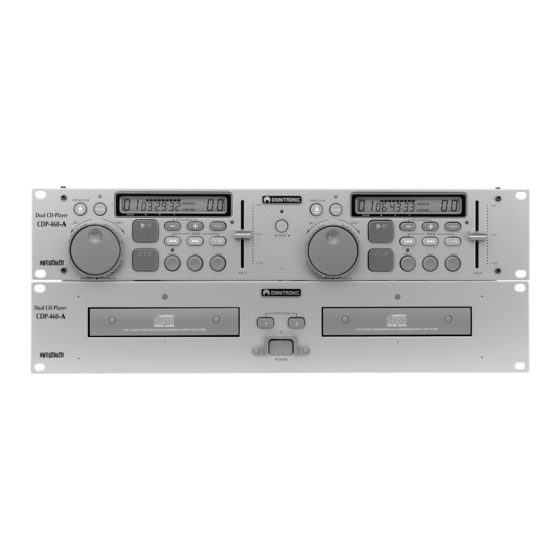
  • Seite 9: Steuereinheit

    Spannungsversorgung/Power supply: 115/230 V AC, 50/60 Hz ~ Gesamtanschlusswert/Power consumption: 25 W OMNITRONIC SHOWEQUIPMENT GmbH, GERMANY 4. NETZANSCHLUSS 5. SPANNUNGSWAHLSCHALTER Achten Sie darauf, dass die richtige Spannung eingestellt ist. 6. AUDIO OUT-BUCHSEN An diese Buchsen wird das Musiksignal in analoger Form ausgegeben. Zum Anschluss an Ihr Mischpult.
  • Seite 10 3. OPEN/CLOSE-TASTEN Über die Open/Close-Tasten können Sie das CD-Schubfach des jeweiligen CD-Players öffnen und schließen. Bitte beachten Sie die Hinweise unter 6.2 CD-Schubfach. 4. DISPLAY LCD-Display zur Anzeige der verschiedenen Modi und Funktionen. Bitte beachten Sie die Hinweise unter 6.3 LCD-Display.
  • Seite 11: Installation

    14. TIME-TASTE Die Zeitanzeige im Display lässt sich über die Time-Taste von Titelrestspielzeit (Remain) auf Titelabspielzeit (Elapsed) umschalten. Während der Wiedergabe erscheint auf der Anzeige die Titelrestspielzeit (Remain). Durch einmaliges Drücken wird die Titelabspielzeit (Elapsed) angezeigt. 15. SINGLE-TASTE Mit dieser Taste können Sie zwischen einmaligem Abspielen eines Titels und Continuous Play wählen. Durch einmaliges Drücken erscheint „SINGLE“...
  • Seite 12: Bedienungshinweise

    ACHTUNG: Achten Sie darauf, dass der CD-Player ausgeschaltet ist (Netzschalter ist in ungedrückter Position) bevor Sie ihn ans Netz anschließen, da sonst Ihre Lautsprecher beschädigt werden könnten. Verbinden Sie die Abspieleinheit über das Anschlusskabel mit der Steuereinheit. Schließen Sie den CD-Player mit dem Cinch-Kabel über die Audio Out-Buchsen an Ihr Mischpult an. Achten Sie darauf, dass die rechts/links Belegung (Steckerfarbe rot/weiß) an beiden Geräten übereinstimmt.
  • Seite 13: Titelauswahl Über Die Track-Tasten

    Wollen Sie die Wiedergabe unterbrechen, drücken Sie Play/Pause-Taste, und der Lesekopf bleibt an der entsprechenden Position stehen. 6.5 Titelauswahl über die Track-Tasten Über die Track-Tasten können Sie den gewünschten Titel auswählen. Soll ein Titel von Anfang an abgespielt werden, drücken Sie die Track-Tasten, bis auf der Anzeige die Nummer des gewünschten Liedes erscheint.
  • Seite 14: Cueing

    Wiedergabe des Programms leuchtet die Program-LED. Sie können durch Drücken der Program-Taste jederzeit wieder in den Program-Modus gelangen, um mehr Titel zu programmieren. Löschen einer Programmierung: Um die Programmierung zu löschen, drücken Sie die Program-Taste und halten sie etwa 3 Sekunden lang oder Sie öffnen das CD-Schubfach oder Sie schalten einfach das Gerät ab und wieder an.
  • Seite 15: Relay-Betrieb

    Wählen Sie den Punkt B (Endpunkt) der Sequenz über das Jog/Shuttle-Rad aus. Auf der Anzeige erscheint der gewählte B-Punkt (z.B. 3:51 11). Drücken Sie die Loop-Taste und der gewählte B-Punkt wird gespeichert (Loop-LED leuchtet permanent). Der CD-Player wiederholt die Sequenz zwischen beiden Punkten bis die Loop- Taste erneut gedrückt wird (Loop-LED aus).
  • Seite 16: Vorsichtsmassnahmen

    7. VORSICHTSMASSNAHMEN Dieses Gerät kann nicht mit konventionellen Hifi CD-Playern verglichen werden, auch wenn sich die Geräte in ihrem Aussehen ähneln. Dieses Gerät wurde besonders stabil gebaut, um den harten Anforderungen beim Transport und bei Mobildiskotheken gewachsen sein zu können. Vibrationen durch starke Bassfrequenzen können zu einem Springen der CDs führen.
  • Seite 17: Technische Daten

    9. TECHNISCHE DATEN Spannungsversorgung: 115/230 V AC, 50/60 Hz Gesamtanschlusswert: 25 W Typ: Doppel Compact Disc Player Geeignete CDs: Standard CDs 8 and 12 cm Quantisierung: D/A-Wandler: 1 Bit Samplingfrequenz: 44,1 kHz Frame-Genauigkeit: 1/75 sec Programmspeicher: Bis zu 20 Titel Geschwindigkeitsanpassung: +/- 12 % Display:...
  • Seite 18: Introduction

    - follow the instructions of this manual 1. INTRODUCTION Thank you for having chosen a OMNITRONIC CDP-460-A. You have acquired a reliable and powerful device. If you follow the instructions given in this manual, we can assure you that you will enjoy this device for many years.
  • Seite 19: Operating Determinations

    Always plug in the power plug least. Make sure that the power-switch is set to OFF position before you connect the device to the mains. Keep away from heaters and other heating sources! If the device has been exposed to drastic temperature fluctuation (e.g. after transportation), do not switch it on immediately.
  • Seite 20: Description

    LED is off. Please refer to the explanations under 6.2 CD-tray. 3. OPEN/CLOSE BUTTON Via the Open/Close-button, you can open and close the CD-tray. Rear panel: Typ/Type: OMNITRONIC CDP-460-A Spannungsversorgung/Power supply: 115/230 V AC, 50/60 Hz ~ Gesamtanschlusswert/Power consumption: 25 W OMNITRONIC SHOWEQUIPMENT GmbH, GERMANY...
  • Seite 21: Controller

    4. AC CONNECTION 5. VOLTAGE SELECTOR Make sure that the indication corresponds to the available voltage. 6. AUDIO OUT-SOCKETS The music-signal of these sockets is analogue. Connect the output to the respective input of your mixer. 7. DIGITAL OUT-SOCKET The music-signal of this socket is digital. Connect the output to the respective input of a digital amplifier for example.
  • Seite 22 Via the Jog-wheel, you can slowly search within a title forwards and backwards. In this way, you can easily find a Cue-point for example.Turn the Jog-wheel to the right in order to search forwards and turn it to the right in order to search backwards.
  • Seite 23: Installation

    Rear panel: 18. CONNECTOR PORTS Connect the main unit here. 19. CONTROL-SOCKETS Via the Control-socket, the respective CD-player can be remotely controlled. If you are using a mixer with Faderstart-function connect the player with the Control Out-socket. Please note that these sockets must never be connected with any voltage.
  • Seite 24: Lcd-Display

    Insert your CD in the CD-tray. Make sure that you only hold the CD with 2 fingers on the edge. Avoid touching the inside area of the CD. CAUTION: Do not close the tray by pushing it as this could harm the construction. Press the Open/Close-button again in order to close the tray.
  • Seite 25: Programming

    Possibility 2: If the two signal-sources only differ in the bass-beat, you can synchronise via the Pitch Bend-buttons. Put the CD-player into playback-mode and cue with the headphones. Synchronise the bass-beat via the left or right Pitch Bend-button. 6.7 Programming Create a program: Press the Program-button and the Program-LED shines.
  • Seite 26: Relay-Operation

    Memorizing the Loop-points: Possibility 1: The player is in Playback-mode. If the loop-button is pressed in the playback-mode, the CD keeps running and the A-point (starting-point) is marked (Loop-LED flashes). If the Loop-button is pressed once more, the B-point (end-point) of the sequence is marked (Loop-LED shines permanently).
  • Seite 27: End Of Operation

    6.12 End of operation Before you switch off the device, please make sure that no CD remains in the player. Also make sure that the CD-tray is completely closed before you switch off. If this is not the case, switch the device on again and close the tray with the Open/Close-button.
  • Seite 28: Technical Specifications

    9. TECHNICAL SPECIFICATIONS Power supply: 115/230 V AC, 50/60 Hz Power consumption: 25 W Type: Dual Compact Disc Player Available disc: Standard CDs 8 and 12 cm Quantisation: D/A-converter: 1 Bit Sampler frequency: 44.1 kHz Frame-accuracy: 1/75 sec Program memory: Up to 20 songs Pitch adjustment: +/- 12 %...
  • Seite 29: Introduction

    - être suffisamment qualifiée - être priée de suivre strictement les instructions de service suivantes. 1. INTRODUCTION Nous vous remercions d'avoir choisi un OMNITRONIC CDP-460-A. Vous êtes en possession d'un appareil très capaz. Sortez le OMNITRONIC CDP-460-A de son emballage.
  • Seite 30: Emploi Selon Les Préscriptions

    La fiche de secteur doit toujours être branchée en dernier lieu. Assurez-vous que l'interrupteur secteur est en position «OFF» avant de brancher l'appareil au secteur. Tenez l'appareil éloigné de toute source de chaleur comme des éléments de chauffage ou des radiateurs souflants.
  • Seite 31: Description

    Ne nettoyez jamais l'appareil avec des produits de nettoyage trop puissants ou abrasifs, mais utilisez un chiffon doux, humide. Si vous deviez transporter l'appareil, utilisez l'emballage d'origine pour éviter tout dommage de transport. Ne jamais retirez le code barre de l'appareil, puisque ceci annullerait toute garantie. Si l'appareil est utilisé...
  • Seite 32: Bloc De Commande

    Spannungsversorgung/Power supply: 115/230 V AC, 50/60 Hz ~ Gesamtanschlusswert/Power consumption: 25 W OMNITRONIC SHOWEQUIPMENT GmbH, GERMANY 4) ALIMENTATION SECTEUR 5) SELECTEUR DE TENSION Assurez-vous que vous utilisez le tension correcte. 6) SORTIES AUDIO OUT Le signal de musique est sortie en output en forme analogue. Les sorties doivent être reliés aux entrées correspondantes de votre tâble de mixage.
  • Seite 33 3) TOUCHE OPEN/CLOSE Avec les touches Open/Close, vous pouvez ouvrier et fermer le tiroir d'accès du CD. 4) DISPLAY Afficheur LCD pour l'affichage des modes et fonctions différents. Veuillez faire attention aux instructions sous 6.3 LCD-Display 5) DISQUE SHUTTLE Mode de lecture: Permet une avance de lecture rapidée soit en avant, soit en arrière.
  • Seite 34: Installation

    15) TOUCHE SINGLE Cette touche permêt la selection dans la fonction lecture, soit en mode simple, soit en mode continu. Si vous pressez la touche Single, la plage est jouée une fois. Apres, le lecteur se place en mode pause. L'indication "SINGLE"...
  • Seite 35: Utilisation

    6. UTILISATION 6.1 Mise en marche Mettez le lecteur CD sous tension en pressant la touche Power. Quand l'appareil est sous tension et qu'aucun CD ne se trouve dans le tiroir, le texte "NO DISC" apparaît sur l'afficheur. 6.2 Tiroir d'accès du CD Ouverture du tiroir: Quand le tiroir est fermé, presser sur la touche Open/Close pour ouvrir le tiroir.
  • Seite 36: Synchronisation

    Le lecteur CD mouve à la plage souhaitée en ce mode que vous avez pressé la touche Track réspective. Par example, si le lecteur est en mode de lecture de plage n° 1 et vous pressez la touche », le lecteur mouve à plage n°...
  • Seite 37: Répition D'une Séquence

    Mémoriser le point Cue: Possibilité 1: Le lecteur se trouve en Mode de lecture. Pressez la touche Play/Pause, et le lecteur se trouve en mode Pause. Pressez la touche Play/Pause, et le lecteur se trouve en Mode de lecture. La DEL Cue rouge clignote deux fois.
  • Seite 38: Faderstart

    6.11 Faderstart Le CDP-460-A vous offre la possibilité de contrôler le lecteur réspectif directement du mixer. Assurez-vous que vous avez connectée la douille Contrôle avec la douille réspective du mixer. Aditionnellement, les douilles Audio Out doivent être connectées avec les douilles d'entrée Line de votre mixer. Veuillez faire attention que la fonction Faderstart seulement fonctionne avec des mixers appropriés.
  • Seite 39: Nettoyage Et Maintenance

    8. NETTOYAGE ET MAINTENANCE DANGER DE MORT! Toujours débrancher avant de proceder à l'entretien! L'appareil doit être nettoyé régulièrement de contaminations comme de la poussière etc. Pour le nettoyage, utilisez un torchon non pelucheux humide. Ne pas utiliser un aucun cas de l’alcool ou des détergents pour le nettoyage.
  • Seite 40: Introducción

    -estar cualificada -seguir las instrucciones de este manual 1. INTRODUCCIÓN Gracias por haber elegido un OMNITRONIC CDP-460-A. Desembale su CDP-460-A. Antes de la puesta en marcha inicial, por favor asegúrese de que no hay daños causados durante el transporte. Si los hubiese, consulte a su proveedor y no use el aparato.
  • Seite 41: Instrucciones De Manejo

    Siempre conectar la clavija de alimentación al final. Asegúrese de que el conmutador de alimentación está en la posición “OFF” antes de conectar el aparato a la red. ¡Manténgalo alejado de estufas o de cualquier fuente de calor! Si el aparato se ha visto expuesto a fluctuaciones drásticas de temperatura (p.e. tras el transporte) no lo ponga en marcha inmediatamente.
  • Seite 42: Descripción Del Aparato

    Mediante la tecla Open/Close, puede abrir y cerrar la bandeja del CD. Por favor dirijase a las explicaciones del apartado 6.2 Bandeja del CD. Panel trasero: Typ/Type: OMNITRONIC CDP-460-A Spannungsversorgung/Power supply: 115/230 V AC, 50/60 Hz ~ Gesamtanschlusswert/Power consumption: 25 W OMNITRONIC SHOWEQUIPMENT GmbH, GERMANY...
  • Seite 43: Controlador

    4. CONEXIÓN AC 5. SELECTOR DE VOLTAJE Asegúrese de que la indicación corresponde al voltaje disponible. 6. CASQUILLOS DE SALIDA DE AUDIO (AUDIO OUT) La señal de música de estos casquillos es análoga. Conecte la salida a la entrada respectiva de su mezclador.
  • Seite 44 Mediante la rueda Jog puede buscar lentamente en una canción hacia delante y hacia atrás. De esta forma puede encontrar un punto Cue por ejemplo. Gire la rueda Jog a la derecha para la búsqueda hacia delante y gire la rueda Jog para la búsqueda hacia atrás. Cuanto más rápido gire la rueda Jog mayor es la velocidad de búsqueda.
  • Seite 45: Instalación

    Panel trasero: 18. CASQUILLOS CONECTORES Conecte aquí la unidad principal. 19. CASQUILLOS CONTROL Mediante el casquillo Control, el CD-player respectivo puede ser controlado à distancia. Si Vd. utilice un mixer con función Faderstart, conecte el CD-Player con el casquillo Control Out. Estos casquillos nunca deben ser conectados con un voltaje.
  • Seite 46: Manejo

    6. MANEJO 6.1 Puesta en marcha Conecte el CD-player mediante el interruptor de alimentación. Cuando el aparato está encendido y no hay disco en la bandeja en la pantalla aparece, "NO DISC". 6.2 Bandeja del CD Pulse la tecla Open/Close para abrir la bandeja del disco. La bandeja del CD se abre, la LED de estado parpadea y en la pantalla aparece "OPEN".
  • Seite 47: Sincronización De La Velocidad De Lectura

    Tecla »: Si pulsa la tecla »- una vez, la lectura comienza al principio de la canción siguiente , si lo pulsa dos veces comienza dos canciones más adelante, etc. Por favor tenga en cuenta que el CD-player trae la canción en el modo en el que usted pulsó la tecla Track. Si el CD-player está...
  • Seite 48: Memorizar Una Secuencia (Función Loop)

    Función Back-Cue: Si pulse la tecla Cue durante la lectura, el lector vuelve a la posición donde la lectura comenzó y se coloca en la posición Pausa. Por favor tenga en cuenta que esta función está disponible dentro de una canción. Memorizar el punto Cue: Posibilidad 1: El lector está...
  • Seite 49: Faderstart

    Posibilidad 2: Pulse la tecla Relay (el LED brilla). En el modo Single, el aparato comienza automáticamente con la lectura del otro CD-player al final de la canción. En el modo Relay, la función Faderstart no funciona. Vd. puede acabar la operación Relay mediante la tecla Relay (el LED off) y la función Faderstart funciona otra vez.
  • Seite 50: Limpieza Y Mantenimiento

    Ruido de fondo Conexiones inadecuadoas Comprobar la calidad del cable y mezclador o amplificador del jack Faderstart no funciona No hay una conexion Audio Out Conectar los casquillos Audio Out con los casquillos de entrada Line del mixer. 8. LIMPIEZA Y MANTENIMIENTO ¡PELIGRO DE MUERTE! ¡Siempre desenchufe el aparato antes de comenzar con el mantenimiento! Recomendamos una limpieza frecuente del aparato.

Inhaltsverzeichnis