Herunterladen Inhalt Inhalt Diese Seite drucken
GLATZ AMBIENTE Montage- Und Gebrauchsanleitung
Vorschau ausblenden Andere Handbücher für AMBIENTE:
Inhaltsverzeichnis

Werbung

Verfügbare Sprachen

Verfügbare Sprachen

AMBIENTE
Montage- und Gebrauchsanleitung / Instructions for
fitting and operating instructions / Instructions de montage et
d'emploi / Istruzioni per il montaggio e l'uso

Werbung

Inhaltsverzeichnis
loading

Inhaltszusammenfassung für GLATZ AMBIENTE

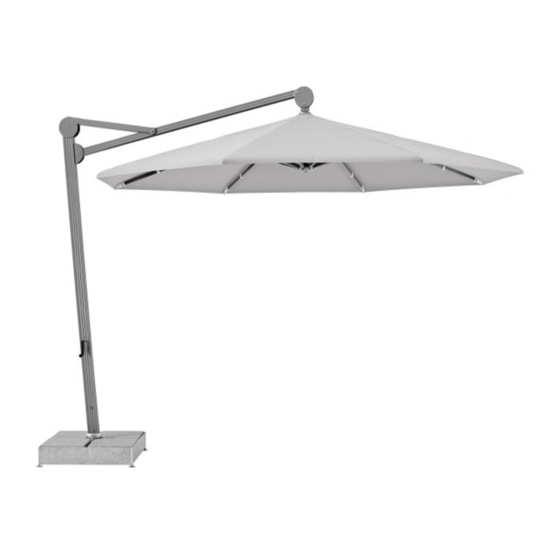
  • Seite 1 AMBIENTE Montage- und Gebrauchsanleitung / Instructions for fitting and operating instructions / Instructions de montage et d’emploi / Istruzioni per il montaggio e l’uso...
  • Seite 2: Informationsservice

    If you would like further information with regard to safety as well as the shade anchoring, please get in touch with your specialist dealer or directly with: Glatz AG, Neuhofstrasse 12, 8500 Frauenfeld / Switzerland – www.glatz.ch You can find the answers to the most frequent questions about our products on our homepage www.glatz.ch under the key word FAQ (frequently asked questions).
  • Seite 4: Inhaltsverzeichnis

    INHALTSVERZEICHNIS | TABLE OF CONTENTS | 1. Sicherheitsvorschriften 1. Safety regulations 1.1 Verwendung der Schirme 1.1 Use of the shades 1.2 Bodenverankerung 1.2 Anchorage 1.3 Elektroinstallation 1.3 Electrical installation 1.4 Beachten Sie bitte im Besonderen folgende Punkte 1.4 Kindly note the following 2.
  • Seite 5 TABLE DES MATIÈRES | INDICE | 1. Préscriptions de sécurité 1. Norme di sicurezza 1.1 Utilisation des parasols 1.1 Modalità d’impiego 1.2 Ancrage 1.2 Ancoraggio al suolo 1.3 Installations électriques 1.3 Installazione elettrica 1.4 Observez particulièrement les instructions d’emploi suivant 22 1.4 Tenete per favore conto in particolare dei seguenti punti 2.
  • Seite 6: Sicherheitsvorschriften

    1.1 Verwendung der Schirme männische Behebung vor weiterem Gebrauch! Die Glatz-Grossschirme sind ausschliesslich als wetterbeständiger • Verwenden Sie nur Original Glatz-Zubehör und Ersatzteile, um Sonnen schutz bestimmt. Die Windfestigkeit des aufgespannten Gewähr für Sicherheit, ungetrübten Komfort und einwandfreie Schirmes ist begrenzt und die Angaben darüber setzen eine Ver- Funktion zu erhalten.
  • Seite 7: Lieferumfang

    2.3 Möglichkeiten zur Verankerung • Bodenhülse M4 mit Deckel • Montageplatte M4 • Spezial-Montageplatte M4 für Garagen und Auf-Deckenmontage • Bodenhülse Ambiente drehbar • Mobiler Sockel Damit die statischen Bedingungen der Befestigung Fig. 1 erfüllt sind, ist die Bedienungsanleitung der entsprechenden Bodenbefestigung zwingend zu konsultieren.
  • Seite 8: Montage

    3. MONTAGE 3.2 Schirm aufstellen (Es sind 2 erwachsene Personen notwendig) 3.1 Standrohr auf Bodenhülse / Sockel montieren • Gegebenenfalls Elektroanschlüsse zusammenstecken, verschrauben (Die Montage auf dem Sockel funktioniert sinngemäss zur unten- und Kabel in Standrohr und Mast verstauen. stehenden Anleitung für die Bodenhülse) •...
  • Seite 9: Schirmstellung Justieren

    | DE 3.3 Schirmstellung justieren 3.3.1 Grundausrichtung (a) Tragarm schwenken (Figur 6 und 7) • Unteren Verbindungsbolzen (6) des Mastes herausnehmen. • Abdeckblech (7) hochschieben. • Alle Verankerungsschrauben (8) um ½-Drehung lösen. • Aufgespannten Schirm in gewünschte Stellung schwenken (4). Fig.
  • Seite 10: Demontage

    (d) Seitliche Neigung (Figur 5 und 7) 4. DEMONTAGE • Höhendifferenz zwischen den seitlichen Schirmrändern feststellen. 4.1 Schirm abbauen (Es sind 2 erwachsene Personen notwendig) • Verankerungsschrauben (8) durch Entfernen des unteren Ver- • Hindernisse im Umlegebereich entfernen. bindungsbolzens (6) und Anheben der Schraubenabdeckung (7) •...
  • Seite 11: Bedienung

    • Bei auffrischendem Wind Ratschläge sollen Ihnen dabei helfen. Schirm schliessen. • Unbeaufsichtigte Schirme Da Glatz die ordnungsgemässe Behandlung des Schirmüberzugs nicht beeinflussen dürfen nicht geöffnet kann, fallen allfällige Schäden bedingt durch Scheuern (Abrieb) nicht unter die bleiben. ordentliche Gewährleistung!
  • Seite 12: Korrektes Aufwickeln Des Schirms

    5.3.2 Korrektes Aufwickeln des Schirms Vermeiden Sie Klemm- und Scheuerschäden und vorzeitige Abnützung durch starkes Flattern und Schlagen des Stoffes im Wind. (1) Nach dem Schliessen des Schirms alle Stoffbahnen einzeln und vollständig zwischen den Streben hervorziehen. (2) Die Stoffbahnen lagenweise eng um das Schirmteil aufwickeln. (3) Mit der mitgelieferten Bindegurte die aufgewickelten Stoffbahnen gut sichern.
  • Seite 13: Wartung Und Pflege

    Die Gestellteile können mit Wasser abgerieben werden. Die Beschich- tungsfarben lassen sich mit einer Autopolitur auffrischen. Lackschäden Leichtgängig machen der Dreh- und Gleitlager: können mit dem bei Glatz erhältlichen Farbreparaturset nachgebessert • Verwenden Sie einen nicht fleckenden Gleitspray. werden. • Führungsfugen auf Mast Vorderseite (1).
  • Seite 14: Safety Regulations

    The Glatz large shades are intended exclusively as weather resistant • Use only original Glatz accessories and spares in order to have the sun protection. The wind resistance of the extended shade is limited guarantee for full safety, unspoilt convenience and perfect functioning.
  • Seite 15: Scope Of Supply

    • Attachment bolt for speedy operation with rechargeable battery drill (drill not included in scope of supply, torque limitation obligatory) • Remote control for GSS-99 • Incorporated lightening for Glatz large shades • Protective cover with/without zip and rod 2.3 Possibilities of anchorage •...
  • Seite 16: Fitting

    3. FITTING 3.2 Setting the sunshade (2 persons are necessary for this) 3.1 Fitting the support tube into the ground socket / movable base • If necessary, plug together the electrical connections, screw them (Fitting the support tube into the movable base works analogously to together and stow the cable away in the support tube and mast.
  • Seite 17: Adjusting The Position

    3.3 Adjusting the position 3.3.1 Basic alignment (a) Swivelling the carrier arm (figures 6 and 7) • Remove the lower connection bolt (6) from the mast. • Push up the cover plate (7). • Loosen all anchoring screws (8) by a ½ turn. •...
  • Seite 18: Disassembling

    (d) Side angle of shade roof (figures 5 and 7) 4. DISASSEMBLING • Determine the difference in high between the side edges of the 4.1 Taking down the sunshade (2 persons are necessary for this) sunshade. • Remove any obstacles in the area for laying the sunshade down. •...
  • Seite 19: Operation

    The following advice helps. • If the wind freshens up, close the sunshade. • Unsupervised sunshades As Glatz cannot monitor the proper treatment of the umbrella coating, any damage must not be left open. caused by abrasion (rubbing) lies outside the regular warranty!
  • Seite 20 5.3.2 Correct winding-up of umbrella Avoid clamping, abrasions and premature wear and tear caused by strong flapping of the material in the case of wind. (1) After closing the umbrella, pull out all the lengths of material individually and completely between the struts. (2) Wind up the lengths of material in tight layers on the umbrella pole.
  • Seite 21: Maintenance And Care

    Paint damage can be made good using • Use a non-staining glide spray. the paint repair kit available from Glatz. • Guide grooves on the pole (1). • Corners of the pole inside (2). To this end, unscrew and then 6.3 Shade tensioning...
  • Seite 22: Préscriptions De Sécurité

    état. comme parasol, solides aux intempéries. La résistance au vent du • N’utilisez que des accessoires et pièces de rechange Glatz originaux, parasol déployé est limité, et les indication en la matière supposent afin d’assurer une sécurité intégrale, une commodité illimitée et un la présence d’un ancrage conforme aux instructions.
  • Seite 23: Matériel Livré

    • Douille M4 avec couvercle • Plaque de montage M4 • Plaque de montage spéciales M4 pour sols isolés • Douille de sol Ambiente pivotante • Socle mobile Pour réunir les conditions statiques requises pour la fixation, veuillez impérativement consulter le Fig.
  • Seite 24: Montage

    3. MONTAGE 3.2 Installation du parasol (il faut 2 personnes) 3.1 Montage du tube d’appui sur la douille de sol / sur le socle mobile • En cas d’installation électrique enficher les connexions, les visser et (Le montage sur le socle mobile est fidèle au contenu que le montage ranger le câble dans le tube d’appui.
  • Seite 25: Ajustement De La Position Du Parasol

    3.3 Ajustement de la position du parasol 3.3.1 Alignement de base (a) Direction du bras support (figures 6 et 7) • Retirer le boulon de liaison inférieur (6) du mât. • Soulever la tôle de couverture (7). • Desserrer de ½ tour toutes les vis d’ancrage (8). •...
  • Seite 26: Démontage

    (d) Inclinaison latérale (figures 5 et 7) 4. DÉMONTAGE 4.1 Replier le parasol (Il faut 2 personnes) • Déterminer la différence de hauteur entre les bords latéraux du parasol. • Enlever les obstacles dans la zone de repli. • Dégager les vis d’ancrage (8) en enlevant le boulon de liaison •...
  • Seite 27: Maniement

    • Le parasol ne peut rester Etant donné que Glatz ne peut pas avoir de l’influence sur le traitement du revêtement ouvert sans surveillance. du parasol, la garantie n’inclut pas les dégâts éventuels dus à l’abrasion (l’usure)!
  • Seite 28 5.3.2 L’enroulement correct du parasol Evitez les dégâts de serrage et d’abrasion ainsi que l’usure anticipée par le battage et le frottement fort du tissu dans le vent. (1) Après la fermeture du parasol il faut tirer toutes les bandes de tissu séparément et complètement des tiges.
  • Seite 29: Entretien Et Soins

    Les éclats de peinture peuvent être réparés avec le kit de • Joints de guidage sur le mât, côté avant (1). réparation disponible en accessoires chez Glatz. • Coins du côté intérieur du mât (2), à cette fin, il faut dévisser la tôle de recouvrement (3) puis la remettre en place.
  • Seite 30: Norme Di Sicurezza

    è limitata, e questo dato di fatto ne richie- • Impiegate solo accessori e pezzi di ricambio originali della Glatz che de l’ancoraggio al suolo da effettuarsi secondo le relative istruzioni. Le sono gli unici garanti di sicurezza, comfort duraturo e funzionamen- basi mobili sono meno stabili rispetto ai sistemi di ancoraggio al suolo.
  • Seite 31: Equipaggiamento Si Serie

    • Comando a distanza GSS-99 viene montato in fabbrica sulla base o sul piantone da interrare) • Illuminazione per gli ombrelloni giganti Glatz • Sacchetto con minuteria (5) con 5 viti di ancoraggio M 10, bullone a • Fodera protettiva con/senza bacchetta e cerniera testa esago- nale per azionamento rapido tramite trapano a batteria 2.3 Sistemi d’ancoraggio...
  • Seite 32: Montaggio

    3. MONTAGGIO 3.2 Mettere l’ombrellone in posizione eretta (occorrono 2 persone adulte) 3.1 Montare il tubo portante sul piantone da interrare / sulla base • All’occorrenza unire i collegamenti elettrici serrando poi le viti e far (Il montaggio sulla base avviene sulla falsariga delle istruzioni valide sparire i cavi nel tubo portante e nel palo.
  • Seite 33: Regolare La Posizione Dell'ombrellone

    3.3 Regolare la posizione dell’ombrellone 3.3.1 Orientamento base (a) Girare il braccio portante (fig. 6 e 7) • Togliere il bullone di connessione inferiore (6) dal palo. • Spingere verso l’alto la lamiera di copertura (7). • Allentare di ½ giro tutte le viti di ancoraggio (8). •...
  • Seite 34: Smontaggio

    (d) Inclinazione laterale (fig. 5 e 7) 4. SMONTAGGIO 4.1 Smontare l’ombrellone (occorrono 2 persone adulte) • Verificare la differenza d’altezza da terra tra i bordi laterali del tetto dell’ombrellone. • Allontanare eventuali ostacoli dall’area di ribaltamento. • Scoprire le viti di ancoraggio (8) togliendo il bullone di connessione •...
  • Seite 35: Azionamento

    è tuttavia possibile evitare i danni di abrasione. A tale scopo si essere chiuso. rimanda ai seguenti suggeri-menti. • Ombrelloni incustoditi non Poichè Glatz non può influire sul trattamento regolare dei teli di copertura, eventuali devono rimanere aperti. danni causati da abrasione (sfregamento) sono esclusi dalla garanzia ordinaria!
  • Seite 36 5.3.2 Corretto avvolgimento dell’ombrellone Prevenire danni dovuti a incastra- mento o abrasione evitando forte agitazione e svolazzamento nel vento del telo di copertura. (1) Dopo la chiusura del- l’ombrellone recuperare tra le stecche tutti i singoli teli, tirandoli verso l’esterno. (2) Avvolgere i teli stretta- mente attorno al tetto, ponendoli uno sopra l’altro.
  • Seite 37: Manutenzione E Cura

    Danni alla vernice possono essere ritoccati con l’apposito kit rotazione e delle guide di scorrimento è necessario: di riparazione disponibile presso la ditta Glatz. • utilizzare uno spray lubrificante che non macchia • trattare le guide di scorrimento sulla parte anteriore del palo (1) 6.3 Tensione del telo di copertura...
  • Seite 40 © Glatz AG AMBIENTE, Int. Patents reg. 11.2017 / Document 261 003 500 60...

Inhaltsverzeichnis