Herunterladen Inhalt Inhalt Diese Seite drucken
Inhaltsverzeichnis

Werbung

Verfügbare Sprachen

Verfügbare Sprachen

NINO
Manuale d'uso e manutenzione
Pag.2
Operator's manual
Page 21
Betriebs- und Wartungsanleitung
Seite 40
Data di emissione: Gennaio, 2016
Revisione: 1
Pag. : 1/63

Werbung

Inhaltsverzeichnis
loading

Inhaltszusammenfassung für SPM NINO

  • Seite 1 NINO Manuale d’uso e manutenzione Pag.2 Operator’s manual Page 21 Betriebs- und Wartungsanleitung Seite 40 Data di emissione: Gennaio, 2016 Revisione: 1 Pag. : 1/63...
  • Seite 2 Revisione: 01 © 2016 – SPM Drink Systems Tutti i diritti di riproduzione del presente manuale sono riservati alla SPM DRINK SYSTEMS, la riproduzione anche parziale è vietata. Le descrizioni e le illustrazioni sono riferite alla specifica macchina/impianto in oggetto. SPM DRINK SYSTEMS si riserva il diritto di apportare in qualsiasi momento tutte le modifiche che riterrà...
  • Seite 3: Inhaltsverzeichnis

    INDICE 1. AVVERTENZE E CONSIGLI IMPORTANTI ..............4 2. CORREDO DELL’APPARECCHIO ....4 3. INDICAZIONI UTILI PER IL TRASPORTO4 4. INDICAZIONI UTILI PER IL SOLLEVAMENTO ........4 5. SPECIFICHE TECNICHE ......5 6. POSIZIONAMENTO ........6 7. COLLEGAMENTO ALLA RETE ELETTRICA ..........7 8. OPERAZIONI DI AVVIAMENTO ....8 9.
  • Seite 4: Avvertenze E Consigli Importanti

    cui può essere utilizzato un getto d’acqua. Il presente apparecchio deve essere 1. AVVERTENZE E CONSIGLI installato in luoghi dove possa essere IMPORTANTI controllato da personale qualificato. Non posizionare bombole con gas infiammabile Il presente manuale d’uso ed installazione vicino a questa apparecchiatura. è...
  • Seite 5: Specifiche Tecniche

    Non sollevare mai l’apparecchio Le dimensioni di ingombro dell’ apparecchio singolarmente, ma con l’aiuto di un altro sono: operatore. NINO Per non provocare danni all'apparecchio, le  Altezza 570 mm. manovre di carico e scarico sono da effettuarsi  Larghezza 170 mm.
  • Seite 6: Posizionamento

    6. POSIZIONAMENTO SOLO PER MANUTENTORE L'installazione e le successive operazioni di manutenzione, devono essere effettuate da personale specializzato ed addestrato all'uso dell'apparecchio, secondo le norme in vigore. a) Dopo aver tolto l’imballo conservarne tutti gli elementi per lo stoccaggio invernale ed assicurarsi dell’integrità...
  • Seite 7: Collegamento Alla Rete Elettrica

    7. COLLEGAMENTO ALLA RETE ELETTRICA SOLO PER MANUTENTORE Prima di inserire la spina nella presa di alimentazione, come già spiegato nel paragrafo precedente, è necessario che per la Vostra sicurezza prendiate attenta visione delle seguenti precauzioni: - Accertarsi che il collegamento sia effettuato ad un impianto dotato di un efficace messa a terra come previsto dalle vigenti normative di sicurezza (fig.3).
  • Seite 8: Operazioni Di Avviamento

    8. OPERAZIONI DI AVVIAMENTO !ATTENZIONE! PRIMA DI EFFETTUARE IL PRIMO AVVIAMENTO DELLA MACCHINA, PROCEDERE ALLE OPERAZIONI DI PULIZIA E SANITIZZAZIONE DESCRITTE AL CAPITOLO 10 - Diluire e miscelare, in un recipiente a parte, il prodotto con acqua o latte secondo le indicazioni del produttore (vedi figura 4).
  • Seite 9 - Per attivare l’impianto frigorifero in modalità raffreddamento e variare la consistenza del prodotto, agire sui tasti della pulsantiera di comando (fig.8), agendo sul si vedranno aumentare i LED accesi e di conseguenza la sua consistenza aumenterà; agendo invece sul , si vedranno diminuire i LED accesi con conseguente calo della consistenza (fig.7).
  • Seite 10: Modalita' D'uso

    9. MODALITA’ D’USO Attivando l’interruttore generale A posto sul lato destro del frontale della macchina viene messo in moto il mescolatore interno alle vasche (fig.10). !ATTENZIONE! Qualora ciò non avvenisse controllare che il coperchio sia posizionato correttamente, ciascuna vasca è dotata di un dispositivo di sicurezza che ne impedisce il funzionamento qualora il coperchio non sia correttamente posizionato nella sua sede.
  • Seite 11: Operazioni Di Pulizia Esanitizzazione Quotidiana

    10. OPERAZIONI DI PULIZIA E SANITIZZAZIONE QUOTIDIANA Né la casa costruttrice della macchina, né il Al fine di avere sempre un buon funzionamento quella produttrice del preparato alimentare dell’apparecchio e di rispettare le vigenti introdotto nella stessa, possono essere ritenute normative sanitarie, è...
  • Seite 12 - Disattivare l’impianto frigorifero (agire sul tasto – fino a quando tutti i LED risultano spenti) e far funzionare la macchina con il solo mescolatore in movimento (tutti i LED spenti) per una decina di minuti. - Munirsi di un comune prodotto adatto alla disinfezione di oggetti in plastica e gomma (AMUCHINA®).
  • Seite 13 Attenzione Onde evitare rischi di shock elettrico o di contatto con parti mobili, durante le operazioni di smontaggio e rimontaggio, assicurarsi che tutti gli interruttori siano nella posizione off e che il cavo di alimentazione sia scollegato dalla rete. - Disattivare l’interruttore generale A posto sul lato destro del frontale della macchina e disconnettere il cavo di alimentazione dalla rete.
  • Seite 14 - Estrarre la spirale di miscelazione e la guarnizione di tenuta a ventosa (fig.18). - Rimuovere la guarnizione di tenuta vasca come indicato in figura 19. - Smontare la vaschetta raccogli gocce muovendola leggermente verso l’alto e tirandola verso l’esterno (fig.20). - Lavare accuratamente ognuno di questi Fig.
  • Seite 15 Una volta eseguite accuratamente tutte queste operazioni di pulizia e sanificazione, si può procedere al rimontaggio dei componenti. Il corretto assemblaggio della macchina è molto importante per prevenire perdite di prodotto ed il danneggiamento della stessa. Per assemblare la macchina è necessario disporre di un lubrificante approvato (Vaselina).
  • Seite 16 - Per agevolarne il montaggio consigliamo inoltre di inumidire con acqua pulita la parte posteriore della vasca nel punto in cui la stessa combacia con la sua guarnizione di tenuta (vedi figura 26); Fig. 26 - Rimontare la vasca spingendola a fondo lungo l’evaporatore fino a bloccarla nella propria sede dietro il profilo di bloccaggio;...
  • Seite 17: Manutenzione Straordinaria

    SANITIZZAZIONE 11. MANUTENZIONE STRAORDINARIA Qualora la macchina rimanga ferma per alcuni giorni dopo essere stata pulita e disinfettata Attenzione accuratamente come descritto nel capitolo 10, al Prima di procedere a qualsiasi operazione momento del riavvio è necessario effettuare le di manutenzione, è obbligatorio spegnere operazioni di sanitizzazione descritte in seguito.
  • Seite 18: Controllo E Sostituzione Delle Guarnizioni

    Controllo e sostituzione delle guarnizioni Stoccaggio invernale GUARNIZIONE VASCA Per proteggere la macchina durante i periodi di inattività come l’inverno, è importante La guarnizione posta sul retro della vasca va immagazzinarla correttamente come descritto in sostituita ogni 12 mesi o a seconda dello stato seguito: di usura e del livello di manutenzione e lubrificazione.
  • Seite 19: Informazioni Utili Sui Preparati Per Gelato

    13. ESCLUSIONE DI RESPONSABILITA’ 12. INFORMAZIONI UTILI SUI PREPARATI PER GELATO La casa costruttrice declina ogni forma di responsabilità per eventuali danni che possono direttamente o indirettamente derivare a AUMENTO DI VOLUME persone, cose, animali in conseguenza della mancata osservanza di tutte le prescrizioni Durante il passaggio dallo stato liquido iniziale a indicate nel presente manuale e concernenti quello denso e cremoso finale, il prodotto...
  • Seite 20: Guida Alla Risoluzione Dei Problemi

    14. GUIDA ALLA RISOLUZIONE DEI NOTA BENE: le seguenti procedure PROBLEMI devono essere eseguite da un tecnico qualificato Problema Possibile causa Soluzione macchina  Lo spazio di ventilazione attorno  Lasciare almeno 20cm di spazio libero raffredda raffredda alla macchina è inadeguato attorno alla macchina e non posizionarla solo parzialmente ed il ...
  • Seite 21 All copying rights are reserved to SPM DRINK SYSTEMS; copying, even partial, is illegal. The descriptions and illustrations refer to the specific machine at issue. SPM Drink Systems reserves the right to modify at any time the equipment for mass production.
  • Seite 22 INDEX 1. IMPORTANT WARNINGS AND ADVICES ..............23 2. EQUIPMENT KIT ........23 3. TRANPORT TIPS ........23 4. LIFTING TIPS ..........23 5. TECHNICAL SPECIFICATIONS ....24 6. POSITIONING ..........25 7. CONNECTION TO THE POWER SUPPLY MAINS ............26 8. START-UP PROCEDURES .......27 9. OPERATING INSTRUCTIONS ....29 10.
  • Seite 23: Important Warnings And Advices

    – staff kitchen areas in shops, offices and other working environments; 1. IMPORTANT WARNINGS AND – farm houses and by clients in hotels, ADVICES motels and other residential type This installation and operation manual is environments; an integral part of the equipment and must –...
  • Seite 24: Technical Specifications

    24°C and 30°C. In order to correctly dispose of the device, please contact the distributor from which you Dimensions and weight: purchased it or our after-sales service. NINO  Height: 570 mm  Width: 170 mm ...
  • Seite 25: Positioning

    6. POSITIONING FOR MAINTENANCE WORKER ONLY The installation and subsequent servicing operations must be carried out by skilled members who have been trained to use the device compliance with regulations in force. a) Remove the packing (fig.1) preserve it in order to reuse for winter storage and make sure the machine is in perfect condition.
  • Seite 26: Connection To The Power Supply Mains

    7. CONNECTION POWER SUPPLY MAINS FOR SERVICEMAN ONLY Before fitting the plug in the power supply socket, your safety, already mentioned in the previous paragraph, please read the following precautions. machine’s electrical safety only guaranteed when it is connected to a suitable earth system, structured as provided by the national safety...
  • Seite 27: Start-Up Procedures

    8. START-UP PROCEDURES !IMPORTANT! BEFORE STARTING THE MACHINE, CARRY OUT THE CLEANING AND SANITISING PROCEDURES DESCRIBED IN CHAPTER 10. - Dilute and mix the product in a separate container according to the manufacturer’s instructions (see fig.4). NOTE: “mix” is the result of the blending between water or milk with the powder to make soft serve creamy product, sorbets, and similar products.
  • Seite 28 - In order to activate the refrigerating system and to regulate the product consistency, it is necessary to use the buttons on the control board (fig.8); operating on the button, the number of lighted LED will increase with the product consistency; operating on the button, the number of lighted LED will decrease with the product consistency (fig.7).
  • Seite 29: Operating Instructions

    9. OPERATING INSTRUCTIONS Activating the main switch A on the right side of the unit, the auger will start rotating and mixing (fig.10). !WARNING! Each bowl is equipped with a very efficient safety mechanism, if the main cover is not correctly positioned, NINA1 will not work.
  • Seite 30: Cleaning And Daily Sanitizing Procedures

    10. CLEANING AND DAILY SANITIZING PROCEDURES In order to maintain the unit in like-new operating condition and to respect current regulations, it’s absolutely necessary to frequently and carefully perform the cleaning and sanitizing operations as described below. In case of prolonged shutdown (winter storage), the machine must be disassembled, washed and sanitized according to the instructions in this manual before start-up to ensure the best...
  • Seite 31 If the Fig. 13 cover is not correctly positioned, NINO will not work. - Empty the bowl and repeat the same operations until the coming out water is clear (fig.14).
  • Seite 32 Caution To avoid electrical shock or contact with moving parts, before proceeding with the disassembling operations, make sure all switches are in “OFF” position and that the main power supply is disconnected. - Switch off the machine and disconnect the power cable.
  • Seite 33 - Pull out the mixing unit, the bell shaped seal and the bowl gasket on the back (fig.18 and 19). Fig. 18 - Remove the drip tray by moving it upward and pulling it outward (fig.20). - Thoroughly wash all the removed components with hot water and dish washing, but do not use abrasive detergents or powders that can damage the bowl.
  • Seite 34 Once performed all these cleaning and sanitizing procedures, it’s possible to reassemble all the components. The correct assembly of the device is essential to prevent leakage of product and damage of the machine. To assemble the machine you will need an approved lubricant (such as Vaseline). Make sure all parts have been washed and sanitized before assembling.
  • Seite 35 - Moisten with water the rear of the tank where it meets with the seal to facilitate the reassembling procedures (see fig.26); Fig. 26 - Reassemble the bowl by positioning it back into its seat until it gets blocked into it (see fig.27).
  • Seite 36: Special Maintentance

    SANITIZING 11. SPECIAL MAINTENTANCE Whenever the machine has remained unused for some days after been cleaned and sanitized as described in the chapter 10, the sanitizing Caution procedures described below must be performed Before proceeding with any maintenance just prior to start-up the machine. operation, it is compulsory to switch off the machine and unplug it from the mains.
  • Seite 37: Control And Replacement Of Seals

    Control and replacement of seals Winter storage BOWL GASKET (LOCATED AT THE REAR OF To protect the unit during seasonal shutdown, BOWL) it’s important to properly store the machine using the following procedures: Replace it every 12 months according to the conditions of use and level of maintenance.
  • Seite 38: Soft Serve Ice Cream Information

    12. SOFT SERVE ICE CREAM 13. DISCLAIMER INFORMATION The manufacturer declines all responsibility for any damage that directly or indirectly might be OVERRUN brought on to people, things, animals, as a consequence of failure to comply with all While the product is frozen in the bowl, its instructions given in this manual with the volume increase;...
  • Seite 39: Troubleshooting Guide

     dispensing  Reassemble dispensing valve has been and replace 14. TROUBLESHOOTING GUIDE valve incompletely  Clean leaking incorrectly lubricate replaced valve and the NOTE: the following procedures must be position valve cylinder performed by a qualified service  free with technician.
  • Seite 40: Wiring Diagram

    – © 2016 SPM Drink Systems Alle Rechte auf Vervielfältigung des vorliegenden Handbuchs sind der Fa. SPM DRINK SYSTEMS vorbehalten. Die auch nur teilweise Vervielfältigung ist untersagt. Die Beschreibungen und Abbildungen beziehen sich auf die vorstehend genannte Maschine/Anlage. SPM DRINK SYSTEMS behält sich das Recht vor, an der Serienproduktion jederzeit alle Änderungen vorzunehmen, die sie für...
  • Seite 41 INHALT 1. WICHTIGE HINWEISE UND EMPFEHLUNGEN ......... 42 2. AUSSTATTUNG DES GERÄTS ...... 42 3. NÜTZLICHE HINWEISE FÜR DEN TRANSPORT ..........42 4. NÜTZLICHE HINWEISE FÜR DAS HEBEN . 42 5. TECHNISCHE DATEN ........43 6. AUFSTELLUNG ..........44 7. ANSCHLUSS AN DAS STROMNETZ .... 45 8.
  • Seite 42: Wichtige Hinweise Und Empfehlungen

    Teeküchen für die Belegschaft in Geschäften, Büros und sonstigen 1. WICHTIGE HINWEISE UND Arbeitsumgebungen; EMPFEHLUNGEN Gemeinschaftsräume in Hotels, Motels oder Gastbetrieben allgemein; Die vorliegende Betriebs- und Bed and Breakfast, Catering und ähnliche Wartungsanleitung ist wesentlicher Bestandteil Anwendungsbereiche des Geräts und muss aufbewahrt werden, um sie auch in Zukunft jederzeit nachschlagen zu können.
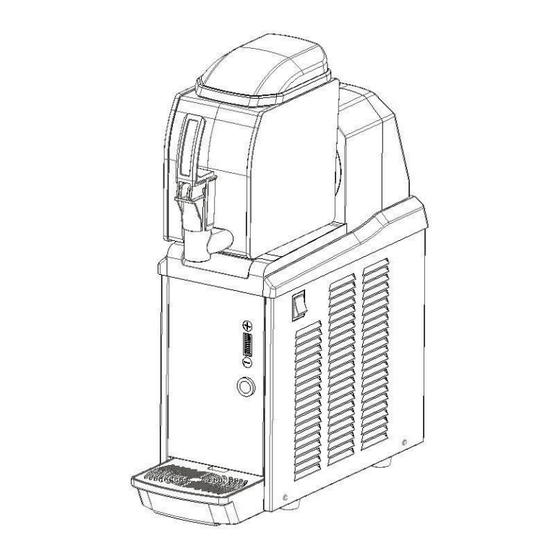
  • Seite 43: Technische Daten

     Max. Strom in Amp  Gewicht in kg  Umgebungstemperatur für den Betrieb der Maschine zwischen 24 und 30°C. Die Abmessungen des Geräts sind: NINO  Höhe 570 mm  Breite 170 mm  Tiefe 430 mm  Gewicht 16kg Geräuschpegel...
  • Seite 44: Aufstellung

    6. AUFSTELLUNG NUR FÜR WARTUNGSTECHNIKER Die Installation und spätere Wartung müssen aufgrund der einschlägigen Vorschriften von Fachpersonal vorgenommen werden, das in den Gebrauch dieses Geräts eingewiesen wurde. a) Alle Verpackungsteile für die Winter- Einlagerung aufbewahren und sicherstellen, dass das Gerät in einwandfreiem Zustand ist (Abb.1). !WICHTIG! Die Bestandteile der Verpackung dürfen nicht in Reichweite von Kindern liegen gelassen werden,...
  • Seite 45: Anschluss An Das Stromnetz

    7. ANSCHLUSS AN DAS STROMNETZ NUR FÜR WARTUNGSTECHNIKER Bevor der Stecker in die Steckdose gesteckt wird, sind zu Ihrer eigenen Sicherheit wie bereits vorstehend erwähnt, sorgsam die folgenden Vorkehrungen zu treffen: - Sicherstellen, dass das Gerät an eine entsprechend den einschlägigen Sicherheitsvorschriften wirksam geerdete Elektroanlage angeschlossen wird (Abb.
  • Seite 46: Inbetriebnahme

    8. INBETRIEBNAHME !ACHTUNG! VOR DER ERSTEN INBETRIEBNAHME DER MASCHINE MÜSSEN ALLE IN KAPITEL 10 BESCHRIEBENEN REINIGUNGS- UND DESINFIZIERUNGSMASSNAHMEN GETROFFEN WERDEN - In einem Gefäß das Produkt je nach Angaben des Herstellers (siehe Abb. 4) mit Wasser oder Milch auflösen und verrühren. HINWEIS: unter "Produkt"...
  • Seite 47 - Zur Aktivierung der Kälteanlage im Kühlbetrieb und zur Veränderung der Konsistenz des Produkts, die Tasten + oder - am Tastenfeld betätigen (Abb.8). Bei Betätigung der Taste leuchten nach und nach mehr Leds auf und die eingestellte Konsistenz wird erhöht. Bei Betätigung der Taste - erlöschen nach und nach die Leds und die Konsistenz wird verringert (Abb.
  • Seite 48: Betriebsmodalitäten

    9. BETRIEBSMODALITÄTEN Bei Einschalten des Hauptschalters A auf der rechten Seite der Frontwand des Geräts, wird der Rührer in den Wannen in Betrieb gesetzt (Abb.10). !ACHTUNG! Sollte dies nicht der Fall sein, kontrollieren, ob der Deckel richtig aufgesetzt wurde. Jede Wanne ist mit einer Sicherheitsvorrichtung ausgestattet, die den Betrieb verhindert, wenn der Deckel nicht ordnungsgemäß...
  • Seite 49: Tägliche Reinigung Und Desinfizierung

    10. TÄGLICHE REINIGUNG UND DESINFIZIERUNG Weder der Hersteller der Maschine noch der Um eine stets einwandfreie Funktion des Geräts und Hersteller des eingefüllten Pulverprodukts können für die Einhaltung der einschlägigen Personenschäden verantwortlich gemacht werden, die Gesundheitsvorschriften zu gewährleisten, müssen direkt oder indirekt durch mangelnde Einhaltung der die nachstehend beschriebenen Reinigungs- und in diesem Handbuch angegebenen Vorschriften, Desinfektionsmaßnahmen häufig und sorgfältig...
  • Seite 50 – - Die Kälteanlage abschalten (Taste drücken, bis alle LEDs erloschen sind) und die Maschine etwa zehn Minuten nur mit laufendem Rührwerk betreiben (alle LEDs erloschen). - Ein handelsübliches Produkt für die Desinfizierung von Kunststoff- und Gummigegenständen bereitstellen (z.B. AMUCHINA®). WICHTIG Die Anweisungen auf dem verwendeten Produkt in Bezug auf Zeit und...
  • Seite 51 Achtung Um die Gefahr von Stromschlägen oder Kontakt mit den bewegten Maschinenteilen zu vermeiden, muss sichergestellt werden, dass während des Ein- und Ausbaus der Bauteile alle Schalter auf Off stehen und das Versorgungskabel aus der Steckdose gezogen ist. - Den Hauptschalter A auf der rechten Seite des Geräts abschalten und den Stecker aus der Steckdose ziehen.
  • Seite 52 - Den Spiralrührer und die Napfdichtung herausnehmen (Abb.18). - Die Dichtung der Wanne entfernen, wie in Abb. 19 dargestellt. - Die Tropfschale leicht nach oben bewegen und dann nach außen abziehen (Abb. 20). - Alle Einzelteile sorgfältig mit heißem Wasser und Geschirrspülmittel reinigen.
  • Seite 53 Nachdem die obigen Reinigungs- und Desinfizierungsmaßnahmen sorgfältig ausgeführt wurden, können die Bauteile wieder eingebaut werden. Das richtige Zusammensetzen der Maschine ist sehr wichtig, da es andernfalls zum Auslaufen von Produkt und zu Schäden der Maschine selbst kommen kann. Beim Zusammenbau ist ein zugelassenes Schmiermittel erforderlich (Vaseline).
  • Seite 54 - Um die Montage zu erleichtern, empfiehlt es sich, den hinteren Teil der Wanne mit sauberem Wasser an dem Punkt anzufeuchten, an dem sie an ihrer Dichtung anliegt (siehe Abb. 26); Abb. 54 - Zum Wiedereinbau, die Wanne am Verdampfer entlang bis zum Anschlag drücken und hinter dem Sperrprofil in ihrer Aufnahme blockieren.
  • Seite 55: Ausserordentliche Wartung

    DESINFIZIERUNG AUSSERORDENTLICHE Wenn die Maschine nach sorgfältiger Reinigung und Desinfizierung gemäß Kapitel 10 mehrere Tage nicht WARTUNG benutzt wird, muss sie wie nachstehend beschrieben neu desinfiziert werden. Achtung - Den Sicherheitsdeckel abheben. Bevor Wartungsarbeiten jeglicher Art ausgeführt werden, muss obligatorisch das - Die Wanne mit Wasser und nahrungsmittelechtem Gerät abgeschaltet und der Stecker aus der Desinfektionsmittel (AMUCHINA®) füllen, wobei die...
  • Seite 56: Kontrolle Und Austausch Der Dichtungen

    Kontrolle und Austausch der Dichtungen Einlagerung über Winter WANNENDICHTUNG Um die Maschine bei Stillstandszeiten wie beispielsweise im Winter zu schützen, muss sie Die Dichtung an der Rückseite der Wanne muss alle ordnungsgemäß gelagert werden, wie nachstehend 12 Monate ausgetauscht werden, je nach Verschleiß beschrieben: und Wartungs- bzw.
  • Seite 57: Nützliche Informationen Zur Herstellung Von Speiseeis

    12. NÜTZLICHE INFORMATIONEN ZUR 13. HAFTUNGSAUSSCHLUSS HERSTELLUNG VON SPEISEEIS Der Hersteller verweigert jegliche Haftung für eventuelle direkte oder indirekte Personen-, VOLUMENSTEIGERUNG Sach- und Tierschäden infolge der mangelnden Einhaltung der Vorschriften dieses Handbuchs, Beim Übergang vom flüssigen Anfangszustand in den insbesondere der Hinweise in Bezug auf verdickten, cremigen Endzustand nimmt das Volumen Installation, Betrieb und Wartung des Geräts.
  • Seite 58: Anleitung Zur Problem Lösung

    HINWEIS: die nachstehenden 14. ANLEITUNG ZUR PROBLEM Arbeitsgänge müssen von technischem Fachpersonal LÖSUNG ausgeführt werden Problem Mögliche Ursache Abhilfe Die Maschine kühlt nicht  Der Belüftungs-Freiraum rings um  Mindestens 20 cm Freiraum rings um die oder nur teilweise, und die Maschine ist nicht ausreichend Maschine belassen und die Maschine fern Kompressor...
  • Seite 59: Wiring Diagram

    15. WIRING DIAGRAM Ausgabedatum: Januar 2016 Revision: 1 Seite: 59/63...
  • Seite 60 Ausgabedatum: Januar 2016 Revision: 1 Seite: 60/63...
  • Seite 61 Ausgabedatum: Januar 2016 Revision: 1 Seite: 61/63...
  • Seite 62 ASSISTENZA TECNICA ITALIA Mail: info@service-k.it Tel. 059782884 Conforme alla normativa RoHS Questo apparecchio è conforme alla direttiva europea 2002/95/CE e successive modifiche per quanto riguarda la restrizione all’uso di sostanze pericolose nella produzione di apparecchiature elettriche ed elettroniche. Smaltimento Ai sensi della direttiva RAEE 2002/96/CE e successiva modifica 2003/108/CE questa apparecchiatura viene contrassegnata con il seguente simbolo del contenitore di spazzatura con ruote barrato.
  • Seite 63 INTERNATIONAL CUSTOMER CARE intcustcare@spm-ice.it +39 059781761 Company with certified quality management system UN EN ISO 9001 Company with certified quality management system UN EN ISO 9001 Ausgabedatum: Januar 2016 Revision: 1 Seite: 63/63...

Inhaltsverzeichnis