Inhaltsverzeichnis
Werbung
Verfügbare Sprachen
Verfügbare Sprachen
Quicklinks
Werbung
Kapitel
Inhaltsverzeichnis

Verwandte Anleitungen für G&D DP1.2-MUX4-USB

Inhaltszusammenfassung für G&D DP1.2-MUX4-USB
-
Seite 2: Zu Dieser Dokumentation
© Guntermann & Drunck GmbH 2018. Alle Rechte vorbehalten. Version 1.00 – 03.07.2018 Firmware: 1.0.10 Guntermann & Drunck GmbH Obere Leimbach 9 57074 Siegen Germany Telefon +49 (0) 271 23872-0 Telefax +49 (0) 271 23872-120 http://www.gdsys.de sales@gdsys.de i · G&D DP1.2-MUX4-USB... -
Seite 3: Fcc Statement
Increase the separation between the equipment and receiver. Connect the equipment into an outlet on a circuit different from that to which the receiver is connected. Consult the dealer or an experienced radio/TV technician for help. G&D DP1.2-MUX4-USB · ii... -
Seite 4: Inhaltsverzeichnis
Umschaltung mit der Maus (de)aktivieren ........... 28 Änderung der Bitrate der Service-Buchse ............ 29 Änderung der Bitrate der RS232-Buchse ............. 30 Auswahl des Typs der USB-Tastatur ............31 USB 2.0-Datenübertragung (de)aktivieren ........... 33 USB-Haltefunktion (Pinning) ..............34 Technische Daten ................... 35 iii · G&D DP1.2-MUX4-USB... -
Seite 5: Sicherheitshinweise
Betreiben Sie dieses Gerät nur mit dem mitgelieferten oder in der Bedienungsan- leitung aufgeführten Netzteil. ! Betreiben Sie das Gerät ausschließlich im vorgesehenen Einsatzbereich Die Geräte sind für eine Verwendung im Innenbereich ausgelegt. Vermeiden Sie extreme Kälte, Hitze oder Feuchtigkeit. G&D DP1.2-MUX4-USB · 1... - Seite 6 Mettre au rebut les batteries usagées conformêment aux instructions du fabricant et de manière écologique. Les batteries usagées ne doivent pas être jetées dans les ordures ménagères. Respectez les prescriptions valables pour l'élimination des produits électroniques. 2 · G&D DP1.2-MUX4-USB...
-
Seite 7: Der Kvm-Switch
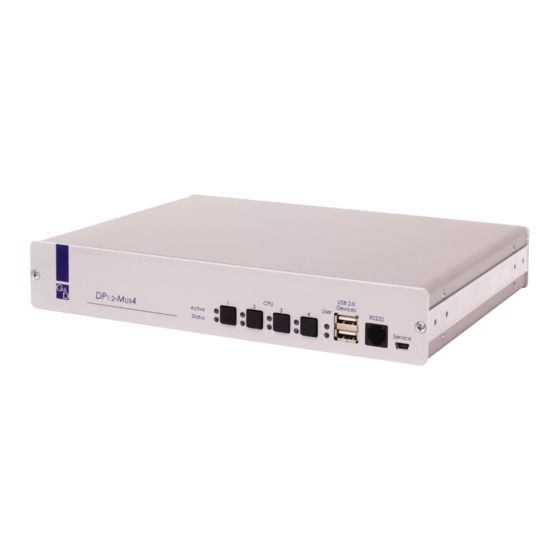
Der KVM-Switch Der KVM-Switch Der KVM-Switch DP1.2-MUX4-USB ermöglicht die Bedienung von bis zu vier Rechnern über einen Arbeitsplatz. Der Arbeitsplatz wird mit einer USB-Tastatur und USB-Maus sowie einem Display- Port™-Monitor ausgestattet. Die an den KVM-Switch angeschlossenen Rechner werden zentral am eingerichteten Arbeitsplatz bedient. -
Seite 8: Installation
Beachten Sie hierbei die maximale Kabellänge von fünf Metern zwischen dem KVM-Switch und den anzuschließenden Rechnern. 3. Entscheiden Sie vor der Installation des KVM-Switch, welcher Taster an der Frontseite des Geräts, welchem Rechner zugewiesen werden soll. 4 · G&D DP1.2-MUX4-USB... -
Seite 9: Anschluss Der Geräte Des Arbeitsplatzes
USB 2.0 Devices: Möchten Sie den angeschlossenen Rechnern USB-Geräte (beispiels- weise einen Drucker oder ein Massenspeichergerät) zur Verfügung stellen, schließen Sie diese Geräte an diese Schnittstellen an der Frontseite (siehe Abbildung 1 auf Seite 4) an. G&D DP1.2-MUX4-USB · 5... -
Seite 10: Anschluss Der Rechner
DP CPU: Verbinden Sie den Videoausgang des Rechners mit dieser Schnittstelle. Verwenden Sie hierfür das DisplayPort-Kabel. HINWEIS: Verbinden Sie bei Einsatz einer -Variante des KVM-Switches ggf. den weiteren Videoausgang des Rechners mit der/den Schnittstelle(n) DP CPU x.y 6 · G&D DP1.2-MUX4-USB... -
Seite 11: Anschluss Der Stromversorgung
USB 2.0 Line In Line Out USB 2.0 Line In Line Out USB 2.0 Abbildung 4: Schnittstelle zum Anschluss der Stromversorgung Verbinden Sie das Stromversorgungskabel (PowerCable-2 Standard) mit einer Power: Netzsteckdose und der Power-Buchse des KVM-Switches. G&D DP1.2-MUX4-USB · 7... -
Seite 12: Inbetriebnahme
Tastatur initialisiert wurde. blinkt Setup-Modus des KVM-Switches aktiv. Status Der KVM-Switch wird mit der erforderlichen elektrischen Spannung versorgt. Der KVM-Switch ist ausgeschaltet oder die erforderliche elektrische Spannung ist nicht verfügbar. Prüfen Sie gegebenenfalls den korrekten Anschluss des Stromversorgungskabels. 8 · G&D DP1.2-MUX4-USB... -
Seite 13: Umschaltung Zwischen Den Rechnern
WICHTIG: Die Umschaltung des Kanals erfolgt, wenn die betätigte Tasten- kombination losgelassen wird. HINWEIS: Falls eine der Tastenkombinationen mit einer Tastenkombination eines eingesetzten Anwendungsprogramms kollidiert, kann die Tastenkombination des KVM-Switches angepasst werden (s. Seite 19 f.). G&D DP1.2-MUX4-USB · 9... -
Seite 14: Umschaltung Mit Step-Keys
Bewegen Sie die Maus nach links oder rechts, um den Kanal in ab- oder aufsteigender Folge umzuschalten. HINWEIS: Ist der Single -Modus aktiviert, kann ausschließlich auf einen Kanal in unmittelbar ab- oder aufsteigender Folge umgeschaltet werden. Die Umschaltung über mehrere Kanäle hinweg ist im Multiple -Modus möglich. 10 · G&D DP1.2-MUX4-USB... -
Seite 15: Umschaltung Über Ein Serielles Gerät
Der Befehl wird unmittelbar nach dem Senden des Befehls durch das seri- elle Gerät ausgeführt. Eine Meldung (s. unten) informiert das serielle Gerät über die korrekte Ausfüh- rung oder den Grund, weshalb die Umschaltung nicht erfolgt ist. G&D DP1.2-MUX4-USB · 11... -
Seite 16: Usb 2.0-Geräte Permanent Umschalten
Permanente Schaltung der USB 2.0-Geräte auf Kanal 1 Permanente Schaltung der USB 2.0-Geräte auf Kanal 2 Permanente Schaltung der USB 2.0-Geräte auf Kanal 3 Permanente Schaltung der USB 2.0-Geräte auf Kanal 4 12 · G&D DP1.2-MUX4-USB... -
Seite 17: Permanente Schaltung Der Usb 2.0-Geräte Beenden
Sekunden lang gedrückt. 2. Drücken und halten Sie die Taste 3. Betätigen Sie zusätzlich die Taste HINWEIS: Nach dem Beenden der permanenten Schaltung werden die USB 2.0- Geräte auf den aktuellen KVM-Kanal (s. Seite 9) geschaltet. G&D DP1.2-MUX4-USB · 13... -
Seite 18: Konfiguration
Auswahl des Typs der USB-Tastatur PC Multimedia USB 2.0-Datenübertragung (de)aktivieren aktiviert USB-Haltefunktion (Pinning) ausgeschaltet Auf den folgenden Seiten wird die grundlegende Bedienung des Setup-Modus sowie des Setup-Menüs erläutert. Die konfigurierbaren Funktionen des KVM-Switches werden ab Seite 18 detailliert beschrieben. 14 · G&D DP1.2-MUX4-USB... -
Seite 19: Bedienung Des Setup-Modus
Änderung mehrerer Einstellungen innerhalb einer Sitzung. Das Setup-Menü wird über ein beliebiges Terminalemulationsprogramm (beispiels- weise HyperTerminal oder PuTTY) bedient. Der Rechner auf dem das Terminalemu- lationsprogramm installiert ist, wird über das mitgelieferte Service-Kabel mit der Service-Buchse des Geräts verbunden. G&D DP1.2-MUX4-USB · 15... - Seite 20 Setup-Menü (s. Abbildung auf Seite 17) dargestellt. HINWEIS: Wird der KVM-Switch gestartet, während die Verbindung aufgebaut wird, sehen Sie kurzzeitig das G&D Firmware Update Utility, bevor das Setup-Menü dargestellt wird. Dieses spezielle Utility wird ausschließlich vom Support-Team angewendet. 16 · G&D DP1.2-MUX4-USB...
- Seite 21 Leertaste Haben Sie einen Menüpunkt ausgewählt, der über einen Unterdialog verfügt, betätigen Sie die Eingabetaste , um diesen zu öffnen. HINWEIS: Detaillierte Anweisungen zur Änderung einer bestimmten Funktion lesen Sie auf den folgenden Seiten. G&D DP1.2-MUX4-USB · 17...
-
Seite 22: Konfigurationseinstellungen
4. Nach Auswahl der gewünschten Einstellung betätigen Sie die Taste um diese zu speichern. Nach der Umschaltung wird der aktive Hotkey in einen Doppel-Hotkey (oder umgekehrt) konvertiert: einfacher Hotkey Doppel-Hotkey Strg Strg+Shift Alt+Shift Alt Gr Alt Gr+Strg Win+Strg Shift Shift+Win 18 · G&D DP1.2-MUX4-USB... -
Seite 23: Änderung Des Einfachen Hotkeys
Aktivierung des Hotkeys Alt Aktivierung des Hotkeys Alt Gr Alt Gr Aktivierung des Hotkeys Win Aktivierung des Hotkeys Shift Shift 4. Nach Auswahl der gewünschten Einstellung betätigen Sie die Taste um diese zu speichern. G&D DP1.2-MUX4-USB · 19... -
Seite 24: Änderung Des Doppel-Hotkeys
Aktivierung des Doppel-Hotkeys Alt Gr + Strg Win+Ctrl Aktivierung des Doppel-Hotkeys Win + Strg Aktivierung des Doppel-Hotkeys Shift + Win Shift+Win 5. Nach Auswahl der gewünschten Einstellung betätigen Sie die Taste um diese zu speichern. 20 · G&D DP1.2-MUX4-USB... -
Seite 25: Änderung Der Select-Keys
A ... D Aktivierung der Select-Keys A, B, C, D Aktivierung der Select-Keys F1, F2, F3, F4 F1 ... F4 4. Nach Auswahl der gewünschten Einstellung betätigen Sie die Taste um diese zu speichern. G&D DP1.2-MUX4-USB · 21... -
Seite 26: Hotkey-Verzögerung Ein- Oder Ausschalten
3. Betätigen Sie (mehrfach) die Leertaste der Tastatur, um die Hotkey-Ver- zögerung an- oder auszuschalten: Aktivierung der Hotkey-Verzögerung Deaktivierung der Hotkey-Verzögerung 4. Nach Auswahl der gewünschten Einstellung betätigen Sie die Taste um diese zu speichern. 22 · G&D DP1.2-MUX4-USB... -
Seite 27: Standardeinstellungen Wiederherstellen
Pfeil die Zeile Set System Defaults aus. 3. Betätigen Sie die Eingabetaste , um die Standardeinstellungen wiederherzustellen. 4. Bestätigen Sie die erscheinende Sicherheitsabfrage mit der Eingabetaste Ein Abbruch der Funktion ist alternativ mit der Taste möglich. G&D DP1.2-MUX4-USB · 23... -
Seite 28: Automatische Aufschaltung Des Ersten Kanals
Tastatur, um zwischen folgenden Optionen zu wählen: Aktivierung des zuletzt aktiven Kanals nach dem Einschalten Aktivierung von Kanal 1 nach dem Einschalten 4. Nach Auswahl der gewünschten Einstellung betätigen Sie die Taste um diese zu speichern. 24 · G&D DP1.2-MUX4-USB... -
Seite 29: Umschaltung Über Taster An Der Frontseite (De)Aktivieren
Tastatur, um zwischen folgenden Leertaste Optionen zu wählen: Umschaltung über Taster an der Frontseite deaktiviert Umschaltung über Taster an der Frontseite aktiviert 4. Nach Auswahl der gewünschten Einstellung betätigen Sie die Taste um diese zu speichern. G&D DP1.2-MUX4-USB · 25... -
Seite 30: Umschaltung Über Tastenkombinationen (De)Aktivieren
3. Betätigen Sie (mehrfach) die Leertaste der Tastatur, um zwischen folgenden Optionen zu wählen: Umschaltung über Tastenkombination deaktiviert Umschaltung über Tastenkombination aktiviert 4. Nach Auswahl der gewünschten Einstellung betätigen Sie die Taste um diese zu speichern. 26 · G&D DP1.2-MUX4-USB... -
Seite 31: Umschaltung Über Step-Keys (De)Aktivieren
3. Betätigen Sie (mehrfach) die Leertaste der Tastatur, um zwischen folgenden Optionen zu wählen: Verwendung von Step-Keys deaktiviert Verwendung der angezeigten Step-Keys aktiviert [Step-Keys] 4. Nach Auswahl der gewünschten Einstellung betätigen Sie die Taste um diese zu speichern. G&D DP1.2-MUX4-USB · 27... -
Seite 32: Umschaltung Mit Der Maus (De)Aktivieren
Select Channel via Mouse 3. Betätigen Sie (mehrfach) die der Tastatur, um zwischen folgenden Leertaste Optionen zu wählen: Single Multiple 4. Nach Auswahl der gewünschten Einstellung betätigen Sie die Taste um diese zu speichern. 28 · G&D DP1.2-MUX4-USB... -
Seite 33: Änderung Der Bitrate Der Service-Buchse
19200 38400 57600 115200 (Standard) 230400 5. Nach Auswahl der gewünschten Einstellung betätigen Sie die Taste um den Dialog zu verlassen. 6. Betätigen Sie die Taste , um die Einstellungen zu speichern. G&D DP1.2-MUX4-USB · 29... -
Seite 34: Änderung Der Bitrate Der Rs232-Buchse
19200 38400 57600 (Standard) 115200 230400 5. Nach Auswahl der gewünschten Einstellung betätigen Sie die Taste um den Dialog zu verlassen. 6. Betätigen Sie die Taste , um die Einstellungen zu speichern. 30 · G&D DP1.2-MUX4-USB... -
Seite 35: Auswahl Des Typs Der Usb-Tastatur
6. Nach Auswahl der gewünschten Einstellung betätigen Sie die Taste um den Dialog zu verlassen. 7. Betätigen Sie die Taste , um die Einstellungen zu speichern. WICHTIG: Erfolgt die Umschaltung auf die Einstellung SUN German bzw. SUN US ist abschließend ein Reboot des Sun-Rechners erforderlich. G&D DP1.2-MUX4-USB · 31... - Seite 36 »Solaris Shortcut Keys« des Sun Keyboards Strg+Alt+F2 Wiederholen Strg+Alt+F3 Eigenschaften Strg+Alt+F4 Zurücknehmen Strg+Alt+F5 Vordergrund Strg+Alt+F6 Kopieren Strg+Alt+F7 Öffnen Strg+Alt+F8 Einfügen Strg+Alt+F9 Suchen Strg+Alt+F10 Ausschneiden Strg+Alt+F11 Hilfe Strg+Alt+F12 Still Strg+Alt+NUM+ Lauter Strg+Alt+NUM- Leiser Strg+Alt+NUM* Compose Strg+Alt+Pause Shutdown Pause+A Stop 32 · G&D DP1.2-MUX4-USB...
-
Seite 37: Usb 2.0-Datenübertragung (De)Aktivieren
3. Betätigen Sie (mehrfach) die der Tastatur, um eine der folgenden Leertaste Tastaturen auszuwählen: USB 2.0-Datenübertragung aktiviert (Standard) enabled disabled USB 2.0-Datenübertragung deaktiviert 4. Nach Auswahl der gewünschten Einstellung betätigen Sie die Taste um diese zu speichern. G&D DP1.2-MUX4-USB · 33... -
Seite 38: Usb-Haltefunktion (Pinning)
3. Betätigen Sie (mehrfach) die Leertaste der Tastatur, um eine der folgenden Tastaturen auszuwählen: disabled USB-Haltefunktion deaktiviert (Standard) enabled USB-Haltefunktion aktiviert 4. Nach Auswahl der gewünschten Einstellung betätigen Sie die Taste um diese zu speichern. 34 · G&D DP1.2-MUX4-USB... -
Seite 39: Technische Daten
EDID inkl. DDC/CI: E-DID-Support via DP-AUX-Kanal Audio Übertragungsart: L-PCM (2/4/6/8 Kanäle), stereo DisplayPort Digital Auflösungen: 16/20/24 bit Abtastraten: 32/44,1/48/88,2/96/176,4/192 kHz Audio Art: analog, bidirektional Line In/Out Auflösung: 24 bit digital, stereo Abtastrate: 96 kHz G&D DP1.2-MUX4-USB · 35... -
Seite 40: Individuelle Eigenschaften Der Varianten
2 × DisplayPort-Buchse für Arbeitsplatz Schnittstellen Video: 2 × DisplayPort-Buchse pro Rechner Stromversorgung Stromaufnahme: 200 mA@240VAC; 400 mA@100VAC Gehäuse Material: Aluminium eloxiert Maße (B × H × T): 270 × 66 × 210 mm Gewicht: ca. 1,7 kg 36 · G&D DP1.2-MUX4-USB... - Seite 41 4 × DisplayPort-Buchse für Arbeitsplatz Schnittstellen Video: 4 × DisplayPort-Buchse pro Rechner Stromversorgung Stromaufnahme: 200 mA@240VAC; 400 mA@100VAC Gehäuse Material: Aluminium eloxiert Maße (B × H × T): 270 × 132 × 210 mm Gewicht: ca. 2,3 kg G&D DP1.2-MUX4-USB · 37...
- Seite 44 © Guntermann & Drunck GmbH 2018. All rights reserved. Version 1.00 – 03/07/2018 Firmware: 1.0.10 Guntermann & Drunck GmbH Obere Leimbach 9 57074 Siegen Germany Phone +49 271 23872-0 +49 271 23872-120 http://www.gdsys.de sales@gdsys.de i · G&D DP1.2-MUX4-USB...
- Seite 45 Increase the separation between the equipment and receiver. Connect the equipment into an outlet on a circuit different from that to which the receiver is connected. Consult the dealer or an experienced radio/TV technician for help. G&D DP1.2-MUX4-USB · ii...
- Seite 46 Changing the bitrate of the Service port ............29 Changing the bitrate of the RS232 port ............30 Selecting the USB keyboard type ..............31 Enabling/Disabling USB 2.0 data transmission ........... 33 USB pinning ....................34 Technical data ....................35 iii · G&D DP1.2-MUX4-USB...
-
Seite 47: Safety Instructions
Operate this device with the provided G&D power pack or with the power pack listed in the manual. ! Operate the device only in designated areas. The devices are designed for indoor use. Avoid exposure to extreme cold, heat or humidity. G&D DP1.2-MUX4-USB · 1... - Seite 48 VORSICHT: Es besteht Explosionsgefahr, wenn die Batterie durch einen falschen Batterie-Typ ersetzt wird. Entsorgen Sie gebrauchte Batterien umweltgerecht. Gebrauchte Batterien dürfen nicht in den Hausmüll geworfen werden. Beachten Sie die gültigen Vorschriften zur Entsorgung elektronischer Produkte. 2 · G&D DP1.2-MUX4-USB...
-
Seite 49: The Kvm Switch
The KVM switch The KVM switch The DP1.2-MUX4-USB KVM switch enables you to operate up to four computers via one console. The console is provided with a USB keyboard, a USB mouse and a DisplayPort™ monitor. The computers connected to the KVM switch are operated from the installed console. -
Seite 50: Installation
KVM switch and the computers which are to be connected. 3. Before installing the KVM switch, decide which button on the front panel of the device should be assigned to which computer. 4 · G&D DP1.2-MUX4-USB... -
Seite 51: Connecting The Console Devices
If you want USB devices to be available to the connected computers USB 2.0 Devices: (e.g. a printer or a mass storage device), connect these devices to the interfaces on the front panel (see figure 1 on page 4). G&D DP1.2-MUX4-USB · 5... -
Seite 52: Connecting The Computers
DP CPU: Use the DisplayPort cable to connect the video output of the computer to this interface. NOTE: When deploying a variant of the KVM switch, connect the computer’s other video outputs to the DP CPU x.y 6 · G&D DP1.2-MUX4-USB... -
Seite 53: Connecting The Power Supply
Line Out USB 2.0 Line In Line Out USB 2.0 Figure 4: Interfaces to connect the power supply Power: Connect the power cable (PowerCable-2 Standard) to a power outlet and the Power socket of the KVM switch. G&D DP1.2-MUX4-USB · 7... -
Seite 54: Start-Up
The setup mode of the KVM switch is active. Status The KVM switch is supplied with the necessary voltage. The KVM switch is turned off or is not supplied with the necessary voltage. If necessary, check the proper connection of the power supply cable. 8 · G&D DP1.2-MUX4-USB... -
Seite 55: Switching Between Computers
Switching between the channels takes place if the pressed key combi- nation is released. NOTE: If one of these key combinations interferes with a key combination of an installed application program, the key combination of the KVM switch can be adjusted (see page 19). G&D DP1.2-MUX4-USB · 9... -
Seite 56: Switching Via Step Keys
Move the mouse to the left or to the right to switch the channel in ascending or descending order. NOTE: If the Single mode is active, you can switch only to the next or the prior channel. Switching across several channels requires the Multiple mode. 10 · G&D DP1.2-MUX4-USB... -
Seite 57: Switching Via Serial Device
« command to show the currently accessing channel. NOTE: The serial device carries out the command directly after it is sent. A message (see below) informs the serial device concerning the success or failure of the switching of channels. G&D DP1.2-MUX4-USB · 11... -
Seite 58: Permanent Switching Of Usb 2.0 Devices
Permanent switching of USB 2.0 devices to channel 1 Permanent switching of USB 2.0 devices to channel 2 Permanent switching of USB 2.0 devices to channel 3 Permanent switching of USB 2.0 devices to channel 4 12 · G&D DP1.2-MUX4-USB... -
Seite 59: Disabling The Permanent Switching Of Usb 2.0 Devices
If the hotkey delay is enabled, press and hold the key combination for seven seconds. 2. Press and hold the key. 3. Additionally, press the key NOTE: After disabling the permanent switching of USB 2.0 devices, the devices are switched to the active KVM channel (see page 9). G&D DP1.2-MUX4-USB · 13... -
Seite 60: Configuration
Basic operation of the setup mode as well as the setup menu is explained in the fol- lowing pages. All functions that can be configured for the KVM switch are described in detail from page 18 on. 14 · G&D DP1.2-MUX4-USB... -
Seite 61: Operating The Setup Mode
The setup menu can be operated via any terminal emulator (e.g. HyperTerminal or PuTTY). Use the supplied service cable to connect the computer on which the termi- nal emulator is installed with the Service port of the device. G&D DP1.2-MUX4-USB · 15... - Seite 62 If the KVM switch is started while the connection is being established, the G&D Firmware Update Utility will be displayed briefly before the setup menu opens. This special utility is solely used by the support team. 16 · G&D DP1.2-MUX4-USB...
- Seite 63 Menu items whose settings are displayed in the right column can be changed by pressing the Space key (repeatedly). A menu item that has a sub-dialogue available can be opened by pressing Enter NOTE: The following pages provide detailed information on how to change a cer- tain function. G&D DP1.2-MUX4-USB · 17...
-
Seite 64: Configuration Settings
4. Press the key to save your settings. Depending on your settings, the active hotkey is converted into a double hotkey (or vice versa): Single Hotkey Double Hotkey Ctrl Ctrl+Shift Alt+Shift Alt Gr Alt Gr+Ctrl Win+Ctrl Shift Shift+Win 18 · G&D DP1.2-MUX4-USB... -
Seite 65: Changing The Single Hotkey
(repeatedly) to enable a certain hotkey: enables Ctrl hotkey Ctrl enables Alt hotkey enables Alt Gr hotkey Alt Gr enables Win hotkey Shift enables Shift hotkey 4. Press the key to save your settings. G&D DP1.2-MUX4-USB · 19... -
Seite 66: Changing The Double Hotkey
enables Ctrl+Shift double hotkey Ctrl+Shift enables Alt+Shift double hotkey Alt+Shift Alt Gr+Ctrl enables Alt Gr+Ctrl double hotkey Win+Ctrl enables Win+Ctrl double hotkey Shift+Win enables Shift+Win double hotkey 5. Press the key to save your settings. 20 · G&D DP1.2-MUX4-USB... -
Seite 67: Changing The Select Keys
enables select keys NUM 1, [...], NUM 3, NUM 4 NUM 1 ... A ... enables select keys A, B, C, D enables select keys F1, F2, F3, F4 F1 ... F 4. Press the key to save your settings. G&D DP1.2-MUX4-USB · 21... -
Seite 68: Enabling/Disabling The Hotkey Delay
Arrow Arrow Hotkey Delay 3. Press the key (repeatedly) to enable/disable the hotkey delay: Space enables hotkey delay disables hotkey delay 4. Press the key to save your settings. 22 · G&D DP1.2-MUX4-USB... -
Seite 69: Resetting The Defaults
2. Use the Arrow Arrow keys to select the Set System Defaults entry. 3. Press Enter to reset the default settings. 4. Confirm the pop up security query with Enter Pressing the key cancels the function. G&D DP1.2-MUX4-USB · 23... -
Seite 70: Auto-Accessing The First Channel
Select Ch.1 after Power up entry. 3. Press the Space key (repeatedly) to choose between the following options: accesses the recently active channel after booting accesses channel 1 after booting 4. Press the key to save your settings. 24 · G&D DP1.2-MUX4-USB... -
Seite 71: (De)Activating The Switching Via Front Buttons
Select Channel via Front Button 3. Press the Space key (repeatedly) to choose one of the following options: disables the switching via front button enables the switching via front button 4. Press the key to save your settings. G&D DP1.2-MUX4-USB · 25... -
Seite 72: (De)Activating The Switching Via Hotkeys
Select Channel via Hotkey entry. 3. Press the Space key (repeatedly) to choose one of the following options: disables the switching via hotkeys enables the switching via hotkeys 4. Press the key to save your settings. 26 · G&D DP1.2-MUX4-USB... -
Seite 73: (De)Activating The Switching Via Step Keys
Arrow Arrow Select Channel via Step Key 3. Press the key (repeatedly) to choose between the following options: Space step keys disabled step keys enabled [Step-Keys] 4. Press the key to save your settings. G&D DP1.2-MUX4-USB · 27... -
Seite 74: Enabling/Disabling Switching By Mouse
2. Use the Arrow Arrow keys to select Select Channel via Mouse 3. Press the Space key (repeatedly) to choose between the following options: Single Multiple 4. Press the key to save your settings. 28 · G&D DP1.2-MUX4-USB... -
Seite 75: Changing The Bitrate Of The Service Port
(repeatedly) to select between the following bitrates: Space 9600 19200 38400 57600 115200 (default) 230400 5. After having selected your desired settings, press to leave the dialog. 6. Press the key to save your settings. G&D DP1.2-MUX4-USB · 29... -
Seite 76: Changing The Bitrate Of The Rs232 Port
(repeatedly) to select between the following bitrates: 9600 19200 38400 57600 115200 (default) 230400 5. After having selected your desired settings, press to leave the dialog. 6. Press the key to save your settings. 30 · G&D DP1.2-MUX4-USB... -
Seite 77: Selecting The Usb Keyboard Type
6. After having selected your desired settings, press to leave the dialog. 7. Press the key to save your settings. IMPORTANT: Changing to the SUN German SUN US keymode requires a reboot of the Sun computer. G&D DP1.2-MUX4-USB · 31... - Seite 78 »Solaris Shortcut Key« of the Sun keyboard Ctrl+Alt+F2 Again Ctrl+Alt+F3 Props Ctrl+Alt+F4 Undo Ctrl+Alt+F5 Front Ctrl+Alt+F6 Copy Ctrl+Alt+F7 Open Ctrl+Alt+F8 Paste Ctrl+Alt+F9 Find Ctrl+Alt+F10 Ctrl+Alt+F11 Help Ctrl+Alt+F12 Mute Ctrl+Alt+NUM+ Loud Ctrl+Alt+NUM- Quiet Ctrl+Alt+NUM* Compose Ctrl+Alt+Pause Shutdown Pause+A Stop 32 · G&D DP1.2-MUX4-USB...
-
Seite 79: Enabling/Disabling Usb 2.0 Data Transmission
3. Press the Space key (repeatedly) to choose between the following key- boards: USB 2.0 data transmission enabled (default) enabled USB 2.0 data transmission disabled disabled 4. Press the key to save your settings. G&D DP1.2-MUX4-USB · 33... -
Seite 80: Usb Pinning
Enter 3. Press the Space key (repeatedly) to choose between the following key- boards: disabled USB pinning disabled (default) enabled USB pinning ensabled 4. Press the key to save your settings. 34 · G&D DP1.2-MUX4-USB... -
Seite 81: Technical Data
E-EDID support via DP-AUX channel (incl. DDC/CI) Audio Transmission type: L-PCM (2/4/6/8 channels), stereo DisplayPort Digital Resolutions: 16/20/24 bit Sampling rates: 32/44,1/48/88,2/96/176,4/192 kHz Audio Type: analog, bidirectional Line In/Out Resolutions: 24 bit digital, stereo Sampling rate: 96 kHz G&D DP1.2-MUX4-USB · 35... -
Seite 82: Individual Variant Features
Interfaces Video: 2 × DisplayPort jack per computer Power supply Power input: 200 mA@240VAC; 400 mA@100VAC Casing Material: anodised aluminium Dimensions (W × H × D): 270 × 66 × 210 mm Weight: approx. 1.7 kg 36 · G&D DP1.2-MUX4-USB... - Seite 83 Interfaces Video: 4 × DisplayPort jack per computer Power supply Power input: 200 mA@240VAC; 400 mA@100VAC Casing Material: anodised aluminium Dimensions (W × H × D): 270 × 132 × 210 mm Weight: approx. 2.3 kg G&D DP1.2-MUX4-USB · 37...