PEAKnx PNX-002-A18-00017 Montage Und Inbetriebnahme
Vorschau ausblenden
Andere Handbücher für PNX-002-A18-00017:
- Handbuch (32 Seiten) ,
- Kurzanleitung (14 Seiten)

Verwandte Anleitungen für PEAKnx PNX-002-A18-00017


Inhaltszusammenfassung für PEAKnx PNX-002-A18-00017
- Seite 1 Controlmini DE Anleitung für Montage und Inbetriebnahme EN Installation and Start-up Instructions...
-
Seite 2: Inhaltsverzeichnis
Über PEAKnx ........ - Seite 3 Abbildung 11: Weitere Anschlüsse der Panelrückseite ....... . 20 www.peaknx.com...
-
Seite 4: Dokumentversion
DE Controlmini, Anleitung für Montage und Inbetriebnahme Produkt Dokumentversion Artikelnummer Controlmini 1.1.3 PNX-002-A18-00017 In diesem Dokument erwähnte Produktnamen können Marken oder eingetragene Marken der jeweiligen Eigentümer sein. Diese sind nicht ausdrücklich durch „™“ und „®“ gekennzeichnet. © DOGAWIST Investment GmbH PEAKnx a DOGAWIST Investment GmbH Division Otto-Röhm-Straße 69... -
Seite 5: Einleitung
Maximale Leistungsaufnahme unter Volllast: 15 W ■ Leistungsaufnahme im Leerlauf: 10 W, Serverbetrieb ohne LCD: 5W ■ Umgebungstemperatur 0 bis 35 °C ■ Einbau parallel zur Wand mit Unterputzdose in der Wand oder mit Aufputzrahmen an der Wand ■ Schutzart IP20 www.peaknx.com... -
Seite 6: Lieferumfang
Treibern des Betriebssystems. Hinweis: Wir empfehlen Ihnen, vor der Installation weiterer Software, mit dem optional erhältlichen Recovery-Stick von PEAKnx eine Sicherung zu erstellen, siehe Abschnitt 5.2.1 Sicherung auf dem Recovery-Stick erstellen. 2. Wichtige Hinweise zur Sicherheit und Handhabung Hinweis: Durch Nichtbeachten der Anleitung können Schäden am Panel, Brand oder andere... -
Seite 7: Montage Und Inbetriebnahme
■ Je nach Untergrund eine Aussparung in der Wand mit den Maßen in Abbildung 1 (Mauerwerk) oder Abbildung 2 (Hohlwand) herstellen. Dazu kann die, mit der PEAKnx Unterputzdose mitgelieferte, Schablone genutzt werden. Die Unterputzdose muss später bündig mit der Wand sein. -
Seite 8: Panel Anschließen
Der zweite KNX-Anschluss wird benötigt, wenn eine weitere KNX-Klemme 2 getrennte KNX Linie aufgebaut werden soll. Der KNX-Feldbus wird im Zusammenhang mit Software von PEAKnx verwendet. Abbildung 4: KNX-WAGO Klemmen 243-211 3.3.3 Tastatur und Maus (optional) Für besondere Fälle können an den USB-Anschluss, siehe Anhang D; Position D1, auch Bediengeräte, zum Beispiel eine Tastatur oder Maus, angeschlossen werden. -
Seite 9: Spannungsversorgung
Um weitere Bedienelemente an das Panel anzuschließen, beispielsweise einen USB-Funk- adapter zur Nutzung einer schnurlosen Tastatur und Maus, ist ein weiterer USB-Anschluss an der Panelrückseite vorhanden, siehe Anhang D; Position D1. An der Panelfront unter dem Frontglas befinden sich zwei weitere USB-Anschlüsse, siehe Anhang B; Position B8. www.peaknx.com... -
Seite 10: Controlmini Ein- Und Ausschalten
■ Touchscreen, siehe Anhang B; Position B9, bei Verschmutzung (zum Beispiel durch Staub) reinigen. Zum Reinigen eines der mitgelieferten Tücher verwenden. Weitere Reinigungstücher erhalten Sie im PEAKnx Shop. Hinweis: Keine scharfen Reinigungsmittel, Säuren oder organische Lösungsmittel verwenden. Keine Feuchtigkeit in das Gerät eindringen lassen. Reiniger nicht direkt auf die Touchscreenoberfläche sprühen. -
Seite 11: Fehlerbehebung
Betriebssystem in den Grundzustand versetzt werden. Dazu empfehlen wir, nach der Erstinbetriebnahme eine Sicherung mit dem optional erhältlichen Recovery-Stick zu erstellen. Bei schwerwiegenden Fehlern von Windows kann direkt von diesem Recovery- Stick gestartet und das Betriebssystem neu installiert werden. www.peaknx.com... -
Seite 12: Sicherung Auf Dem Recovery-Stick Erstellen
Ein/Aus-Taster, siehe Anhang B; Position B5, ca. 10 Sekunden drücken, bis das Gerät sich abschaltet. ■ Den Recovery-Stick am USB-Anschluss des Panels, siehe Anhang B; Position B8, anschließen. ■ Das Panel am Ein/Aus-Taster (B5) einschalten. ■ Paragon startet vom Recovery-Stick. Die Hauptansicht wird angezeigt. www.peaknx.com... -
Seite 13: Technischer Support
Das Ein/Aus-Symbol in der oberen rechten Ecke des Bildschirms anwählen und „Herunterfahren“ wählen. ■ Den Stick entfernen. ■ Das Panel neu starten. 5.3 Technischer Support Sollten Probleme mit Ihrem Controlmini auftreten, kontaktieren Sie bitte unser PEAKnx Support Team: ■ Mail: support@peaknx.com ■ Tel.: +49-6151-279 1825 www.peaknx.com... -
Seite 14: Technische Daten
1 x USB 3.0 Ethernet 100 Mbit-Ethernet-Anschluss, geeigneter Stan- dard für Verkabelung: Cat-5 oder besser. Externer Bildschirm 1 x Mini HDMI Feldbus 2 x KNX 2 x 1-Wire* *PEAKnx stellt optinal Treiber für diesen Bus zur Verfügung. Versorgungsklemmen 24 V DC www.peaknx.com... -
Seite 15: Auflösung
297 x 210 x 0,7 mm Gewicht Computer mit Panel 1420 g Gewicht Frontglas 116 g Umgebung Umgebungstemperatur 0 bis +35 °C Temperatur für Lagerung und Transport -20 bis +60 °C Schutzart (DIN EN 60529) IP20 Richtlinie 2014/30/EU, EN 61000-4-3:2011-04, EN 55011:2017-03 www.peaknx.com... -
Seite 16: Anhang A: Geräte-Elemente
DE Controlmini, Anleitung für Montage und Inbetriebnahme Anhang A: Geräte-Elemente I. Unterputzvariante Abbildung 6: Geräte-Elemente, Unterputzvariante Position Beschreibung Unterputzdose Panel mit Touchscreen Frontglas www.peaknx.com... -
Seite 17: Abbildung 7: Geräte-Elemente, Aufputzvariante
DE Controlmini, Anleitung für Montage und Inbetriebnahme Anhang A: Geräte-Elemente II. Aufputzvariante Abbildung 7: Geräte-Elemente, Aufputzvariante Position Beschreibung Aufputzrahmen Panel mit Touchscreen Frontglas www.peaknx.com... -
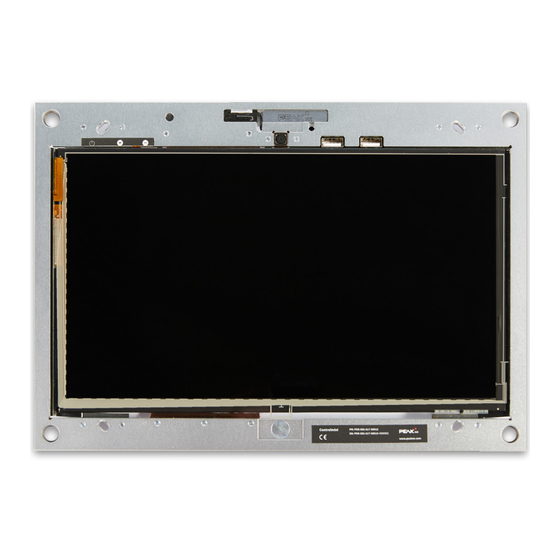
Seite 18: Anhang B: Touchpanelfront
DE Controlmini, Anleitung für Montage und Inbetriebnahme Anhang B: Touchpanelfront Abbildung 8: Touchpanelfront Position Beschreibung 4 x Befestigungsloch 4 x Aufnahme für Frontglas Mikrofon WLAN-Antenne Ein/Aus-Taster Lauter/Leiser-Taster Kamera 2 x USB 2.0 Touchscreen Windows Homebutton www.peaknx.com... -
Seite 19: Anhang C: Untere Anschlüsse Der Panelrückseite
Spannungsversorgung, Panel: 24 V DC Spannungsversorgung, Panel: GND 1-Wire Busmaster 1* 1-Wire-5 V-Ausgang* 1-Wire-Data* *Diese Anschlüsse sind reserviert für die angegebenen Funktionen. 1-Wire-GND* PEAKnx stellt optional Treiber 1-Wire-5 V-Ausgang* zur Unterstüzung von 1 - Wire zur Verfügung. 1-Wire-Data* 1-Wire-GND* 1-Wire Busmaster 2* www.peaknx.com... -
Seite 20: Anhang D: Seitliche Anschlüsse Der Panelrückseite
Anhang D: Seitliche Anschlüsse der Panelrückseite Abbildung 10: Seitliche Anschlüsse der Panelrückseite Position Beschreibung USB 3.0 MicroSD-Karteneinschub Mini HDMI Anhang E: Weitere Anschlüsse der Panelrückseite Abbildung 11: Weitere Anschlüsse der Panelrückseite Position Beschreibung 100 Mbit Ethernetanschluss 2 x KNX-Wago-Installationsklemme 243-211 www.peaknx.com... -
Seite 21: Entsorgungshinweis
• gefährliche Stoffe enthalten, die für die Gesundheit und die Umwelt schädlich sind, oder • wertvolle Stoffe enthalten, die der Wiederverwendung zugeführt werden sollen. Daher nicht im Hausmüll entsorgen. Elektro-/Elektronik-Altgeräte können zur umweltgerechten Entsorgung kostenfrei an öffentlichen Sammelstellen abgegeben werden. www.peaknx.com... - Seite 22 DE Controlmini, Anleitung für Montage und Inbetriebnahme Notizen www.peaknx.com...
-
Seite 23: Über Peaknx
Die Experten für Hausautomation bieten auch die dazugehörigen Dienstleistungen – von der Planung des Bauvorhabens über die Beratung bis hin zur Installation und Realisierung durch zertifizierte Partner. Das Ziel von PEAKnx ist es, das alltägliche Leben seiner Kunden komfortabler, sicherer und kostensparender zu machen. Dabei greift das Unternehmen auf die mehr als 20-jährige Erfahrung der PEAK-Firmengruppe zurück. - Seite 24 About PEAKnx ........
-
Seite 25: List Of Figures
Figure 11: Further Ports of the Panel‘s Back ......... 42 www.peaknx.com... - Seite 26 Product Document version Item number Controlmini 1.1.3 PNX-002-A18-00017 The product names mentioned in this document may be brands or registered trademarks of their respective owners. These are not explicitly labeled with “™” or “®”. © DOGAWIST Investment GmbH PEAKnx a DOGAWIST Investment GmbH Division Otto-Röhm-Straße 69...
-
Seite 27: Introduction
Maximum power consumption under full load: 15 W ■ Power consumption, no load: 10 W, Server operation without LCD: 5W ■ Ambient temperature 0 to 35 °C ■ flush-mounted or surface-mounted wall installation, parallel to the wall ■ Protection class IP20 www.peaknx.com... -
Seite 28: Delivery
Controlmini. Other drivers and programs for the visualization of building information and for building control can be installed later. PEAKnx provides no service and no warranty for software products from other companies and in case of OS driver updates. Note: We recommend you to create a backup with PEAKnx’s optional Recovery USB Flash Drive... -
Seite 29: Installation
1 (brickwork) or figure 2 (cavity wall). You can use the stencil board delivered in the PEAKnx flush-mounted box to draw the dimensions of the recess on the wall. The flush mounted box must be later flush with the wall. -
Seite 30: Cabling The Panel
KNX-terminal 2 The second KNX connection is required if another separate KNX line is to be set up. The KNX fieldbus can only be used with PEAKnx software. Figure 4: KNX-WAGO-Terminals 3.3.3 Keyboard and Mouse (Optional) In special cases, control devices, such as a keyboard or mouse can be connected to the USB port of the panel, see appendix D;... -
Seite 31: Power Supply
To connect additional controls to the panel, for example a USB adapter for using a wireless keyboard and mouse, there is an additional USB port on the back of the panel, see appendix D; D1. There are two more USB ports on the panel front under the glass cover, see appendix B; B8. www.peaknx.com... -
Seite 32: Switching The Controlmini On And Off
Clean the Touchscreen, see appendix B; B9, if soiled (e.g. by dust). Use one of the supplied cleaning wipes to clean. Further cleaning wipes are available in the PEAKnx shop. Note: Do not use harsh detergents, acids or organic solvents. Do not let any moisture get into the unit. -
Seite 33: Troubleshooting
Therefore, we recommend to create a backup with the (optionally available) Recovery USB Flash Drive from PEAKnx at first use. In case of serious errors in Windows it can be started directly from the Recovery USB Flash Drive and the operating system can be re-installed. -
Seite 34: Creating A Backup On The Recovery Usb Flash Drive
■ Connect a mouse. ■ Select “Restore backup”. ■ The Back up Wizard starts. In “Select the archive to restore”, navigate to the „External devices” tab and select in “PARAGON” the pfi-file from the created backup folder to restore. www.peaknx.com... -
Seite 35: Technical Support
Select the On/Off icon in the upper right corner of the screen and select “Shut Down”. ■ Remove the Recovery USB Flash Drive. ■ Restart the panel. 5.3 Technical Support If you experience problems with your Controlmini, please contact our PEAKnx Support Team: ■ Mail: support@peaknx.com ■ Tel.: +49-6151-279 1825... -
Seite 36: Technical Data
1 x USB 3.0 Ethernet 100 Mbit Ethernet port, suitable standard for cabling: Cat-5 or better External screen 1 x Mini HDMI Fieldbus 2 x KNX 2 x 1-Wire* *PEAKnx optionally provides drivers for this bus. Supply 24 V DC www.peaknx.com... - Seite 37 Weight computer with panel 1420 g Weight glass cover 116 g Environment Ambient temperature 0 bis +35 °C Temperature for storage and transport -20 bis +60 °C Protection class (DIN EN 60529) IP20 Directive 2014/30/EU, EN 61000-4-3:2011-04, EN 55011:2017-03 www.peaknx.com...
-
Seite 38: Appendix A: Components
EN Controlmini, Installation and Start-up Instructions Appendix A: Components I. Flush-Mounted Version Figure 6: Components, Flush-Mounted Version Position Description Flush-mounted box Panel with touchscreen Glass cover www.peaknx.com... -
Seite 39: Figure 7: Components, Wall-Mounted Version
EN Controlmini, Installation and Start-up Instructions Appendix A: Components II. Wall-Mounted Version Figure 7: Components, Wall-Mounted Version Position Description Wall-mounted frame Panel with touchscreen Glass cover www.peaknx.com... -
Seite 40: Appendix B: Touch Panel's Front
EN Controlmini, Installation and Start-up Instructions Appendix B: Touch Panel‘s Front Figure 8: Touch Panel‘s Front Position Description 4 x Mounting hole 4 x Intake for glass cover Microphone WLAN antenna On/Off-Button Volume Up/Down-Button Camera 2 x USB 2.0 Touchscreen Windows Homebutton www.peaknx.com... -
Seite 41: Appendix C: Lower Ports Of The Panel's Back
Panel power supply: 24 V DC Panel power supply: GND 1-Wire Busmaster 1* 1-Wire-5 V-Output* 1-Wire-Data* * These terminals are reserved for 1-Wire-GND* the listed functions. 1-Wire-5 V-Output* PEAKnx optionally provides drivers to support 1 - Wire. 1-Wire-Data* 1-Wire-GND* 1-Wire Busmaster 2* www.peaknx.com... -
Seite 42: Appendix D: Lateral Ports Of The Panel's Back
Figure 10: Lateral Ports of the Panel‘s Back Position Description USB 3.0 Micro SD slot Mini HDMI Appendix E: Further Ports of the Panel‘s Back Figure 11: Further Ports of the Panel‘s Back Position Description 100 Mbit Ethernet port 2 x KNX-Wago 243-211 installation terminal www.peaknx.com... -
Seite 43: About Peaknx
The aim of PEAKnx is to make its customers’ everyday life more convenient, safe and economical. Along the way, the company can draw on more than 20 years of experience within the PEAK holding. - Seite 44 www.peaknx.com...