Herunterladen Inhalt Inhalt Diese Seite drucken
IMG STAGE LINE CPL-3DMX Bedienungsanleitung

IMG STAGE LINE CPL-3DMX Bedienungsanleitung

Dmx-interface und controller für 12-v- oder 24-v-leds

Werbung

Verfügbare Sprachen
  • DE

Verfügbare Sprachen

  • DEUTSCH, seite 1
DMX-INTERFACE und CONTROLLER
für 12-V- oder 24-V-LEDs
DMX INTERFACE and CONTROLLER for 12 V or 24 V LEDs
INTERFACE DMX et CONTRÔLEUR pour LEDs 12 V ou 24 V
INTERFACCIA DMX e CONTROLLER per LED a 12 V o 24 V
CPL-3DMX
Best.-Nr. 38.3910
BEDIENUNGSANLEITUNG • INSTRUCTION MANUAL
MODE D'EMPLOI • ISTRUZIONI PER L'USO • GEBRUIKSAANWIJZING
MANUAL DE INSTRUCCIONES • INSTRUKCJA OBSŁUGI

Werbung

Inhaltsverzeichnis
loading

Inhaltszusammenfassung für IMG STAGE LINE CPL-3DMX

  • Seite 1 DMX INTERFACE and CONTROLLER for 12 V or 24 V LEDs INTERFACE DMX et CONTRÔLEUR pour LEDs 12 V ou 24 V INTERFACCIA DMX e CONTROLLER per LED a 12 V o 24 V CPL-3DMX Best.-Nr. 38.3910 BEDIENUNGSANLEITUNG • INSTRUCTION MANUAL MODE D’EMPLOI •...
  • Seite 2 Before switching on … Wir wünschen Ihnen viel Spaß mit Ihrem neuen We wish you much pleasure with your new “img Gerät von „img Stage Line“. Bitte lesen Sie diese Stage Line” unit. Please read these operating Bedienungsanleitung vor dem Betrieb gründlich instructions carefully prior to operating the unit.
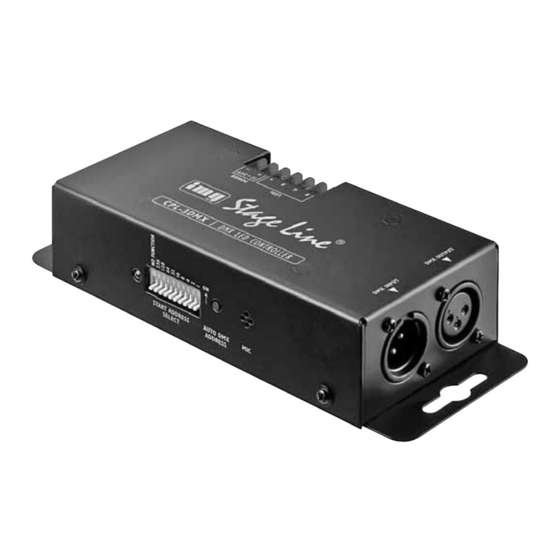
  • Seite 3 START ADDRESS AUTO DMX SELECT ADDRESS Œ REMOTE CONTROL ONLY LEDs POWER 12 – 24V  Ž...
  • Seite 4: Wichtige Hinweise Für Den Gebrauch

    Startadresse; DIP-Schalter Nr. 10 ohne Funktion 3 Taste für die automatische DMX-Adresseneinstel- 3 Einsatzmöglichkeiten lung ( Kapitel 6.2.1) Das Gerät CPL-3DMX dient zum Steuern von LEDs 4 Mikrofon zur Musiksteuerung oder LED-Ketten, die eine Betriebsspannung zwischen 5 DMX-Signal-Eingang (3-pol. XLR) zum Anschluss 12 V und 24 V benötigen.
  • Seite 5: Montage Und Anschluss

    2) Den Anschluss DMX OUTPUT des ersten Neben- einsetzen, um die LEDs von einem DMX-Lichtsteuer- gerätes mit dem Anschluss DMX INPUT des zwei- gerät aus zu steuern. Dazu ist das CPL-3DMX mit ten Nebengerätes verbinden usw., bis alle Geräte in 4 DMX-Steuerkanälen ausgestattet.
  • Seite 6: Bedienung Über Ein Lichtsteuergerät

    Protokoll (z. B. DMX-1440 oder DMX-510USB von Startadresse 1 erhalten soll: „img Stage Line“) verfügt das CPL-3DMX über vier 1) An allen CPL-3DMX alle DIP-Schalter (2) in die DMX-Steuerkanäle. Die Funktionen der Kanäle und untere Position (OFF) stellen. die DMX-Werte finden Sie im Kap. 7.1 auf der Seite 7.
  • Seite 7: Steuerung Mit Dem Led-4C

    Kanal 4: Dimmer / Musiksteuerung / Stroboskop 0 – 7 Licht aus 6.3 Steuerung mit dem LED-4C Das Gerät LED-4C von „img Stage Line“ ist ein einfach Dimmer: dunkel → hell 8 – 190 zu bedienendes Steuerpult, mit dem sich auch das CPL-3DMX steuern lässt.
  • Seite 8: Operating Elements And Connections

    4 Microphone for music control 3 Applications 5 DMX signal input (3-pole XLR) to connect a light The unit CPL-3DMX is used to control LEDs or LED controller; chains requiring an operating voltage between 12 V Pin 1 = ground, 2 = DMX-, 3 = DMX+ and 24 V .
  • Seite 9: Mounting And Connection

    4 Mounting and Connection mode and can be synchronized by the master unit. 1) Mount the CPL-3DMX to a suitable place, if required. 2) Connect the LEDs to the screw terminals (7). To pre- 5.2 Remote control LC-3...
  • Seite 10: Operation Via A Light Controller

    3-pole XLR jacks of the following pin configuration: After a while, the LEDs will light up again. The start address of the first CPL-3DMX unit is now set to 1. The Pin 1 = ground, 2 = DMX-, 3 = DMX+...
  • Seite 11: Specifications

    0 – 255 brightness of red Set the start address of the CPL-3DMX to 1 or to a multiple of 4 + 1 (5, 9, 13, …, 61 max.), chapter 6.2. Channel 2: proportion of green Detailed information for operation can be found in the 0 –...
  • Seite 12: Eléments Et Branchements

    : Pin 1 = masse, 2 = DMX-, 3 = DMX + Lʼappareil CPL-3DMX permet de gérer des LEDs ou des chaînes de LEDs (Flex LEDs) nécessitant une ten- 6 Sortie signal DMX (XLR 3 pôles) pour brancher à...
  • Seite 13: Montage Et Branchement

    LEDs ne doit pas dépasser DMX INPUT sur lʼappareil principal de sorte que la par canal (R, G, B) 1,5 A sinon le CPL-3DMX sera LED rouge (1) brille en continu ou sʼéteint au rythme endommagé.
  • Seite 14: Utilisation Via Un Contrôleur

    DIP (2) sur la position inférieure (OFF). DMX512 (par exemple DMX-1440 ou DMX-510USB de “img Stage Line”), le CPL-3DMX dispose de 4 canaux de commande DMX. Les fonctions des canaux et les valeurs DMX sont décrites page 15, chapitre 7.1.
  • Seite 15: Caractéristiques Techniques

    248 – 255 luminosité maximale CPL-3DMX. Le LED-4C dispose de 4 canaux : tous les appareils qui y sont reliés peuvent être gérés unique- ment de manière synchrone. Réglez lʼadresse de démarrage du CPL-3DMX sur 1 ou sur un multiple de 4 + 1 (5, 9, 13, ...
  • Seite 16: Elementi Di Comando E Collegamenti

    1,5 A per ogni canale gamento con lʼingresso DMX di un ulteriore CPL- (R, G, B). Dal programma di “img Stage Line”, con il 3DMX o di unʼunità DMX per effetti luce; CPL-3DMX si possono controllare, per esempio, i...
  • Seite 17: Montaggio E Collegamento

    DMX, per comandare i LED da unʼunità cavo XLR a 3 poli (p. es. della serie MEC-... o DMX di comando luce. A tale scopo, il CPL-3DMX è MECN-... dal programma di “img Stage Line”). equipaggiato con 4 canali di comando DMX.
  • Seite 18: Funzionamento Attraverso Unʼunità Di Comando Luce

    3DMX e se il primo apparecchio deve avere lʼindirizzo dissolvenza dei colori fra lento, medio o veloce. di start 1: Il comando musica non è possibile con questo 1) Su tutti i CPL-3DMX mettere tutti i dip-switch (2) in modo. posizione inferiore (OFF). 6 Funzionamento attraverso unʼunità di comando luce Per il funzionamento attraverso unʼunità...
  • Seite 19: Dati Tecnici

    Lʼapparecchio LED-4C di “img Stage Line” è unʼunità Dimmer: scuro → chiaro 8 – 190 di comando facile da usare con il CPL-3DMX. Dispone Cambio colori comandato dalla musica di 4 canali, così che tutti gli apparecchi collegati pos- 191 – 200 tramite il microfono integrato sono essere comandati solo in modo sincronizzato.
  • Seite 20: Overzicht Van De Bedienings- Elementen En Aansluitingen

    (geen kleurmenging mogelijk, alleen verschillende helderheid tus- De afstandsbediening is als toebehoren verkrijgbaar sen de rode, groene en blauwe kettingen) en is niet in de levering van de CPL-3DMX inbegrepen. LEDM-2/RT + LEDM-2/GN + LEDM-2/BL 10 Toets STAND BY voor het uit- en inschakelen van LEDS-5/RT + LEDS-5/GN + LEDS-5/BL de aangesloten LEDʼs...
  • Seite 21: Montage En Aansluiting

    (4) optimaal functioneert. Verklein zo lende kleur nodig de afstand tussen luidsprekers en CPL-3DMX of 3. muziekgestuurde flitssalvoʼs met wisselende stel de CPL-3DMX zo op dat de microfoon naar de kleur luidspreker is gericht. Telkens u de toets FUNCTION ingedrukt houdt, wordt de volgende stroboscoopfunctie geacti- 5.1 Meerdere CPL-3DMX-apparaten...
  • Seite 22: Bediening Via Een Lichtregelaar

    Normale afge- Even later lichten de LEDʼs opnieuw op. Het startadres schermde microfoonkabels met een leidingdiameter van eerste CPL-3DMX is nu ingesteld op 1. De start- van ten minste 2 × 0,22 mm en een zo gering moge-...
  • Seite 23: Technische Gegevens

    Stroboscoop: langzaam → snel 201 – 247 Stel het startadres van de CPL-3DMX in op 1 of op een veelvoud van 4 + 1 (5, 9, 13, … max. 61), 248 – 255 maximale helderheid hoofdstuk 6.2.
  • Seite 24: Notas Importantes

    6.2.1) 3 Aplicaciones 4 Micrófono para el control por música El aparato CPL-3DMX se utiliza para controlar LEDs o 5 Entrada de señal DMX (XLR 3 polos) para conectar para cadenas de LEDs que necesitan un voltaje entre a controlador; Pin 1 = masa, 2 = DMX-, 3 = DMX+ 12 V y 24 V .
  • Seite 25: Montaje Y Conexión

    óptimo de la música mediante el sica, cambio de color micrófono (4). Si es necesario, reduzca la distancia entre el altavoz y el CPL-3DMX o altere la posición del 3. Salvas controladas por música, cambio de CPL-3DMX de modo que el micrófono apunte hacia el color altavoz.
  • Seite 26: Funcionamiento Mediante Un Controlador

    – El LED del botón MODE parpadea lentamente – dirección de inicio 17 en el CPL-3DMX. Los canales El botón FUNCTION permite seleccionar cinco DMX 2 – 4 se asignan automáticamente a las tres programas diferentes de cambio de color.
  • Seite 27: Especificaciones

    él sólo pueden controlarse de modo sincronizado. Estroboscopio: Lento → Rápido 201 – 247 Ajuste la dirección de inicio del CPL-3DMX en 1 o en múltiplo de 4 + 1 (5, 9, 13, … 61 máx.), apar- 248 – 255 Máximo brillo...
  • Seite 28: Elementy Operacyjne I Złącza

    DMX ( rozdz. 6.2.1) 3 Zastosowanie 4 Mikrofon do sterowania muzyką Urządzenie CPL-3DMX służy do sterowania diodami 5 Wejście sygnału DMX (3-pin XLR) do podłączania lub paskami diodowymi wymagającymi zasilania kontrolera świateł; 12 V lub 24 V . Pobór prądu podłączonych diod każ- Pin 1 = masa, 2 = DMX-, 3 = DMX+ dego kanału R, G, B nie może pnekraczać...
  • Seite 29: Montaż I Podłączanie

    2) Połączyć wyjście DMX OUTPUT pierwszego urzą- jako interfejs DMX do sterowania diodami poprzez dzenia podrzędnego z wejściem DMX INPUT kolej- kontroler DMX. W tym celu, CPL-3DMX posiada 4 nego itd. kanały sterujące DMX. Nie wolno w tym czasie podawać sygnału sterującego DMX na wejście DMX INPUT urządzenia nadrzędnego...
  • Seite 30: Sterowanie Poprzez Kontroler Światła

    6.2.1 Automatyczne ustawianie adresu startowego Metoda ta jest zalecania w przypadku wykorzystywa- nia kilku kontrolerów CPL-3DMX, i gdy pierwszy z nich 6 Sterowanie poprzez kontroler światła ma mieć ustawiony adres startowy 1: Do sterowania wymagany jest kontroler z protokołem 1) Na wszystkich kontrolerach CPL-3DMX, ustawić...
  • Seite 31 → szybko 201 – 247 mogą być tylko sterowane synchronicznie. Ustawić adres startowy kontrolera CPL-3DMX na 1 248 – 255 maksymalna jasność lub na wielokrotność 4 + 1 (5, 9, 13, … 61 max), rozdz.
  • Seite 32 ® Copyright © by MONACOR INTERNATIONAL GmbH & Co. KG, Bremen, Germany. All rights reserved. A-0945.99.01.02.2009...

Inhaltsverzeichnis