
Verwandte Anleitungen für Philips Dinion LTC 0455 Serie

Inhaltszusammenfassung für Philips Dinion LTC 0455 Serie
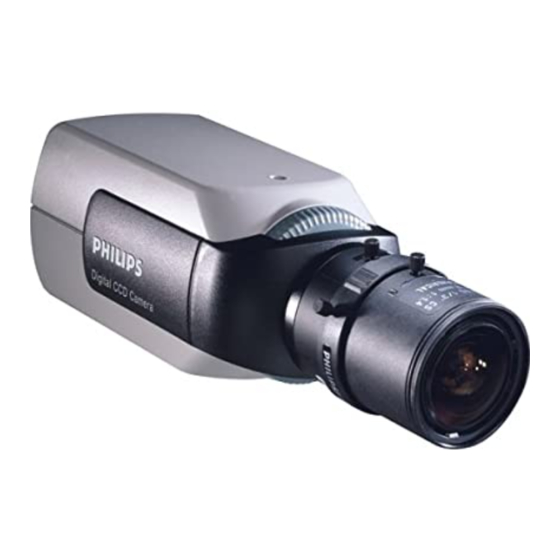
- Seite 1 LTC 0435 & LTC 0455 SERIES COLOR CAMERAS I N S T A L L A T I O N I N S T R U C T I O N S Philips Communication, Security & Imaging...
-
Seite 2: Important Safety Instructions
IMPORTANT SAFETY INSTRUCTIONS Servicing is required when the apparatus does not function in the normal way, has been dropped, if liquid has been spilled on it, or if it has been exposed to rain or water. Unplug the The lighting flash with arrowhead sysbol, unit from the outlet and refer servicing to within an equilateral triangle, is intended qualified service personnel. - Seite 3 SPECIFICATIONS LTC 0435/x0 LTC 0455/x0 Standard resolution High resolution Standard NTSC NTSC Active pixels (H x V) 512 x 582 512 x 492 752 x 492 768 x 492 Imager 1/3" interline CCD Resolution 330 TV lines 480 TV lines Minimum illumination <0.7 lux <0.8 lux...
-
Seite 4: Unpacking
UNPACKING Unpack carefully and handle the equipment with care. The packaging contains: • Camera • CCD protection cap • Spare lens connector (male) • These Instructions Note: If equipment appears to have been damaged during shipment, repack it in the original packaging and notify the shipping agent or supplier. -
Seite 5: Lens Mounting
Y/C output (LTC 0455/x0 only) Y/C Socket GND Y GND C LENS MOUNTING Video iris lens DC iris lens Supply (11 V, 50 mA max.) Damp- Not used Damp+ Video signal 1 Vpp, 1 kΩ Drive+ Ground Drive- • Video-iris and DC-iris lenses are recommended for the best picture performance. •... -
Seite 6: Back Focus Adjustment
Back focus adjustment • Camera accepts both C and CS-mount lenses. 1. Unlock the back focus locking button. 2. Turn the back focus adjustment as required. (See Note 1). 3. Lock the back focus locking button. Notes: 1. To optimize picture sharpness in both bright and low-level lighting, it is recommended to adjust the back focus when carrying out the set-up... -
Seite 7: Advanced Setup
ADVANCED SET -UP The camera will normally give an optimal picture without the need for further adjustments. However for special circumstances advanced set up options are available. Accessing and navigating menus • Five softkeys are used for navigating menus (located under the side panel). •... -
Seite 8: Menu Navigation
Menu Navigation Press the menu button MAIN MENU SHUT/AGC MENU LEVEL SHUTTER SHUT/AGC COLOR AUTOBLACK SYNC LINE LOCK VPHASE 0° NIGHTSENSE EXIT EXIT Shutter/AGC Menu Main Menu COLOR MENU WHITE BAL RED-GAIN BLUE-GAIN EXIT Color Menu Press the menu button for more than 5sec. - Seite 9 Main menu Function Selection Description LEVEL -15 - 0 - +15 Adjusts video level. SHUT/AGC Select next menu Shutter / Automatic Gain Control menu. When 'ON', the level is optimized at the center of the screen. Parts outside the center may be under- or over-exposed (this is normal).
- Seite 10 Color menu Note: Auto Tracking White Balance must be selected OFF. Function Selection Description WHITE BAL ATW: Auto tracking white balance allows the AWB HOLD camera to constantly adjust for optimal color reproduction. AWB HOLD: Puts the ATW on hold and saves the color settings.
- Seite 11 Lens wizard menu Function Description SET BACK FOCUS NOW Back focus the lens (see 'Back focus adjustment'). The scene is focused at maximum lens opening to ensure that the object of interest remains in focus in bright and low-light conditions. SET LVL When a Video-iris lens is detected, a level potentiometer is displayed to obtain the best picture performance.
- Seite 12 DATEN LTC 0435/x0 LTC 0455/x0 Standardauflösung Hochauflösend Standard NTSC NTSC Aktive Pixel (H x V) 512 x 582 512 x 492 752 x 492 768 x 492 Sensor 1/3" Interline CCD Auflösung 330 Bildschirmzeilen 480 Bildschirmzeilen Minimale <0,7 Lux <0,8 Lux Beleuchtungsstärke <0,3 Lux mit Nightsense™...
- Seite 13 Überblick über die Typen Kleinspannung Netzspannung PAL (Europa) NTSC (USA) PAL (Europa) NTSC (USA) Standardauflösung LTC 0435/10 LTC 0435/20 LTC 0435/50 LTC 0435/60 Hochauflösend LTC 0455/10 LTC 0455/20 LTC 0455/50 LTC 0455/60 AUSPACKEN Vorsichtig auspacken und Gerät vorsichtig handhaben. Die Verpackung enthält: •...
-
Seite 14: Einsetzen Des Objektivs
FBAS-Signal Y/C-Ausgang (nur LTC 0455/x0) Y/C-Buchse ERDE Y ERDE C EINSETZEN DES OBJEKTIVS Objektiv mit videogesteuerter Objektiv mit automatischer Blendenregelung gleichstrom- gesteuerter Blende Stromversorgung (11 V, 50 mA max.) Dämpfung- Nicht belegt Dämpfung+ Videosignal 1 Vpp, 1 kOhm Antrieb+ Erde Antrieb-... - Seite 15 • Zur Gewährleistung bestmöglicher Bildqualität werden Objektive mit videogesteuerter automatischer Blendenregelung oder mit gleichstromgesteuerter Blende empfohlen. • Die Kamera stellt automatisch den verwendeten Objektivtyp fest und optimiert die Bildqualität entsprechend. • Für den Bedarfsfall ist ein Ersatzstecker vorhanden. Vorsicht: Zur Vermeidung von Beschädigungen am CCD-Sensor bei Einsetzen eines Objektivs mit C-Fassung vor Einsetzen des Objektivs zunächst den 'grünen' Backfocus-Ring bis an den Anschlag gegen den Uhrzeigersinn drehen ("Backfocus-Justierung").
-
Seite 16: Backfocus-Justierung
Backfocus-Justierung • Die Kamera ist kompatibel mit Objektiven mit einer C-Fassung und einer CS-Fassung. 1. Backfocus-Sperrtaste entriegeln. 2. Backfocus-Justierung nach Bedarf drehen. (Siehe Hinweis 1). 3. Backfocus-Sperrtaste verriegeln. Hinweise: 1. Zur Optimierung der Schärfe sowohl bei heller als auch bei schwacher Beleuchtung ist es empfehlenswert, den Backfocus bei der Einrichtung der Kamera zu justieren. -
Seite 17: Manuelle Einrichtung
MANUELLE EINRICHTUNG Im Normalfall liefert die Kamera ein optimales Bild, ohne dass weitere Einstellungen notwendig wären. Für besondere Umstände gibt es aber Optionen für die manuelle Einrichtung. Zugriff auf und Navigation durch die Menüs • Es gibt fünf Kurzwahltasten für die Navigation durch die Menüs (unter der Seitenabdeckung). -
Seite 18: Navigation Durch Die Menüs
Navigation durch die Menüs Menütaste drücken MAIN MENU SHUT/AGC MENU LEVEL SHUTTER SHUT/AGC COLOR AUTOBLACK SYNC LINE LOCK VPHASE 0° NIGHTSENSE EXIT EXIT Shutter/AGC-Menü Hauptmenü COLOR MENU WHITE BAL RED-GAIN BLUE-GAIN EXIT Farbmenü Menütaste länger als 5 Sek. drücken LENS WIZARD DETECTED LENS DCIRIS INSTALLER... - Seite 19 Hauptmenü Funktion Auswahl Beschreibung LEVEL -15 - 0 - +15 Stellt die Lichtstärke ein. SHUT/AGC Nächstes Menü Menü Shutter / Automatische Verstärkungsregelung. auswählen Bei "ON" wird die Lichtstärke im Zentrum des Bildschirms optimiert. Teile außerhalb des Zentrums können unter- oder überbelichtet sein (das ist normal).
- Seite 20 Shutter/AGC-Menü Funktion Auswahl Beschreibung SHUTTER (AES) Auto-Shutter stellt die optimale Verschlussgeschwindigkeit (entzerrt) für manuelle Objektivblenden ein. (FL) Die Betriebsart "entzerrt" vermeidet Interferenz bei Ausschaltung von Lichtquellen (nur für Verwendung mit Objektiven mit videogesteuerter automatischer Blendenregelung oder gleichstromgesteuerter Blende empfohlen). ON/OFF Automatische Verstärkungsregelung AUTOBLACK ON/OFF...
- Seite 21 Farbmenü Hinweis : Die automatische Helligkeitssteuerung muss AUS geschaltet sein. Funktion Auswahl Beschreibung WHITE BAL ATW: Die automatische Helligkeitssteuerung ermöglicht es der Kamera, sich automatisch auf die optimale Farbwiedergabe einzustellen. AWB HOLD AWB HOLD: Unterbricht ATW und bewahrt die Farbeinstellungen. RED- GAIN* -5 - 0 - +5 Verschiebung der fabrikmäßigen Weißpunkt-...
-
Seite 22: Einstellung Eines Objektivs Mit Gleichstromgesteuerter Blende
Lens Wizard Menü Funktion Beschreibung SET BACK FOCUS NOW Backfocus-Justierung des Objektivs (siehe "Backfocus- Justierung"). Die Szene wird bei maximaler Blendenöffnung fokussiert, um sicherzustellen, dass das Objekt im Brennpunkt sowohl bei hellem als auch bei wenig Licht scharf bleibt. SET LVL Wird ein Objektiv mit videogesteuerter automatischer Blendenregelung festgestellt, so wird ein Lichtstärken- Potentiometer angezeigt, um die beste Bildqualität zu erzielen. - Seite 23 E I N E M E X P E R T E N A U F D E M G E B I E T D E R C C T V- Ü B E RWA C H U N G , D A Z U Die CCTV- Produkte sind nur ein Teil der Produktlinie von Philips Communication, Security & Imaging. Philips N O C H E I N E D R E I J Ä...
- Seite 24 I N T E L L I G E N T E Ü B E R W A C H U N G Die intelligenten Überwachungskameras der Dinion™-Reihe basieren auf dem einzigartigen Sachwissen von Philips im Bereich der Funk-, Fernseh-, Video-, Halbleiter- und Bildverar- beitungstechnik und bieten eine bessere Bildleistung als jede andere Kamera dieser Klasse.
- Seite 25 LTC 0435 Series Color Cameras • 1/3-inch Format CCD Imager • High Sensitivity • Advanced Digital Signal • Processing • Standard Resolution • Auto Detection of Lens Type • Easy to Install • Accepts AC or DC Voltages The LTC 0435 series are compact rugged, 1/3-inch image The ability to operate on AC or DC provides added format digital color CCD cameras.
-
Seite 26: Accessories
SPECIFICATIONS Controls Electrical Video level. Model No. Rated Voltage Voltage Range System Shutter: AES/Off/Flickerless LTC 0435/10 12 VDC 10.8-39 VDC AGC: On/Off 24 VAC, 50 Hz 12-28 VAC, 45-65 Hz BLC: On/Off LTC 0435/20 12 VDC 10.8-39 VDC NTSC Auto Black: On/Off 24 VAC, 60 Hz 12-28 VAC, 45-65 Hz ATW: On/Hold... - Seite 27 LTC 9215/00, LTC 9215/00S, LTC 9219/01 Indoor/Outdoor Feed-through Mounts Philips Communication, Security & Imaging...
-
Seite 28: Service
5. Install the mount using bolts or studs at least 8-mm (5/16- If the unit ever needs repair service, the customer should contact in) in diameter. the nearest Philips Communication, Security & Imaging, Inc. 6. To mount the camera or camera housing: Service Center for authorization to return and shipping a. -
Seite 29: Ltc 9215/00 30-Cm (12-In) Indoor/Outdoor Feed-Through Mount
SPECIFICATIONS LTC 9219/01 40-cm (15-in) Indoor/Outdoor Feed-through J-mount LTC 9215/00 30-cm (12-in) Indoor/Outdoor Maximum Load: 9 kg (20 lb). Mounting Head: Adjustable. 360° pan, 180° tilt. Feed-through Mount Maximum Load: 9 kg (20 lb). Finish: Dark mushroom. Mounting Head: Adjustable. 360° pan, 180° tilt. Approx. - Seite 30 LTC 9219/01 Feed-through J-mount 3935 890 15114 01-06 © 2001 Philips Electronics N.V. Printed in U.S.A. © 2001 Philips Communication, Security & Imaging, Inc. All Rights Reserved. Philips ® is a registered trademark of Philips Electronics N.V. Data subject to change without notice...
- Seite 31 LTC 9483/50C, LTC 9488/50C Housings Philips Communication, Security & Imaging...
-
Seite 33: Important Safeguards
For additional information or to speak to a representative, are not likely to be walked on or pinched by items placed upon or against please contact the Philips Communication, Security & Imaging them, paying particular attention to cords and plugs, convenience location nearest you: receptacles, and the point where they exit from the appliance. -
Seite 34: Safety Precautions
SAFETY PRECAUTIONS SICHERHEITSVORKEHRUNGEN VORSICHT: UM EINEN ELEKTRISCHEN CAUTION: TO REDUCE THE RISK OF SCHLAG ZU VERMEIDEN, ABDECKUNG ELECTRICAL SHOCK, DO NOT OPEN COVERS. NICHT ENTFERNEN. WARTUNGEN ALLER NO USER SERVICEABLE PARTS INSIDE. REFER ART QUALIFIZIERTEM PERSONAL SERVICING TO QUALIFIED SERVICE ÜBERLASSEN. -
Seite 35: Inhaltsverzeichnis
If the unit ever needs repair service or parts, the customer 6.8.1 Power Connections: should contact Philips Communication, Security & Imaging LTC 9483/50C, LTC 9488/50C ... . .8 Service Center for authorization to return and shipping 6.8.2 Control Connections: LTC 9488/50C Only . -
Seite 36: Housing Mounting
Cable Size: Outside diameter between Housing Mounting 4.6 mm (0.181-in) - 7.9 mm (0.312-in). 1. Use the two 1/4-20 x 0.50-inch screws and 1/4-in spring Cable Shape: Round. washers provided in the hardware kit to mount the housing Shield: > 93% Braided Copper Shield. to a mount or a pan/tilt. - Seite 37 Mounting LTC 0330/x1, LTC 0350/x1, LTC 0430/x1, and LTC 0450/x1 fixed lens cameras in LTC 9480, LTC 9483 Series Housings 3c. Remove the mounting block from the camera by removing the two small screws that attach the foot to the camera. Use a small straight blade screw driver to remove these screws.
-
Seite 38: Camera/Lens Wiring
Video Camera/Lens Wiring BNC Jack WARNING: Only use the cables specified under "INSTALLATION, Cable Requirements" for wiring of all cameras and lenses. 6.8.1 Power Connections: LTC 9483/50C, LTC 9488/50C 1. Cut the camera power cord, leaving enough cable to allow connection to the terminal block. -
Seite 39: Control Connections: Ltc 9488/50C Only
2. As the cover nears the rear cap, make sure the captive screws Figure 10 Control Connector in the back are not blocking the cover from engaging into Mating Connector: Amphenol-Tuchel the rear cap. C016 10E014 0021 Philips #3153502-900. 3. Screw the two rear captive screws into the housing. -
Seite 40: Fuse Replacement
6.12 Fuse Replacement 1. To replace a fuse, take a flat blade screw driver and twist the top of the fuseholder counter clockwise about a ⁄ of a turn. The fuse is spring loaded so it will eject. 2. Replace the fuse with a fuse that has the same current rating. The fuse is a 5x20 mm slow blow cartridge type fuse. - Seite 42 2001 Philips Electronics N.V. 3935 890 23113 01-06 2001 Philips Communication, Security & Imaging, Inc. Printed In U.S.A. All Rights Reserved. Philips is a registered trademark of Philips Electronics N.V. Data subject to change without notice...
- Seite 43 Powering this housing is made easy temperature of the housing in cold using the 4-pin Amphenol connector temperature conditions. located on the back of the housing. Philips Communication, Security & Imaging...
- Seite 44 LTC 9483 Series Ó 9498 961 36711 00-09 2000 Philips Electronics N.V. Ó Printed In U.S.A. 2000 Philips Communication, Security & Imaging, Inc. Ò All Rights Reserved. Philips is a registered trademark of Philips Electronics N.V. Data subject to change without notice...