Pelgrim OVM506RVS Anleitung
Inhaltsverzeichnis
Verfügbare Sprachen
Verfügbare Sprachen
Quicklinks
Kapitel
Inhaltsverzeichnis

Verwandte Anleitungen für Pelgrim OVM506RVS


Inhaltszusammenfassung für Pelgrim OVM506RVS
- Seite 1 OVM506RVS OVM506MAT OVM426RVS OVM426MAT Anleitung Ofen Instructions for use Oven...
- Seite 2 Anleitung DE 3 - DE 26 Manual EN 3 - EN 26 Benutzte Piktogramme - Pictograms used Wissenswertes - Important information Tipp - Tip...
-
Seite 3: Inhaltsverzeichnis
INHALT Ihr ofen Einführung Bedienleiste Beschreibung Verwendung Erste verwendung Ofeneinstellungen Ofenmodi Timer Zusätzliche modi wählen Reinigung Den ofen reinigen Einschubschienen entfernen und reinigen Grillelement nach unten klappen Demontieren der ofentür Demontieren der ofenscheiben Aqua-clean-modus Ofenlampe auswechseln Probleme lösen Allgemeines Technische spezifikationen Ihr ofen und die umwelt Entsorgung des geräts und der verpackung DE 3... -
Seite 4: Ihr Ofen
IHR OFEN Einführung Herzlichen Glückwunsch zum Kauf Ihres Pelgrim-Ofens. Bei der Entwicklung dieses Produkts stand der Gedanke der optimalen Benutzerfreundlichkeit im Mittelpunkt. Daher bietet der Ofen Ihnen eine umfangreiche Auswahl an Einstellungen, wodurch Sie jederzeit die passende Zubereitungsweise wählen können. -
Seite 5: Bedienleiste
IHR OFEN Bedienleiste 1. Aus 2. Oberhitze + Unterhitze 3. Kleiner Grill 4. Großer Grill 5. Grill mit Lüfter 6. Oberhitze + Unterhitze + Lüfter 7. Unterhitze mit Lüfter 8. Geschirrwärmer 9. Auftauen 10. Aqua-Clean 11. Display (Zubereitungsinformationen und Timeruhr) 12. -
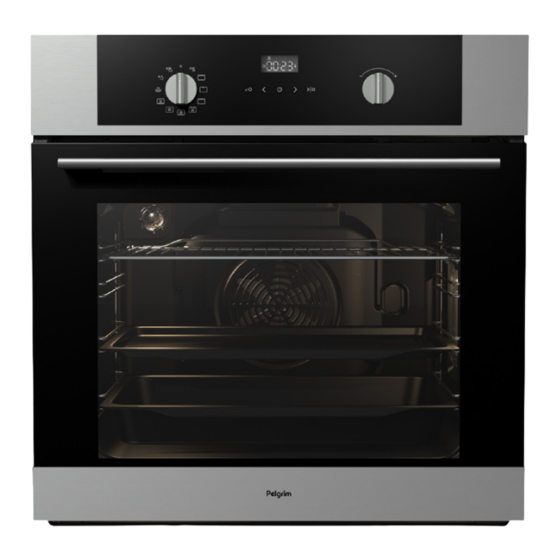
Seite 6: Beschreibung
IHR OFEN Beschreibung Ebene 4 Ebene 3 Ebene 2 Ebene 1 1. Bedienleiste 2. Einschubebenen 3. Ofentür 4. Griff Das folgende Zubehör wird bei Ihrem Ofen mitgeliefert: • Tiefes Backblech. • Backblech. • Ofenrost. Anmerkung Beziehen Sie sich auf die Kochanleitung in dieser Anleitung, um das passende Zubehör für Ihre Speisen zu bestimmen. -
Seite 7: Verwendung
VERWENDUNG Erste Verwendung Aktuelle Zeit einstellen Wenn Sie das Gerät das erste Mal an das Stromnetz anschließen, leuchtet das Display auf. Nach drei Sekunden beginnen das Uhrensymbol und „12:00“ auf dem Display zu blinken. 1. Drücken Sie auf die „Weniger/Mehr-Taste“, um die aktuelle Zeit Weniger/Mehr-Taste einzustellen. -
Seite 8: Ofeneinstellungen
VERWENDUNG Anmerkungen • Die Temperatur kann während der Zubereitung geändert werden. • Die Garzeiten entsprechen ungefähren Schätzungen und können in Abhängigkeit von einigen Bedingungen variieren. • Für einige Speisen muss der Ofen erst vorgeheizt werden. • Wenn Sie Backpapier verwenden, muss dieses gegen hohe Temperaturen beständig sein. - Seite 9 VERWENDUNG Grill + Lüfter Die Hitze wird durch die obersten Heizelemente erzeugt und durch den Lüfter verteilt. Dieser Modus kann auch zum Grillen von Fleisch und Fisch verwendet werden. Oberhitze + Unterhitze + Lüfter Die Kombination aus Oberhitze, Unterhitze und Lüfter sorgt für eine gleichmäßige Erhitzung und ist ideal zum Backen geeignet.
-
Seite 10: Ofenmodi
VERWENDUNG Ofenmodi Oberhitze + Unterhitze Die Hitze wird durch die Heizelemente oben und unten im Gerät erzeugt. Diese Einstellung eignet sich zum traditionellen Backen und Braten. Ober- und Unterhitze • Das Backblech oder der Ofenrost wird in der Regel auf Ebene 2 eingeschoben. - Seite 11 VERWENDUNG • Stellen Sie bei diesem Ofenmodus den „Temperaturschalter“ auf die Grilleinstellung. • Beobachten Sie den Garvorgang stets aufmerksam. Das Fleisch kann aufgrund der hohen Temperatur schnell anbrennen. • Heizen Sie den Ofen 5 Minuten vor. Grilleinstellung Großer Grill Die Hitze strömt aus dem obersten Element und dem Grillelement. Dies ist besonders geeignet für Aufläufe und gebackene Speisen, die eine schöne Kruste am Boden oder eine Bräunung benötigen.
- Seite 12 VERWENDUNG Grill + Lüfter Die Hitze wird durch das oberste Heizelement erzeugt und durch den Lüfter verteilt. Dieser Modus kann auch zum Grillen von Fleisch, Fisch, Geflügel und Gemüse verwendet werden. Sie müssen die Lebensmittel nicht wenden und sie werden schön knusprig. Grill und Lüfter •...
- Seite 13 VERWENDUNG * Die von Ihnen verwendeten Glasschalen müssen für Temperaturen von 50 – 275 °C geeignet sein. Unterhitze + Lüfter Die Speise wird durch das unterste Heizelement erhitzt und der Lüfter verteilt die Hitze im Ofen. Diese Einstellung wird zum Backen von Hefegebäck und zum Einkochen von Obst und Gemüse verwendet.
-
Seite 14: Timer
VERWENDUNG Timer Timeruhr einstellen • Drücken Sie zweimal auf die „Timertaste“. • Drücken Sie auf die „Weniger/Mehr-Taste“, um die aktuelle Zeit einzustellen. • Drücken auf die „Timertaste“ zum bestätigung. „Garzeit“ einstellen • In diesem Modus können Sie einstellen, wie lange der Ofen in Betrieb sein soll (Garzeit). - Seite 15 VERWENDUNG Eine Gar- und Endzeit einstellen • Wählen Sie mit dem „Ofenfunktionsknopf“ eine Ofenfunktion aus und stellen Sie die Temperatur ein. • Drücken Sie auf die „Timer-Taste“, um die Funktion „Garzeit“ auszuwählen. • Auf dem Display leuchtet das Symbol für „Garzeit“ auf. •...
-
Seite 16: Zusätzliche Modi Wählen
VERWENDUNG Der Modus „Küchenwecker“ • Der Modus „Küchenwecker“ kann unabhängig vom Ofen verwendet werden. Die längst mögliche Einstellung beträgt 23 Stunden und 59 Minuten. Die letzte Minute der Laufzeit wird in Sekunden angegeben. Sie können alle Timermodi abbrechen, indem Sie die Zeit auf „0“ stellen. Nach einigen Minuten, in denen das Gerät nicht aktiv ist, wechselt das Gerät in den Stand-by-Modus. - Seite 17 VERWENDUNG Ofenlampe • Die Ofenlampe leuchtet automatisch auf, wenn ein Ofenmodus ausgewählt und auf „Start/Stopp“ gedrückt wird. Akustisches Signal Die Lautstärke des akustischen Signals kann angepasst werden, wenn kein Timermodus aktiviert ist (es wird nur die Zeit angezeigt). • Halten Sie die „Weniger-Taste“ 5 Sekunden gedrückt. Auf dem Display wird „Vol“...
-
Seite 18: Reinigung
REINIGUNG Den Ofen reinigen Reinigen Sie den Ofen regelmäßig, um zu vermeiden, dass sich Essensreste ansammeln, besonders auf den Oberflächen und an der Innen- und Außenseite, der Tür und den Dichtungen. • Reinigen Sie die Oberflächen an der Außenseite mit einem weichen Tuch und warmer Seifenlauge. -
Seite 19: Grillelement Nach Unten Klappen
REINIGUNG Grillelement nach unten klappen Das oberste Heizelement kann für die bessere Reinigung des Ofenraums nach unten geklappt werden. Entnehmen Sie zuerst den Ofenrost und/oder das Backblech und die Einschubschienen. Trennen Sie das Gerät vom Stromnetz. Das Heizelement muss kalt sein, da sonst ein Verbrennungsrisiko besteht. -
Seite 20: Demontieren Der Ofenscheiben
REINIGUNG 3. Schließen Sie langsam die Tür, bis die Verriegelungshebel sich mit den Scharnieröffnungen in einer Linie befinden. Heben Sie die Tür in einem Winkel von 15° (gemessen an der Position der geschlossenen Tür) leicht an und ziehen Sie sie aus beiden Scharnieröffnungen des Geräts. -
Seite 21: Aqua-Clean-Modus
REINIGUNG 2. Fassen Sie das Glas an der Unterseite und drücken Sie es vorsichtig hoch, um es aus der Stütze zu entfernen. 3. Das innerste dritte Glas (abhängig vom Modell) kann entfernt werden, indem es vorsichtig angehoben und entfernt wird. Entfernen Sie auch die Gummidichtungen rund um das Glas. -
Seite 22: Ofenlampe Auswechseln
REINIGUNG Ofenlampe auswechseln Die Lampe (E14, 230-240 V, 25 W, 300 °C) ist ein Gebrauchsgegenstand und fällt daher nicht unter den Garantieanspruch. Trennen Sie das Gerät vom Stromnetz, indem Sie den Stecker aus der Steckdose ziehen oder die Sicherung im Zählerkasten ausschalten. Lampe in der Rückwand 1. -
Seite 23: Probleme Lösen
PROBLEME LÖSEN Allgemeines Falls Sie Probleme mit Ihrem Ofen haben, probieren Sie die nachfolgenden Lösungen aus. Möglicherweise sparen Sie sich so die Zeit und Mühe eines unnötigen Anrufs beim Kundendienst. Das Essen wird nicht zubereitet. • Überprüfen Sie, ob der Timer eingestellt ist und auf die „Start-Taste“ gedrückt worden ist. - Seite 24 Wenn eine Wartungsmaßnahme durchgeführt werden muss, ziehen Sie den Stecker aus der Steckdose und nehmen Sie bitte Kontakt mit dem Kundendienst von Pelgrim auf. Halten Sie die folgenden Informationen bei Ihrem Anruf griffbereit: • Die Modell- und Seriennummer (angegeben an der Innenseite der Ofentür).
-
Seite 25: Technische Spezifikationen
TECHNISCHE SPEZIFIKATIONEN Modell OVM506/OVM426 Stromquelle 220-240 V ~ 50/60 Hz Energieverbrauch Maximale Leistung 2700 W Grillmodus (klein) 1600 W Grillmodus (groß) 2700 W Unterhitze 1000 W Oberhitze 1100 W Kühlmethode Motorbetriebener Kühllüfter Abmessungen Abmessungen Gerät: B 595 x H 595 x T 568 mm Abmessungen bei Einbau: B 560 x H 560 x T 550 mm Volumen... -
Seite 26: Ihr Ofen Und Die Umwelt
IHR OFEN UND DIE UMWELT Entsorgung des Geräts und der Verpackung Dieses Produkt wurde aus nachhaltigen Materialien hergestellt. Wenn das Gerät nicht mehr verwendet wird, muss es in verantwortungsbewusster Weise entsorgt werden. Informationen dazu erhalten Sie bei den zuständigen Behörden. Die Verpackung des Geräts ist recycelbar. - Seite 51 EN 27...
- Seite 52 Das Gerätetypenschild befindet sich an der Unterseite des Gerätes. The appliance identification card is located on the bottom of the appliance. Halten Sie die vollständige Typennummer bereit, wenn Sie mit der Kundendienstabteilung Kontakt aufnehmen. When contacting the service department, have the complete type number to hand. Adressen und Telefonnummern der Kundendienstorganisation finden Sie auf der Garantiekarte.