Herunterladen Inhalt Inhalt Diese Seite drucken

Werbung

Verfügbare Sprachen
  • DE

Verfügbare Sprachen

QUICKSTART GUIDE
ENGLISH ( 3 – 5 )
MANUAL DE INICIO RÁPIDO
ESPAÑOL ( 6 – 8 )
GUIDE D'UTILISATION RAPIDE
FRANÇAIS ( 9 – 11 )
GUIDA RAPIDA
ITALIANO ( 12 – 14 )
KURZANLEITUNG
DEUTSCH ( 15 – 17 )

Werbung

Inhaltsverzeichnis
loading

Inhaltszusammenfassung für Numark M101

  • Seite 1 QUICKSTART GUIDE ENGLISH ( 3 – 5 ) MANUAL DE INICIO RÁPIDO ESPAÑOL ( 6 – 8 ) GUIDE D’UTILISATION RAPIDE FRANÇAIS ( 9 – 11 ) GUIDA RAPIDA ITALIANO ( 12 – 14 ) KURZANLEITUNG DEUTSCH ( 15 – 17 )
  • Seite 3: Box Contents

    Safety & Warranty Information Booklet REGISTRATION Please go to http://www.numark.com to register your M101. Registering your product ensures that we can keep you up-to-date with any last-minute product developments and provide you with world-class technical support, should you run into any problems.
  • Seite 4: Rear Panel Features

    Channel 2. Note: The crossfader is user-replaceable if it should ever wear out. Simply remove the facepanel, then remove the screws holding it in position. Replace the fader with a quality authorized replacement from your local Numark retailer only.
  • Seite 5: Contenido De La Caja

    Folleto de información sobre la seguridad y la garantía REGISTRO Visite http://www.numark.com y registre su M101. El registro de su producto asegura que podamos mantenerle actualizado con los desarrollos de productos de último momento y brindarle apoyo técnico de categoría mundial en caso de que tenga algún problema.
  • Seite 6 Nota: El usuario puede reemplazar el crossfader en caso de que se desgaste. Simplemente, retire el panel frontal y luego los tornillos que lo mantienen sujeto. Cambie el fader por un repuesto de calidad autorizado por su vendedor de Numark más cercano. ENTRADA DE MICRÓFONO – Conecte un micrófono de 1/4” a esta entrada.
  • Seite 7: Contenu De La Boîte

    Le livret des consignes de sécurité et des informations concernant la garantie ENREGISTREMENT Veuillez visiter le site internet http://www.numark.com pour enregistrer votre nouvelle M101. L'enregistrement des produits vous permet d'être informé sur les toutes dernières nouveautés concernant les produits et de vous offrir un soutien technique de niveau international, si vous en aviez besoin.
  • Seite 8: Caractéristiques Du Panneau Arrière

    Remplacez le potentiomètre avec un autre potentiomètre de qualité autorisé provenant de votre détaillant Numark local. ENTRÉE MIC – Permet de brancher un microphone ¼ po. Les commandes microphone sont situées sur le panneau supérieur.
  • Seite 9: Contenuti Della Confezione

    Libretto di istruzioni di sicurezza e garanzia REGISTRAZIONE Recarsi alla pagina http://www.numark.com per registrare il M101. La registrazione del prodotto garantisce che possiamo tenervi aggiornati con tutti gli ultimissimi sviluppi del prodotto e offrirvi assistenza tecnica di livello mondiale, in caso di eventuali problemi.
  • Seite 10 Nota bene: il crossfader è sostituibile dall’utente in caso di usura. Rimuovere il pannello anteriore e le viti che lo tengono in posizione. Sostituire il fader con un ricambio autorizzato acquistato presso il proprio rivenditore Numark locale. INGRESSO MIC – Collegare un microfono da ¼” a questo ingresso. I comandi del microfono si trovano sul pannello superiore.
  • Seite 11: Inhalt Der Verpackung

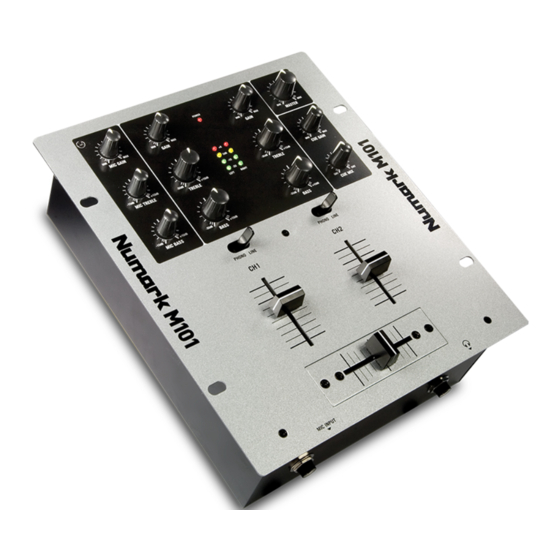
    Kurzanleitung Broschüre mit den Sicherheits- und Garantierichtlinien REGISTRIERUNG Registrieren Sie Ihren M101 bitte auf http://www.numark.de. Dadurch geben Sie uns die Möglichkeit, Ihnen Informationen bei Produktaktualisierungen zukommen zu lassen und Ihnen bei möglichen Problemen den bestmöglichen technischen Support zu bieten. GRUNDREGELN Überprüfen Sie, dass sich alle auf der Vorderseite der Anleitung abgebildeten Bestandteile im Karton befinden.
  • Seite 12: Übersicht Über Die Rückseite

    Abdeckung abgenommen, dann die Befestigungsschrauben des Faders entfernen. Der Fader sollte nur mit einem vom Numark-Fachhändler authorisierten Ersatzteil ersetzt werden. MIC EINGANG – Verbinden Sie Ihr Mikrofon mit einem 6,3 mm Klinkenkabel mit diesem Eingang. Die Regler für das Mikrofon befinden sich auf der Oberseite des Mixers.
  • Seite 13: Specifications

    SPECIFICATIONS INPUTS Line: 10 kΩ input impedance 90 mV rms sensitivity for 1.22 V output Phono: 47 kΩ input impedance 1.1 mV rms sensitivity @ 1 kHz for 1.22 V output 600 Ω input impedance unbalanced Mic: 1.15 mV rms sensitivity for 1.22V output 67 mV rms max input OUTPUTS Line:...
  • Seite 16 MANUAL VERSION 1.0...

Inhaltsverzeichnis