Multiplex RR EasyStar II Zusatzanleitung
Quicklinks
D : Zusätzlich Empfohlene Ausrüstung
MULTIPLEX Empfänger ab RX-5 light M-LINK
oder RX-6-DR light M-LINK
Akku: Li-BATT ECO 3/1-2000 (M6)
GB: Additional recommended equipment:
MULTIPLEX receiver, min. RX-5 light M-LINK
or RX-6-DR light M-LINK
Battery: Li-BATT ECO 3/1-2000 (M6)
F : Equipement recommandé:
Récepteur MULTIPLEX à partir
de RX-5 light M-LINK
Récepteur RX-6-DR light M-Link
Batterie: Li-BATT ECO 3/1-2000 (M6)
I :
Componenti consiglati:
Ricevente MULTIPLEX a partire
da RX-5 light M-LINK
o RX-6-DR light M-LINK
Accumulatore: Li-BATT FX 3/1-2200 (M6)
E : Componentes recomendados:
Receptor MULTIPLEX, a partir
de RX-5 light M-LINK
A partir de RX-6-DR light M-LINK
El acumulador: Li-BATT FX 3/1-2200 (M6)
MULTIPLEX
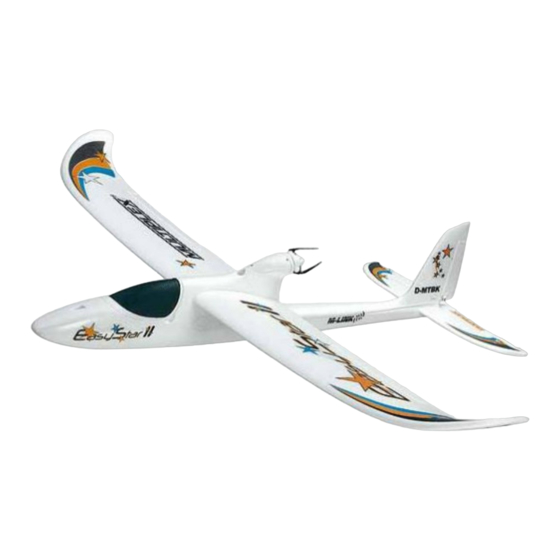
RR EasyStar II
# 26 4260
Das Modell RR EasyStar II # 26 4260 ist nahezu flugfertig vormontiert und
es entfallen für Sie zahlreiche Arbeitsschritte, die in der Bauanleitung be-
schrieben sind. Das Modell ist somit in kürzester Zeit betriebsbereit. Lesen
Sie vor Fertigstellung und Inbetriebnahme die Anleitungen und beachten
unbedingt auch die Sicherheitshinweise und Tipps.
Um das Modell vollständig auszurüsten, ist noch ein Empfänger und der
Antriebsakku notwendig. Unsere Empfehlungen hierzu entnehmen Sie bitte
der Bauanleitung bzw. diesem Blatt und darüber hinaus (z.B. Sender, Lade-
gerät etc.) dem aktuellen Katalog oder der Multiplex Homepage unter:
www.multiplex-rc.de
Stückliste RR EasyStar II
Lfd. Stk. Bezeichnung
1
1 Bauanleitung Easy Star II
1.1 1 Anleitungen RR EasyStar II / Antriebssatz
2
2 Dekorbogen
3,4* 1 Rumpf vormontiert
7,8 1 Tragflächen (L+R)
5
1 Kabinenhaube
6
1 Höhenleitwerk
50
1 Holm
1 Kleinteilebeutel mit den Teilen: 20(3x), 21(3x), 22(2x), 23(2x), 24(2x),
25(1x), 26(2x)
# 5 5808
==> siehe Stückliste in der Bauanleitung
# 5 5809
* mit 2 eingebauten Servos Nano-S (UNI) incl. kompl. Ruderanlenkungen,
# 15 7231
BL-Motor PERMAX BL-O 2830-1100, Regler MULTIcont BL-20 SD-L.
1. Prüfen Sie mit Hilfe der Stückliste den Inhalt auf Vollständigkeit.
# 5 5808
# 5 5809
2. Höhenleitwerk montieren Punkt 19., 20. in der Bauanleitung ==>
# 15 7231
Abb.20, 21
3. Rudergestänge des Höhenruders einhängen Punkt 11 ==> Abb.19
4. Empfänger und Flugakku einbauen
5. Servos und Ruder auf korrekte Neutralstellung überprüfen
6. Tragflächen anstecken Punkt 35 ==> Abb. 40, 41
# 5 5808
# 5 5809
7. Ruderausschläge und Schwerpunkt einstellen
# 15 7231
Punkt 38. und 40. in der Bauanleitung ==> Abb.B
8. Dekorbogen aufkleben Punkt 39. in der Bauanleitung
9. Der Erstflug - ab Punkt 42. in der Bauanleitung
Prüfen Sie vor jedem Start die Funktionsfähigkeit von Fernsteuerung und
# 5 5808
Modell, der Ruder und Anlenkungen sowie den Antrieb und den Ladezu-
# 5 5809
stand des Akkus.
# 15 7231
Optional: Querruder anlenken. Dazu sind zwei weitere Servos Nano-S
erforderlich # 6 5120- Punkte 24-28 ==> Abb. 25-28
Weiterhin erforderlich: 2 Servoverlängerungskabel 30 cm Best. Nr. 8
5031 zur Verbindung der Querruderservokabel mit dem Empfänger im Rumpf.
# 5 5808
# 5 5809
Als Anfänger sollten Sie unbedingt den Abschnitt „Grundlagen
am Beispiel eines Flugmodells" in der Anleitung lesen und sich
# 15 7231
ggf. von einem erfahrenen Modellpiloten unterstüzen lassen!
Höhenruderverriegelung öffnen:
Drücken Sie hierzu mit zwei Fingern die HLW Klammern 44
zusammen und ziehen gleichzeitig den HLW Schieber 48 nach
unten.
Modellsport GmbH & Co.KG • Westliche Gewerbestrasse 1 • D-75015 Bretten-Gölshausen • www.multiplex-rc.de
D
# 26 4260
Material
Abmessungen
bedruckte Klebefolien Fertigteile
Elapor geschäumt
Fertigteil
Elapor geschäumt
Fertigteil
Elapor geschäumt
Fertigteil
Elapor geschäumt
Fertigteil
GFK-Rohr
Ø8,0x5,4x579 mm
RR EasyStar II
# 26 4260
The RR EasyStar II model aircraft, # 26 4260, is supplied factory-assembled
and almost completely ready to fly. Many of the stages of construction
described in the building instructions have already been completed for
you, so the model can be ready for the air in a very short time. Please read
through these instructions before you complete and fly the model, paying
particular attention to the Safety Notes and Tips.
To complete the model's equipment you will need a receiver and flight
battery. Please refer to our recommendations stated in the building instructions
and this sheet. For details of additional equipment (e.g. transmitter, battery
charger etc.) we suggest that you turn to the current Multiplex catalogue, or
visit the website at: www.multiplex-rc.de
Parts List - RR EasyStar II
PartNo. Description
Material
1
1 EasyStar II building instructions
1.1 1 RR EasyStar II / Power Set instructions
2
2 Decal sheet
Printed film
3,4*1 Fuselage, assembled*
Moulded Elapor foam Ready made
7,8 1 Wing (L+R)
Moulded Elapor foam Ready made
5
1 Canopy
Moulded Elapor foam Ready made
6
1 Tailplane
Moulded Elapor foam Ready made
50 1 Wing joiner
GRP tube
1 Small parts bag containing the following components: 20 (3 x), 21 (3
x), 22 (2 x), 23 (2 x), 24 (2 x), 25 (1 x), 26 (2 x)
==> see Parts List in the Building Instructions
* with two factory-installed Nano-S (UNI) servos, complete with linkages,
PERMAX BL-O 2830-1100 BL motor, MULTIcont BL-20 SD-L speed
controller.
1. Check that the contents are complete, referring to the Parts List
2. Fit the tailplane Points19., 20. in the building instructions ==> Figs. 20,
21
3. Connect the elevator pushrod Point 11 ==> Fig.19
4. Install the receiver and flight battery
5. Check that the servos and control surfaces are exactly at neutral
(centre)
6. Plug in the wings Point 35 ==> Figs. 40, 41
7. Set the correct control surface travels and Centre of Gravity
Points 38. and 40. in the building instructions ==> Fig. B
8. Apply the decals Point 39. in the building instructions
9. First flight - starting at Point 42. in the building instructions
Before every flight check that all the systems are working properly: the
radio control system and model, the control surfaces and linkages, the
power system and the state of charge of the battery.
Optional: complete the aileron linkage. For this you require two additional
Nano-S servos, # 6 5120 - Points 24 - 28 ==> Figs. 25 - 28
Also required: two 30 cm servo extension leads, Order No. 8 5031 to
connect the aileron servo leads to the receiver in the fuselage.
If you are a beginner, it is essential to read the section entitled "The
basics of model flying" in the instructions. We strongly advise you to
ask an experienced model pilot for assistance.
Release of the elevator locking device:
Squeeze together with 2 fingers the elevator bracket 44 and pull
down simultaneous the elevator locking bolt 48.
GB
# 26 4260
Dimensions
8.0Øx5.4x
579mm

Verwandte Anleitungen für Multiplex RR EasyStar II


Inhaltszusammenfassung für Multiplex RR EasyStar II
- Seite 1 # 26 4260 # 26 4260 Das Modell RR EasyStar II # 26 4260 ist nahezu flugfertig vormontiert und The RR EasyStar II model aircraft, # 26 4260, is supplied factory-assembled and almost completely ready to fly. Many of the stages of construction es entfallen für Sie zahlreiche Arbeitsschritte, die in der Bauanleitung be-...
- Seite 2 # 26 4260 # 26 4260 Le modèle RR EasyStar II # 26 4260 est pré assemblé et quasiment près à voler, Il modello RR EasyStar II # 26 4260 è quasi pronto al volo e molti dei El modelo RR EasyStar II # 26 4260 viene casi listo para volar, con un alto grado de finalización y con muchos de los pasos de montaje descritos en...