Herunterladen Inhalt Inhalt Diese Seite drucken
Texas A/S Smart 5105WS Bedienungsanleitung
Vorschau ausblenden Andere Handbücher für Smart 5105WS:
Inhaltsverzeichnis

Werbung

Verfügbare Sprachen
  • DE

Verfügbare Sprachen

  • DEUTSCH, seite 16
DK
GB
DE
F
PL
RO
РУС
Smart 5105WS - XM 510W
VIGTIGT !
HUSK AT PÅFYLDE MOTOROLIE
SAE-30
FØR START!
ВАЖНО!
НЕ ЗАбУДЬТЕ ЗАПОЛНИТЬ
МОТОРНЫМ МАСЛОМ OIL SAE-30
ПРЕЖДЕ ЧЕМ НАЧАТЬ!
Texas A/S - Knullen 22 - DK-5260 Odense S - Denmark
Tel. +45 6395 5555 - www.texas.dk - post@texas.dk
Betjeningsvejledning
User manual
Bedienungsanleitung
Manuel de l'utilisateur
Instrukcja obsługi
Manual de instrucţiuni
Инструкция по эксплуатации
IMPORTANT !
REMEMBER TO FILL WITH ENGINE OIL
SAE-30
BEFORE START!
IMPORTANT !
NE PAS OUBLIER DE REMPLIR AVEC
DE L'HUILE DE MOTEUR SAE-30
AVANT LE DEMARRAGE !
ATENTIE!
GÂNDIRE TU AMINTIȚI ÎNAINTE ULEI
MOTOR DE FUNCȚIONARE (SAE-30)
COMPLETEAZA!
ACHTUNG !
DENKEN SIE DARAN, VOR
INBETRIEBNAHME MOTORÖL (SAE-30)
AUFZUFÜLLEN!
Version 18.2

Werbung

Inhaltsverzeichnis
loading

Inhaltszusammenfassung für Texas A/S Smart 5105WS

  • Seite 1 МОТОРНЫМ МАСЛОМ OIL SAE-30 DE L’HUILE DE MOTEUR SAE-30 INBETRIEBNAHME MOTORÖL (SAE-30) ПРЕЖДЕ ЧЕМ НАЧАТЬ! AVANT LE DEMARRAGE ! AUFZUFÜLLEN! Texas A/S - Knullen 22 - DK-5260 Odense S - Denmark Version 18.2 Tel. +45 6395 5555 - www.texas.dk - post@texas.dk...
  • Seite 2 Actual model may vary from the illustration shown Faktiske model kan variere fra de viste illustrationer Ihr Modell kann von der Abbildung abweichen Votre modèle actuel peut être différent des illustrations W rzeczywistości urządzenie może się nieznacznie różnić Modelul actual poate varia de cel prezentat în figură Фактическая...
  • Seite 3 Actual model may vary from the illustration shown Faktiske model kan variere fra de viste illustrationer Ihr Modell kann von der Abbildung abweichen Votre modèle actuel peut être différent des illustrations W rzeczywistości urządzenie może się nieznacznie różnić Modelul actual poate varia de cel prezentat în figură Фактическая...
  • Seite 4 Actual model may vary from the illustration shown Faktiske model kan variere fra de viste illustrationer Ihr Modell kann von der Abbildung abweichen Votre modèle actuel peut être différent des illustrations 1. Mounting the inner rear wheel cover as shown in the illustration. 1.
  • Seite 5 Actual model may vary from the illustration shown Faktiske model kan variere fra de viste illustrationer Ihr Modell kann von der Abbildung abweichen Votre modèle actuel peut être différent des illustrations W rzeczywistości urządzenie może się nieznacznie różnić Modelul actual poate varia de cel prezentat în figură Фактическая...
  • Seite 6 Actual model may vary from the illustration shown Faktiske model kan variere fra de viste illustrationer Ihr Modell kann von der Abbildung abweichen Votre modèle actuel peut être différent des illustrations W rzeczywistości urządzenie może się nieznacznie różnić Modelul actual poate varia de cel prezentat în figură Фактическая...
  • Seite 7 Advarselssymboler / Warning symbols / Warnsymbole / Simboluri de avertizare Læs betjenings-vejledningen Benyt høreværn og Advarsel: Advarsel: Brug ikke på skråninger over Rør ikke roterende dele grundigt før maskinen sikkerhedsbriller. Sikkerhedsinformation Pas på flyvende objector 22° benyttes. omkring situationer der kan ende i personskade Please read the user manual Always wear eye and ear...
  • Seite 8: Inhaltsverzeichnis

    Dansk Original brugsanvisning Betjen aldrig maskinen i hurtigt tempo. Undlad at overbelaste maskinens kapacitet ved at forsøge at skubbe den for stærkt. Sikkerhedsforskrifter ............ 1   Undlad at køre med passagerer. Identifikation af dele ............. 2   Tillad aldrig tilskuere at opholde sig foran enheden. Montering ..............
  • Seite 9: Identifikation Af Dele

    Brug kun originale reservedele eller tilbehør. Hvis Montering af kabler rekylstarter: Illustration M4 der ikke anvendes originale dele eller tilbehør, Træk og hold bøjle for motorstop inde, for at bortfalder garantien. frigøre startsnor grebet på motorblokken. Træk startsnoren forsigtigt ud af motorblok. Diverse (Motorstopbøjle SKAL holdes inde imens) Der er ikke påfyldt olie på...
  • Seite 10: Vaskestuds

    Rekylstart med primer Luftfilter Illustration F2 Tryk primer pumpen ind flere gange i første Luftfilteret skal efterses og renses jævnligt. Hvis filteret omgang ca. 1-3 gang suppler evt. med op ikke er blevet renset i en længere periode, vil dette til 3-5 gange.
  • Seite 11: Opbevaring Og Vedligeholdelse

    Montering/anvendelse af uoriginale reservedele brug. Græs og snavs skal løbende fjernes fra • Andre forhold, som Texas A/S er uden ansvar for undersiden af klippeskjoldet. Ved tipning af plæneklipperen (for rengøring) anbefales det at tippe Hvorvidt en sag er en garantisag eller ej, afgøres i hvert forenden opad (max.
  • Seite 12 GB Original instructions Do not overload machine capacity by attempting to push at too fast a rate. Do not carry passengers. Safety ................5   Never allow any bystanders in front of unit. Identification of the parts ..........6   Only operate the machine at daylight or in fully Mounting ..............
  • Seite 13: Identification Of The Parts

    Miscellaneous Mounting the recoil-starter: Illustration M4 The motor is not pre-filled with oil. Pull the engine brake handlebar and hold, in Always before start check the engine oil level. order to release the starter cord on the engine. Factory-fitted control devices, such as the handle- Pull gently the starter cord from the engine mounted clutch cable, must not be removed or (Engine brake handlebar MUST be hold)
  • Seite 14: Water Nozzle

    Stop: Illustration F3 Blade Release the engine brake and self-propelled bar to turn off the mower and the engine Inspection of the blade • Tilt the mower with the front upwards. Note: The blades will still rotate at up to 3 seconds •...
  • Seite 15: Storage And Maintenance

    Storage and maintenance Warranty terms and conditions Maintain your lawnmower: Check all bolts, screws, The warranty period is 2 years for private end users in nuts and deck. Dismount the blade and the belt plastic EU countries. cover for regular cleaning. Always make sure that the Products sold for commercial use, only have a warranty blade is sharp.
  • Seite 16: Betrieb

    DE Übersetzung der Originalbetriebsanleitung Betrieb Wenn ein Fremdkörper getroffen wurde, stoppen Sie sofort den Motor, entfernen Sie den Sicherheitsvorkehrungen..........9   Zündkerzenstecker und untersuchen Sie die Identifizierung der Teile ..........10   Maschine gründlich auf Beschädigungen. Montage ..............10   Reparieren Sie die Beschädigungen, bevor Sie  ...
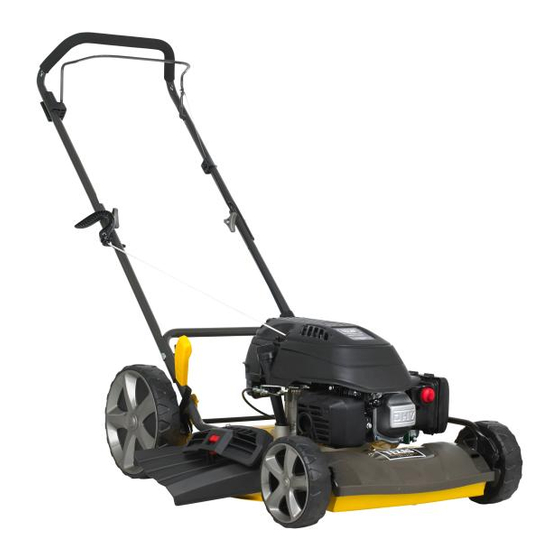
  • Seite 17: Identifizierung Der Teile

    Verwenden Sie beim Betanken niemals die Identifizierung der Teile Feststellfunktion der Tankpistole. Rauchen Sie nicht beim Betanken. Siehe Abildung ID Betanken Sie niemals innerhalb von Gebäuden Hinweis: Die Abbildungen können von Ihrem Modell oder wo Benzindämpfe auf eine Zündquelle treffen abweichen können.
  • Seite 18: Bowdenzug-Einstellungen

    Montage der Frontplatte: Abbildung M5* Stoppen: Abbildung F3 Bei Modellen mit Frontplatte mit Lassen Sie die Bügel für Motorbremse und Getränkehalter folgen Sie Abbildung M5-1 Eigenantrieb los, um den Rasenmäher und den Bei Modellen mit Frontplatte folgen Sie Motor auszuschalten! Abbildung M5-2 Hinweis: Die Messer drehen sich nach dem Stoppen * Hinweis: Nicht alle Modelle haben Frontplatten...
  • Seite 19: Luftfilter

    Luftfilter Wartung der Zündkerze Bitte inspizieren und reinigen Sie die Luftfilter Ziehen Sie den Zündkerzenstecker ab. regelmäßig. Wenn die Filter nicht über einen längeren Entfernen Sie Schmutz und Rückstände von der Zeitraum gereinigt worden sind, beeinflusst dies die Zündkerze mit einer Bürste. Motorkraft, den Abgasausstoß...
  • Seite 20: Standard-Gewährleistungsbedingungen

    Standard-Gewährleistungsbedingungen Die Gewährleistungsfrist beträgt zwei Jahre für private Endanwender in EU-Ländern. Bei kommerzieller Nutzung beträgt die Gewährleistungsfrist nur ein Jahr. Die Gewährleistung deckt Material- und/oder Herstellungsfehler ab. Einschränkungen und Anforderungen Normaler Verschleiß und Austausch von Verschleißteilen fallen NICHT unter die Gewährleistungsregelung.
  • Seite 21 FR Sommaire "Traduction de la notice originale immédiatement la cause. Les vibrations signalent en général un dégât. Coupez toujours le moteur et vérifiez que toutes les Consignes de sécurité ..........14   parties mobiles sont complètement arrêtées avant Identification des pièces ..........15  ...
  • Seite 22: Identification Des Pièces

    Vérifiez régulièrement que tous les boulons et vos préférences. Il peut s'avérer utile de décider écrous sont serrés. Resserrez-les si nécessaire. quelle Le moteur doit être complètement refroidi avant hauteur vous conviendra le mieux avant d'installer d'être rangé à l'intérieur ou couvert. la poignée.
  • Seite 23: Utilisation

    Utilisation Vidange d'huile Vérifiez toujours le niveau d'huile et remplissez de L'huile doit être vidangée après 5 heures lors de la nouveau son réservoir avant toute utilisation ! première utilisation puis au moins une fois par an. Lisez et respectez les instructions du guide de démarrage fourni avec la tondeuse ! Vous aurez besoin d'un kit d'extraction d'huile.
  • Seite 24: Lame

    Lame Rangement et entretien Inspection de la lame Entretenez régulièrement votre tondeuse à • gazon : Vérifiez tous les boulons, écrous et le Basculez la tondeuse en plaçant sa partie frontale capot. Assurez-vous que la lame est toujours en l'air. •...
  • Seite 25 PL Tłumaczeniem instrukcji oryginalnej wszystkie ruchome części całkowicie się zatrzymały. Zachować najwyższą ostrożność podczas pracy na Środki ostrożności ............18   zboczach. Elementy składowe ............ 19   Nigdy nie pracować w szybkim tempie. Montaż ............... 19   Nie przeciążać urządzenia, pracując w zbyt  ...
  • Seite 26: Elementy Składowe

    Wszystkie etykiety należy utrzymywać w dobrym Uchwyt oraz regulacja wysokości: Ilustracja M2 stanie i w razie konieczności wymieniać. Można regulować wysokość uchwytu. Oznacza to, Używać tylko oryginalnych części zamiennych lub że można go ustawić na odpowiedniej dla operatora akcesoriów. W przypadku użycia nieoryginalnych wysokości.
  • Seite 27: Obsługa

    Obsługa Wymiana oleju Zawsze przed uruchomieniem silnika należy Pierwszą wymianę oleju należy wykonać po 5 sprawdzić oraz uzupełnić poziom oleju! godzinach pracy kosiarki, a następnie co najmniej 1 raz Należy uważnie przeczytać oraz stosować w roku. wskazówki zawarte w dołączonej instrukcji uruchomienia! Konieczny będzie zestaw do odciągania oleju.
  • Seite 28: Ostrze

    Ostrze Przechowywanie w okresie zimowym: Opróżnić zbiornik paliwa i włączyć silnik aż do usunięcia resztek paliwa. Zdjąć kołpak świecy zapłonowej. Wyjąć świecę Kontrola ostrza zapłonową i wlać jedną łyżkę stołową oleju w otwór. • Obrócić kosiarkę spodem do góry. Kilkakrotnie pociągnąć sznurek rozruchowy. Włożyć •...
  • Seite 29 RO Cuprins - Traducere a Instrucţiuni originale Fiţi extrem de atent la operarea în pante. Nu operaţi niciodată maşina rapid. Nu suprasolicitaţi capacitatea maşinii, încercând să Precauţii de siguranţă ..........22   lucraţi la o viteză prea rapidă. Identificarea pieselor ..........23  ...
  • Seite 30: Identificarea Pieselor

    Întreţineţi sau înlocuiţi etichetele de siguranţă şi cu Adaptaţi cablul şi asiguraţi-l cu coliere pentru instrucţiuni, dacă este necesar. cablu Utilizaţi numai piese de schimb şi accesorii originale. Dacă nu se utilizează piese sau accesorii Montarea cablului de frână al motorului: Figura originale, răspunderea nu se mai aplică.
  • Seite 31: Duză De Apă

    Ajustarea înălţimii de tăiere: Figura F1 (figurile pot Umpleţi motorul cu ulei SAE-30. diferi de modelul dvs. actual) Verificaţi nivelul uleiului cu joja de ulei. (Min / Max) Maşina de tuns iarba are 6 înălţimi diferite. Înălţimea de tăiere este cuprinsă între 28 mm şi 75 mm Amintiţi-vă...
  • Seite 32: Întreţinerea Bujiei

    Întreţinerea bujiei MEMENTO: Achiziţionarea de piese de schimb, precum şi orice solicitare de reparaţie prin garanţie, impune întotdeauna specificarea numărului de model şi a Înlăturaţi capacul bujiei. numărului de serie. Acestea se găsesc pe eticheta CE îndepărtaţi prin periere orice impurităţi şi depuneri de pe maşină! de pe bujie.
  • Seite 33: Правила Безопасности

    Содержание - РУС осмотрите машину на предмет повреждений. Прежде чем продолжить работу, устраните повреждение Правила безопасности ..........26   Если во время работы машины появится Обозначение составных частей ......27   неестественная вибрация, заглушите двигатель Сборка ............... 27   и установите причину неполадки. Вибрация, как  ...
  • Seite 34: Обозначение Составных Частей

    Никогда не выполняйте заправку внутри зданий Сборка или там, где пары бензина могут вступить в контакт с источником воспламенения. Распаковка: Рисунок М1 Храните бензин и располагайте двигатель Извлечь газонокосилку из коробки, вытянув ее подальше от устройств, паяльных ламп, сбоку. Коробка содержит: барбекю, электроприборов, электрического...
  • Seite 35: Регулировка Тросика

    Ограждение бокового выброса: Рисунок М7 Насадка для разбрызгивания Поднимите боковое ограждение и установите ограждение бокового выброса. Затем вставьте В левой части деки газонокосилки расположена мульчирующий клин в задний выбрасыватель насадка для разбрызгивания, осуществляющая чтобы косить, используя задний выброс травы. промывку деки. (См. рисунок ID-F) Регулировка...
  • Seite 36: Нож

    см. А2 Техническое обслуживание Очистите место вокруг воздушного фильтра перед снятием. Регулярно обслуживайте газонокосилку: Аккуратно снимите бумажный фильтр и Проверьте затяжку всего крепежа. Регулярно проверьте его. Очистите его с помощью мягкой проверяйте состояние ножа. Нож должен быть щетки. Если фильтр очень загрязнен, замените всегда...
  • Seite 37: Tekniske Specifikationer

    Tekniske specifikationer / Technical specifications / Technische Daten / Caractéristiques techniques Model Model Modell Modèle Smart 5105WS XM 510W Klippebredde Cutting width Messer Lames 51 cm 51 cm Højdejustering Height adjustment Höheneinstellung Réglage de la hauteur 28-75 mm 28-75 mm Hjulstørrelse...
  • Seite 38: Fejlfinding

    Motor vil ikke stoppe Problem Årsag Løsning Maskinen stopper ikke efter 5 sek. • • Motorkabel går for stramt. Kontrollér motorkabel og juster, følg vejledningen i manualen. Hvis dit problem ikke er beskrevet i foroven, kontakt venligst et godkendt servicecenter eller Texas A/S.
  • Seite 39 The machine does not stop after 5 seconds • • The engine brake cable runs too tightly Check and adjust the engine brake cable, following the instructions in the manual. If your problem is not described above, please contact an approved service centre or Texas A/S.
  • Seite 40: Der Motor Stoppt Nicht

    Das Motorbremskabel liegt zu straff Überprüfen Sie das Motorbremskabel und stellen Sie es entsprechend den nicht an Anweisungen im Handbuch ein. Falls Ihr Problem nicht oben beschrieben ist, nehmen Sie bitte Kontakt mit einem anerkannten Kundendienstzentrum oder mit Texas A/S auf.
  • Seite 41 • Le câble du frein moteur est trop tendu. Vérifiez et réglez le câble du frein moteur en suivant les instructions du manuel. 5 secondes Si vous problème n'est pas décrit ci-dessus, veuillez contacter un réparateur agréé ou Texas A/S.
  • Seite 42 Linka hamulca silnika jest za bardzo naprężona Sprawdzić i wyregulować linkę hamulca silnika, według procedury opisanej w instrukcji po 5 sekundach obsługi. Jeżeli występujący problem nie jest tutaj opisany, prosimy o kontakt z wyznaczonymi centrami serwisowymi lub firmą Texas A/S.
  • Seite 43 Cablul de frână al motorului funcţionează prea Verificaţi şi ajustaţi cablul de frână al motorului, respectând instrucţiunile din manual. secunde strâns Dacă problema dvs. nu este descrisă mai sus, vă rugăm să contactaţi un centru de service aprobat sau Texas A/S.
  • Seite 44: Устранение Неполадок

    Машина не останавливается через 5 Трос торможения двигателя ходит слишком Проверьте и отрегулируйте трос двигателя, следуя инструкциям руководства по секунд туго эксплуатации. Если вы не нашли описание своей проблемы выше, обратитесь в авторизованный сервисный центр или в компанию Texas A/S.
  • Seite 45: Ce Overensstemmelseserklæring

    Het apparaat stopt niet na 5 seconden De motorremkabel draait te strak Controleer de motorremkabel en stel deze bij volgens de instructies in de handleiding. Als uw probleem hierboven niet is beschreven, neemt u dan contact op met een goedgekeurd service centre of met Texas A/S.
  • Seite 46 Plæneklipper • Lawn mower • Rasenmäher • La tondeuse à gazon • Kosiarka • Mașină de tuns gazon Smart 5105WS - XM 510W Er fremstillet i overensstemmelse med følgende direktiver • Is in compliance with the specifications of the machine directive and subsequent modifications •...

Diese Anleitung auch für:

Xm 510w

Inhaltsverzeichnis