Dell S320 Schnelleinstellungsanleitung
1
Connect the power cable and the appropriate signal cables
Connecter le câble d'alimentation et les câbles de signal
appropriés
Das Stromkabel und die passenden Signalkabel anschließen
Collegare il cavo elettrico e i cavi segnale appropriati
Conecte el cable de alimentación y los cables de señal
apropiados
4
Press the power button
Appuyer sur le bouton Marche/Arrêt.
Drücken Sie den Stromschalter.
Premere il pulsante di alimentazione
Pulse el botón de encendido
Dell S320_QSC-EMEA1.indd 1
NOTE:
Connect the Mini-USB cable (not included) to use the Page Up
and Page Down options on your remote control.
REMARQUE:
Connectez le câble Mini-USB (non fourni) pour utiliser les options
Page Haut et Page Bas sur votre télécommande.
HINWEIS:
Schließen Sie das Mini-USB-Kabel (nicht mitgeliefert) an, um die
Optionen "Page Up" (Bild auf) und "Page Down" (Bild ab) auf der
Fernbedienung zu benutzen.
NOTA:
Collegare il cavo Mini-USB (non in dotazione) per usare le opzioni
Pagina su e Pagina giù sul telecomando.
NOTA:
Conecte el cable Mini-USB (no incluido) para usar las opciones de
Retroceder Página y Avanzar Página en su mando a distancia.
NOTE:
If nothing appears on the screen, press <Fn><F8> or
<Fn><F1> for video redirection (Dell laptops only).
It may take several seconds for the image to appear.
REMARQUE:
Si rien n'apparaît sur l'écran, appuyez sur <Fn><F8> ou
<Fn><F1> pour la redirection vidéo (pour les ordinateurs
portables Dell uniquement).
Il peut falloir quelques secondes pour que l'image apparaisse.
HINWEIS:
Wenn nichts auf dem Bildschirm erscheint, drücken Sie bitte
die Tasten <Fn><F8> oder <Fn><F1> für die
Videoumleitung (nur bei Dell-Laptops).
Es kann einige Sekunden dauern, bis das Bild erscheint.
NOTA:
Se sullo schermo non appare nulla, premere <Fn><F8> o
<Fn><F1> per il reindirizzamento video (solo per laptop
Dell).
Potrebbero volerci diversi secondi prima che appaia l'immagine.
NOTA:
Si nada aparece en la pantalla, pulse <Fn><F8> o
<Fn><F1> para redirección de vídeo (Sólo portátiles de
Dell).
Puede que la señal tarde unos segundos en aparecer.
2
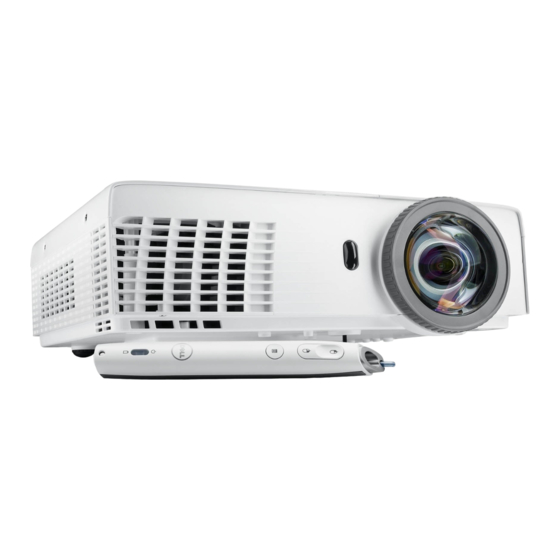
Remove the lens cap
Retirer le couvre-objectif
Die Objektivabdeckung entfernen
Rimuovere il tappo della lente
Quite la tapa de la lente
5
Adjust the image size and focus
Focus Adjust
Réglage de la mise au point
Fokuseinstellung
Regolazione del fuoco
Ajuste del Enfoque
Régler la taille de l'image et la mise au point
Die Bildgröße und den Fokus einstellen
Regolare la dimensione dell'immagine e la messa a fuoco
Ajuste el tamaño de la imagen y el enfoque
3
Insert the batteries into the remote
control
Insérez les piles dans la télécommande.
Legen Sie die Batterien in die Fernbedienung ein.
Inserire le batterie nel telecomando.
Inserte las baterías en el control remoto.
Press Auto Adjust to re-sync your computer to the projector for
proper image if necessary.
Appuyez sur Auto Adjust (Réglage auto) pour re-sync votre
ordinateur au projecteur pour une meilleure image si besoin.
Synchronisieren Sie Ihren Computer zur Optimierung der
Bildqualität – falls notwendig – erneut mit dem Projektor, indem
Sie auf Auto Adjust (Autom. Einrichten) drücken.
Se necessario, premere Auto Adjust (Regolazione automatica)
per sincronizzare di nuovo il computer col proiettore ed ottenere
immagini appropriate.
Pulse Auto Adjust (Ajuste automático) para volver a
sincronizar su equipo con el proyector si es necesario y ver
correctamente la imagen.
For more information about your projector, see your User's Guide.
Pour obtenir plus d'informations concernant votre projecteur,
consultez votre Guide Utilisateur.
Weitere Informationen zu dem Projektor finden Sie in der
Bedienungsanleitung.
Per ulteriori informazioni sul proiettore, vedere la Guida utente.
Para más información sobre su proyector, consulte su Guía de
Usuario.
2012/7/25 上午 05:14:20

Verwandte Anleitungen für Dell S320


Inhaltszusammenfassung für Dell S320
- Seite 1 Die Bildgröße und den Fokus einstellen Drücken Sie den Stromschalter. Potrebbero volerci diversi secondi prima che appaia l’immagine. Weitere Informationen zu dem Projektor finden Sie in der Regolare la dimensione dell’immagine e la messa a fuoco Premere il pulsante di alimentazione NOTA: Bedienungsanleitung.
- Seite 2 Telecomando 1 1. Enter button 12. Rechte Taste Mando a distancia are trademarks of Dell und das DELL-Logo Dell e il logo DELL sono Télécommande 10. Tasto alimentazione 12. Right button 13. Ab-Taste 10. Botón de Encendido Dell y el logotipo DELL Dell Inc.