Herunterladen Inhalt Inhalt Diese Seite drucken

Werbung

Verfügbare Sprachen
  • DE

Verfügbare Sprachen

  • DEUTSCH, seite 1
BENUTZERHANDBUCH
SET AUDIOTÜRSPRECHANLAGE advanced
3 Familien
Ruf tätigen mit Hilfe der Ruftasten der Außeneinheit;
Full-duplex Freisprech Audiokommunikation;
Das Zugangstor / die -Tür von der Inneneinheit aus öffnen;
Die Audioüberwachung des Eingangsbereiches;
Optionaler Hilfsbefehl: Autotor, Garagentür usw.;
Optional max. 3 parallel angeschlossene Audioinneneinheiten
Optional max. 3 parallel angeschlossene Ausseneinheiten
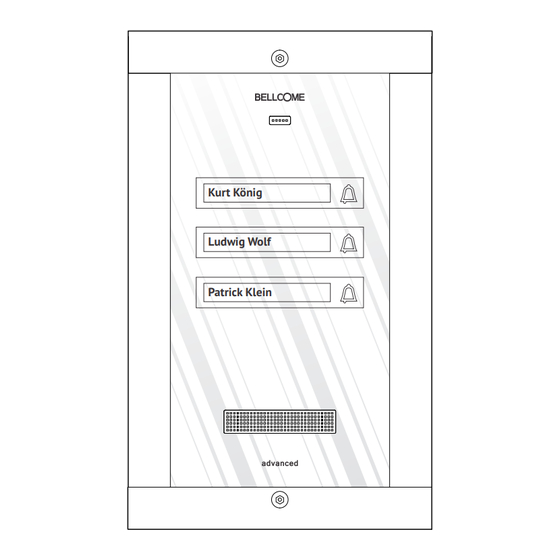
Kurt König
Ludwig Wolf
Patrick Klein
, für jede Familie
.
DE
;

Werbung

Inhaltsverzeichnis
loading

Inhaltszusammenfassung für Bellcome advanced

  • Seite 1 BENUTZERHANDBUCH SET AUDIOTÜRSPRECHANLAGE advanced 3 Familien Kurt König Ludwig Wolf Patrick Klein Ruf tätigen mit Hilfe der Ruftasten der Außeneinheit; Full-duplex Freisprech Audiokommunikation; Das Zugangstor / die -Tür von der Inneneinheit aus öffnen; Die Audioüberwachung des Eingangsbereiches; Optionaler Hilfsbefehl: Autotor, Garagentür usw.;...
  • Seite 2: Inhalt Des Sets

    1 INHALT DES SETS Kurt König Ludwig Wolf Patrick Klein Außeneinheit Inneneinheit Stromversorgungseinheit Verbindungsbox 1 Stück 3 Stück 1 Stück 1 Stück 238 × 144 × 53 mm 170 × 96 × 30 mm 130 × 141 × 73 mm 100 ×...
  • Seite 3 Gehäuse Glasbildschirm, 3 mm stark Aufputz Montage Schutzklasse (IP) IP31 Betriebstemperaturbereich 0°C ... + 40°C Transport- und - 33°C ... + 55°C Lagerungstemperaturen Masse 171 x 96 x 30 mm Gewicht 0,4 kg 2.3 Technische Eigenschaften der Stromversorgung 230V±10%/50Hz Betriebsspannung +14V - GND : +14VGleichstrom (stabilisiert)/ Versorgungsspanung / -strom 2A Gleichstrom...
  • Seite 4: Blockdiagramm Der Anlage

    Masse 100 x 71 x 60 mm Gewicht 0,2 kg 3 BLOCKDIAGRAMM DER ANLAGE Alle als „optional“ beschriebenen Produkte sind nicht im Lieferumfang erhalten und können separat erworben werden. AUSSEN INNEN Akku Inneneinheit 1 (Optional) 12V/7Ah Kurt König (Optional) Ludwig Wolf Elektromagnetisches Patrick Klein Schloss DC/ AC...
  • Seite 5: Installation

    INSTALLATION 4.1 Empfohlene Kabel Außeneinheit Stromversorgungseinheit Verbindungsbox Inneneinheit UTP CAT5e (AWG24) Kabel für Längen von bis zu max. 70 m zwsichen der Außeneinheitund der Stromversorgung und von 250 m zwischen dem Außeneinheit und der Inneneinheit. Falls Sie Verkabelungen von mehr als 250 m planen, kontaktieren Sie bitte den Hersteller für weitere Informationen.
  • Seite 6 4.3 Der Einbau der Stromversorgung Aufputz Einbau auf einer DIN Schiene PROG Video Audio STROMVERSORGUNGSEINHEIT (SCU.VDN.BL W) ACHTUNG! SCHLOSSÖFFNUNGSZEIT EINGANG: 230V Wechselspannung 50Hz, 0.4A Lebensgefahr, (sekunden) gerät nicht öffnen! AUSGANG 1: 14V, 2A Gleichspannung (S1) GEFAHR EINES AUSGANG 2: 14V, 0.5A Gleichspannung (S2) STROMSCHLAGS! DIN Schiene Befestigungsklammern...
  • Seite 7 Vorderansicht Seitenansicht Hinteransicht 4.5 Der Einbau der Inneneinheiten Bevor Sie anfangen... A3,5 × 35(32) Schraube Befestigungsteil – Führungsteil für Kabel (4 St.) 18 cm Die Inneneinheit wird auf einer Höfe Die Kabellänge von 155 cm (empfohlene Höhe) montiert. (von der Wand) 29,5 96,5 60,0...
  • Seite 8 Der Einbau der Außeneinheit Die Außeneinheit wird beim Grundstück- oder Hauseingang, auf die Halterung, die dem Zugangstor / -Tür am nächsten liegt, auf einer Höhe von ca. 1,70 m (Oberkante) vom Boden montiert, so dass sie vor Witterungseinflüssen geschützt ist. Das Zählen von Außeneinheit- Tastatur ist von kieloben, der erste Taste, der Adresse 1 bedeutet.
  • Seite 9 DA S A N S C H L U S S S C H E M ATA 9/92...
  • Seite 10: Die Inbetriebnahme Der Anlage

    5.1 Der Einbau des elektromagnetischen Schlosses (optional) Gleichstrom Wechselstrom 2 x 0.75 mm² Kabel Trafo. 12 V 230 V wechselstrom gleichstrom LA/C 2 x 0.75 mm² Gleichstrom Kabel elektromagnetisches Schloss Stromversorgungseinheit LA/C Die Zentraleinheit/ Stromversorgung kann  Strom von max. 1 A für die Versorgung des Wechselstrom Stromversorgungseinheit Schlosses liefern.
  • Seite 11 6.2 Die Überprüfung der Anschlüsse innerhalb der Anlage und der Anschluss der Stromversorgungseinheit Überprüfen Sie die Richtigkeit der Anschlüsse innerhalb der Anlage! Der +14V , GND , CD Empfang ist für alle Bestanteile der Anlage gemeinsam. Ein Kurzschluss dazwischen führt zu Beschädigungen der gesamten Anlage. Mit Hilfe eines Ohmmeters wird überprüft dass es keinen Kurzschluss in der Anlage gibt.
  • Seite 12 Die 10 A Sicherungen im Sicherungskasten und die 1 Die Anlage läuft nicht Stromversorgung: und 1,6 A Sicherungen vom (Stromversorgungseinheit Keine Spannung vom Stromversorgungseingang ohne Akku) 230 V Wechselstrom werden überprüft. Netz. PROG: Überprüfen der Kabelverbindungen. Ursachen für den Stromversorgung: Kurzschluss in der Kurzschluss finden und Die Anlage läuft nicht...
  • Seite 13 Die 10 A Sicherungen aus dem Elektroschaltschrank und Keine Spannung die 1 und 1,6 A Stromversorgung: Die Anlage vom 230 V Sicherungen vom S1: rot funktioniert Wechselstromnetz. Eingang der (Stromversorgungseinheit Die Anlage wird aus Stromversorgungseinheit PROG: mit Akku) dem Akku versorgt. werden überprüft.
  • Seite 14: Wartung

    3 ZUGANG ZUGANG UND GESPRÄCH BEENDEN! Nach dem Befehl ist das Schloss für eine Zeitspanne von 1 ... 10 sec. nicht gesperrt, damit die Besucher herein kommen können. // Wenn Sie die Taste nicht im Vorfeld gedrückt haben, kann kein Zugang gewährt werden.
  • Seite 15: Gewährleistung

    Brand, Erdbeben, Einstellungen, die vom dafür nicht zugelassenen Personal ausgeführt wurden, wenn die Bestandteile der Anlage bei Renovierungsarbeiten nicht geschützt werden. Die BELLCOME Anlagen für Ein- und Mehrfamilienhäuser sind gemäß den gültigen EU-Vorschriften hergestellt und sind gemäß dem EG-Beschilderungsverfahren beschildert. HERGESTELLT FÜR...
  • Seite 16 USER MANUAL KIT Audio DOOR PHONE advanced 3 families Kurt König Ludwig Wolf Patrick Klein Call from the outdoor panel keys; Full duplex hands-free audio communication; Command of the access gate/door opening from the interior terminal; Audio monitoring of the entrance of the property, by the inhabitant;...
  • Seite 17: Kit Components

    1 KIT COMPONENTS Kurt König Ludwig Wolf Patrick Klein Outdoor panel Terminal Supply control unit Audio connection 1 pc. 2 pcs. box - 1 pc. 238 × 144 × 53 mm 170 × 96 × 30 mm 130 × 141 × 73 mm 100 ×...
  • Seite 18 Case Glass screen, 3 mm thick Surface Mounting Casing protection level (IP) IP31 Operating temperature range 0°C ... + 40°C Range of transport and storage - 33°C ... + 55°C temperatures Dimensions 171 x 96 x 30 mm Weight 0,4 kg 2.3 Technical features of the supply control unit 230V±10%/50Hz Supply tension...
  • Seite 19 3 BLOCK DIAGRAM OF THE SYSTEM All additional products are sold separately. OUTDOOR INDOOR Terminal 1 (Optional) 12V/7Ah Kurt König (Optional) Ludwig Wolf Electromagnetic Patrick Klein lock DC / AC 230 Va.c. Supply control unit Terminal 2 Panel Terminal 3 Additional terminal in parallel (optional) From the audio connection box...
  • Seite 20 INSTALLATION 4.1 Recommended cables Outdoor panel Supply control unit Audio connection box Audio terminal UTP CAT5e (AWG24) cable for distances of maximum 70 m between the outdoor panel and the supply control unit and 250m between the outdoor panel and the audio terminal. For distances greater than 250 m, please request additional information from the producer.
  • Seite 21 4.3 Installation of the supply control unit Wall mounting DIN rail mounting PROG Video Audio STROMVERSORGUNGSEINHEIT (SCU.VDN.BL W) ACHTUNG! SCHLOSSÖFFNUNGSZEIT EINGANG: 230V Wechselspannung 50Hz, 0.4A Lebensgefahr, (sekunden) gerät nicht öffnen! AUSGANG 1: 14V, 2A Gleichspannung (S1) GEFAHR EINES AUSGANG 2: 14V, 0.5A Gleichspannung (S2) STROMSCHLAGS! DIN rail Retainer...
  • Seite 22 Frontal view Lateral view Back view 4. 5 Installation of the audio terminal Before starting... A3,5 × 35(32) screw Cable retainers (4 pcs.) – adapters 18 cm The terminal will be placed at 155 cm Cable length height (recommended height) (from the wall) 29,5 96,5...
  • Seite 23 Installation of the outdoor panel The outdoor panel is installed at the entrance of the property or building, on the body closest to the access door, at a height of approx. 1.7 m (upper part) from the ground, protected from rain and sunrays.
  • Seite 24 CO N N E CT I O N D I AG RA M 24/92...
  • Seite 25: Commisioning Of The System

    5.1 Installation of the electromagnetic lock (optional) Drive current (D C) Alternative current (AC) 2 x 0.75 mm² cable Transformer 230 Va . c . 12 Va . c . LA/C 2 x 0.75 mm² Drive current cable electromagnetic lock (DC) supply control unit The supply control unit can supply a current of LA/C...
  • Seite 26: Troubleshooting

    6.2 Checking the precision of the connections in the system and the connection of the supply control unit Check the precision of the connections in the system! The +14V , GND , CD signals are common to all components of the system. Any short circuit between them leads to the non-operation of the entire system.
  • Seite 27 Check the 10A fuses from the electrical panel and Control unit: The system does not the 1,6A Fuse 1 from the Lack of tension from function (supply Supply control unit input. the 230Va.c. network control unit without Check the continuity of PROG: accumulator) the supply cables.
  • Seite 28 Check the 10A fuses from Lack of tension from the Control unit: the electrical panel and The system functions 230Va.c. network S1: red the 1,6A Fuse 1 from the (supply control unit The system functions supply control unit input. with accumulator) powered by the PROG: Check the continuity of...
  • Seite 29: Maintenance

    3 ACCES ACCESS and END COMMUNICATION! After the command, the lock is unblocked for 1...10 sec. for the access of the visitors. // You cannot grant access without having a prior communication. Communication 4 AUX COMMAND AUXILIARY COMMAND No matter what the state of the terminal is: monitoring, call or communication, this key may action an automation connected to the system: auto access or garage gate, lighting system etc.
  • Seite 30: Warranty

    The BELLCOME systems for residential buildings are produced in compliance with the EU standards and bear the CE conformity marking.
  • Seite 31: Manuel De L'utilisateur

    MANUEL DE L'UTILISATEUR KIT INTERPHONE AUDIO advanced 3 famillies Kurt König Ludwig Wolf Patrick Klein Appel de la touche du panneau extérieur; Communication audio en duplex intégral mains-libres; Ouverture du portillon / de la porte d'accès du terminal intérieur; Surveillance audio de l'entrée par le locataire;...
  • Seite 32: Composants Du Kit

    1 COMPOSANTS DU KIT Kurt König Ludwig Wolf Patrick Klein Panneau extérieur Terminal Unité centrale Boîte de jonction 1 pc. 3 pcs. 1 pc. audio -1 pc. 238 × 144 × 53 mm 170 × 96 × 30 mm 130 × 141 × 73 mm 100 ×...
  • Seite 33 Carcasse Écran en verre, épaisseur 3 mm En surface Montage Grade de protection par encastré (IP IP31 0°C ... + 40°C Gamme des températures de fonctionnement Gamme des températures - 33°C ... + 55°C de transportation et de stockage Dimensions hors tout 171 x 96 x 30 mm Masse 0,4 kg...
  • Seite 34 Dimensions hors tout 100 x 71 x 60 mm Masse 0,2 kg 3 SCHÉMA-BLOC DE L'INSTALLATION Tous les produits optionnels sont vendus séparément. EXTÉRIEUR INTÉRIEUR Terminal 1 (En option) 12V/7Ah Kurt König (En option) Ludwig Wolf Serrure Patrick Klein CC/CA 230 Vc.a Terminal 2 Unité...
  • Seite 35 INSTALLATION 4.1 Câbles recommandés Panneau extérieur Unité centrale Boîte de jonction audio Terminal audio Câble UTP CAT5e (AWG24) pour des distances jusqu'à 70 m entre le panneau extérieur et l'unité centrale et 250 m entre le panneau extérieur et le terminal vidéo. Pour des distances sur le câble supérieures à...
  • Seite 36 4.3 L'installation de l'unité centrale Montage en surface Montage sur Rail DIN PROG Video Audio STROMVERSORGUNGSEINHEIT (SCU.VDN.BL W) ACHTUNG! SCHLOSSÖFFNUNGSZEIT EINGANG: 230V Wechselspannung 50Hz, 0.4A Lebensgefahr, (sekunden) gerät nicht öffnen! AUSGANG 1: 14V, 2A Gleichspannung (S1) GEFAHR EINES AUSGANG 2: 14V, 0.5A Gleichspannung (S2) STROMSCHLAGS! Rail DIN Clips de fixation...
  • Seite 37 Vue de face Vue de côté Vue arrière 4.5 Installation du terminal audio Avant de commencer ... Vis A3,5 × 35(32) Pièces fixation- (4 pcs.) guide des câbles 18 cm Le terminal sera déplacé à une hauteur longueur du câble de 155cm (hauteur recommandée).
  • Seite 38 Installation du panneau extérieur Le panneau extérieur est monté à l'entrée de la propriété ou dans l'immeuble, sur le support la plus proche du portillon /de la porte d'accès, à une hauteur d'env. 1,7 m (partie supérieur) à la terre, à l'abri de la pluie et du soleil. La numérotation de touches de panneau extérieur est de bas en haut, la première touche signifiant l'adresse 1.
  • Seite 39 L E S C H É M A D E CO N N E X I O N S 39/92...
  • Seite 40 5.1 Installation de la serrure électromagnétique (en option) Courant continu (CC) Courant alternatif (CA) Câble 2 x 0.75 mm² Transformateur 230 Vc . a . 12 Vc . a . LA/C Serrure électromagnétique Câble de courant continu (CC) 2 x 0.75 mm² Unité...
  • Seite 41: Dépannage

    6.2 Contrôle des connexions dans l'installation et le raccordement de l'unité centrale Vérifiez l'exactitude des connexions dans l'installation! Les signaux +14V , GND , CD sont communes à tous les composants de l'installation. Tout court-circuit entre elles conduit à l'échec de non- fonctionnement de l'ensemble de l'installation. À...
  • Seite 42 On vérifie les fusibles de L'installation ne Unité centrale : 10A dans le panneau fonctionne pas Pas de tension à partir électrique et le fusible 1 (unité centrale du réseau 230Vc.a. de 1,6 A dans l'entrée sans accumulateur) PROG: de l'unité centrale. IL'installation ne Unité...
  • Seite 43 On vérifie les fusibles de 10A dans le panneau Unité centrale : Pas de tension du réseau L'installation fonctionne électrique et la fusible 1 S1: rouge 230Vc.a.L'installation (unité centrale de 1,6 A dans l'entrée de fonctionne alimenté avec accumulateur) l'unité centrale. La continuité PROG: de l'accumulateur des câbles d'alimentation...
  • Seite 44: Entretien

    3 ACCÈS ACCÈS ET FINIR LA CONVERSATION! Après l'ordre, la serrure est libérée au cours des 1 ... 10 secondes pour accorder l'accès aux visiteurs. // Vous ne pouvez pas accorder l'accès, sauf si vous avez déjà touche la clé Conversation 4 COMMANDE AUX COMMANDE AUXILIAIRE...
  • Seite 45: Garantie

    Les installations BELLCOME pour bâtiments de type villa sont effectués conformément aux normes de l'UE et portent le marquage selon CE.
  • Seite 46 IL MANUALE DELL'UTENTE KIT AUDIO-CITOFONO advanced 3 famiglie Kurt König Ludwig Wolf Patrick Klein Chiamata dal tasto del pannello esterno; Comunicazione audio full-duplex vivavoce; Apertura del cancello/ porta di accesso dal terminale interno; Monitoraggio audio dell'ingresso dal locatario; Comando ausiliario opzionale: cancello automatico, porta del garage, ecc.;...
  • Seite 47: Composizione Del Kit

    1 COMPOSIZIONE DEL KIT Kurt König Ludwig Wolf Pannello esterno Dose derivazione Terminale – 3 pezzi Unità centrale – 1 pezzo – 1 pezzo - 1 pezzo 170 × 96 × 30 mm 130 × 141 × 73 mm 238 × 144 × 53 mm 100 ×...
  • Seite 48 Apparentemente Montaggio Grado di protezione attraverso il IP31 montaggio della carcassa (IP) Gamma delle temperature di 0°C ... + 40°C trasporto e stoccaggio Gamma delle temperature di - 33°C ... + 55°C trasporto e stoccaggio Dimensioni della sagoma 171 x 96 x 30 mm 0,4 kg Massa 2.3 Caratteristiche tecniche dell'unità...
  • Seite 49 3 SCHEMA A BLOCCHI DELL'IMPIANTO Tutti i prodotti opzionali si acquistano separatamente ESTERNO INTERNO Terminale 1 (Opzionale) 12V/7Ah (Opzionale) Dose Kurt König derivazione Ludwig Wolf Serratura Patrick Klein CC/CA 230 Va.c. Unità centrale Terminale 3 Pannello Terminale 2 Terminale aggiuntivo in parallelo (opzionale) Dalla dose derivazione Terminale...
  • Seite 50: Installazione

    INSTALLAZIONE 4.1 Cavi raccomandati Pannello esterno Unità centrale Dose derivazione Terminale audio Cavo UTP CAT5e (AWG24) per distanze non superiori a 70 m tra il pannello esterno e l'unità centrale e 250 m tra il pannello esterno e il terminale. Per distanze su cavo superiori a 250 m richiedere informazioni aggiuntive dall'impresa produttrice.
  • Seite 51 4.3 Istallazione dell'unità centrale Montaggio su muro Montaggio sulla rotaia DIN PROG Video Audio STROMVERSORGUNGSEINHEIT (SCU.VDN.BL W) SCHLOSSÖFFNUNGSZEIT EINGANG: 230V Wechselspannung 50Hz, 0.4A ACHTUNG! Lebensgefahr, (sekunden) gerät nicht öffnen! AUSGANG 1: 14V, 2A Gleichspannung (S1) GEFAHR EINES AUSGANG 2: 14V, 0.5A Gleichspannung (S2) STROMSCHLAGS! Clip di fissaggio Rotaia DIN...
  • Seite 52 Vista frontale Vista laterale Vista posteriore Istallazione dei terminali audio 4. 5 Prima d'iniziare … Vite A3,5 × 35(32) Pezzi fissaggio (4 pezzi) – guida cavi 18 cm Il terminale si colloca all'altezza di Lunghezza cavo 155cm (altezza raccomandata). (dal muro) 29,5 96,5 60,0...
  • Seite 53 4.6 Istallazione del pannello esterno Il pannello esterno viene montato all'ingresso sulla proprietà o nell'immobile, sul supporto più vicino al cancello/ porta d'accesso, ad un'altezza di circa 1,7 m (parte superiore) rispetto al suolo, protetto dalla pioggia e dai raggi solari. La numerazione delle tasti di pannello all'aperte è...
  • Seite 54: Connection Diagram

    CONNECTION DIAGRAM...
  • Seite 55 5.1 L'istallazione della serratura elettromagnetica (opzionale) Corrente continua (CC) Corrente alternata (AC) Cavo 2 x 0.75 mm² Trasformatore 230 Vc . a . 12 Vc . a . LA/C Serratura elettromagnetica Cavo di corrente continua (CC) 2 x 0.75 mm² Unità...
  • Seite 56 6.2 Verificazione delle connessioni nell'impianto e la connessione dell'unità centrale Verificate la correttezza delle connessioni nell'impianto! I segnali +14V , GND , CD sono comuni a tutti i componenti dell'impianto. Qualsiasi cortocircuito tra loro porta al non-funzionamento dell'intero impianto. Con l'aiuto di un ohmmetro Verificare che non sia un cortocircuito tra le connessioni, ovunque nell'impianto. Collegate l'unità...
  • Seite 57 Verificare gli interruttori di 10A dal Unità centrale: Mancanza di quadro elettrico e L'istallazione non l'interruttore 1 di 1,6A tensione dalla funziona (unità centrale dal entrata dell'unità rete 230Vc.a. senza accumulatore) centrale. Verificare la PROG: continuazione dei cavi d'alimentazione. Unità centrale: S'identifica il luogo del Cortocircuito L'istallazione non...
  • Seite 58 Mancanza della Verificare gli interruttori tensione dalla rete Unità centrale: L'istallazione funziona di 10A dal quadro 230V c.a. S1: rosso (unità centrale con elettrico e l'interruttore L'istallazione accumulatore) di 1,6A dall'entrata funziona alimentata PROG: dell'Unità centrale dall'accumulatore UTILIZZAZIONE 7.1 Istruzioni di sicurezza in utilizzo Non colpire lo schermo di vetro con oggetti duri! Se lo schermo frontale di vetro crepa, NON toccare il prodotto! 7.2 L'utilizzazione dei terminali audio...
  • Seite 59: Manutenzione

    3 ACCESSO ACCESSO E FINISCE LA CONVERSAZIONE! Dopo il comando, la serratura è sbloccata durante 1…10 sec. per dare l'accesso ai visitatori. dare l'accesso // Non è possibile senza avere una comunicazione preventiva. Conversazione 4 COMANDO AUS. COMANDO AUSILIARIO Indipendentemente dallo stato del terminale: monitoraggio, chiamata o conversazione, questo tasto può...
  • Seite 60: Garanzia

    Gli impianti BELLCOME per palazzi tipo villa sono realizzati in conformità agli standard UE e hanno il marchio di conformità CE. PRODOTTO PER...
  • Seite 61: Gebruikershandleiding

    GEBRUIKERSHANDLEIDING KIT AUDIOINTERFON advanced 3 gezinnen Kurt König Ludwig Wolf Patrick Klein Oproep van de knop van het externe paneel; Full- duplex audio-communicatie hands-free; Mogelijkheid van het openen van de toegangspoort/deur van de inwendige terminal; Audiobewaking van de ingang door de bewoner;...
  • Seite 62 1 KIT SAMENSTELLING Kurt König Ludwig Wolf Patrick Klein Uitwendig paneel – 1 stuk Terminal - 3 stukken Centrale eenheid – 1 stuk. Verbindingsdoos - 1 stuk 238 × 144 × 53 mm 170 × 96 × 30 mm 130 × 141 × 73 mm 100 ×...
  • Seite 63 Huisvesting Glazen scherm, 3 mm dik Schijnbaar Montage Beschermingsgraad huisvesting IP31 Operationeel temperatuurbereik 0°C ... + 40°C Operationeel temperatuurbereik - 33°C ... + 55°C voor transport en opslag Afmetingen 171 x 96 x 30 mm Gewicht 0,4 kg 2.3 Technische kenmerken van de centrale eenheid Spanningen 230V±10%/50Hz +14V - GND : +14V...
  • Seite 64 BLOKSCHEMA VAN DE INSTALLATIE Alle optionele producten worden afzonderlijk verkocht. Terminal 1 BUITEN BINNEN Accu 12V/7Ah (Optioneel) Verbindingsdoos Kurt König Ludwig Wolf Slot Patrick Klein (gelijkstroom/ wisselstroom) 230 V wisselstroom (Optioneel) Centrale Terminal 2 eenheid Paneel Terminal 3 3.1 Schema bloc de conectare în paralel a 3 terminale adiționale (opțional) Toegevoegde terminals in parallel (optioneel) Van de centrale...
  • Seite 65 INSTALLEREN 4.1 Aanbevolen kabels Uitwendig paneel Centrale eenheid Verbindingsdoos audio Audio terminal UTP CAT5e-kabel (AWG24) voor afstanden van maximum 70 m tussen het buitenste paneel en de centrale eenheid en 250 m tussen het buitenste paneel en de Audio-terminal. Voor kabelafstanden langer dan 250 m kunt u aanvullende informatie aanvragen van de fabrikant.
  • Seite 66 4.3 Installeren van de centrale eenheid Montage aan de wand Montage op Rail DIN Rail DIN Bevestigingshaak Schroef A3,5x32 (2 stuks) Beschermkap (2 stuks) Schroef B2,9 x 13 (4 stuks) Vooraanzicht Zijaanzicht Achteraanzicht De accu zal gekoppeld worden aan de sluitklemmen van de centrale eenheid na het in werking stellen van de installatie.
  • Seite 67 Vooraanzicht Zijaanzicht Achteraanzicht 4.5 Installeren van de audio-terminals Voor aanvang…. Onderdelen voor het Schroef A3,5 × 35(32) vastzetten- (4 stuks) geleiden van kabels De terminal zal op een hoogte van 18 cm 155 cm geplaatst worden Kabellengte (vanaf de wand) (aanbevolen hoogte).
  • Seite 68 4.6 Installeren van het uitwendige paneel Het uitwendige paneel wordt gemonteerd bij de ingang van het eigendom of in het pand, op een steun zo dicht mogelijk bij de poort/toegangsdeur, op een hoogte van ongeveer 1,7 m (bovenkant) vanaf de vloer, beschermd tegen regen en zonnestralen. De uitwendige paneel toetsen nummering is van beneden naar boven, de eerste toets betekenis adres 1.
  • Seite 69 OVERZICHT VAN VERBINDINGEN 69/92...
  • Seite 70 5.1 Installeren van het elektromagnetische slot (optioneel) Gelijkstroom Wisselstroom Kabel Transformator 2 x 0.75 mm² wisselstroom 12 V 230 V LA/C wisselstroom Kabel Elektromagnestisch slot 2 x 0.75 mm² op gelijkstroom Centrale eenheid De centrale eenheid is in staat stroom van max. LA/C ...
  • Seite 71 6.2 Controle van de verbindingen in de installatie en de aansluiting van de centrale eenheid Controleer de deugdzaamheid van de verbindingen in de installatie! De signalen +14V , GND , CD zijn gelijk voor alle onderdelen van de installatie. Elke kortsluiting hiertussen leidt tot uitval van de gehele installatie. Met behulp van een ohmmeter wordt gecontroleerd of er geen kortsluiting bestaat tussen de verbindingen, overal in de installatie Sluit de centrale eenheid aan op het net van 230Vwisselstroom middels het koppelen van de twee...
  • Seite 72 De zekeringen van 10A in de elektriciteitskast en De installatie werkt Sig.1 van 1,6A op de ingang Centrale eenheid: niet: Ontbreken van de centrale eenheid (centrale eenheid worden gecontroleerd. De netspanning 230V continuïteit van de zonder accu) wisselstroom PROG: voedingskabels wordt gecontroleerd.
  • Seite 73 De zekeringen van 10V Ontbreken spanning uit de elektriciteitskast Centrale eenheid: van het net 230V en Sig.1 van 16A bij de De installatie werkt S1: rood wisselstroom (centrale eenheid met ingang van de centrale De installatie werkt, accu) eenheid, worden PROG: gevoed door de accu gecontroleerd.
  • Seite 74 3 TOEGANG TOEGANG EN AFSLUITEN GESPREK! Als gevolg van de opdracht, wordt het slot geopend gedurende 1…10 sec. om de bezoekers toegang te verlenen. // U kunt geen toegang verlenen als u niet eerst de toets ingedrukt hebt. Gesprek 4 Opdracht AUX ONDERSTEUNENDE OPDRACHT Ongeacht de staat van de terminal: bewaking, oproep of gesprek, kan deze toets een aan de installatie verbonden automatisering in werking...
  • Seite 75 De BELLCOME-installaties voor gebouwen van het type villa zijn uitgevoerd in overeenstemming met de EU-voorwaarden en dragen het keurmerk CE. GEPRODUCEERD IN...
  • Seite 76: Instrukcja Użytkownika

    INSTRUKCJA UŻYTKOWNIKA ZESTAW AUDIODOMOFONU advanced 3 rodzin Kurt König Ludwig Wolf Patrick Klein Przycisk wywołania na panelu zewnętrznym; Prowadzenie rozmowy full-duplex hands-free; Otwarcie bramy/drzwi wejściowych z modułu wewnętrznego; Monitorowanie audio wejścia przez domownika; Opcjonalne zamówienie wyposażenia dodatkowego: automatyczne bramy, drzwi garażowe itp.;...
  • Seite 77: Zawartość Zestawu

    1 ZAWARTOŚĆ ZESTAWU Kurt König Ludwig Wolf Patrick Klein Panel zewnętrzny Moduł Jednostka główna Skrzynka przyłączeniowa - 1 szt. - 1 szt. - 3 szt. - 1 szt. 100 × 71 × 60 mm 238 × 144 × 53 mm 170 ×...
  • Seite 78 Obudowa Ekran szklany, gruby. 3 mm Na widoku Instalacja Stopień ochrony zapewniany przez IP31 obudowę (IP) Zakres temperatur pracy 0°C ... + 40°C Zakres temperatur transportu - 33°C ... + 55°C i przechowywania Rozmiary gabarytowe 171 x 96 x 30 mm Ciężar 0,4 kg 2.3 Charakterystyka techniczna jednostki głównej...
  • Seite 79 Rozmiary gabarytowe 100 x 71 x 60 mm Ciężar 0,2 kg 3 SCHEMAT BLOKOWY UKŁADU Wszystkie produkty opcjonalne są do nabycia osobno. NA ZEWNĄTRZ WEWNĄTRZ Akumulator Moduł 1 (Opcjonalnie) 12V/7Ah Kurt König Ludwig Wolf Zamek drzwiowy Patrick Klein PS/PZ 230 Vp.p. (Opcjonalnie) Moduł...
  • Seite 80 INSTALACJA 4.1 Zalecane przewody Panel zewnętrzny Jednostka główna Skrzynka przyłączeniowa Moduł audio Przewody UTP CAT5e (AWG24) dla maksymalnych odległości wynoszących 70 m między panelem zewnętrznym i jednostką główną i 250 m między panelem zewnętrznym a modułem audio. Dla odległości przewodów powyżej 250 m należy uzyskać dodatkowe informacje od producenta. Jednostka główna Zamek elektromagnetyczny (opcjonalnie) Kabel wielożyłowy, elastyczny (Cu) 2 lub 3 x 0,75 mm ²...
  • Seite 81 4.3 Instalacja jednostki głównej Zainstalowanie na ścianie Zainstalowanie na Szynie DIN Śruba A3,5 × 32 (2 szt.) Pokrywa Śruba B2,9 x 13 (4 szt.) Szyna DIN Uchwyt mocujący ochronna (2 szt.) 73,0 42,8 51,0 140,7 35,5 Widok z przodu Widok z boku Widok z tyłu Akumulator zostanie podłączony do zacisków jednostki głównej po uruchomieniu instalacji.
  • Seite 82 Widok z przodu Widok z boku Widok z tyłu Instalacja modułów audio Przed rozpoczęciem instalacji... Śruba A3,5 × 35(32) Części mocowania- (4 szt.) prowadzenia przewodu 18 cm Moduł należy umieścić na wysokości Długość przewodu 155 cm (wysokość zalecana). (od ściany) 29,5 96,5 60,0...
  • Seite 83 4.5 Instalacja panelu zewnętrznego Zewnętrzny panel montowana jest przed wejściem na nieruchomość lub do budynku, w miejscu znajdującym się najbliżej bramy / drzwi wejściowych, na wysokości ok. 1,7 m (część górna) od podłoża, chronione przed deszczem i bezpośrednim działaniem promieni słonecznych. Numeracja klawiaturze panelu jest od dołu do góry, pierwszy klucz adres Znaczenie 1.
  • Seite 84: Schemat Połączeń

    SCHEMAT POŁĄCZEŃ 84/92...
  • Seite 85: Uruchomienie Systemu

    5.1 Instalacja zamka (opcjonalnie) Prąd stały (PS) Prąd przemienny (PP) Przewód 2 x 0.75 mm² Transformator 230 Vp.p. 12 Vp.p. LA/C Zamek Przewód Elektromagnetyczny 2 x 0.75 mm² Jednostka główna na prąd stały (PS) LA/C Jednostka główna jest w stanie dostarczać prąd ...
  • Seite 86 6.2 Sprawdzenie połączeń w systemie i podłączenie jednostki głównej Sprawdzić poprawność połączeń w systemie! Sygnały +14V , GND , CD są wspólne dla wszystkich części składowych systemu. Jakiekolwiek zwarcie między nimi prowadzi do awarii całego systemu. Z pomocą omomierza należy sprawdzić czy nie ma zwarcia między złączami, gdziekolwiek w systemie.
  • Seite 87 Należy sprawdzić bezpieczniki 10A elektrycznej tablicy Jednostka główna: System nie działa rozdzielczej i Brak zasilania w (jednostka główna bez Bezpiecznik1 1,6A przy sieci 230Vp.p. akumulatora) wejściu jednostki PROG: głównej. Należy sprawdzić ciągłość przewodów zasilających. Należy zidentyfikować Jednostka główna: System nie działa miejsce zwarcia.
  • Seite 88 Należy sprawdzić bezpieczniki 10A Brak zasilania w sieci elektrycznej tablicy Jednostka główna: 230Vp.p. System działa rozdzielczej i Bezpiecznik S1: czerwony System działa na (jednostka główna z 1 1,6A przy wejściu zasilaniu z akumulatorem) jednostki głównej. PROG: akumulatora Należy sprawdzić ciągłość przewodów zasilających.
  • Seite 89 3 DOSTĘP DOSTĘP KOŃCZY ROZMOWĘ! Po wydaniu polecenia, zamek zostaje odblokowany na okres 1...10 sek. aby udzielić dostępu dla odwiedzających. // Nie można udzielić dostępu jeśli wcześniej nie zostanie naciśnięty Rozmowa przycisk. 4 POLECENIE AUX POLECENIE POMOCNICZE Niezależnie od stanu modułu: monitorowanie, wywołanie lub rozmowa, przycisk ten może uruchomić...
  • Seite 90 żywiołowych, nieautoryzowanych interwencji w systemie, brak elementów ochrony systemu podczas wykonywania robót remontowych. Systemy BELLCOME dla budynków typu willa są wykonane zgodnie z normami EU i są opatrzone oznakowaniem zgodności CE. WYPRODUKOWANO DLA ELECTRA Building Communications GmbH Parkring 10, Liebenberggasse 7 1010 Wien –...

Inhaltsverzeichnis