
Verwandte Anleitungen für Audiotec Fischer DIRECTOR

Inhaltszusammenfassung für Audiotec Fischer DIRECTOR
- Seite 1 DIRECTOR Bedieneinheit mit Touchscreen Remote control with Touchscreen Benutzerhandbuch User manual Stand: Juni 2017...
-
Seite 2: Inhaltsverzeichnis
5.2.4 Mute / ATT Function ..........................19 5.2.5 Auto Source ..............................19 5.3 System ................................20 5.3.1 Reset to defaults (Zurücksetzen des DIRECTORs auf die Werkseinstellungen) ........20 5.3.2 System Info ...............................21 5.3.3 DIRECTOR Update ...........................21 5.4 Design ................................22 5.4.1 Font Design ...............................22 5.4.2 Screen Design ............................23 5.5 Unused Functions .............................23 6. DIRECTOR Update ........................24... -
Seite 3: Allgemeine Hinweise
Vor Beginn der Installation unterbrechen Sie den Minusanschluss der Autobatterie. Wir empfehlen, die Installation von einem Einbauspezialisten vornehmen zu lassen, da der Nachweis eines fachge- rechten Einbaus und Anschlusses des Gerätes Voraussetzung für die Garantieleistungen sind. Installieren Sie Ihren DIRECTOR an einer trockenen Stelle im Auto und vergewissern Sie sich, dass die Bedieneinheit am Montageort genügend Kühlung erhält. Montieren Sie das Gerät nicht in der Nähe von wärmeabstrahlenden Teilen oder elektronischen Steuerungen des Fahrzeuges. Im Sinne der Unfallsicherheit muss die Bedieneinheit professionell befestigt werden, damit die Bedieneinheit keine Gefahr für die Insassen und/oder das Fahrzeug während einer kritischen Fahrsituation, wie beispielswei- se einer Gefahrenbremsung, darstellt. -
Seite 4: Allgemeine Hinweise Zur Bedienung
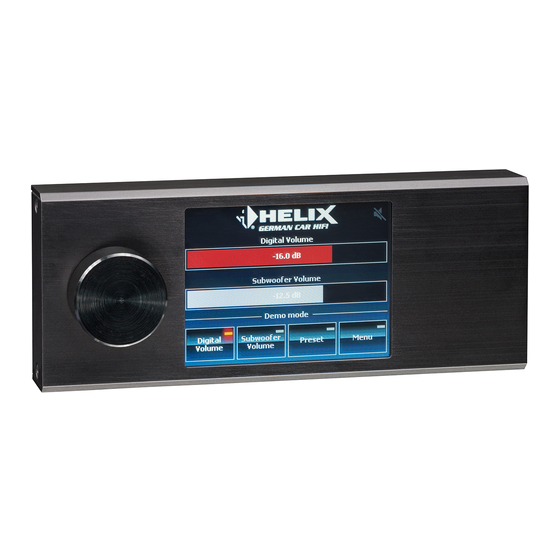
1. Allgemeine Hinweise 1.2 Allgemeine Hinweise zur Bedienung Mute / ATT aktiv PC-Modus Error - Fehler im System Navigationsleiste Hinweis: Sollte das Error-Symbol im Display aufleuchten, liegt ein Fehler im System des DIRECTORs vor. Zur Fehler- behebung führen Sie bitte die unter Kapitel 7 „Problembehandlung“ (Seite 25) aufgeführten Problemlösungsvorschlä- ge durch. Sollte das Symbol nach Durchführung der Lösungsansätze weiterhin aufleuchten, wenden Sie sich bitte an Ihren örtlichen BRAX / HELIX / MATCH Fachhändler. 1.2.1 Bedienung des DIRECTORs: Die Bedienung des DIRECTORs erfolgt mittels Touchscreen-Display und Drehregler. Der Touchscreen dient zur Auswahl der jeweiligen Funktion und zum Navigieren durch die Menüs. Mit dem Drehregler lassen sich dann die jeweiligen Parameter (z.B. Volume, Sound Setups, Timeout-Zeit etc.) im aktiven Funktionsmenü verändern. Hinweis: Das Hauptmenü kann auch durch ein zwei sekündiges Drücken des Markenlogos aufgerufen werden. Der Drehregler kann zudem noch gedrückt werden, wobei zwischen kurzem und langem Druck vom DIRECTOR unter- schieden wird: • Kurzer Druck: dient zum Schalten der Mute/ATT-Funktion oder zum Bestätigen des Sound Setups im jeweiligen Menü • Langer Druck (Gerät angeschlossen): versetzt den DIRECTOR in den Standby Modus • Langer Druck (kein Gerät angeschlossen): schaltet den DIRECTOR im Demo Modus ein und aus. Hinweis: Bei eingeschalteter Mute/ATT-Funktion ist eine Volume-Regelung nicht mehr möglich. -
Seite 5: Konfiguration Der Navigationsleiste
1.2.2 Konfiguration der Navigationsleiste: Dem Nutzer stehen mit der Navigationsleiste vier individuell konfigurierbare Buttons zur Verfügung. Diese Buttons können mit den am häufigsten genutzten Funktionen des DIRECTORs belegt werden und ermöglichen eine schnelle Umschaltung zwischen den Funktionsmenüs. Um einen Button neu zu belegen, halten Sie den jeweiligen Button für wenige Sekunden gedrückt. Es öffnet sich anschließend das Auswahlmenü (siehe Markierung im nachfolgenden Bild), in dem die gewünschte Funktion ausgewählt werden kann. Hinweis: Der Funktionsumfang variiert je nach angeschlossenen Produkt und dessen etwaigen Erweiterungen, wie beispielsweise einer HELIX / MATCH Extension Card. Innerhalb des markierten Bereichs befinden sich die zur Auswahl stehenden Funktionen. -
Seite 6: Anschluss Des Directors An Einen Dsp / Verstärker Mit Dsp
3. Verbinden Sie die Masseleitung des Anschlusskabels (Ground / braun) mit einem Massepunkt (bspw. von Lack- resten befreiter Massepunkt am Kfz-Chassis oder Masseanschluss eines DSPs / Verstärkers). Danach schließen Sie die Versorgungsleitung (+12 V / orange) an eine +12 V Spannungsquelle (bspw. Pluspol der Autobatterie oder +12 V Anschluss des DSPs / Verstärkers) an. Achtung: Achten Sie auf eine korrekte Verkabelung, um Beschädigungen am DIRECTOR und/oder dem DSP / Verstärker / der Kfz-Elektronik zu vermeiden. Optional kann die Beleuchtungsleitung (Light / blau) an eine Lichtquelle (beispielsweise Armaturenbrettbeleuch- tung) angeschlossen werden. Wird die Beleuchtungsleitung angeschlossen, kann die automatische Dimmfunktion des D IRECTORs genutzt werden. -
Seite 7: Erste Inbetriebnahme
3. Erste Inbetriebnahme 3.1 Verbinden des DIRECTORs mit dem DSP Nach Einschalten des Soundsystems wird vom DIRECTOR eine automatische Verbindung zum DSP aufgebaut. Während des Verbindungsaufbaus wird das oben gezeigte Fenster auf dem Bildschirm des DIRECTORs angezeigt. Durch einen Klick auf „DIRECTOR Update“ gelangt der DIRECTOR in den Update-Modus für ein Firmware Update (siehe Kapitel 6 „DIRECTOR Update“). Hinweis: Der Verbindungsaufbau kann einige Sekunden in Anspruch nehmen. 3.2 Aktivierung des DIRECTORs Damit der DIRECTOR genutzt werden kann, muss dieser im DSP registriert / aktiviert werden. Falls der DIRECTOR nach erfolgreichem Verbindungsaufbau nicht im DSP aktiviert ist, wird folgende Warnung angezeigt: Durch Bestätigung des Warnhinweises wird der DIRECTOR temporär aktiviert und kann nun genutzt werden. Hinweis: Die Aktivierung ist nur temporär gültig und muss bei jedem Neustart des DSPs erneut vorgenommen werden. Nach Bestätigung der Warnung werden die HEC/MEC/AUX und Digital Optical Lautstärke aus Sicherheitsgründen au- tomatisch auf -60 dB gesetzt (gemutet). - Seite 8 3. Erste Inbetriebnahme Im folgenden Abschnitt werden die wichtigsten Schritte zur Aktivierung im DSP PC-Tool erklärt: 1. Schließen Sie den DIRECTOR mit dem beiliegenden USB Kabel am Computer an. Verlängern Sie das Kabel auf kei- nen Fall mit einer passiven USB-Verlängerung, da so keine einwandfreie Kommunikation zwischen dem D IRECTOR und Ihrem PC sicher gestellt werden kann. Wenn Sie längere Distanzen zu überbrücken haben, verwenden Sie bitte eine aktive USB-Verlängerung mit integriertem Repeater. 2. Schalten Sie Ihren DSP / Verstärker mit DSP ein und starten Sie die DSP PC-Tool Software. Der DIRECTOR wird durch den DSP automatisch mit eingeschaltet. Hinweis: Sollte sich die Betriebssoftware des DSPs nicht auf dem aktuellsten Stand befinden, wird diese automa- tisch aktualisiert. 3. Öffnen Sie das „Device Configuration Menu“ (DCM) im DSP PC-Tool. Im Reiter „Extended Features“ können Sie nun den DIRECTOR anwählen. 4. Um den Vorgang abzuschließen, speichern Sie die durchgeführte Aktivierung des DIRECTORs im DSP durch das Klicken auf den „Save & Store“ Button im DSP PC-Tool. 5. Die Aktivierung ist nun abgeschlossen.
-
Seite 9: Erklärung Der Hauptmenüs
4. Erklärung der Hauptmenüs 4.1 Volume Menüs Der DIRECTOR bietet die Möglichkeit, die Master-, Subwoofer-, HEC/MEC/AUX- sowie Digital Lautstärke direkt über den Drehregler einzustellen. Der Regelbereich liegt für Master-, HEC/MEC/AUX- und Digital Lautstärke zwischen -60 dB und 0 dB und für die Subwoofer Lautstärke zwischen -40 dB und 0 dB. Die Abstufung erfolgt jeweils in 0,5 dB Schritten. Hinweis: Der Drehregler regelt immer die rot hinterlegte Lautstärke; mit einem Klick auf das jeweils andere Anzeigefeld kann zwischen beiden Reglern umgeschaltet werden. 4.2 Sound Setup Menü Über das Sound Setup Menü können die verschiedenen Setups direkt mit dem DIRECTOR umgeschaltet werden. Ins- gesamt stehen 22 Speicherplätze bei Verwendung des DIRECTORs zur Verfügung. Sound Setup 1 und 2 sind dabei intern im angeschlossenen Gerät gespeichert, die restlichen 20 Setups werden im DIRECTOR gespeichert. Zum Umschalten eines Sound Setups muss dieses zunächst mit Hilfe des Drehreglers ausgewählt werden. Dabei wird die Nummer des Speicherslots sowie der Name des Setups auf dem Display angezeigt. Die Auswahl kann mit einem Druck auf den Drehregler bestätigt werden. Hinweis: Die Sound Setups 1 und 2 werden weiterhin im DSP gespeichert, die Speicherplätze 3 – 22 befinden sich im DIRECTOR. Der Ladevorgang eines Setups kann einige Sekunden in Anspruch nehmen. Sound Setups stehen erst nach der Programmierung des DSPs / DIRECTORs mit dem DSP PC-Tool zur Verfügung. Bei aktiver Verbindung zum DSP PC-Tool ist die Auswahl über den DIRECTOR nicht möglich. -
Seite 10: Input Select Menü
4. Erklärung der Hauptmenüs 4.3 Input Select Menü Im „Input Select“ Menü können die Eingangsquellen direkt mit dem DIRECTOR umgeschaltet werden. Je nach ange- schlossenem Gerät stehen als Eingangsquellen Main, HEC/MEC/AUX und Digital Optical zur Verfügung. Des Weiteren kann hier die Lautstärke der angewählten Quelle eingestellt werden. Die aktuelle Lautstärke wird im Textfeld im Bereich zwischen -60 dB und 0 dB angezeigt. Die Abstufung erfolgt dabei in 0,5 dB Schritten. Hinweis: Die manuelle Umschaltung der Eingangsquelle durch den DIRECTOR erfordert die Konfiguration der Signal Detection des jeweiligen Eingangs auf „Manually via Remote Control“ mittels des DSP PC-Tools. 4.4 Bluetooth Connect Menü ® Der DIRECTOR ermöglicht die direkte Steuerung der HEC/MEC BT Erweiterung. Im Funktionsmenü „Bluetooth Con- ® nect“ stehen die folgenden Funktionen zur Steuerung der Bluetooth Verbindung zur Verfügung: ® • Connect: Das Bluetooth Modul versucht eine Verbindung mit dem zuletzt verbundenen Gerät herzustellen Pair: Ver- ® setzt das Bluetooth Modul in den Pairing Modus ® • Disconnect: Trennt die Verbindung zwischen Bluetooth Modul und Gerät ® • Lautstärkeregelung: Mit dem Drehregler kann die Lautstärke der verbundenen Musikquelle in 0,5 dB Schritten einge- stellt werden. -
Seite 11: Bluetooth ® Control Menü
4.5 Bluetooth Control Menü ® Sobald eine Bluetooth Verbindung erfolgreich hergestellt wurde, ist eine Steuerung des Moduls über das Funktions- ® menü „Bluetooth Control“ möglich. Neben Play/Pause, Song Vor- und Zurück kann außerdem mit dem Drehregler die ® Lautstärke der Bluetooth Eingangsquelle direkt angepasst werden. Die aktuelle Lautstärke wird im Textfeld im Bereich ® zwischen -60 dB und 0 dB angezeigt. Hinweis: Die Bluetooth Menüs werden nur angezeigt, wenn ein HEC/MEC BT Modul im Gerät installiert ist. ® 4.6 Tone Control Menü Die „Tone Control“ Funktion ermöglicht den Bass- und Hochtonpegel sowie deren Übernahmefrequenzen direkt über den Drehregler einzustellen. Der Regelbereich für den Basspegel und seiner Übernahmefrequenz liegt zwischen -6 dB und +6 dB sowie 10 Hz und 1.000 Hz. Die Abstufung erfolgt in 0,25 dB / 10 Hz Schritten. Die Hochtonpegelanpassung hat ebenso einen Regelbereich zwischen -6 dB und +6 dB, die Übernahmefrequenz zwischen 1.000 Hz und 20.000 Hz. Die Abstufung der Hochtonpegelanpassung erfolgt dabei in 0,25 dB / 100 Hz Schritten. Hinweis: Der Drehregler regelt immer die rot hinterlegte Funktion. Durch Drücken des Drehreglers kann zwischen dem Bass- und Hochton-Regelbereich hin und her gewechselt werden. Mit einem Klick auf das jeweils andere Anzeigefeld kann zwischen dem Pegelbereich und der Übernahmefrequenz umgeschaltet werden. Hinweis: Die Funktion muss zuerst im „Device Configuration Menu“ (DCM) des DSP PC-Tools aktiviert werden. Durch die Aktivierung des „Tone Control“ wird von allen Kanälen das zweite EQ-Band deaktiviert. Achtung: Das Hinzufügen der Tone Control Verstärkungen kann zu einer Übersteuerung des Systems führen. -
Seite 12: Voltage Monitor
4. Erklärung der Hauptmenüs 4.7 Voltage Monitor Die „Voltage Monitor“ Funktion ermöglicht die Versorgungsspannung sowie Temperatur des angeschlossenen Geräts auf dem Display anzuzeigen. Hinweis: Die Funktion wird nicht von allen Geräten untersützt. Unterstütztes Feature Unterstütze Geräte Versorgungsspannung Temperatur P SIX DSP MK2 V EIGHT DSP HELIX DSP PRO MK2 DSP.2 M 5DSP PP 86DSP MATCH PP 62DSP ... -
Seite 13: Konfigurationsmenü
5. Konfigurationsmenü Durch einen Klick auf die Menu-Schaltfläche lässt sich das Hauptmenü aufrufen. Von hier aus gelangt man in weiter- führende Menüs zur Konfiguration des Bildschirms und der Handhabung. Das Menü kann außerdem durch ein zwei sekündiges Drücken des Markenlogos aufgerufen werden. Die Menü-Struktur: Bildschirmoberfläche Hauptmenü... -
Seite 14: Display Settings
5. Konfigurationsmenü 5.1 Display Settings Unter dem Menüpunkt „Display Settings“ befinden sich zahlreiche Optionen zur Displaykonfiguration. 5.1.1 Display Rotation In diesem Menü kann die Orientierung des Touchscreens, je nach Einbaulage des DIRECTORs, um 180° gedreht wer- den. Somit kann die Position des Drehreglers auf die linke oder rechte Seite des Gerätes gelegt werden. -
Seite 15: Backlight Mode
5.1.2 Backlight Mode Hier lässt sich die Hintergrundbeleuchtung des Displays individuell konfigurieren. Es stehen 4 Modi zur Verfügung: • Auto (High): Die Hintergrundbeleuchtung wird automatisch gedimmt, sobald an der Lichtleitung ein High-Pegel er- kannt wird (8 - 18 V) • Auto (Low): Die Hintergrundbeleuchtung wird automatisch gedimmt, sobald an der Lichtleitung ein Low-Pegel erkannt wird (GND / Masse) • Dim: Die Hintergrundbeleuchtung ist dauerhaft auf den Dim-Pegel eingestellt • On: Die Hintergrundbeleuchtung ist dauerhaft mit voller Beleuchtungsstärke eingeschaltet Zudem lässt sich ein Display Timeout über den Drehregler im Bereich 0-60 Sek. konfigurieren. Nach Ablauf der einge- stellten Zeit ohne Benutzereingabe wird die Hintergrundbeleuchtung automatisch auf die Timeout-Helligkeit gedimmt. Hinweis: Die Dim- sowie Timeout-Helligkeit der Hintergrundbeleuchtung können im Menü „Backlight Level“ individuell konfiguriert werden. 5.1.3 Backlight Level Unter diesem Menüpunkt kann der Nutzer die Helligkeit der Hintergrundbeleuchtung sowohl für die Dim- als auch für die Timeoutfunktion über den Drehregler einstellen. Wird die Timeout-Helligkeit auf den Wert „0“ gesetzt, so schaltet sich das Display nach Ablauf der Timeout-Zeit komplett ab. Hinweis: Die Konfiguration der Dim- und Timeoutfunktion erfolgt im Menü „Backlight Mode“. -
Seite 16: Screensaver
5. Konfigurationsmenü 5.1.4 Screensaver Der „Screensaver“ ist eine Bildschirmschonerfunktion. Durch die Aktivierung schaltet der DIRECTOR nach Ablauf der eingestellten Zeit (15, 30 oder 60 Sekunden) auf den Bildschirmschoner um. Dieser entspricht dem „Voltage Monitor“ Screen (siehe Punkt. 4.7). Hinweis: Der „Screensaver“ steht nur Geräten zur Verfügung, welche die „Voltage Monitor“ Funktion unterstützen. -
Seite 17: Usability Settings
5.2 Usability Settings In diesem Menü lassen sich verschiedene Einstellungen zur Handhabung des DIRECTORs konfigurieren. 5.2.1 Startup Volume Der DIRECTOR bietet die Möglichkeit eine Einschalt-Lautstärkelimitierung für die Quellen HEC/MEC/AUX und Digital/ Optical zu konfigurieren. Diese Limitierung des Signalpegels wird nur beim Start des DIRECTORs geprüft und ange- wendet. Sollte die Lautstärke der jeweiligen Signalquelle den eingestellten Wert überschreiten, so wird die jeweilige Lautstärke auf den konfigurierten Wert reduziert. Der Nutzer kann die Lautstärke danach wieder wie gewohnt über das jeweilige Funktionsmenü regeln. -
Seite 18: Knob Sensitivity
5. Konfigurationsmenü 5.2.2 Knob Sensitivity In diesem Menü lässt sich die Empfindlichkeit des Drehreglers für die Auswahl des Sound Setups verändern. Es stehen 2 Voreinstellungen zur Verfügung: • Low: Um das Sound Setup zu wechseln, müssen in kurzer Zeit mindestens 3 Rastpunkte des Drehreglers überwun- den werden • High: Das Soundsetup wechselt mit jedem Rastpunkt des Drehreglers Hinweis: Diese Einstellung bezieht sich nur auf die Funktion „Sound Setups“. 5.2.3 PS Mode Der DIRECTOR überprüft in vordefinierten Zeitabständen den Zustand des „Power Save Modus“ des angeschlossenen DSPs. Bei eingeschalteter Funktion und aktiviertem „Power Save Modus“ im DSP, schaltet der DIRECTOR automatisch in den Standby Modus, das Display wird dann ausgeschaltet. Der DIRECTOR wird automatisch aus dem Standby ge- weckt, sobald der „Power Save Modus“ deaktiviert wird oder eine Nutzereingabe erfolgt. Hinweis: Der DIRECTOR schaltet im Standby Modus nur das Display ab, die Verbindung zum DSP bleibt bestehen. -
Seite 19: Mute / Att Function
5.2.4 Mute / ATT Function Das Verhalten des DIRECTORs bei Druck auf den Drehregler kann hier zwischen Mute und ATT (Attenuation) geändert werden. Für die ATT-Funktion stehen für die Verringerung der Lautstärke drei Optionen zur Verfügung. Hinweis: Die ATT-Funktion verringert nur die Master Volume um den eingestellten Wert. Eine Änderung der Lautstärke bei aktivierter Mute / ATT-Funktion wird nicht übernommen. 5.2.5 Auto Source Wird die „Auto Source“ Funktion aktiviert, wechselt der DIRECTOR automatisch auf die Quelle, deren Volume-Steller (Master-, Subwoofer-, HEC/MEC/AUX- oder Digital-Volume) ausgewählt wird. Beispiel: Durch einen Wechsel in das Menü „Digital Volume“ wird automatisch die digitale Quelle aktiviert. -
Seite 20: System
5. Konfigurationsmenü 5.3 System Unter diesem Menüpunkt sind verschiedene Systemfunktionen anwählbar. 5.3.1 Reset to Defaults Hier kann der DIRECTOR auf Werkseinstellungen zurückgesetzt werden. Achtung: Alle gespeicherten Einstellungen und DIRECTOR Setups werden nach einem Klick auf „Yes“ im Gerät gelöscht! Hinweis: Der Reset kann einige Sekunden in Anspruch nehmen, der DIRECTOR startet anschließend neu. -
Seite 21: System Info
5.3.2 System Info Unter diesem Menüpunkt werden alle wichtigen Systeminformationen angezeigt. 5.3.3 DIRECTOR Update In diesem Menü kann der Updateprozess des DIRECTORs mit Hilfe der PC-Software „DIRECTOR Updater“ gestartet werden. Bitte beachten Sie hierzu die Anleitung (siehe Kapitel 6, DIRECTOR Update) und Hinweise zum Update der DIRECTOR Firmware. Hinweis: Dieses Menü kann nicht aufgerufen werden, falls der DIRECTOR mit dem DSP PC-Tool verbunden ist. Wird dieses Menü angezeigt, so ist eine Verbindung mit dem DSP PC-Tool nicht mehr möglich. -
Seite 22: Design
5. Konfigurationsmenü 5.4 Design In diesem Menü lassen sich verschiedene Einstellungen am Design der Benutzeroberfläche vornehmen. 5.4.1 Font Design Unter diesem Menüpunkt kann die Schriftart und die Schriftgröße des DIRECTORs eingestellt werden. Zur Auswahl stehen drei Schriftarten (Tahoma, SanSerif und LCD) und zwei Schriftgrößen. -
Seite 23: Screen Design
5.4.2 Screen Design An dieser Stelle kann die Hintergrundfarbe der Benutzeroberfläche festgelegt werden. Es stehen dabei sechs verschie- dene Farben zur Auswahl: • Standard (Default) • Braun • Gelb • Rot • Orange • Grün 5.5 Unused Functions Über die „Unused Functions“ Schaltfläche können alle nicht verwendeten Funktionen des DIRECTORs über das Menü angewählt werden. Hinweis: Der Funktionsumfang kann mit dem angeschlossenen Produkt und etwaigen Erweiterungen (HEC/MEC Mo- dule) variieren. -
Seite 24: Director Update
• Die DSP PC-Tool Software darf während des Updates nicht gestartet werden. Um ein Update durchzuführen, befolgen Sie die folgenden Schritte: 1. Installieren Sie den DIRECTOR Updater (Starten Sie Ihren Computer nach der erstmaligen Installation neu). 2. Schließen Sie den DIRECTOR an eine 12 Volt Stromversorgung an. 3. Verbinden Sie den DIRECTOR per USB mit dem Computer und schalten Sie den DIRECTOR ein. 4. Aktivieren Sie im Menü des DIRECTORs die „System Update“ Funktion (Menu → System → System Update). Hinweis: Dieses Menü kann nicht aufgerufen werden, falls der DIRECTOR mit dem DSP PC-Tool verbunden ist. 5. Wird dieses Menü angezeigt, so ist eine Verbindung mit dem DSP PC-Tool nicht mehr möglich. 6. Öffnen Sie das „DIRECTOR Updater“ Programm. 7. Aktivieren Sie die Schaltfläche „Update DIRECTOR“ und folgen Sie den Anweisungen. Achtung: Der DIRECTOR wird sich während des Vorgangs ausschalten. Ein Zugriff auf die Bedienelemente ist wäh- rend des Updates nicht möglich. Das Display bleibt während des Update-Vorgangs ausgeschaltet. Achtung: Durch das Update werden alle Einstellung auf die Standardwerte zurück gesetzt und alle im DIRECTOR gespeicherten Sound Setups werden gelöscht! -
Seite 25: Problembehandlung
7. Problembehandlung Problem: Fehler beim Verbindungsaufbau Sollte der Verbindungsaufbau aus irgendeinem Grund nicht möglich sein, so wird auf dem Display des DIRECTORs eine entsprechende Meldung angezeigt. Hierbei werden drei Fälle vom DIRECTOR unterschieden: • Kein Gerät angeschlossen • Gerät angeschlossen, aber nicht kompatibel mit dem DIRECTOR • Kompatibles Gerät angeschlossen, aber falsche Softwareversion installiert Fall 1: Kein Gerät angeschlossen Falls kein Gerät angeschlossen oder vom DIRECTOR erkannt wurde, wird die obige Meldung angezeigt. In diesem Fall startet der DIRECTOR nach einem Klick auf „Ok“ im Demo-Modus. Fall 2: Gerät angeschlossen, aber nicht kompatibel mit dem DIRECTOR Falls ein nicht kompatibles oder unbekanntes Gerät vom DIRECTOR erkannt wurde, wird die obige Meldung angezeigt. - Seite 26 Lautstärkeregler überprüfen (Master, HEC/MEC/AUX, Digital Optical Volume); Mute deaktivieren; Eingangsquelle umschalten. Problem: Keine Verbindung mit kompatiblen Gerät möglich Mögliche Ursache: Übertragungsproblem zum DSP; inkompatible Softwareversionen. Problemlösung: DIRECTOR Steckverbinder auf festen Sitz prüfen; DSP Software mit aktuellem DSP PC-Tool updaten, DIRECTOR Firmware aktualisieren. Problem: DIRECTOR schaltet nach Firmware Update nicht ein / Display bleibt schwarz Mögliche Ursache: Update fehlgeschlagen, DIRECTOR bleibt ausgeschaltet bis das Update erfolgreich durchgeführt wurde. Problemlösung: Erneuter Versuch; USB-Kabel tauschen (möglichst kurz und High Quality); mit einem anderen PC versuchen. Problem: Keine Verbindung mit DSP PC-Tool möglich Mögliche Ursache: Übertragungsprobleme Problemlösung:...
-
Seite 27: Garantiehinweis
Garantiehinweis Die Garantieleistung entspricht der gesetzlichen Regelung. Von der Garantieleistung ausgeschlossen sind Defekte und Schäden, die durch Überlastung oder unsachgemäße Behandlung entstanden sind. Eine Rücksendung kann nur nach vorheriger Absprache in der Originalverpackung, einer detaillierten Fehlerbeschreibung und einem gültigen Kaufbeleg erfolgen. Technische Änderungen und Irrtümer vorbehalten! Für Schäden am Fahrzeug oder Gerätedefekte, hervor- gerufen durch Bedienungsfehler des Gerätes, können wir keine Haftung übernehmen. Dieses Produkt ist mit einer CE-Kennzeichnung versehen. Damit ist das Gerät für den Betrieb in Fahrzeugen innerhalb der Europäischen Union (EU) zertifiziert. Hinweis „Die Bluetooth Wortmarke und die Logos sind eingetragene Warenzeichen der Bluetooth SIG, Inc. und jegliche Nutzung dieser Marken durch die ® Audiotec Fischer GmbH geschieht unter Lizenz. Andere Handelsmarken und Handelsnamen gehören den jeweiligen Inhabern.“... - Seite 28 1.2.1 Using the DIRECTOR ..........................30 1.2.2 Configuration of the soft keys ........................31 2. Connecting the DIRECTOR to a DSP / amplifier with DSP ............32 3. Initial operation ...........................33 3.1 Connection of the DIRECTOR to the DSP .......................33 3.2 Activation of the DIRECTOR ..........................33 4. Explanation of the main functions .....................35 4.1 Volume menu ..............................35 4.2 Sound Setup menu ............................35...
-
Seite 29: General Instructions
/ or risk of injury. For a proper performance and to ensure full warranty coverage, we strongly recommend to get this product installed by an authorized BRAX, HELIX or MATCH dealer. Install your DIRECTOR in a dry location with sufficient air circulation for proper cooling of the equipment. For safety reasons the DIRECTOR must be installed professionally to prevent hazard to the vehicle and / or risk of injury to the passengers during a critical driving situation such as an emergency braking. The remote control should be secured to a solid mounting surface using proper mounting hardware. Attention: During assembly make sure that the DIRECTOR cannot interfere with any safety system of the car (e.g. -
Seite 30: General Usage Information
1. General instructions 1.2 General usage information Mute / ATT active PC mode Error - Error in the system soft keys navigation Note: The error symbol lights up if a fault in the system of the DIRECTOR occurs. In this case please follow the mentioned solution proposals of the trouble-shooting (see chapter 7, page 51) in this man- ual. If the error symbol still lights up after the execution of the problem-solving approaches, please contact your local BRAX / HELIX / MATCH dealer. 1.2.1 Using the DIRECTOR: The DIRECTOR is controlled via the touchscreen and the control dial. The touchscreen is used to select the different functions and navigate through the menu. The control dial is used to manage parameters (e.g. volume, sound setups, timeout etc.) in the active menu. Note: The main menu can also be retrieved by clicking for 2 seconds on the brand logo. The control dial can also be pressed short or long to activate different functions: • short press: activates/deactivates the Mute/ATT function or loads the selected sound setup • long press (device connected): activates the standby mode • long press (no device connected): turns the DIRECTOR in demo mode on and off Note: Controlling the volume while Mute/ATT function is activated is not possible... -
Seite 31: Configuration Of The Soft Keys
1.2.2 Configuration of the soft keys: There are four single configurable soft key buttons available. Each button can be assigned to a separate function to have a fast access to the most frequently used functions in the layout you want to have. To configure a soft key press the respective button for a few seconds and a new window will appear where you can select a specific function (marked in the picture below). Note: The available functions vary depending on the connected products and their extensions e.g. HELIX / MATCH Extension Card. In the marked area you can see the available functions. -
Seite 32: Connecting The Director To A Dsp / Amplifier With Dsp
4. Now you can turn on your sound system. Important: The USB input of the DSP / amplifier with DSP is deactivated as soon as the DIRECTOR is con- nected to the control input. If you want to establish a connection between your PC and the DSP / amplifier with DSP always use the USB input of the DIRECTOR. -
Seite 33: Initial Operation
The window is shown on the DIRECTOR`s screen during connection. Pressing the D IRECTOR Update activates an update mode for the internal DIRECTOR`s firmware. Note: The connection setup can take a few seconds. 3.2 Activation of the DIRECTOR In order to use the DIRECTOR the device has to be activated / registered in the DSP. If the connection is successfully done and the D IRECTOR is not activated / registered in the DSP the following message will appear: By confirming the warning message the DIRECTOR will be temporarily activated. Note: The temporary activation has to be repeated after every restart. For safety reasons the volumes for HEC/MEC/ AUX and Digital Optical will be set to -60 dB (mute) after confirming the warning message. It is strongly recommended to permanently activate the DIRECTOR in the DSP PC-Tools DCM menu. - Seite 34 3. Initial operation The following shows the important steps for the activation process: 1. Connect the DIRECTOR with the provided USB cable to the USB port of your computer. Do not prolong the included USB cable with a passive extension cable; otherwise a proper communication can not be ensured. To extend the included cable always use an active USB cable with an integrated repeater. 2. Switch on the DSP / amplifier with DSP and start the DSP PC-Tool software. The DIRECTOR will be turned on au- tomatically. Note: If the operating software of the DSP is not up-to-date it will be updated automatically. 3. Go to the Device Configuration Menu in the DSP PC-Tool software. In the Extended Features tab you can activate the DIRECTOR as a remote control. 4. To finish the setup and save the adjustment click on the Save & Store button. 5. The activation is finished.
-
Seite 35: Explanation Of The Main Functions
4. Explanation of the main functions 4.1 Volume menu The DIRECTOR allows the control of Master, Subwoofer, HEC/MEC/AUX and Digital volume by using the control dial. The adjustment range for the source volumes reaches from - 60 dB to 0 dB and for the subwoofer volume from -40 dB to 0 dB. The increments are graded in 0.5 dB steps. Note: The control dial always adjusts the red lighted volume bar. You can choose between the two displayed volume bars by tapping on the respective bar. 4.2 Sound Setup menu The Sound Setup menu is used to select the different memory positions directly from the DIRECTOR. In total 22 pro- grammable memory positions are available. Sound Setup 1 and 2 are saved in the DSP itself and the other 20 setups are saved in the DIRECTOR`s memory. To change the sound setup use the control dial to select a specific number / name. The setup can be activated by press- ing the control dial. Note: Loading a sound setup may take a few seconds. The memory slots are available after connecting to the DSP by using the USB port of the DIRECTOR. During DSP PC-Tool connection a sound setup selection is not possible. -
Seite 36: Input Select Menu
4. Explanation of the main functions 4.3 Input Select menu The Input Select menu is used to select the different input sources of the connected device. Depending on the connect- ed device the following sources are available: Main, HEC/MEC/AUX and Digital optical. In addition the control dial can be used to control the volume of the active source. The adjustment range is from - 60 dB to 0 dB and is displayed below the buttons. The increments are graded in 0.5 dB steps. Note: The manual switching between input sources by the DIRECTOR needs a specific configuration in the DSP P C-Tool. Each source signal detection in the DCM menu has to be set to “Manually via Remote Control”. 4.4 Bluetooth Connect menu ® The DIRECTOR allows the direct control of the HEC/MEC BT extension module. The Bluetooth Connect menu con- ® tains the following functions to control the connection: • Connect: The Bluetooth module tries to establish a connection to the last connected device ® • Pair: Activates the Bluetooth pairing mode ® • Disconnect: Disconnects the actual Bluetooth connection ®... -
Seite 37: Bluetooth ® Control Menu
Control menu can be used. It allows to ® ® send play/pause, skip forward and skip backward “commands” to your Bluetooth device. In addition the control dial can ® be used to control the HEC/MEC BT volume. The adjusted volume is displayed below the buttons. Note: The Bluetooth menus are only displayed if a HEC/MEC BT module is installed in the device. ® 4.6 Tone Control menu This menu allows to control the level and the crossover frequency of the bass and treble by using the control dial. The control range of the bass level and its crossover frequency is from -6 dB to +6 dB and from 10 Hz to 1.000 Hz. The increments are graded in 0.25 dB / 10 Hz steps. The control range of the treble level is as well from -6 dB to +6 dB, its crossover frequency from 1.000 Hz to 20,000 Hz. The increments of the treble are graded in 0.25 dB / 100 Hz steps. Note: The control dial always adjusts the red lighted function. Press the control dial in order to toggle between bass and treble control. By tapping on the respective bar you can toggle between the gain and frequency indicator panels. Note: In order to enable the DIRECTOR Tone Control, the feature has to be activated at first in the Device Configuration Menu (DCM) of the DSP PC-Tool software. Through the activation of the Tone Control the 2nd band of each channel will be deactivated. Caution: Pay attention that adding Tone Control boosts can overdrive the system. 4.7 Voltage Monitor... -
Seite 38: Bypass Eq Menu
4. Explanation of the main functions The Voltage Monitor function enables to show the supply voltage as well as the temperature of the connected device on the display of the DIRECTOR. Note: This function is not supported by all Audiotec Fischer devices. Supported features Supported devices Supply voltage Temperature P SIX DSP MK2 V EIGHT DSP HELIX DSP PRO MK2 DSP.2 M 5DSP ... -
Seite 39: Explanation Of The Setup Menu
5. Explanation of the setup menu By clicking on the menu button the main menu appears. It contains several functions and options to configure and adjust display, usability and system functions as well as accessing unused functions. The main menu can also be retrieved by clicking for 2 seconds on the brand logo. The menu structure: Main menu... -
Seite 40: Display Settings
5. Explanation of the setup menu 5.1 Display Settings The Display Settings offers several functions for adjusting the display rotation, brightness, and modes as well as a screensaver function. 5.1.1 Display Rotation This menu is used to rotate the display at 180° by tapping on the Flip Screen button. Thus, the position of the control dial can be set to the left or the right side of the display. -
Seite 41: Backlight Mode
5.1.2 Backlight Mode This menu is used to configure the backlight of the display individually. There are four options available: • Auto (High): The backlight is automatically dimmed if a high level is detected at the illumination wire (8 - 18 V) • Auto (Low): The backlight is automatically dimmed if a low level is detected at the illumination wire (GND / Ground) • Dim: The backlight is dimmed permanently (set to the backlight dim level) • On: The backlight is permanently set to full brightness In addition a display timeout value can be adjusted between 0 and 60 seconds by using the control dial. The timeout is triggered if no user interactions are recognized for the adjusted time frame. In this case the display brightness is set to the backlight timeout level. Note: The dim- and timeout brightness of the display can be individually adjusted in the Backlight Level menu. 5.1.3 Backlight Level This menu is used to change the dim and timeout brightness by using the control dial. If the timeout brightness is set to “0” the display is completely turned off after the time is expired. Note: The configuration of the dim and timeout function has to be adjusted in the Backlight Mode. -
Seite 42: Screensaver
5. Explanation of the setup menu 5. Explanation of the setup menu 5.1.4 Screensaver If the Screensaver function is activated, the display changes to the Voltage Monitor screen (see item 4.7) when the ad- justed time (15, 30 or 60 Seconds) is expired. Note: The Screensaver is only supported by devices that support the Voltage Monitor function. -
Seite 43: Usability Settings
5.2 Usability Settings The Display Settings offers several usability functions like startup volume, knob sensitivity, PS mode, Mute/ATT func- tionality or auto source. 5.2.1 Startup Volume This menu allows the configuration of a startup volume for the HEC/MEC/AUX and Digital Optical sources. The limita- tion of the source volume is only applied after the startup. If the volume exceeds the adjusted value, the volume will be reduced to the set value. After this startup limitation the volume can be controlled as usual within the full range. -
Seite 44: Knob Sensitivity
5. Explanation of the setup menu 5.2.2 Knob Sensitivity The Knob Sensitivity menu allows to change the sensitivity of the control dial in the Sound Setup menu. There are two different options available: • Low: To change the sound setup the control dial has to be rotated by 3 steps within a short time • High: The sound setup changes by each step of the control dial Note: This adjustment is only applied for the Sound Setup menu. 5.2.3 PS Mode The DIRECTOR frequently checks the status of the Power Save Mode of the connected DSP device. If the auto standby option of this menu is enabled and the Power Save Mode is activated in the device, the DIRECTOR will be set automat- ically to standby mode and the display turned off. The DIRECTOR wakes up automatically if the Power Save Mode is deactivated or a user interaction is done. Note: The DIRECTOR´s connection to the DSP remains active in standby mode. -
Seite 45: Mute / Att Function
5.2.4 Mute / ATT Function This menu allows to switch between Mute and ATT (attenuation) when the control dial is pushed. The ATT function can be set to three different values which specify the different sound attenuation levels. Note: The ATT function always reduces the master volume by the adjusted value. Changing the volume while Mute/ATT is activated has no effect. 5.2.5 Auto Source The Auto Source function changes the input source automatically depending on the selected volume page (Master, Subwoofer, HEC/MEC/AUX or Digital volume). Example: The Digital volume activates automatically the digital input source. -
Seite 46: System
5. Explanation of the setup menu 5.3 System The System menu offers several system functions like info and update menus. 5.3.1 Reset to Defaults This menu is used to set the DIRECTOR back to default values. Caution: The saved configuration and the internal DIRECTOR Sound Setups (No. 3- 22) will be erased after ac- cepting the warning message by tapping on “Yes”! Note: The reset may take a few minutes and the DIRECTOR will be restarted after this procedure. -
Seite 47: System Info
5.3.2 System Info This menu shows all important system information of the DIRECTOR and the connected device. 5.3.3 DIRECTOR Update This menu activates the firmware update process of the DIRECTOR by using the DIRECTOR Updater software. Please note the instructions and advises for the update of the DIRECTOR firmware (see chapter 6, DIRECTOR up- date). Note: This menu cannot be accessed during a DSP PC-Tool connection. If this screen is active a connection to the DSP PC-Tool is not possible. -
Seite 48: Design
5. Explanation of the setup menu 5.4 Design The Design menu offers several options for customizing the graphical user interface like font design or screen design. 5.4.1 Font Design This menu allows to change the font style and font size of the DIRECTOR. There are three different font styles (Tahoma, SanSerif and LCD) and two font sizes selectable. -
Seite 49: Screen Design
5.4.2 Screen Design This menu is used to define the background color of the DIRECTOR´s user interface. There are six different colors selectable: • Standard (Default) • Brown • Yellow • Red • Orange • Green 5.5 Unused Functions The Unused Function menu contains all unassigned soft keys that can be accessed in this menu. Note: The available functions may vary on the supported products and the installed extensions (e.g. HEC BT). -
Seite 50: Director Update
• Do not launch the DSP PC-Tool software during the update. To update the device carefully perform the following steps: 1. Install the DIRECTOR Updater (re-start your computer after its first installation). 2. Connect the DIRECTOR via its USB port to your computer and turn on the device. 3. Activate the System Update function in the DIRECTOR menu (Menu → System → System Update). 4. Launch the DIRECTOR Updater software. 5. Click on Update DIRECTOR to start the update process and follow the instructions. Please note: The DIRECTOR will shut down during the update process. Neither the display nor the device itself will have any function until the update is finished. Please note: All adjustments will be set to default values and all stored sound setups in the DIRECTOR (No. 3 - 22) will be erased! -
Seite 51: Trouble-Shooting
7. Trouble-shooting Issue: Failed connection establishment If the connection establishment fails for any reason the DIRECTOR screen shows one of the following messages. There are three different possibilities: • No device connected • Device connected but not compatible • Compatible device connected but wrong software version installed Case 1: No device connected The above message appears if there is no device connected or recognized by the DIRECTOR. In this case you can start the Demo Mode by tapping on “Ok”. Case 2: Device connected but not compatible with the DIRECTOR The above message appears if an unknown or not support product is connected. - Seite 52 Issue: No connection to compatible device possible Possible reason: Transmission problem to DSP / incompatible software version. Trouble-shooting: Check the cable plugs for proper mounting / Check for DSP PC-Tool updates and install the lat- est version on your DSP / Check for DIRECTOR firmware updates and make an update via the DIRECTOR Updater. Issue: DIRECTOR does not turn on after DIRECTOR update and the screen stays black Possible reason: Update failed / DIRECTOR stays in update mode and the screen stays black until the update is successfully completed. Trouble-shooting: Try to update the DIRECTOR again / Check the USB cable to DIRECTOR and try to replace it with a new cable (short and high quality) / Try the update with a different computer. Issue: Connection with the DSP PC-Tool not possible Possible reason: Communication / transmission issues.
-
Seite 53: Warranty Disclaimer
Warranty Disclaimer The limited warranty comply with legal regulations. Failures or damages caused by overload or improper use are not covered by the warranty. Please return the defective product only with a valid proof of purchase and a detailed malfunc- tion description. Technical specifications are subject to change! Errors are reserved! For damages on the vehicle and the device, caused by handling errors of the module, we can’t assume liability. These devices are certified for the use in vehicles within the European Community (EC). Note “The Bluetooth word mark and logos are registered trademarks owned by Bluetooth SIG, Inc. and any use of such marks by Audiotec Fischer GmbH ® is under license. Other trademarks and trade names are those of their respective owners.”... - Seite 54 Audiotec Fischer GmbH Hünegräben 26 · 57392 Schmallenberg ·Germany Tel.: +49 2972 9788 0 · Fax: +49 2972 9788 88 E-mail: contact@audiotec-fischer.com · Internet: www.audiotec-fischer.com...