Herunterladen Inhalt Inhalt Diese Seite drucken
Inhaltsverzeichnis

Werbung

Verfügbare Sprachen

Verfügbare Sprachen

Installatie-, gebruiks- en onderhoudsvoorschriften
Installation, use and maintenance instructions
Instrucciones para la instalación, uso y mantenimiento
Öl-Gebläsebrenner
D
Light oil burners
GB
Quemadores de gasóleo
E
Einstufiger Betrieb
One stage operation
Funcionamiento de una sola llama
RES RBLU BF
CODE
CÓDIGO
3502801
3502802
3502901
3502902
3503001
3503002
MODELL - MODEL
MODELO
G23 RBLU BF
G27 RBLU BF
G35 RBLU BF
G40 RBLU BF
G44 RBLU BF
G52 RBLU BF
TYP - TYPE
TIPO
738 T1
738 T2
738 T3
2903225 (0)

Werbung

Inhaltsverzeichnis
loading

Inhaltszusammenfassung für Riello 738 T1

  • Seite 1 Funcionamiento de una sola llama RES RBLU BF CODE MODELL - MODEL TYP - TYPE CÓDIGO MODELO TIPO 3502801 G23 RBLU BF 738 T1 3502802 G27 RBLU BF 3502901 G35 RBLU BF 738 T2 3502902 G40 RBLU BF 3503001 G44 RBLU BF...
  • Seite 2 Herstellerbescheinigung gemäß 1. BImSchV, 1996 RIELLO S.p.A. bestätigt, daß folgende Produkte, die von der 1. BImSchV, 1996, § 7 (2) geforderten NOx - Grenzwerte einhalten: Producer declaration according to 1. BImSchV, 1996 RIELLO S.p.A. declares, that the following products comply with the NOx limit values indicated in the 1.
  • Seite 3: Identifizierung

    Der Brenner besitzt die CE-Markierung und ist mit den wichtigsten Anforderungen folgender Richtlinien konform: – CE - Reg. - Nr.: ..... gemäß 92/42/EWG; – Richtlinie zur Elektromagnetischen Verträglichkeit 89/336/EWG; – Richtlinie Niederspannung 73/23/EWG; – Maschinenrichtlinie 98/37/EWG; – Wirkungsgradrichtlinie 92/42/EWG. Brenner entspricht der Schutzart IP X0D (IP 40) gemäß EN 60529. IDENTIFIZIERUNG Auf dem Typenschild sind die Seriennummer, das Modell und die wichtigsten technischen Angaben und Leistungsdaten angegeben.
  • Seite 4: Inhaltsverzeichnis

    INHALT BESCHREIBUNG DES BRENNERS ..........Mitgeliefertes Zubehör .
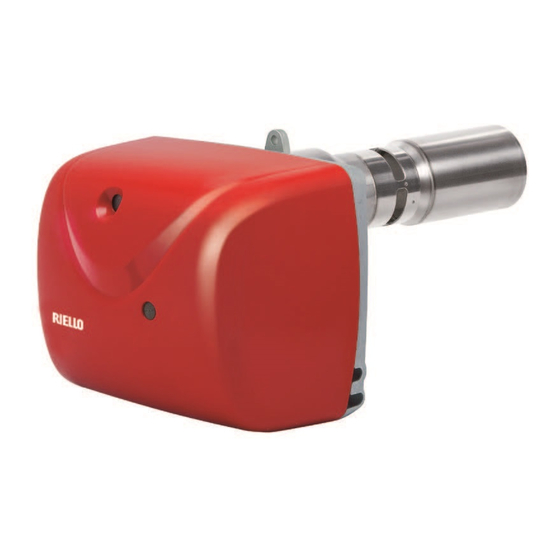
  • Seite 5: Beschreibung Des Brenners

    BESCHREIBUNG DES BRENNERS Einstufiger Gasölbrenner. Abb. 1 D7298 1 – Steuergerät 7 – Ölpumpe 2 – Entstörtaste mit Störanzeige 8 – Rezirkulationsschlitze 3 – Luft-Einstellgruppe BF 9 – Befestigungsmutter für den Anschluss des Erwärmers 4 – Motor 10 – Luftansauggitter 5 –...
  • Seite 6: Technische Merkmale

    TECHNISCHE MERKMALE 2.1 TECHNISCHE DATEN 738T1 738 T2 738T3 ÷ ÷ ÷ ÷ ÷ ÷ Massenstrom Kg/h ÷ ÷ ÷ ÷ ÷ ÷ Wärmeleistung 35,5 ÷ Brennstoff Gasöl, Viskosität 4 6 mm /s a 20°C (H i = 11,86 kWh/kg) Stromversorgung Einphasig, ±...
  • Seite 7: Installation

    INSTALLATION DIE INSTALLATION DES BRENNERS MUSS IN ÜBEREINSTIMMUNG MIT DEN ÖRTLICHEN GESETZEN UND VORSCHRIFTEN AUSGEFÜHRT WERDEN. 3.1 BETRIEBSPOSITION Der Brenner darf ausschließlich in der 1., 2. und 3. Position in Betrieb sein. Die Installation 1 ist vorzuziehen, da sie die Einzige ist, in der die Wartung wie hier folgend in dieser Anleitung beschrieben ausgeführt werden kann.
  • Seite 8: Montage Des Brenners

    3.3 MONTAGE DES BRENNERS FÜR EINE KORREKTE BF-ANWENDUNG MUSS DER BRENNER AN EINEN GEEIGNETEN HEIZKESSEL BF INSTALLIERT WERDEN. Die Zufuhr der Verbrennungsluft erfolgt über einen Schlauch oder ein Rohr, das an den Luftanschluss angeschlossen wird (9, Abb. 4 S. 4). Die folgenden Anforderungen und Hinweise müssen beachtet werden: Das Ansaugrohr der Verbrennungsluft muss: - gut am Brenner befestigt sein;...
  • Seite 9: Ölversorgungsanlage

    3.4 ÖLVERSORGUNGSANLAGE Abb. 5 Die Gasölschläuche können von beiden Seiten ange- schlossen werden. An der Brennstoff-Ansaugleitung muss ein Filter ange- bracht werden. PUMPE (siehe Abb. 5) Die Pumpe ist werksseitig für den Zweirohr-Betrieb eingerichtet. Es muss sichergestellt werden, daß die Ölrücklaufleitung ohne Verengung und Verstopfung frei in den Tank zurückgeführt wird.
  • Seite 10: Anlagen Mit Unterdruck

    ANLAGEN MIT UNTERDRUCK (Abb. 8 und 9) Unterdruckanlagen haben einen negativen Brennstoffdruck am Brennereingang. Der Tank liegt gewöhnlich niedriger als der Brenner. Abb. 8 Abb. 9 EINROHR ZWEIROHR D7312 NUR FÜR ITALIEN: L Meter Automatische Absperrung gemäß Rundschreiben des Innenministeriums ø...
  • Seite 11: Elektrische Anschlüsse

    3.5 ELEKTRISCHE ANSCHLÜSSE ACHTUNG: 50Hz 230V Den Nullleiter nicht mit der Phase Vertauschen. Genau den ange- gebenen Schaltplan beachten und eine gute Erdung ausführen. Der Leiterquerschnitt muss mindestens 1 mm betragen. (Außer im Falle anderslautender Angaben durch Normen und örtliche Gesetze). Die vom Installateur ausgeführten elektrischen Verbindungen müs- sen den örtlichen Vorschriften entsprechen.
  • Seite 12: Betrieb

    BETRIEB DIE ERSTE ZÜNDUNG MUSS VON FACHMÄNNISCHEM PERSONAL MIT GEEIG- ACHTUNG NETER INSTRUMENTIERUNG AUSGEFÜHRT WERDEN. 4.1 EINSTELLUNG DER VERBRENNUNG Gemäß der Leistungsrichtlinie 92/42/EWG müssen der Anbau des Brenners an den Heizkessel, Regulierung und Prüfung unter Beachtung des Bedienungshandbuches des Heizkessels ausgeführt werden. Dies schließt die Kontrolle von CO und CO -Gehalt in den Abgasen, der Abgastemperatur und der mittleren Wassertempera- tur des Heizkessels mit ein.
  • Seite 13: Empfohlene Düsen

    4.2 EMPFOHLENE DÜSEN Abb. 12 Danfoss Typ S. 4.3 PUMPENDRUCK Die Pumpe wird im Werk auf 12 bar geeicht. 4.4 EINSTELLUNG REZIRKULATIONS- SCHLITZE Um die Rezirkulationsschlitze einzustellen, wie folgt vorgehen: Schrauben (2, Abb. 12) lockern und das Flammrohr (1) leicht drehen, um es laut den Angaben der Tabelle auf Seite 9 auf der Einstellkerbe (3) zu positionieren.
  • Seite 14: Elektrodeneinstellung

    Weitere notwendige Schritte: Den Regler wie in der Tabelle auf Seite 9 angegeben drehen. Die Brennerhaube montieren und die Schraube anziehen. Bacharach und CO kontrollieren. Etwaige Anpassungen des Reglers wie oben angegeben ausführen. 4.6 ELEKTRODENEINSTELLUNG, (siehe Abb. 14) ACHTUNG Die Position der Elektroden ist nicht einstellbar. Im Falle von Störungen kontrollieren, ob die auf der Abbildung angegebenen Abmessungen eingehalten werden.
  • Seite 15: Austausch Der Düse

    4.8.2 AUSTAUSCH DER DÜSE, (Abb. 16) Abb. 16 Um auf die Düse zuzugreifen, wie folgt vorgehen: Die Befestigungsmutter vom Flansch abschrauben und den Brenner herausnehmen. Den Brenner am Flansch (1) anschließen und die Schrauben (3) lockern. Die gesamte Flammkopfgruppe (2) aus dem Stellring (4) herausnehmen, und dabei nicht vergessen die Kabel (5) von den Elektroden (7, Abb.
  • Seite 16: Betriebsprogramm

    BETRIEBSPROGRAMM 4.9.1 NORMALBETRIEB MIT VORWÄRMEN ZEICHENERKLÄRUNG – Flammenfühler – Zündtransformator – Thermostat für Startfreigabe nach Vor- wärmen LED – Anzeige Betriebszustand von Entstörta- MV – Gebläsemotor PH – Gasöl-Erwärmer TL – Grenzthermostat V1 – Ölventil Grün + Gelb mit langsamem Blinken Grün Grün + Gelb mit schnellem Blinken Gelb...
  • Seite 17: Störabschaltung Wegen Ausfall Der Zündung

    4.9.2 STÖRABSCHALTUNG WEGEN AUSFALL DER ZÜNDUNG ZEICHENERKLÄRUNG – Flammfühler – Zündtransformator – Thermostat für Startfreigabe nach Vor- wärmen LED – Anzeige Betriebszustand von Entstörta- MV – Gebläsemotor PH – Gasöl-Erwärmer TL – Grenzthermostat Grün + Gelb V1 – Ölventil Gelb Grün Vorhandensein von Signal nicht erforderlich.
  • Seite 18: Led-Farbcode An Der Entstörtaste Des Steuergerätes

    LED-FARBCODE AN DER ENTSTÖRTASTE DES STEUERGERÄTES Blink- Betriebzustand LED-Farbcode Geschwin- Sekunden digkeit Wartezustand Led ausgeschaltet Vorwärmen Gelb Vorbelüftung Grün Lange Vorbelüftung Grün Zündung des Transformators Grün + Gelb blinkend Schnell Reguläre Flamme Grün + Gelb blinkend Langsam Nachbelüftung Grün + Gelb Erneuter Anlauf Grün + Gelb blinkend Mittel...
  • Seite 19: Zusätzliche Programmierbare Funktionen Des Steuergeräts

    4.10 ZUSÄTZLICHE, PROGRAMMIERBARE STEUERGERÄT-FUNKTIONEN 4.10.1 NACHBELÜFTUNGSFUNKTION (t6) Die Nachbelüftung ist eine Funktion, mit der die Belüftung auch nach dem Ausschalten des Brenners stattfin- det. Das Ausschalten des Brenners erfolgt bei der Öffnung des Grenzthermostaten (TL) mit folgender Unter- brechung der Brennstoffzufuhr der Ventile. Um diese Funktion zu benutzen, muss die Entstörtaste betätigt werden, wenn der Grenzthermostat (TL) nicht umgeschaltet ist (Brenner aus).
  • Seite 20: Wartung

    WARTUNG Unterbrechen Sie vor jedem Reinigungs- oder Kontrollvorgang die Stromversorgung des Brenners durch Betätigen des Hauptschalter und schließen Sie das Gasölabsperrventil. Der Brenner muss in regelmäßigen Zeitabständen und in Übereinstimmung mit den örtlichen Gesetzen und Vorschriften vom Kundendienst gewartet werden. Die regelmäßige Wartung ist für den umweltfreundlichen Betrieb des Brenners unbedingt notwendig.
  • Seite 21: Störungen / Abhilfe

    SIGNAL MÖGLICHE URSACHE Ausfall der Flamme während des Betriebs: – Brenner schlecht eingestellt; 7 Mal Blinken – Ölventil defekt oder schmutzig; – Flammenfühler defekt oder schmutzig. Überprüfung und Kontrolle des Öl-Erwärmers (falls vorhanden): 8 Mal Blinken – Öl-Erwärmer oder Kontrollthermostat defekt. Um das Steuergerät nach der Anzeige der Diagnostik rückzustellen, muss auf die ACHTUNG Entstörtaste gedrückt werden.
  • Seite 22: Betriebsstörungen

    STÖRUNGEN MÖGLICHE URSACHE ABHILFE Zündelektroden nicht in richtiger Po- Gemäß den Angaben dieser Anleitung sition. korrekt einstellen. Anlauf des Brenners Gemäß den Angaben dieser Anleitung mit verspäteter Zün- Zu hoher Luftdurchsatz. den Luftdurchsatz korrekt einstellen. dung. Verschmutzte oder defekte Düse. Austauschen.
  • Seite 23: General Warnings

    The burner has CE marking and conforms to the basic requisites of the following Directives: – CE Certification No.: ..... as 92/42/EEC; – Electromagnetic Compatibility Directive 89/336/EEC; – Low Voltage Directive 73/23/EEC; – Machine Directive 98/37/EEC; – Efficiency Directive 92/42/EEC. The burner meets protection level of IP X0D (IP 40) as EN 60529.
  • Seite 24 INDEX BURNER DESCRIPTION............Burner equipment .
  • Seite 25: Burner Description

    BURNER DESCRIPTION One stage light oil burner. Fig. 1 D7298 1 – Control-box 7 – Light oil pump 2 – Reset button with lockout lamp 8 – Flue gases slotted holes 3 – BF Air regulation unit 9 – Heater connection fixing nut 4 –...
  • Seite 26: Technical Data

    TECHNICAL DATA 2.1 TECHNICAL DATA Type 738T1 738 T2 738T3 − − − − − − Flow rate Kg/h − − − − − − Thermal power 35.5 − Fuel Light oil, viscosity 4 6 mm /s a 20°C (H i = 11.86 kWh/kg) Electrical supply Single phase, ±...
  • Seite 27: Installation

    INSTALLATION THE BURNER MUST BE INSTALLED IN CONFORMITY WITH LEGISLATION AND LOCAL STANDARDS. 3.1 WORKING POSITION The burner is designed to work only in the positions 1, 2 and 3. Installation 1 is preferable, as it is the only one that allows performing maintenance operations as de- scribed in this manual.
  • Seite 28: Burner Fitting

    3.3 BURNER FITTING FOR PROPER BF APPLICATION, THE BURNER MUST BE INSTALLED ON AN APPROPRIATE BF BOILER. Air for combustion is fed through a flexible or rigid pipe connected to the air intake (9, fig. 4 page 4). It is then necessary to comply with the following requirements and indications: The combustion air suction pipe must be: - fixed to the burner properly;...
  • Seite 29: Hydraulic Systems

    3.4 HYDRAULIC SYSTEMS Fig. 5 The burner is designed to allow installation of the oil-lines on either side of the burner. It is necessary to install a filter on the fuel supply line. PUMP (see fig. 5) The pump is designed to allow working with two pipes. Before starting the burner make sure that the return pipeline is not clogged.
  • Seite 30 DEPRESSURISED SYSTEMS (fig. 8 and 9) Depressurised systems have a negative fuel pressure (depression) on intake to the burner. Usually the tank is lower than the burner. ONE PIPE TWO PIPE Fig. 8 Fig. 9 SYSTEM SYSTEM D7312 ONLY FOR ITALY L meters Automatic shutoff device as per Ministry of Internal Affairs’...
  • Seite 31: Electrical Connections

    3.5 ELECTRICAL CONNECTIONS Warning: 50Hz 230V Do not swap neutral and phase over, follow the diagram shown carefully and make a good earth connection. The cross section of the wires must be at least 1 sq. mm. (Unless requested otherwise by local standards and legislation). The electrical wiring carried out by the installer must comply with the rules in force in the country.
  • Seite 32: Working

    WORKING FIRST IGNITION MUST BE BY QUALIFIED PERSONNEL, USING ADEQUATE IN- WARNING STRUMENTS. 4.1 COMBUSTION ADJUSTMENT In conformity with Efficiency Directive 92/42/EEC the application of the burner on the boiler, adjustment and testing must be carried out observing the instruction manual of the boiler, including verification of the CO and CO concentration in the flue gases, their temperatures and the average temperature of the water in the boiler.
  • Seite 33: Recirculation Slotted Holes Adjustment

    4.2 NOZZLES RECOMMENDED Fig. 12 Danfoss type S. 4.3 PUMP PRESSURE The pump leaves the factory set at 12 bar. 4.4 RECIRCULATION SLOTTED HOLES ADJUSTMENT To adjust the fume recirculation slot, it is necessary to: Loosen the screws (2, fig. 12) and slightly turn the flame tube (1) until finding the position on the adjust- ment notch (3) in accordance with the indications given in the table on page 9.
  • Seite 34: Fuel Heating

    It is also necessary: To turn the regulator as shown in the table on page 9. Replace the cover and tighten the screws. Check the smoke number device and CO Make any adjustments to the regulator as shown above. ELECTRODE POSITIONING, (fig. 14) WARNING The position of the electrodes cannot be regulated.
  • Seite 35: Tube And Disc Replacement

    4.8.2 NOZZLE REPLACEMENT, (fig. 16) Fig. 16 Do the following to access the nozzle: Remove the flange-fixing nut and pull out the burner. Hook the burner to the flange(1) and loosen the screws (3). Remove the entire combustion head group (2) from the collar (4), being careful to remove the wires (5) from the electrodes (7, fig.
  • Seite 36: Operation Programme

    OPERATION PROGRAMME 4.9.1 NORMAL OPERATION WITH PREHEATING KEY TO LAY-OUT – Flame detector – Ignition transformer – Enabling switch thermostat for start up after preheating LED – Signal of operation status from reset button MV – Fan motor PH – Diesel oil heater TL –...
  • Seite 37: Block Due To Non-Ignition

    4.9.2 BLOCK DUE TO NON-IGNITION KEY TO LAY-OUT – Flame detector – Ignition transformer – Enabling switch thermostat for start up after preheating LED – Signal of operation status from reset button MV – Fan motor PH – Diesel oil heater TL –...
  • Seite 38: Block Types And Intervention Times If The Burner Fails

    LED COLOUR CODE OF THE CONTROL BOX RESET BUTTON Blinking Operation status LED colour codes speed Seconds Wait LED off Preheating Yellow Pre-purging Green Long pre-purging Green Transformer turn on Green + Yellow blinking Fast Flame regular Green + Yellow blinking Slow Post-purging Green+Yellow...
  • Seite 39: Supplementary, Programmable Control Box Functions

    4.10 SUPPLEMENTARY, PROGRAMMABLE CONTROL BOX FUNCTIONS 4.10.1 POST-PURGING FUNCTION (t6) Post-purging is a function that keeps air purging on even after the burner switches off. The burner switches off when the limit thermostat (TL) opens, consequently cutting off the fuel supply to the valves. To use this function the reset button must be pressed when the limit thermostat is not switched over (burner switched off).
  • Seite 40: Maintenance

    MAINTENANCE Before carrying out any cleaning or control operation, cut off the electricity supply to the burner using the system's main switch and close the oil cut off valve. The burner requires periodic maintenance carried out by a qualified and authorised technician in conformity with legislation and local standards.
  • Seite 41: Faults / Solutions

    SIGNAL PROBABLE CAUSE Loss of flame during operation: – badly adjusted burner; 7 led pulses – oil valve defective or dirty; – lame detector defective or dirty; Check and control of the oil heater (if there is one): 8 led pulses –...
  • Seite 42: Operating Faults

    FAULTS POSSIBLE CAUSE SOLUTION The ignition electrodes are wrongly Adjust them according to the instruc- positioned. tions of this manual. Burner starts with an Set the air output according to the in- Air output is too high. ignition delay. structions of this manual. Nozzle dirty or worn.
  • Seite 43: Advertencias Generales

    El quemador posee el marcado CE y es conforme a los requisitos esenciales de las siguientes Directivas: – CE Reg. N.: ..... según 92/42/CEE; – Directiva Compatibilidad Electromagnética 89/336/CEE; – Directiva Baja Tensión 73/23/CEE; – Directiva Máquinas 98/37/CEE; – Directiva Rendimientos 92/42/CEE; Nivel de protección del quemador IP X0D (IP 40) de acuerdo con EN 60529.
  • Seite 44 ÍNDICE DESCRIPCIÓN DEL QUEMADOR..........Material suministrado en dotación .
  • Seite 45: Descripción Del Quemador

    DESCRIPCIÓN DEL QUEMADOR Quemador de gasóleo de una sola llama. Fig. 1 D7298 1 – Caja de control 6 – Brida con junta aislante 2 – Pulsador de desbloqueo con señalización 7 – Bomba de combustible de bloqueo 8 – Ranuras de recirculación de humos 3 –...
  • Seite 46: Datos Técnicos

    DATOS TÉCNICOS 2.1 DATOS TÉCNICOS TIPO 738T1 738 T2 738T3 ÷ ÷ ÷ ÷ ÷ ÷ Caudal Kg/h ÷ ÷ ÷ ÷ ÷ ÷ Potencia térmica 35.5 ÷ Combustible Gasóleo, viscosidad 4 6 mm /s a 20°C (H i = 11,86 kWh/kg) Alimentación eléctrica Monofásica, ±...
  • Seite 47: Instalación

    INSTALACIÓN EL QUEMADOR SE DEBE INSTALAR DE CONFORMIDAD CON LAS LEYES Y NORMATIVAS LOCALES. 3.1 POSICIÓN DE FUNCIONAMIENTO El quemador está preparado exclusivamente para el funcionamiento en las posiciones 1, 2 y 3. Es conveniente escoger la instalación 1 puesto que es la única que permite el mantenimiento tal como descrito a continuación en este manual.
  • Seite 48: Montaje Del Quemador

    3.3 MONTAJE DEL QUEMADOR PARA UNA CORRECTA APLICACIÓN BF, EL QUEMADOR DEBE INSTALARSE EN UNA CALDERA BF APROPIADA. La alimentación de aire para la combustión se realiza a través de un tubo flexible o rígido conectado a la toma de aire (9, fig. 4 pág. 4). Por lo tanto, es necesario cumplir con los siguientes requisitos e indicaciones: El tubo de aspiración del aire comburente debe: - estar bien conectado al quemador;...
  • Seite 49: Instalación Hidráulica

    3.4 INSTALACIÓN HIDRÁULICA Fig. 5 El quemador está preajustado para conectar los tubos de ali- mentación del gasóleo de ambos lados. Es necesario instalar un filtro en la línea de alimentación del combustible. BOMBA (ver fig. 5) La bomba está prevista para funcionar en bitubo. Antes de poner en funcionamiento el quemador hay que ase- gurarse de que el tubo de retorno del combustible no esté...
  • Seite 50 INSTALACIONES BAJO (fig. 8 y 9) Las instalaciones bajo vacío presentan una presión del combustible negativa (vacío) en la entrada del que- mador. Por lo general el depósito está más abajo que el quemador. Fig. 8 Fig. 9 UN TUBO DOS TUBO D7312 SÓLO PARA ITALIA:...
  • Seite 51: Conexiones Eléctricas

    3.5 CONEXIONES ELÉCTRICAS ATENCIÓN: 50Hz 230V No intercambiar el neutro con la fase; respetar exactamente el esquema indicado y efectuar una buena conexión de tierra. La sección de los conductores debe ser de mín. 1 mm2. (Salvo indicaciones diferentes de normas y leyes locales). Las conexiones eléctricas efectuadas por el instalador deben respetar la normativa vigente en el país.
  • Seite 52: Funcionamento

    FUNCIONAMENTO EL PRIMER ENCENDIDO DEBE SER REALIZADO POR PERSONAL CUALIFICA- ATENCIÓN DO Y CON LAS HERRAMIENTAS IDÓNEAS. 4.1 REGULACIÓN DE LA COMBUSTIÓN De acuerdo con la Directiva de Rendimiento 92/42/EEC la aplicación del quemador a la caldera, el ajuste y la prueba deben realizarse siguiendo el manual de instrucciones de la caldera, incluyendo el control de la concentración de CO y CO en los gases de combustión, sus temperaturas y la temperatura media del...
  • Seite 53: Regulación Del Aire

    4.2 BOQUILLAS RECOMENDADAS Fig. 12 Danfoss tipo S. 4.3 PRESIÓN DE LA BOMBA La bomba se calibra en fábrica a 12 bar. 4.4 REGULACIÓN RANURAS DE RECIRCULA- CIÓN DE HUMOS Para regular las ranuras de reciclado de humos, proceder del siguiente modo: Aflojar los tornillos (2, fig.
  • Seite 54: Precalentamiento Del Combustible

    Además es necesario: Girar el regulador según se indica en la tabla que figura en la página 9. Montar la envolvente y ajustar los tornillos. Controlar el bacharach y la CO Efectuar los eventuales ajustes del regulador según lo indicado anteriormente. 4.6 REGULACIÓN DE LOS ELECTRODOS, (fig.
  • Seite 55 4.8.2 SUSTITUCIÓN DE LA BOQUILLA, (fig. 16) Fig. 16 Para acceder a la boquilla, proceder del siguiente modo: Quitar la tuerca de fijación a la brida y extraer el que- mador. Enganchar el quemador a la brida (1) y aflojar los tor- nillos (3).
  • Seite 56: Programa De Funcionamiento

    PROGRAMA DE FUNCIONAMIENTO 4.9.1 FUNCIONAMIENTO NORMAL CON PRE-CALENTAMIENTO LEYENDA – Detector de llama – Transformador de encendido – Termostato para permitir el arranque después del pre-calentamiento LED – Señalización de funcionamiento desde le pulsador de desbloqueo MV – Motor del ventilador PH –...
  • Seite 57: Bloqueo Por Falta De Encendido

    4.9.2 BLOQUEO POR FALTA DE ENCENDÍDO LEYENDA – Detector de llama – Transformador de encendido – Termostato para permitir el arranque después del pre-calentamiento LED – Señalización de funcionamiento desde le pulsador de desbloqueo MV – Motor del ventilador PH – Calentador de gasóleo TL –...
  • Seite 58: Tipos De Bloqueo Y Tiempos De Intervención En Caso De Desperfecto Del Quemador

    CÓDIGO DE COLOR DEL LED INDICADOR DEL PULSADOR DE DESBLOQUEO DE LA CAJA DE CONTROL Códigos de color DIODO ELECTROLU- Velocidad Estado de funcionamiento MINISCENTE (LED) INDICADOR destello Segundos Diodo electroluminiscente (led) Espera indicador apagado Pre-calentamiento Amarillo Pre-ventilación Verde Pre-ventilación larga Verde Encendido del transformador Verde + Amarillo destellante...
  • Seite 59: Funciones Programables Adicionales De La Caja De Control

    4.10 FUNCIONES ADICIONALES PROGRAMABLES DE LA CAJA DE CONTROL 4.10.1 FUNCIÓN DE POST-VENTILACIÓN (t6) La post-ventilación es una función que mantiene la ventilación del aire incluso después de apagado el que- mador. El apagado del quemador se produce con la apertura del termostato límite (TL) con la consiguiente interrupción del aporte de combustible de las válvulas.
  • Seite 60: Mantenimiento

    MANTENIMIENTO Antes de realizar cualquier operación de limpieza o control, desconectar la alimentación eléctrica del que- mador mediante el interruptor general de la instalación y cerrar la válvula de interceptación del gasóleo. El quemador necesita un mantenimiento periódico, que debe realizar personal especializado y de acuerdo con las leyes y normativas locales.
  • Seite 61: Anomalías / Soluciones

    SEÑAL CAUSA PROBABLE Pérdida de la llama durante el funcionamiento: – quemador mal regulado; 7 destellos – válvula del aceite defectuosa o sucia; – detector de llama defectuoso o sucio. Verificar y controlar el calentador de aceite (si estuviere presente): 8 destellos –...
  • Seite 62: Anomalías En El Funcionamiento

    ANOMALÍA POSIBLE CAUSA SOLUCIÓN Electrodos de encendido mal regula- Ajustarlos según se indica en este ma- dos. nual. Puesta en marcha del quemador con Ajustarlo según se indica en este ma- Caudal de aire demasiado fuerte. retardo en el encen- nual.
  • Seite 64 RIELLO S.p.A. I-37048 San Pietro di Legnago (VR) Tel.: +39.0442.630111 http:// www.rielloburners.com...

Diese Anleitung auch für:

G23 rblu bfG27 rblu bfG35 rblu bfG40 rblu bf738 t3G44 rblu bf ... Alle anzeigen

Inhaltsverzeichnis