VEVOR YA-10L Bedienungsanleitung
Vakuum-tumbler-marinator

Verwandte Anleitungen für VEVOR YA-10L


Inhaltszusammenfassung für VEVOR YA-10L
- Seite 1 Vacuum tumbler marinator Model:YA-10L/YA-20L/YA-40L Technical Support and E-Warranty Certificate www.vevor.com/support...
- Seite 3 MODEL:YA-10L/YA-20L/YA-40L This is the original instruction, please read all manual instructions carefully before operating. VEVOR reserves a clear interpretation of our user manual. The appearance of the product shall be subject to the product you received. Please forgive us that we won't inform you again if there are any technology or software updates on our product.
-
Seite 4: Safety Warnings And Precautions
Warning-To reduce the risk of injury, user must read instructions manual carefully. Safety warnings and precautions 1.If any accident occurs, press the emergency stop switch to cut off the power immediately. 2.After work is completed, the working parts that come into contact with food must be removed and cleaned. - Seite 5 children to avoid danger. 11.This product must not be cleaned with water jets. 12.After finishing the work, you must wait until the moving parts stop completely and the power is disconnected before cleaning or taking food. 13.Clean all parts that come into contact with food after work. 14.Before installing or disassembling this product, you must disconnect the power supply and unplug it.
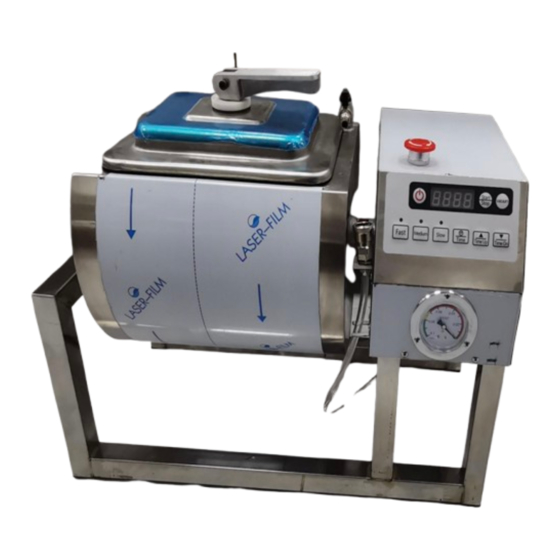
- Seite 6 ④ Time down key ⑤ Start/Stop ⑥ Vacuum key YA-10L 1.Power on: Plug in the power cord, the time display window displays "OFF" and continues, indicating that the device is in standby mode. Press the red "power" button on the lower panel, the time display window shows...
- Seite 7 2.Loading: Place the drum firmly on the rack, press or click the forward/reverse button, rotate the drum cylinder cover vertically upwards, put the food to be marinated together with the marinade into the drum, close the lid and press. ①Take out the wrench and coupling ②Align the coupling fixing screw with the motor shaft plane ③Put it in flat and align it with the two holes ④Tighten the screw with a wrench...
- Seite 8 ①Put the cylinder on the rack ②Align it with the notch of the motor coupling ③Push it in the direction of the motor coupling until it stops and then put it down 3.Vacuum: Connect the vacuum connection pipe to the valve body and the roller.
-
Seite 9: Wiring Diagram
the bottom. At this time, the spring washer will lock the trachea.washer and the special-shaped O-ring until the bottom. At this time, the spring washer will lock the trachea. ②Pull out the air pipe. Push the interface downwards and the spring washer will open. - Seite 10 - 8 -...
- Seite 11 YA-20L/YA-40L 1.Power on: Plug in the power cord, the time display window displays "OFF" and continues, indicating that the device is in standby mode. Press the red "power" button on the lower panel, the time display window shows that the factory preset vacuum time is 1 minute 20 seconds (it is strongly recommended that users do not modify the vacuum time, vacuum pump system and maintenance detailed instructions).
- Seite 12 ①Put the cylinder on the rack ②Align it with the notch of the motor coupling ③Push it in the direction of the motor coupling until it stops and then put it down 3.Vacuum: Connect the vacuum connection tube (female) to the valve body and the roller (male).
- Seite 13 preset time is 1 minute and 30 seconds ( the factory preset time is not the marinating time, please determine the marinating time according to the specific food and effect) ), wait until the vacuuming is completed, press the time setting key, the two digits in front of the time display window flash (minutes), and then press the time reduction button/time increase button to set the required time .
- Seite 14 Wiring Diagram - 12 -...
- Seite 16 Technical Support and E-Warranty Certificate www.vevor.com/support...
- Seite 17 Machine Translated by Google Marinateur s ous v ide Modèle: Y A10L/YA20L/YA40L Assistance t echnique e t c ertificat d e g arantie électronique w ww.vevor.com/support...
- Seite 18 Machine Translated by Google...
- Seite 19 Machine Translated by Google Marinateur s ous vide Modèle : Y A10L/YA20L/YA40L Il s 'agit d e l a n otice d 'utilisation d 'origine. V euillez l ire a ttentivement t outes les i nstructions d u m anuel a vant d e l 'utiliser. V EVOR s e r éserve l e d roit d'interpréter ...
-
Seite 20: Avertissements E T P Récautions D E S Écurité
Machine Translated by Google Avertissement P our r éduire l e r isque d e b lessure, l 'utilisateur d oit l ire Lisez a ttentivement l e m anuel d 'instructions. Avertissements e t p récautions d e s écurité 1. ... - Seite 21 Machine Translated by Google les e nfants p our é viter l e d anger. 11. C e p roduit n e d oit p as ê tre n ettoyé a vec d es j ets d 'eau. 12.Après a voir t erminé l e t ravail, v ous d evez a ttendre q ue l es p ièces m obiles s 'arrêtent complètement ...
- Seite 22 Machine Translated by Google A limentation F enêtre d 'affichage d e l 'heure Touche d 'augmentation du t emps T ouche d e diminution d u t emps M arche/Arrêt T ouche d e v ide YA10L 1. ...
- Seite 23 Machine Translated by Google 2. C hargement : P lacez f ermement l e t ambour s ur l e s upport, a ppuyez o u c liquez s ur l e bouton m arche a vant/arrière, f aites p ivoter l e c ouvercle d u c ylindre d u t ambour verticalement ...
- Seite 24 Machine Translated by Google Placez l e c ylindre s ur l a c rémaillère Alignezle a vec l 'encoche d e l 'accouplement d u m oteur Poussez le d ans l e s ens d e l 'accouplement d u m oteur j usqu'à c e q u'il s 'arrête, p uis p lacezle vers ...
- Seite 25 Machine Translated by Google le f ond. À c e m oment, l a r ondelle à r essort v a v errouiller l a t rachée.la r ondelle e t le j oint t orique d e f orme s péciale j usqu'au f ond. À c e m oment, l a r ondelle é lastique bloquera ...
- Seite 26 Machine Translated by Google 8 ...
- Seite 27 Machine Translated by Google YA20L/YA40L 1. M ise s ous t ension : b ranchez l e c ordon d 'alimentation, l a f enêtre d 'affichage d e l 'heure a ffiche « OFF » e t c ontinue, i ndiquant q ue l 'appareil e st e n m ode v eille. A ppuyez s ur l e b outon r ouge « power » sur ...
- Seite 28 Machine Translated by Google Placez l e c ylindre s ur l a c rémaillère. Alignezle a vec l 'encoche d e l 'accouplement m oteur. Poussezle d ans l e s ens d e l 'accouplement m oteur j usqu'à c e q u'il s 'arrête, p uis p osezle. 3. ...
- Seite 29 Machine Translated by Google Le t emps p réréglé e st d e 1 m inute e t 3 0 s econdes ( le t emps p réréglé e n u sine n 'est p as l e temps d e m arinade, v euillez d éterminer l e t emps d e m arinade e n f onction d e l 'aliment e t de ...
- Seite 30 Machine Translated by Google Schéma d e c âblage 1 2 ...
- Seite 31 Machine Translated by Google...
- Seite 32 Machine Translated by Google Assistance t echnique e t c ertificat d e g arantie électronique w ww.vevor.com/support...
- Seite 33 Machine Translated by Google Vakuum-Tumbler-Marinator Modell:YA-10L/YA-20L/YA-40L Technischer Support und E-Garantie-Zertifikat www.vevor.com/support...
- Seite 34 Machine Translated by Google...
- Seite 35 MODELL:YA-10L/YA-20L/YA-40L Dies ist die Originalanleitung. Bitte lesen Sie alle Anweisungen sorgfältig durch, bevor Sie das Gerät in Betrieb nehmen. VEVOR behält sich eine klare Auslegung unserer Bedienungsanleitung vor. Das Erscheinungsbild des Produkts richtet sich nach dem Produkt, das Sie erhalten haben. Bitte verzeihen Sie uns, dass wir Sie nicht erneut informieren, wenn es Technologie- oder Software-Updates für unser Produkt gibt.
-
Seite 36: Sicherheitswarnungen Und Vorsichtsmaßnahmen
Machine Translated by Google Warnung-Um das Verletzungsrisiko zu verringern, muss der Benutzer Lesen Sie die Bedienungsanleitung sorgfältig durch. Sicherheitswarnungen und Vorsichtsmaßnahmen 1.Wenn ein Unfall passiert, drücken Sie den Not-Aus-Schalter, um das schalten Sie es sofort aus. 2.Nach Abschluss der Arbeiten sind die Arbeitsteile, die mit in Kontakt kommen Speisereste müssen entfernt und gereinigt werden. - Seite 37 Machine Translated by Google Kinder, um Gefahren zu vermeiden. 11. Dieses Produkt darf nicht mit einem Wasserstrahl gereinigt werden. 12.Nach Abschluss der Arbeit müssen Sie warten, bis die beweglichen Teile zum Stillstand kommen vollständig und von der Stromversorgung getrennt ist, bevor Sie reinigen oder Speisen entnehmen. 13.
- Seite 38 Zeit-Abwärtstaste ÿ Start/Stop ÿ Vakuumtaste YA-10L 1. Einschalten: Stecken Sie das Netzkabel ein. Im Zeitanzeigefenster wird „OFF“ angezeigt und fortgesetzt, was bedeutet, dass sich das Gerät im Standby-Modus befindet. Drücken Sie die rote „Power“-Taste auf der unteren Seite. Im Zeitanzeigefenster wird angezeigt, dass die werkseitig voreingestellte Vakuumzeit 1 Minute und 20 Sekunden beträgt (es wird dringend empfohlen, dass Benutzer die Vakuumzeit, das...
- Seite 39 Machine Translated by Google 2. Laden: Legen Sie die Trommel fest auf den Korb, drücken oder klicken Sie auf Vorwärts-/Rückwärts-Taste, Trommelzylinderdeckel senkrecht nach oben drehen, Mariniergut samt Marinade in die Trommel geben, Deckel schließen und drücken. ÿNehmen Sie den Schraubenschlüssel und die Kupplung heraus ÿRichten Sie die Befestigungsschraube der Kupplung auf die Ebene der Motorwelle aus ÿLegen Sie es flach hinein und richten Sie es an den beiden Löchern aus ÿZiehen Sie die Schraube mit einem Schraubenschlüssel fest...
- Seite 40 Machine Translated by Google ÿZylinder auf die Zahnstange setzen ÿZylinder auf die Kerbe der Motorkupplung ausrichten ÿZylinder bis zum Anschlag in Richtung Motorkupplung schieben und dann runter 3. Vakuum: Verbinden Sie das Vakuumanschlussrohr mit dem Ventilkörper und der Rolle. Ziehen Sie es heraus, nachdem es richtig angeschlossen ist. Wenn es nicht herauskommt, ist es angeschlossen.
-
Seite 41: Schaltplan
Machine Translated by Google der Boden. Zu diesem Zeitpunkt wird die Federscheibe die Trachea verriegeln.Unterlegscheibe und den speziell geformten O-Ring bis zum Boden. Zu diesem Zeitpunkt die Federscheibe verschließt die Luftröhre. ÿZiehen Sie den Luftschlauch heraus. Drücken Sie die Schnittstelle nach unten und die Feder Unterlegscheibe öffnet sich. - Seite 42 Machine Translated by Google - 8 -...
- Seite 43 Machine Translated by Google YA-20L/YA-40L 1. Einschalten: Stecken Sie das Netzkabel ein. Im Zeitanzeigefenster wird „OFF“ angezeigt und fortgesetzt, was bedeutet, dass sich das Gerät im Standby-Modus befindet. Drücken Sie die rote „Power“-Taste auf der unteren Seite. Im Zeitanzeigefenster wird angezeigt, dass die werkseitig voreingestellte Vakuumzeit 1 Minute und 20 Sekunden beträgt (es wird dringend empfohlen, dass Benutzer die Vakuumzeit, das Vakuumpumpensystem und die detaillierten Wartungsanweisungen nicht ändern).
- Seite 44 Machine Translated by Google ÿZylinder auf die Zahnstange setzen ÿZylinder an der Kerbe der Motorkupplung ausrichten ÿZylinder bis zum Anschlag in Richtung Motorkupplung schieben und ablegen 3. Vakuum: Verbinden Sie den Vakuumanschlussschlauch (weiblich) mit dem Ventilkörper und der Rolle (männlich). Sie hören ein „Klick“-Geräusch, wenn die Verbindung korrekt ist.
- Seite 45 Machine Translated by Google voreingestellte Zeit ist 1 Minute und 30 Sekunden (die werkseitig voreingestellte Zeit ist nicht die Marinierzeit, bitte bestimmen Sie die Marinierzeit je nach Lebensmittel und Zubereitungsart), warten Sie, bis das Vakuumieren abgeschlossen ist, drücken Sie die Zeiteinstelltaste, die beiden Ziffern vor dem Zeitanzeigefenster blinken (Minuten), und drücken Sie dann die Zeitverkürzungstaste/Zeiterhöhungstaste, um die gewünschte Zeit einzustellen.
- Seite 46 Machine Translated by Google Schaltplan - 12 -...
- Seite 47 Machine Translated by Google...
- Seite 48 Machine Translated by Google Technischer Support und E-Garantie-Zertifikat www.vevor.com/support...
- Seite 49 Machine Translated by Google Marinatrice a vuoto Modello: YA-10L/YA-20L/YA-40L Supporto tecnico e certificato di garanzia elettronica www.vevor.com/support...
- Seite 50 Machine Translated by Google...
- Seite 51 MODELLO: YA-10L/YA-20L/YA-40L Questa è l'istruzione originale, si prega di leggere attentamente tutte le istruzioni del manuale prima di utilizzare. VEVOR si riserva una chiara interpretazione del nostro manuale utente. L'aspetto del prodotto sarà soggetto al prodotto ricevuto. Vi preghiamo di perdonarci se non vi informeremo di nuovo se ci sono aggiornamenti tecnologici o software sul nostro prodotto.
- Seite 52 Machine Translated by Google Attenzione: per ridurre il rischio di lesioni, l'utente deve leggere attentamente il manuale di istruzioni. Avvertenze e precauzioni di sicurezza 1. In caso di incidente, premere l'interruttore di arresto di emergenza per interrompere il funzionamento. potenza immediatamente. 2.
- Seite 53 Machine Translated by Google bambini per evitare il pericolo. 11. Questo prodotto non deve essere pulito con getti d'acqua. 12.Dopo aver terminato il lavoro, è necessario attendere che le parti mobili si fermino completamente e scollegare l'alimentazione prima di pulire o consumare cibo. 13.
- Seite 54 ÿ Avvio/ Arresto ÿ Tasto di aspirazione YA-10L 1. Accensione: collegare il cavo di alimentazione, la finestra di visualizzazione dell'ora mostra "OFF" e continua, indicando che il dispositivo è in modalità standby. Premere il pulsante rosso "power" sul pannello inferiore, la finestra di visualizzazione dell'ora mostra che il tempo di vuoto preimpostato in fabbrica è...
- Seite 55 Machine Translated by Google 2. Caricamento: posizionare saldamente il tamburo sul rack, premere o fare clic sul pulsante avanti/indietro, ruotare il coperchio del cilindro del tamburo verticalmente verso l'alto, mettere il cibo da marinare insieme alla marinata nel tamburo, chiudere il coperchio e premere.
- Seite 56 Machine Translated by Google ÿ Posizionare il cilindro sul rack ÿ Allinearlo con la tacca dell'accoppiamento del motore ÿ Spingerlo nella direzione dell'accoppiamento del motore fino all'arresto e quindi posizionarlo giù 3. Vuoto: collegare il tubo di collegamento del vuoto al corpo valvola e al rullo. Tirarlo fuori dopo averlo collegato correttamente.
-
Seite 57: Schema Elettrico
Machine Translated by Google il fondo. A questo punto, la rondella elastica bloccherà la trachea.rondella e l'O-ring dalla forma speciale fino al fondo. A questo punto, la rondella elastica bloccherà la trachea. ÿEstrarre il tubo dell'aria. Spingere l'interfaccia verso il basso e la molla la lavatrice si aprirà. - Seite 58 Machine Translated by Google - 8 -...
- Seite 59 Machine Translated by Google YA-20L/YA-40L 1. Accensione: collegare il cavo di alimentazione, la finestra di visualizzazione dell'ora mostra "OFF" e continua, indicando che il dispositivo è in modalità standby. Premere il pulsante rosso "power" sul pannello inferiore, la finestra di visualizzazione dell'ora mostra che il tempo di vuoto preimpostato in fabbrica è...
- Seite 60 Machine Translated by Google ÿ Posizionare il cilindro sul rack ÿ Allinearlo con la tacca dell'accoppiamento del motore ÿ Spingerlo nella direzione dell'accoppiamento del motore fino all'arresto e quindi riporlo 3. Vuoto: collegare il tubo di collegamento del vuoto (femmina) al corpo valvola e al rullo (maschio).
- Seite 61 Machine Translated by Google il tempo preimpostato è 1 minuto e 30 secondi (il tempo preimpostato di fabbrica non è il tempo di marinatura, si prega di determinare il tempo di marinatura in base al cibo specifico e all'effetto), attendere il completamento dell'aspirazione, premere il tasto di impostazione del tempo, le due cifre davanti alla finestra di visualizzazione del tempo lampeggiano (minuti), quindi premere il pulsante di riduzione del tempo/pulsante di aumento del tempo per impostare il tempo richiesto.
- Seite 62 Machine Translated by Google Schema elettrico - 12 -...
- Seite 63 Machine Translated by Google...
- Seite 64 Machine Translated by Google Supporto tecnico e certificato di garanzia elettronica www.vevor.com/support...
- Seite 65 Machine Translated by Google Marinador d e v aso a l v acío Modelo: Y A10L/YA20L/YA40L Soporte t écnico y c ertificado d e g arantía electrónica w ww.vevor.com/support...
- Seite 66 Machine Translated by Google...
- Seite 67 Machine Translated by Google Marinador c on vaso d e v acío MODELO:YA10L/YA20L/YA40L Estas s on l as i nstrucciones o riginales, l ea a tentamente t odas l as instrucciones d el m anual a ntes d e u tilizar e l p roducto. V EVOR s e r eserva u na interpretación ...
-
Seite 68: Advertencias Y P Recauciones D E S Eguridad
Machine Translated by Google Advertencia: P ara r educir e l r iesgo d e l esiones, e l u suario d ebe l eer Lea a tentamente e l m anual d e i nstrucciones. Advertencias y p recauciones d e s eguridad 1. ... - Seite 69 Machine Translated by Google Niños p ara e vitar e l p eligro. 11.Este p roducto n o d ebe l impiarse c on c horros d e a gua. 12.Después d e t erminar e l t rabajo, d ebe e sperar h asta q ue l as p artes m óviles s e d etengan. completamente ...
- Seite 70 Machine Translated by Google E ncendido V entana d e v isualización d e l a h ora T ecla d e a umento d e la h ora T ecla d e d isminución de l a h ora I nicio/ Detención ...
- Seite 71 Machine Translated by Google 2. C arga: C oloque e l t ambor f irmemente s obre e l e stante, p resione o h aga c lic e n e l Botón d e a vance/retroceso, g ire l a t apa d el c ilindro d el t ambor v erticalmente h acia a rriba, c oloque l os alimentos ...
- Seite 72 Machine Translated by Google Coloque e l c ilindro e n l a c remallera Alinéelo c on l a m uesca d el a coplamiento d el m otor Empújelo e n l a d irección d el a coplamiento d el m otor h asta q ue s e d etenga y l uego c olóquelo abajo 3. ...
- Seite 73 Machine Translated by Google la p arte i nferior. E n e ste m omento, l a a randela d e r esorte b loqueará l a t ráquea. la j unta t órica d e f orma e special h asta e l f ondo. E n e ste m omento, l a a randela e lástica bloqueará ...
- Seite 74 Machine Translated by Google 8 ...
- Seite 75 Machine Translated by Google YA20L/YA40L 1. E ncendido: C onecte e l c able d e a limentación, l a v entana d e v isualización d e l a h ora muestra " OFF" y c ontinúa, l o q ue i ndica q ue e l d ispositivo e stá e n m odo d e e spera. P resione el ...
- Seite 76 Machine Translated by Google Coloque e l c ilindro e n l a c remallera Alinéelo c on l a m uesca d el a coplamiento d el m otor Empújelo e n l a d irección d el a coplamiento d el m otor h asta q ue s e d etenga y l uego b ájelo 3. ...
- Seite 77 Machine Translated by Google El t iempo p reestablecido e s d e 1 m inuto y 3 0 s egundos ( el t iempo p reestablecido d e f ábrica no e s e l t iempo d e m arinado, d etermine e l t iempo d e m arinado d e a cuerdo c on e l alimento ...
- Seite 78 Machine Translated by Google Diagrama d e c ableado 1 2 ...
- Seite 79 Machine Translated by Google...
- Seite 80 Machine Translated by Google Soporte t écnico y c ertificado d e g arantía electrónica w ww.vevor.com/support...
- Seite 81 Machine Translated by Google Marynarka próżniowa Modelu: YA-10L/YA-20L/YA-40L Wsparcie techniczne i certyfikat gwarancji elektronicznej www.vevor.com/support...
- Seite 82 Machine Translated by Google...
- Seite 83 Marynarka próżniowa MODEL:YA-10L/YA-20L/YA-40L To jest oryginalna instrukcja, przed użyciem należy uważnie przeczytać wszystkie instrukcje. VEVOR zastrzega sobie jasną interpretację naszej instrukcji obsługi. Wygląd produktu będzie zależał od produktu, który otrzymałeś. Prosimy o wybaczenie, że nie poinformujemy Cię ponownie, jeśli w naszym produkcie pojawią...
- Seite 84 Machine Translated by Google Ostrzeżenie – aby zmniejszyć ryzyko obrażeń, użytkownik musi przeczytać Przeczytaj uważnie instrukcję obsługi. Ostrzeżenia i środki ostrożności dotyczące bezpieczeństwa 1. W razie wypadku naciśnij wyłącznik awaryjny, aby wyłączyć zasilanie. natychmiast włączyć zasilanie. 2. Po zakończeniu pracy należy oczyścić części robocze, które mają kontakt z jedzenie musi zostać...
- Seite 85 Machine Translated by Google dzieci, aby uniknąć niebezpieczeństwa. 11. Produktu nie wolno czyścić strumieniem wody. 12. Po zakończeniu pracy należy odczekać, aż ruchome części zatrzymają się. Przed czyszczeniem lub spożywaniem posiłków należy całkowicie wyłączyć zasilanie. 13. Po pracy należy wyczyścić wszystkie części, które mają kontakt z żywnością. 14.
- Seite 86 Start/Stop Klawisz odkurzania YA-10L 1. Włącz zasilanie: Podłącz przewód zasilający, okno wyświetlacza czasu wyświetli „OFF” i będzie kontynuowane, wskazując, że urządzenie jest w trybie gotowości. Naciśnij czerwony przycisk „power” na dolnym panelu, okno wyświetlacza czasu pokaże, że fabrycznie ustawiony czas odkurzania wynosi 1 minutę...
- Seite 87 Machine Translated by Google 2. Załadunek: Umieść bęben mocno na ruszcie, naciśnij lub kliknij przycisk do przodu/do tyłu, obróć pokrywę cylindra bębna pionowo do góry, włóż żywność przeznaczoną do marynowania wraz z marynatą do bębna, zamknij pokrywę i naciśnij. Wyjmij klucz i sprzęgło Wyrównaj śrubę...
- Seite 88 Machine Translated by Google Umieść cylinder na zębatce. Wyrównaj go z wycięciem sprzęgła silnika. Przesuń go w kierunku sprzęgła silnika, aż się zatrzyma, a następnie umieść go w dół 3. Podciśnienie: Podłącz rurę przyłączeniową podciśnienia do korpusu zaworu i rolki. Wyciągnij ją po prawidłowym podłączeniu. Jeśli nie da się jej wyjąć, jest podłączona.
-
Seite 89: Schemat Okablowania
Machine Translated by Google dół. W tym momencie podkładka sprężynowa zablokuje tchawicę.podkładka i specjalnie ukształtowany pierścień uszczelniający do dołu. W tym momencie podkładka sprężysta zablokuje tchawicę. Wyciągnij rurę powietrzną. Wciśnij interfejs w dół i sprężynę pralka otworzy się. Uwaga: Przed wyciągnięciem przewodu powietrza upewnij się, że przewód powietrza ciśnienie w rurze wynosi zero. - Seite 90 Machine Translated by Google - 8 -...
- Seite 91 Machine Translated by Google YA-20L/YA-40L 1. Włącz zasilanie: Podłącz przewód zasilający, okno wyświetlacza czasu wyświetli „OFF” i będzie kontynuowane, wskazując, że urządzenie jest w trybie gotowości. Naciśnij czerwony przycisk „power” na dolnym panelu, okno wyświetlacza czasu pokaże, że fabrycznie ustawiony czas odkurzania wynosi 1 minutę i 20 sekund (zdecydowanie zaleca się, aby użytkownicy nie modyfikowali czasu odkurzania, systemu pompy próżniowej i szczegółowych instrukcji konserwacji).
- Seite 92 Machine Translated by Google Umieść cylinder na zębatce. Wyrównaj go z wycięciem sprzęgła silnika. Przesuń go w kierunku sprzęgła silnika, aż się zatrzyma, a następnie odłóż. 3. Podciśnienie: Podłącz rurkę przyłączeniową podciśnienia (żeńską) do korpusu zaworu i rolki (męskiej). Po prawidłowym podłączeniu usłyszysz dźwięk „kliknięcia”. Jeśli go nie usłyszysz, sprawdź...
- Seite 93 Machine Translated by Google Czas ustawiony fabrycznie to 1 minuta i 30 sekund (czas ustawiony fabrycznie nie jest czasem marynowania, należy określić czas marynowania zgodnie ze specyfiką żywności i efektem)), odczekaj, aż odkurzanie zostanie zakończone, naciśnij przycisk ustawiania czasu, dwie cyfry przed oknem wyświetlacza czasu zaczną...
- Seite 94 Machine Translated by Google Schemat okablowania - 12 -...
- Seite 95 Machine Translated by Google...
- Seite 96 Machine Translated by Google Wsparcie techniczne i certyfikat gwarancji elektronicznej www.vevor.com/support...
- Seite 97 Machine Translated by Google Vacuüm tumbler marinator Model:YA-10L/YA-20L/YA-40L Technische ondersteuning en e-garantiecertificaat www.vevor.com/support...
- Seite 98 Machine Translated by Google...
- Seite 99 MODEL:YA-10L/YA-20L/YA-40L Dit is de originele instructie, lees alle handleidingen zorgvuldig door voordat u het product gebruikt. VEVOR behoudt zich een duidelijke interpretatie van onze gebruikershandleiding voor. Het uiterlijk van het product is afhankelijk van het product dat u hebt ontvangen. Vergeef ons dat we u niet opnieuw zullen informeren als er technologie- of software-updates voor ons product zijn.
- Seite 100 Machine Translated by Google Waarschuwing - Om het risico op letsel te verminderen, moet de gebruiker de gebruiksaanwijzing lezen Lees de gebruiksaanwijzing zorgvuldig door. Veiligheidswaarschuwingen en voorzorgsmaatregelen 1. Als er een ongeluk gebeurt, druk dan op de noodstopknop om de motor uit te schakelen. onmiddellijk stroom.
- Seite 101 Machine Translated by Google kinderen om gevaar te vermijden. 11. Dit product mag niet met waterstralen worden gereinigd. 12. Nadat u klaar bent met het werk, moet u wachten tot de bewegende delen stoppen volledig en de stroom wordt losgekoppeld voordat u gaat schoonmaken of eten meeneemt. 13.
- Seite 102 Machine Translated by Google ÿ Power ÿ Tijdweergavevenster ÿ Tijd omhoog-toets ÿ Tijd omlaag-toets ÿ Start/Stop ÿ Vacuümtoets JA-10L 1. Inschakelen: Steek de stekker in het stopcontact, het tijdsweergavevenster geeft "UIT" weer en blijft dit weergeven, wat aangeeft dat het apparaat in de stand- bymodus staat.
- Seite 103 Machine Translated by Google 2. Laden: Plaats de trommel stevig op het rek, druk of klik op de vooruit/achteruit-knop, draai het deksel van de trommelcilinder verticaal omhoog, doe het te marineren voedsel samen met de marinade in de trommel, sluit het deksel en druk op de knop.
- Seite 104 Machine Translated by Google ÿPlaats de cilinder op het rek ÿLijn deze uit met de inkeping van de motorkoppeling ÿDuw deze in de richting van de motorkoppeling totdat deze stopt en plaats deze vervolgens omlaag 3. Vacuüm: Sluit de vacuümaansluitbuis aan op het kleplichaam en de rol. Trek deze eruit nadat deze correct is aangesloten.
- Seite 105 Machine Translated by Google de onderkant. Op dit moment zal de veerring de trachea vergrendelen.ring en de speciaal gevormde O-ring tot aan de onderkant. Op dit moment, de veerring zal de luchtpijp vergrendelen. ÿTrek de luchtpijp eruit. Duw de interface naar beneden en de veer wasmachine gaat open.
- Seite 106 Machine Translated by Google - 8 -...
- Seite 107 Machine Translated by Google YA-20L/YA-40L 1. Inschakelen: Steek de stekker in het stopcontact, het tijdsweergavevenster geeft "UIT" weer en blijft dit weergeven, wat aangeeft dat het apparaat in de stand- bymodus staat. Druk op de rode "aan/uit"-knop op het onderste paneel, het tijdsweergavevenster geeft aan dat de fabrieksinstelling voor vacuümtijd 1 minuut en 20 seconden is (het wordt ten zeerste aanbevolen dat gebruikers de vacuümtijd, het vacuümpompsysteem en de gedetailleerde onderhoudsinstructies niet wijzigen).
- Seite 108 Machine Translated by Google ÿPlaats de cilinder op het rek ÿLijn deze uit met de inkeping van de motorkoppeling ÿDuw deze in de richting van de motorkoppeling totdat deze stopt en zet deze vervolgens neer 3. Vacuüm: Sluit de vacuümverbindingsbuis (vrouwelijk) aan op het kleplichaam en de rol (mannelijk).
- Seite 109 Machine Translated by Google vooraf ingestelde tijd is 1 minuut en 30 seconden (de fabrieksinstelling is niet de marineertijd, bepaal de marineertijd op basis van het specifieke voedsel en effect)), wacht tot het vacuüm trekken is voltooid, druk op de tijdinstellingstoets, de twee cijfers voor het tijdweergavevenster knipperen (minuten) en druk vervolgens op de tijdreductieknop/ tijdverhogingsknop om de gewenste tijd in te stellen.
- Seite 110 Machine Translated by Google Bedradingsschema - 12 -...
- Seite 111 Machine Translated by Google...
- Seite 112 Machine Translated by Google Technische ondersteuning en e- garantiecertificaat www.vevor.com/support...
- Seite 113 Machine Translated by Google Vacuum tumbler marinator Modell: YA-10L/YA-20L/YA-40L Teknisk support och e-garanticertifikat www.vevor.com/support...
- Seite 114 Machine Translated by Google...
- Seite 115 MODELL:YA-10L/YA-20L/YA-40L Detta är den ursprungliga instruktionen, läs alla instruktioner noggrant innan du använder den. VEVOR reserverar sig för en tydlig tolkning av vår användarmanual. Utseendet på produkten är beroende av den produkt du fått. Ursäkta oss att vi inte kommer att informera dig igen om det finns någon teknik eller mjukvaruuppdateringar på...
- Seite 116 Machine Translated by Google Varning - För att minska risken för skada måste användaren läsa bruksanvisningen noggrant. Säkerhetsvarningar och försiktighetsåtgärder 1.Om någon olycka inträffar, tryck på nödstoppsknappen för att stänga av ström direkt. 2. Efter avslutat arbete, de arbetsdelar som kommer i kontakt med mat måste tas bort och rengöras.
- Seite 117 Machine Translated by Google barn för att undvika fara. 11. Denna produkt får inte rengöras med vattenstrålar. 12. Efter avslutat arbete måste du vänta tills de rörliga delarna stannar helt och strömmen kopplas bort innan du rengör eller tar mat. 13.
- Seite 118 ÿ Time down- knapp ÿ Start/ Stopp ÿ Vakuumknapp YA-10L 1. Ström på: Koppla in nätsladden, tidsvisningsfönstret visar "OFF" och fortsätter, vilket indikerar att enheten är i standbyläge. Tryck på den röda "strömknappen" på den nedre panelen, tidsdisplayen visar att den fabriksinställda vakuumtiden är 1 minut 20 sekunder (det rekommenderas...
- Seite 119 Machine Translated by Google 2.Ladda: Placera trumman stadigt på gallret, tryck eller klicka på framåt/bakåt-knapp, vrid trumcylinderlocket vertikalt uppåt, lägg maten som ska marineras tillsammans med marinaden i trumman, stäng locket och tryck. ÿTa ut skiftnyckeln och kopplingen ÿ Rikta in kopplingens fästskruv med motoraxelplanet ÿSätt den plant och rikta in den mot de två...
- Seite 120 Machine Translated by Google ÿSätt cylindern på kuggstången. 3. Vakuum: Anslut vakuumanslutningsröret till ventilhuset och rullen. Dra ut den efter att den är korrekt ansluten. Om den inte kommer ut är den ansluten. Se till att ventilbrytaren är påslagen (ventilen öppnas i samma räta linje som anslutningsröret). Tryck på...
- Seite 121 Machine Translated by Google botten. Vid denna tidpunkt kommer fjäderbrickan att låsa luftstrupen.tvättare och den specialformade O-ringen till botten. Vid denna tid, fjäderbrickan kommer att låsa luftstrupen. ÿDra ut luftröret. Tryck gränssnittet nedåt och fjädern tvättmaskinen öppnas. Obs: Innan du drar ut luftröret, se till att luften finns trycket i röret är noll.
- Seite 122 Machine Translated by Google - 8 -...
- Seite 123 Machine Translated by Google YA-20L/YA-40L 1. Ström på: Koppla in nätsladden, tidsvisningsfönstret visar "OFF" och fortsätter, vilket indikerar att enheten är i standbyläge. Tryck på den röda "strömknappen" på den nedre panelen, tidsdisplayen visar att den fabriksinställda vakuumtiden är 1 minut 20 sekunder (det rekommenderas starkt att användare inte ändrar vakuumtiden, vakuumpumpsystemet och detaljerade underhållsinstruktioner) .
- Seite 124 Machine Translated by Google ÿSätt cylindern på kuggstången. 3. Vakuum: Anslut vakuumanslutningsröret (hona) till ventilhuset och rullen (hane). Du kommer att höra ett "klick"-ljud efter att anslutningen är korrekt. Om du inte hör det, kontrollera igen tills du hör ljudet. Se till att öppna ventilomkopplaren (ventilen öppnas i samma linje som anslutningsröret), och tryck på...
- Seite 125 Machine Translated by Google förinställd tid är 1 minut och 30 sekunder (fabriksinställd tid är inte marineringstiden, vänligen bestäm marineringstiden enligt den specifika maten och effekten) ), vänta tills dammsugningen är klar, tryck på tidsinställningsknappen, de två siffrorna framför tidsvisningsfönstret blinka (minuter) och tryck sedan på tidsminskningsknappen/ tidsökningsknappen för att ställa in önskad tid .
- Seite 126 Machine Translated by Google Kopplingsschema - 12 -...
- Seite 127 Machine Translated by Google...
- Seite 128 Machine Translated by Google Teknisk support och e-garanticertifikat www.vevor.com/support...