Samsung VP-D130 Bedienungsanleitung
Digital video camcorder
Inhaltsverzeichnis
Quicklinks
ENGLISH
Digital Video Camcorder
AF
Auto Focus
CCD
Charge Coupled Device
LCD
Liquid Crystal Display
Owner's Instruction Book
Before operating the unit, please read
this instruction book thoroughly, and
retain it for future reference.
This product meets the intent of
Directive 89/336 CEE, 73/23 CEE, 93/68 CEE.
VP-D130/D130i
VP-D190/D190i
ELECTRONICS
Dieses Produkt entspricht den Vorgaben der
folgenden Richtlinien: 89/336 EWG, 73/23 EWG,
93/68 EWG.
Digitaler Camcorder
AF
Auto Focus
CCD
Charge Coupled Device
LCD
Liquid Crystal Display
Bedienungsanleitung
Bitte lesen Sie die Bedienungsanleitung vor
Inbetriebnahme des Camcorders
vollständig durch. Bewahren Sie die
Anleitung für den späteren Gebrauch auf.
AD68-00442F(AA-E7)
DEUTSCH
Inhaltsverzeichnis

Verwandte Anleitungen für Samsung VP-D130


Inhaltszusammenfassung für Samsung VP-D130
- Seite 1 ENGLISH DEUTSCH Digital Video Camcorder Digitaler Camcorder VP-D130/D130i VP-D190/D190i Auto Focus Auto Focus Charge Coupled Device Charge Coupled Device Liquid Crystal Display Liquid Crystal Display Bedienungsanleitung Owner’s Instruction Book Bitte lesen Sie die Bedienungsanleitung vor Before operating the unit, please read...
-
Seite 2: Inhaltsverzeichnis
DEUTSCH ENGLISH Contents Inhalt Notes and Safety Instructions Wichtige Informationen und Sicherheitshinweise Notes regarding the rotation of the LCD screen ........6 Hinweise zum Drehen des LCD-Monitors ..........6 Notes regarding moisture condensation............ 7 Hinweise zur Feuchtigkeitskondensation ..........7 Notes regarding Camcorder................7 Hinweise zum Camcorder ................7 Notes regarding the battery pack .............. - Seite 3 DEUTSCH ENGLISH Contents Inhalt Tipps für gute Aufnahmen ..............28 Hints for Stable Image Recording ............28 LCD-Monitor verwenden ..............28 Recording with the LCD monitor ............ 28 Suchermonitor verwenden ..............28 Recording with the Viewfinder ............28 Adjusting the LCD .................. 29 LCD-Monitor einstellen ................
- Seite 4 DEUTSCH ENGLISH Contents Inhalt Automatische Fokuseinstellung ............59 Auto Focusing .................. 59 Manual Focusing ................59 Manuelle Fokuseinstellung ..............59 Gegenlichtausgleich BLC (Back Light Compensation) ......60 BLC (Back Light Compensation) ............60 Einblenden und Ausblenden ..............61 Fade In and Out ..................61 Am Anfang einer Aufnahme einblenden ..........
- Seite 5 DEUTSCH ENGLISH Contents Inhalt Inserting and ejecting the SmartMediaCard .......... 78 SmartMedia-Karte einlegen und ausgeben ..........78 Inserting the card ................78 Karte einlegen ..................78 Ejecting the card ................78 Karte ausgeben ................78 Structure of folders and files on the Smart Media Card ......79 Verzeichnis- und Dateistruktur auf der SmartMedia-Karte ....
-
Seite 6: Notes And Safety Instructions
DEUTSCH ENGLISH Notes and Safety Instructions Wichtige Informationen und Sicherheitshinweise Hinweise zum Drehen des LCD-Monitors Notes regarding the rotation of the LCD screen Please rotate the LCD screen carefully as illustrated. Drehen Sie den LCD-Monitor vorsichtig wie in den Abbildungen Over rotation may cause damage to the inside of the hinge that gezeigt. -
Seite 7: Notes Regarding Moisture Condensation
DEUTSCH ENGLISH Notes and Safety Instructions Wichtige Informationen und Sicherheitshinweise Notes regarding moisture condensation Hinweise zur Feuchtigkeitskondensation 1. A sudden rise in atmospheric temperature may cause 1. Ein plötzlicher Temperaturanstieg kann dazu führen, dass sich im Inneren des Camcorders Feuchtigkeit niederschlägt. condensation to form inside the camcorder. -
Seite 8: Notes Regarding The Battery Pack
DEUTSCH ENGLISH Notes and Safety Instructions Wichtige Informationen und Sicherheitshinweise Hinweise zum Akku Notes regarding the battery pack Make sure that the battery pack is fully Laden Sie den Akku vollständig auf, bevor charged before starting record. Sie Aufnahmen im Freien machen. To preserve battery power, keep your Schalten Sie Ihren Camcorder aus, wenn camcorder turned off when you are not... -
Seite 9: Note Regarding The Lens
DEUTSCH ENGLISH Notes and Safety Instructions Wichtige Informationen und Sicherheitshinweise Hinweise zum Objektiv Note regarding the LENS Richten Sie den Camcorder beim Aufnehmen nicht direkt auf die Do not film with the camera lens pointing directly at the sun. Sonne. Direktes Sonnenlicht kann den CCD-Sensor beschädigen. Direct sunlight can damage the CCD(Charge Coupled Device). -
Seite 10: Precautions Regarding The Lithium Battery
DEUTSCH ENGLISH Notes and Safety Instructions Wichtige Informationen und Sicherheitshinweise Precautions regarding the Lithium battery Sicherheitshinweise zur Lithiumbatterie 1. The lithium battery maintains the clock function and user settings, 1. Die Lithiumbatterie dient zur Sicherung von Datum, Uhrzeit even if the battery pack or AC adapter is removed. und anderen im Camcorder gespeicherten Daten, wenn der Camcorder weder vom Netz noch vom Akku mit Strom versorgt wird. -
Seite 11: Getting To Know Your Camcorder
Verbindungssystem zur Übertragung von or edit various images. DV-Daten (DV - Digital Video). (VP-D130/D190 is not able to record and receive digital data from - Die Modelle VP-D130/D190 können keine digitalen Daten von another DV Device.) anderen DV-Systemen empfangen und aufnehmen. -
Seite 12: Accessories Supplied With Camcorder
DVC Media 2.0 Instruction Book (VP-D190/D190i only) DVC Media 2.0 VP-D190/D190i: VP-D190/D190i: DVC Media 1.0 DVC Media 1.0 12. SmartMediaCard 12. SmartMedia-Karte (VP-D190/D190i only) (nur VP-D190/D190i) 13. USB AUDIO cable 13. USB AUDIO cable 13. USB-Audiokabel (VP-D130/D130i only) (VP-D130/D130i only) (nur VP-D130/D130i) -
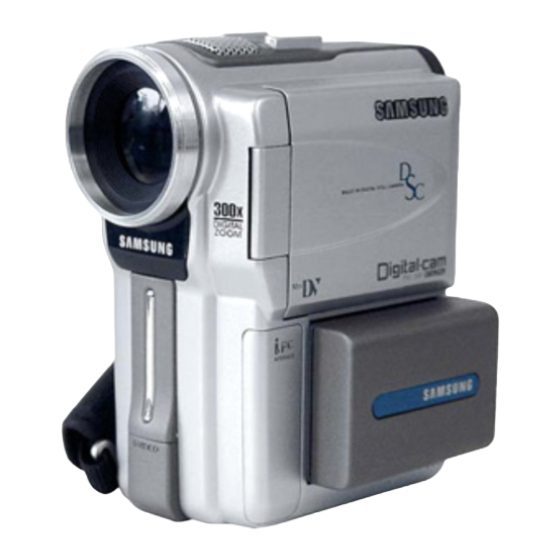
Seite 13: Front & Left View
7. External MIC in (see page 62) 8. USB-Anschluss (siehe Seite 73) 8. USB Jack (see page 73) 9. VP-D130/D190: digitaler Ausgang DV OUT (siehe S. 71, 72) 9. DV out (VP-D130/D190) (see pages 71, 72) VP-D130i/D190i: digitaler Ein-/Ausgang DV IN/OUT DV in/out (VP-D130i/D190i) 10. -
Seite 14: Right & Top View
ENGLISH DEUTSCH Getting to Know Your Camcorder Überblick über den Camcorder Right & Top View Rechte Seite und Oberseite 2. Video Light Holder 9. Internal MIC 3. Dual Zoom 6. Photo button 4. Custom.Q button 7. Zoom lever 1. SPEAKER 5. -
Seite 15: Rear & Bottom View
DEUTSCH ENGLISH Getting to Know Your Camcorder Überblick über den Camcorder Rear & Bottom View Rückansicht und Unterseite 13. RESET 11. Viewfinder 1. LCD open 12. Power switch 2. MENU button 6. FADE button 3. MENU DIAL 4. Battery Release button 9. -
Seite 16: Remote Control
DEUTSCH ENGLISH Getting to Know Your Camcorder Überblick über den Camcorder Remote control Fernbedienung 16. DISPLAY 1. PHOTO START/ WIDE PHOTO DISPLAY STOP 2. START/STOP 15. Zoom WIDE SELF ZERO A.DUB TIMER MEMORY 3. SELF TIMER 14. Zoom TELE 4. ZERO MEMORY TELE 13. -
Seite 17: Osd (On Screen Display In Cam And Vcr Modes)
DEUTSCH ENGLISH Getting to Know Your Camcorder Überblick über den Camcorder OSD (On Screen Display in CAM and VCR modes) Monitoranzeigen (CAM- und VCR-Modus) 1. Battery level (see page 24) 1. Akkuladezustand (siehe Seite 24) 2. Custom or Easy mode (see pages 57, 58) 2. -
Seite 18: Osd (On Screen Display In M.rec And M.play Modes)
DEUTSCH ENGLISH Getting to Know Your Camcorder Überblick über den Camcorder Monitoranzeigen (M.REC- und M.PLAY-Modus) OSD (On Screen Display in M.REC/M.PLAY modes) Diese Anzeigen erscheinen nur bei VP-D190/D190i. These items are available in for the VP-D190/D190i models only. 28. Folder number-file number (see page 79) 28. -
Seite 19: How To Use The Remote Control
DEUTSCH ENGLISH Getting to Know Your Camcorder Überblick über den Camcorder How to use the Remote Control Fernbedienung verwenden Battery Installation for the Remote Control Lithiumbatterie in die Fernbedienung einlegen You need to insert or replace the lithium battery when : Legen Sie eine Lithiumbatterie ein bzw. -
Seite 20: Preparation
DEUTSCH ENGLISH Preparation Camcorder vorbereiten Adjusting the Hand Strap Halteschlaufe einstellen It is very important to ensure that the Hand strap has been Stellen Sie die Halteschlaufe ein, bevor Sie eine Aufnahme machen. correctly adjusted before you begin your recording. Mit einer richtig eingestellten Halteschlaufe können Sie: den Camcorder ruhig und bequem halten;... -
Seite 21: Connecting A Power Source
DEUTSCH ENGLISH Preparation Camcorder vorbereiten Connecting a Power Source Camcorder an eine Stromquelle anschließen There are two types of power source that can be connected Es gibt zwei Möglichkeiten für den Anschluss einer Stromquelle. to your camcorder. - Bei Innenaufnahmen können Sie den Camcorder über das Netzkabel und den Netzadapter an eine Steckdose anschließen. -
Seite 22: Using The Lithium Ion Battery Pack
DEUTSCH ENGLISH Preparation Camcorder vorbereiten Using the Lithium Ion Battery Pack Lithium-Ionen-Akku verwenden The amount of continuous recording time available depends on : Die mit einem voll aufgeladenen Akku verfügbare Aufladezeit hängt von folgenden Faktoren ab: The type and capacity of the battery pack you are using. welchen Akkutyp Sie verwenden;... -
Seite 23: Table Of Continuous Recording Time Based On Model And Battery Type
DEUTSCH ENGLISH Preparation Camcorder vorbereiten Using the Lithium Ion Battery Pack Lithium-Ionen-Akku verwenden Table of continuous recording time based on model and Übersicht über die Aufnahmezeiten bei Dauerbetrieb je nach battery type. Modell und Akkutyp Wenn Sie den LCD-Monitor schließen, wird automatisch die If you close the LCD screen, it switches off and the EVF LCD-Anzeige ausgeschaltet und der Suchermonitor schaltet switches on automatically. -
Seite 24: Battery Level Display
DEUTSCH ENGLISH Preparation Camcorder vorbereiten Battery level display Akku-Ladezustandsanzeige • Die Akku-Ladezustandsanzeige gibt an, wieviel Leistung im • The battery level display indicates the amount of power Akku noch vorhanden ist. remaining in the battery pack. a. Fully charged a. Vollständig aufgeladen b. -
Seite 25: Inserting And Ejecting A Cassette
DEUTSCH ENGLISH Preparation Camcorder vorbereiten Inserting and Ejecting a Cassette Kassetten einlegen und entnehmen There are three types of Mini DV CASSETTE tapes: DVM80, Folgende Kassettentypen sind für den Camcorder geeignet: DVM60 and DVM30. DVM80, DVM60 und DVM30. When inserting a tape or closing a cassette holder, do not apply Wenden Sie beim Einlegen von Kassetten und beim Schließen excessive force. -
Seite 26: Basic Recording
DEUTSCH ENGLISH Basic Recording Einfache Aufnahmen erstellen Making your First Recording Ihre erste Aufnahme 1. Connect a Power source to the 1. Schließen Sie eine camcorder. (see page 21) Stromquelle an - siehe Seite 21 (A battery pack or a AC power (Akku oder Netzanschluss). -
Seite 27: Edit Search
ENGLISH DEUTSCH Basic Recording Einfache Aufnahmen erstellen When a cassette is loaded and the camcorder is left in the STBY Bleibt der Camcorder mit eingelegter Kassette über fünf Minuten mode for more than 5 minutes without being used, it will switch off im Aufnahme-Bereitschaftsmodus (Anzeige STBY), schaltet er automatically. -
Seite 28: Hints For Stable Image Recording
ENGLISH DEUTSCH Basic Recording Einfache Aufnahmen erstellen Tipps für gute Aufnahmen Hints for Stable Image Recording While recording, it is very important to hold the camcorder Beim Filmen ist es sehr wichtig, den Camcorder richtig zu correctly. halten. Fix the LENS cap firmly by clipping it to the hand strap. Hängen Sie die Objektivkappe in die Halteschlaufe ein. -
Seite 29: Adjusting The Lcd
ENGLISH DEUTSCH Basic Recording Einfache Aufnahmen erstellen LCD-Monitor einstellen Adjusting the LCD Your camcorder is equipped with a 2.5 inch color Liquid Crystal Der Camcorder ist mit einem 2,5 Zoll-Farbmonitor mit Display(LCD) screen, which enables you to view what you are Flüssigkristallanzeige ausgestattet, auf dem Sie direkt sehen recording or playing back directly. -
Seite 30: Using The Viewfinder
ENGLISH DEUTSCH Basic Recording Einfache Aufnahmen erstellen 8. Push the MENU DIAL again. 8. Drücken Sie auf das Menü-Einstellrad. You may select NORMAL or SUPER in the BRIGHT SELECT Option BRIGHT SELECT: Sie können zwischen den feature and push the MENU DIAL Einstellungen NORMAL oder SUPER wählen, indem Sie auf to save the setting. -
Seite 31: Playing Back A Tape You Have Recorded On The Lcd
DEUTSCH ENGLISH Basic Recording Einfache Aufnahmen erstellen Notes regarding the rotation of the LCD screen Aufnahmen auf dem LCD-Monitor wiedergeben Playing back a tape you have recorded on the LCD You can monitor the playback picture on the LCD monitor. Sie können Aufnahmen auf dem LCD-Monitor wiedergeben. -
Seite 32: Adjusting The Lcd During Play
DEUTSCH ENGLISH Basic Recording Einfache Aufnahmen erstellen Adjusting the LCD during PLAY LCD-Monitor während der Wiedergabe einstellen Sie können den LCD-Monitor während der Wiedergabe You can adjust the LCD during playback. einstellen. The adjustment method is the same procedure as used in Gehen Sie dabei genauso vor wie unter “LCD-Monitor CAM mode. -
Seite 33: Advanced Recording
DEUTSCH ENGLISH Advanced Recording Weiterführende Funktionen Notes regarding the rotation of the LCD screen Use of various Functionsa Funktionen einstellen und verwenden Menüoptionen aufrufen Setting menu items Menü Untermenü Modus MENU SUB MENU MODE switch INITIAL CLOCK SET C/V/MR/MP CLOCK SET C/V/MR/MP INITIAL REMOCON... -
Seite 34: Availability Of Functions In Each Mode
ENGLISH DEUTSCH Advanced Recording Weiterführende Funktionen Availability of functions in each mode Verfügbarkeit der Funktionen in den einzelnen Betriebsmodi Gewünschte Digital Digitale Requested Digitale Funktionen Digital functions Funktion Spezial- special Mode Operating Aktive D.ZOOM PHOTO D.ZOOM PHOTO effekte effects Mode Funktion D.ZOOM D.ZOOM... -
Seite 35: Clock Set
ENGLISH DEUTSCH Advanced Recording Weiterführende Funktionen CLOCK SET CLOCK SET (Datum und Uhrzeit einstellen) CLOCK setup works in CAM, VCR, M.REC and M.PLAY Die Funktion CLOCK SET ist in folgenden Modi verfügbar: modes. CAM, VCR, M.REC und M.PLAY. The DATE/TIME is automatically recorded onto a tape. Datum und Uhrzeit werden automatisch mit auf das Band Before recording, please set the DATE/TIME. -
Seite 36: Remocon
ENGLISH DEUTSCH Advanced Recording Weiterführende Funktionen REMOCON REMOCON (Fernbedienung aktivieren/deaktivieren) THE REMOCON function works in CAM, VCR, M.REC, Die Funktion REMOCON ist in folgenden Modi verfügbar: M.PLAY modes. CAM, VCR, M.REC und M.PLAY. Mit dieser Funktion können Sie die Fernbedienung des The REMOCON option allows you to able or disable Camcorders aktivieren bzw. -
Seite 37: Beep Sound
ENGLISH DEUTSCH Advanced Recording Weiterführende Funktionen BEEP SOUND BEEP SOUND (Tonsignal ein-/ausschalten) THE BEEP SOUND function works in CAM, VCR, M.REC, Die Funktion BEEP SOUND ist in folgenden Modi verfügbar: M.PLAY modes. CAM, VCR, M.REC und M.PLAY. Use the MENU, to setup the BEEP SOUND function. Select Mit dieser Funktion können Sie einstellen, ob ein akustisches whether or not you want to hear a beep sound whenever you Signal erklingt oder nicht, wenn Sie eine Einstellung ändern. -
Seite 38: Shutter Sound
ENGLISH DEUTSCH Advanced Recording Weiterführende Funktionen SHUTTER SOUND SHUTTER SOUND (Foto-Klickton ein-/ausschalten) Der Foto-Klickton wird nur dann ausgegeben, wenn die You can hear SHUTTER SOUND only when the PHOTO Fotofunktion aktiviert ist. function is working. Mit der Funktion SHUTTER SOUND können Sie einstellen, Determines whether or not you wish to hear a SHUTTER ob beim Aufnehmen digitaler Bilder ein Klickton ertönt oder SOUND when filming digital. -
Seite 39: Demonstration
ENGLISH DEUTSCH Advanced Recording Weiterführende Funktionen DEMONSTRATION DEMONSTRATION (Demo-Funktion starten/beenden) Demonstration automatically shows you the major functions Die Demo-Funktion bietet Ihnen einen Überblick über die that are included with your camcorder so that you may use wichtigsten Funktionen des Camcorders. them more easily. -
Seite 40: Program Ae
ENGLISH DEUTSCH Advanced Recording Weiterführende Funktionen PROGRAM AE PROGRAM AE (Belichtungsprogramme) The PROGRAM AE function works in CAM or M.REC mode Die Option PROGRAM AE ist nur in folgenden Modi only. verfügbar: CAM und M.REC. The PROGRAM AE mode allows you to adjust shutter Durch die Auswahl eines Belichtungsprogramms können Sie speeds and apertures to suit different shooting conditions. -
Seite 41: Setting The Program Ae
ENGLISH DEUTSCH Advanced Recording Weiterführende Funktionen Setting the PROGRAM AE Belichtungsprogramm einstellen 1. Press the MENU button. 1. Drücken Sie die Taste MENU. Das Menü wird eingeblendet. The menu list will appear. 2. Wählen Sie mit dem Menü-Einstellrad die 2. Turn the MENU DIAL to highlight CAMERA and CAM MODE Option CAMERA. -
Seite 42: Wht. Balance (White Balance)
ENGLISH DEUTSCH Advanced Recording Weiterführende Funktionen WHT. BALANCE (Weißabgleich einstellen) WHT. BALANCE (WHITE BALANCE) The WHITE BALANCE function works in CAM or M.REC Die Weißabgleich-Funktion ist nur im Modus CAM oder mode only. M.REC verfügbar. The WHITE BALANCE is a recording function that preserves Durch den Weißabgleich wird eine natürliche the unique color of the object in any recording condition. -
Seite 43: Zooming In And Out With Digital Zoom
Die Zoomfunktion ist nur im Modus CAM/M.REC verfügbar. Ein- und Auszoomen Zooming In and Out Die Camcorder-Modelle VP-D130/D130i/D190/D190i sind mit The VP-D130/D130i/D190/D190i model offers a DUAL Zoom dem besonders komfortablen Dual-Zoom-System ausgestattet. system for added convenience. Mit der Zoomfunktion können Sie die Abbildungsgröße Ihres Zooming is a recording technique that lets you change the size Motivs beim Aufnehmen einstellen. -
Seite 44: Digital Zoom
ENGLISH DEUTSCH Advanced Recording Weiterführende Funktionen Digital Zoom D.ZOOM (digitalen Zoom ein-/ausschalten) More than 12x zoom is achieved digitally. Über 12fache Vergrößerung wird durch den digitalen Zoom The picture quality may deteriorate depending on how erzielt. much you zoom in on the subject. Wenn Sie in den T-Bereich zoomen, wird die Bildqualität We recommend that you use the EIS feature with DIGITAL geringfügig schlechter. -
Seite 45: Eis (Electronic Image Stabilizer)
ENGLISH DEUTSCH Advanced Recording Weiterführende Funktionen EIS (Electronic Image Stabilizer) EIS (Electronic Image Stabilizer - elektronischer Bildstabilisator) The EIS function works in CAM/M.REC mode only. EIS(Electronic Image Stabilizer) is a function that Die EIS-Funktion ist nur im Modus CAM/M.REC verfügbar. compensates for any shaking or hand movement while Der Bildstabilisator gleicht kleine Handbewegungen oder ein holding the camcorder (within reasonable limits). -
Seite 46: Dse(Digital Special Effects) Select
ENGLISH DEUTSCH Advanced Recording Weiterführende Funktionen DSE(Digital Special Effects) SELECT DSE SELECT (Digital Special Effects - digitale Spezialeffekte) The DSE function works in CAM and M.REC mode only. Die DSE-Funktion ist nur im Modus CAM und M.REC The digital effects enable you to give a creative look to your verfügbar. -
Seite 47: Selecting An Effect
ENGLISH DEUTSCH Advanced Recording Weiterführende Funktionen Selecting an effect Effekt wählen 1. Set the camcorder to CAM mode. 1. Stellen Sie den Betriebsmodus-Schalter auf CAM MODE Position CAM. INITIAL 2. Press the MENU button. CAMERA PROGRAM AE WHT. BALANCE The menu list will appear. 2. -
Seite 48: Custom.q
ENGLISH DEUTSCH Advanced Recording Weiterführende Funktionen CUSTOM.Q CUSTOM.Q (benutzerdefinierte Einstellungen) Sie können die von Ihnen bevorzugten Aufnahmeeinstellungen You can customize settings and save them for future use. speichern und mit dem CUSTOM-Modus wieder aufrufen. The CUSTOM.Q function operates in the CAM and M.REC Die Funktion CUSTOM.Q ist im Modus CAM und M.REC mode. -
Seite 49: Rec Mode
ENGLISH DEUTSCH Advanced Recording Weiterführende Funktionen REC MODE REC MODE (Aufnahmegeschwindigkeit wählen) Die Funktion REC MODE ist im Modus CAM und VCR The REC MODE function works in both CAM and VCR modes. verfügbar. This camcorder records and plays back in SP (standard play) Sie können beim Aufzeichnen und beim Wiedergeben von mode and in LP (long play) mode. -
Seite 50: Audio Mode
ENGLISH DEUTSCH Advanced Recording Weiterführende Funktionen AUDIO MODE AUDIO MODE (Audiomodus wählen) The AUDIO MODE function works in CAM and VCR modes. Die Funktion AUDIO MODE ist im Modus CAM und VCR This camcorder records sound in two ways. (12bit, 16bit) verfügbar. -
Seite 51: Wind Cut
ENGLISH DEUTSCH Advanced Recording Weiterführende Funktionen WIND CUT WIND CUT (Rauschunterdrückung ein-/ausschalten) The WIND CUT function works in CAM and VCR modes. Die Funktion WIND CUT ist im Modus CAM und VCR The WIND CUT function minimizes wind noise or other noise verfügbar. -
Seite 52: Date/Time
ENGLISH DEUTSCH Advanced Recording Weiterführende Funktionen DATE/TIME DATE/TIME (Datum und Uhrzeit ein-/ausblenden) Die Funktion DATE/TIME ist im Modus CAM, VCR, M.REC und The DATE/TIME function works in CAM, VCR, M.REC and M.PLAY verfügbar. M.PLAY modes. Datum und Uhrzeit werden automatisch auf einem speziellen The date and time are automatically recorded on a special data Datenbereich des Bands aufgezeichnet. -
Seite 53: Tv Display
ENGLISH DEUTSCH Advanced Recording Weiterführende Funktionen TV DISPLAY TV DISPLAY (Monitoranzeigen auf TV ein-/ausblenden) The TV DISPLAY function works in CAM, VCR, M.REC, M.PLAY Die Funktion TV DISPLAY ist im Modus CAM, VCR, M.REC und M.PLAY verfügbar. modes. Mit dieser Funktion können Sie die Ausgabe von You can select the output path of the OSD (On Screen Display). -
Seite 54: Using Quick Menu
DEUTSCH ENGLISH Advanced Recording Weiterführende Funktionen Using Quick Menu Kurzmenü verwenden Quick menu is available only in CAM mode. Das Kurzmenü ist nur im CAM-Modus verfügbar. Das Kurzmenü bietet Ihnen die Möglichkeit, bestimmte Quick menu is used to adjust to camera environments that are Einstellungen für die Aufnahme mit Hilfe des Menü-Einstellrads easily changing subject to photographing schnell zu ändern. -
Seite 55: Shutter Speed & Exposure
ENGLISH DEUTSCH Advanced Recording Weiterführende Funktionen WHT. BALANCE(see page 42) WHT. BALANCE (siehe Seite 42) - Wenn Sie WHT.BALANCE wählen und auf das Menü- Each time you select WHT. BALANCE and press the Einstellrad drücken, schalten Sie zwischen dem zuvor MENU DIAL, preset WHT.BLANCE values and gewählten Weißabgleich-Modus und dem automatischen AUTO are switch- ed to each other. -
Seite 56: Belichtung Einstellen (Shutter Speed Und Exposure)
ENGLISH DEUTSCH Advanced Recording Weiterführende Funktionen Belichtung einstellen (SHUTTER SPEED und EXPOSURE) SHUTTER SPEED & EXPOSURE Die Funktionen SHUTTER SPEED und EXPOSURE sind nur im You can set SHUTTER SPEED and EXPOSURE only in CAM CAM-Modus verfügbar. mode. Sie benötigen diese Funktionen nur beim Erstellen von SHUTTER SPEED and EXPOSURE are necessary only when Aufnahmen, deshalb können Sie sie nur über das Kurzmenü... -
Seite 57: Easy Mode (For Beginners)
ENGLISH DEUTSCH Advanced Recording Weiterführende Funktionen EASY Mode (for Beginners) EASY-Aufnahmemodus (für die ersten Aufnahmen) The EASY mode allows a beginner to make good recordings Der EASY-Modus bietet einen besonders leichten Einstieg in die easily. Verwendung des Camcorders. The EASY mode only operates in CAM mode. Der EASY-Aufnahmemodus funktioniert nur im CAM- Betriebsmodus. -
Seite 58: Custom Mode
DEUTSCH ENGLISH Advanced Recording Weiterführende Funktionen CUSTOM Mode CUSTOM-Aufnahmemodus You can customize settings and save them for future use. Sie können die von Ihnen bevorzugten Aufnahmeeinstellungen The CUSTOM SET function operates in CAM mode only. speichern und mit dem CUSTOM-Modus wieder aufrufen. Please set the custom settings before using this function. -
Seite 59: Mf/Af (Manual Focus/Auto Focus)
DEUTSCH ENGLISH Advanced Recording Weiterführende Funktionen Fokus automatisch oder manuell einstellen MF/AF (Manual Focus/Auto Focus) Die automatische oder manuelle Fokuseinstellung steht nur im The MF/AF function works in CAM and M.REC mode only. CAM und M.REC Modus zur Verfügung. In most situations, it is better to use the automatic focus Verwenden Sie vorzugsweise die automatische feature, as it enables you to concentrate on the creative side of Fokuseinstellung, da Sie sich dann besser auf die kreative Seite... -
Seite 60: Blc (Back Light Compensation)
DEUTSCH ENGLISH Advanced Recording Weiterführende Funktionen BLC (Back Light Compensation) Gegenlichtausgleich BLC (Back Light Compensation) BLC works in CAM/M.REC mode. Die Funktion BLC ist im Modus CAM/M.REC verfügbar. Back lighting exists when the subject is darker than the Eine Gegenlichtaufnahme liegt vor, wenn das Motiv dunkler als background: der Hintergrund ist: The subject is in front of a window. -
Seite 61: Fade In And Out
DEUTSCH ENGLISH Advanced Recording Weiterführende Funktionen Fade In and Out Einblenden und Ausblenden The FADE function works in CAM mode only. Die Funktion Einblenden/Ausblenden You can give your recordings a steht nur im CAM-Modus zur professional look by using special Verfügung. -
Seite 62: Audio Dubbing
DEUTSCH ENGLISH Advanced Recording Weiterführende Funktionen Audio dubbing Nachvertonung (AUDIO DUBBING) Die Funktion AUDIO DUBBING ist nur im VCR-Modus verfügbar. The AUDIO DUBBING function only works in VCR Mode. Mit dieser Funktion können Sie für bereits erstellte SP- You can add sound to the original sound on a pre-recorded tape, Aufnahmen (mit 12-Bit-Ton) einen neuen Ton aufzeichnen recorded in SP mode with 12bit sound. -
Seite 63: Dubbed Audio Playback
DEUTSCH ENGLISH Advanced Recording Weiterführende Funktionen Nachträglich aufgezeichneten Ton wiedergeben Dubbed audio Playback 1. Legen Sie die Kassette mit der nachträglich aufgezeichneten 1. Insert the dubbed tape and press MENU button. Tonspur in den Camcorder ein. Drücken Sie die Taste MENU. 2. -
Seite 64: Photo Image Recording
DEUTSCH ENGLISH Advanced Recording Weiterführende Funktionen PHOTO Image Recording Einzelbilder aufnehmen (Fotofunktion) 1. Drücken Sie die Taste PHOTO halb ein, und 1. Press the PHOTO Button lightly (about halfway halten Sie sie. down) and hold it. Auf dem LCD-Monitor wird ein Standbild The still picture appears on the LCD monitor. -
Seite 65: Various Recording Techniques
DEUTSCH ENGLISH Advanced Recording Weiterführende Funktionen Various Recording Techniques Mögliche Aufnahmewinkel In some situations different recording techniques may be Mit dem drehbaren LCD-Monitor sind auch schwierige required for more dramatic results. Aufnahmewinkel möglich. Hinweis Reference Gewaltsames Drehen kann zu Schäden am Drehgelenk führen, mit Please rotate the LCD screen carefully as excessive rotation may dem der LCD-Monitor mit dem Camcorder verbunden ist. -
Seite 66: Tape Playback
DEUTSCH ENGLISH Advanced Recording Weiterführende Funktionen Tape Playback Aufnahmen wiedergeben To watch a recorded tape. Der folgende Abschnitt enthält Informa- Audio input Video input- (left)-White tionen zur Wiedergabe von Aufnahmen. The playback function works in VCR mode Audio input Yellow (right)-Red only. -
Seite 67: Connecting To A Tv Which Has No Audio And Video Input Jacks
DEUTSCH ENGLISH Advanced Recording Weiterführende Funktionen Connecting to a TV which has no Audio and Video input jacks Anschluss an ein Fernsehgerät ohne AV-Eingang Schließen Sie den Camcorder über einen Videorecorder an das You can connect your camcorder to a TV through a VCR. Fernsehgerät an. -
Seite 68: Various Functions While In Vcr Mode
DEUTSCH ENGLISH Advanced Recording Weiterführende Funktionen Various Functions while in VCR mode Funktionen bei der Wiedergabe The PLAY/STILL, STOP, FWD, REW buttons are located on the Die Tasten PLAY/STILL, STOP, FWD und REW sind sowohl auf dem Camcorder als auch auf der Fernbedienung vorhanden. camcorder and the Remote Control. -
Seite 69: Frame Advance (To Play Back Frame By Frame)
DEUTSCH ENGLISH Advanced Recording Weiterführende Funktionen Frame advance (To play back frame by frame) Einzelbild-Wiedergabe Drücken Sie auf der Fernbedienung im Standbild-Modus die Press the F.ADV button on the Remote Control while in Still Taste F.ADV. mode. Die Funktion F.ADV ist nur im Standbild-Modus verfügbar. The F.ADV function works in still mode only. -
Seite 70: Zero Memory
DEUTSCH ENGLISH Advanced Recording Weiterführende Funktionen ZERO MEMORY ZERO MEMORY (zum Zähler-Nullpunkt zurückkehren) The MEMORY function works in both CAM and VCR modes. Die Funktion ZERO MEMORY ist im Modus CAMERA und You can mark a point on a tape that you want to return to VCR verfügbar. -
Seite 71: Ieee 1394 Data Transfer
DEUTSCH ENGLISH IEEE 1394 Data Transfer Datenübertragung mit Schnittstelle IEEE 1394 Transferring IEEE1394 (i.LINK)-DV standard data connections Übertragung über Standard-DV-Datenanschluss IEEE1394 (i.LINK) Connecting to a DV device Anschluss an ein DV-Gerät Über die Schnittstelle IEEE 1394, auch als “i.LINK” bezeichnet, Connecting with other DV standard products. -
Seite 72: System Requirements
DEUTSCH ENGLISH IEEE 1394 Data Transfer Datenübertragung mit Schnittstelle IEEE 1394 Systemanforderungen System requirements CPU: kompatibel zu Intel ® Pentium lII 450 MHz CPU : faster Intel ® Pentium III 450Mhz compatible. Betriebssystem: Windows ® 98SE, ME, XP, Mac OS Operating system : Windows ®... -
Seite 73: Usb Interface
DEUTSCH ENGLISH USB interface USB-Schnittstelle Übertragung von digitalen Bildern über einen USB-Anschluss Transferring a Digital Image through a USB Connection Über den USB-Anschluss können Sie Einzelbilder vom You can easily transfer a still image from a camera, tape, Camcorder, von Kassette oder SmartMedia-Karte zum PC memory to a PC without additional add-on cards übertragen. -
Seite 74: Installing Dvc Media 2.0 Program
DEUTSCH ENGLISH USB interface USB-Schnittstelle Installing DVC Media 2.0 Program Software DVC Media 2.0 installieren Do not connect the camcorder to PC before installing the Schließen Sie den Camcorder erst nach Installation der Software an den PC an. program. Falls eine andere Kamera oder ein Scanner angeschlossen ist, If another camera or scanner is connected, please disconnect it trennen Sie dieses Gerät vor der Installation vom PC. - Seite 75 4. The below window displays the folder to Programm installieren möchten. install the program. Standardordner für die Installation: Basically the program is installed in the C:\Programfiles\Samsung\DVC Media 2.0 following folder. Klicken Sie auf , um einen C:\Programfiles\Samsung\DVC Media 2.0 anderen Ordner zu wählen.
-
Seite 76: Connecting To A Pc
USB devices, the camcorder may not work properly. einwandfrei. In this case, remove the other USB devices from the PC and In solchen Fällen trennen Sie die anderen USB-Geräte vom reconnect the camcorder. PC und schließen den Camcorder neu an. USB Cable USB AUDIO Cable (VP-D130/D130i only) -
Seite 77: Digital Still Camera Mode (Vp-D190/D190I Only) Smartmediacard
DEUTSCH ENGLISH Digital Still Camera mode (VP-D190/D190i only) Digitalkamera-Modus für Einzelbilder (nur bei VP-D190/D190i) SmartMediaCard SmartMedia-Karte Mit dem Camcorder aufgenommene Einzelbilder können Sie The SmartMediaCard (SMC), store and manage still images auf SmartMedia-Karte speichern. recorded by the camera. Funktionen der SmartMedia-Karte Functions with SMC Bilder speichern Recording still images... -
Seite 78: Inserting And Ejecting The Smartmediacard
Handhabung der Karte sowie infolge statischer Aufladung, noise or repair. Save important images separately. elektrischer Störungen, Fehler und Reparaturarbeiten verändert Samsung is not responsible for data loss due to misuse. werden oder verlorengehen. Speichern Sie wichtige Bilder deshalb auf einem separaten Speichermedium. -
Seite 79: Structure Of Folders And Files On The Smart Media Card
DEUTSCH ENGLISH Digital Still Camera mode (VP-D190/D190i only) Digitalkamera-Modus für Einzelbilder (nur bei VP-D190/D190i) Verzeichnis- und Dateistruktur auf der SmartMedia-Karte Structure of folders and files on the Smart Media Card Die Bilder werden im Dateiformat JPEG auf SmartMedia-Karte The still images that you recorded are saved in JPEG file gespeichert. -
Seite 80: Selecting The Image Quality
DEUTSCH ENGLISH Digital Still Camera mode (VP-D190/D190i only) Digitalkamera-Modus für Einzelbilder (nur bei VP-D190/D190i) Selecting the image quality Bildqualität einstellen You can select the quality of a still image to be recorded. Sie können einstellen, in welcher Qualität Bilder gespeichert werden. -
Seite 81: Recording Still Images To A Smartmediacard
DEUTSCH ENGLISH Digital Still Camera mode (VP-D190/D190i only) Digitalkamera-Modus für Einzelbilder (nur bei VP-D190/D190i) Recording Still images to a SmartMediaCard in M.REC Mode. Bilder auf SmartMedia-Karte speichern You cannot record moving Pictures onto a SmartMediaCard. Es ist nicht möglich, bewegte Bilder (Bildsequenzen) auf SmartMedia-Karte zu speichern. -
Seite 82: Recording An Image From A Cassette As A Still Image
DEUTSCH ENGLISH Digital Still Camera mode (VP-D190/D190i only) Digitalkamera-Modus für Einzelbilder (nur bei VP-D190/D190i) Recording an image from a cassette as a still image. Bild von einer Kassettenaufnahme als Einzelbild speichern You can record still image from a cassette onto a Sie können ein Einzelbild aus einer Kassettenaufnahme SmartMediaCard. -
Seite 83: Viewing Still Images
DEUTSCH ENGLISH Digital Still Camera mode (VP-D190/D190i only) Digitalkamera-Modus für Einzelbilder (nur bei VP-D190/D190i) Viewing Still images Bilder wiedergeben You can playback and view still images recorded on the Sie können Bilder wiedergeben, die auf SmartMedia-Karte SmartMediaCard. gespeichert sind. There are 2 ways to view recorded images. Sie können entweder Single : To view an image frame by frame. -
Seite 84: Copying Still Images From A Cassette To Smartmediacard
DEUTSCH ENGLISH Digital Still Camera mode (VP-D190/D190i only) Digitalkamera-Modus für Einzelbilder (nur bei VP-D190/D190i) Copying still images from a cassette to SmartMediaCard Einzelbilder von einer Kassette auf SmartMedia-Karte kopieren You can copy still images with PHOTO function on a cassette Sie können die mit der Fotofunktion aufgenommenen Einzelbilder von der Kassette auf SmartMedia-Karte kopieren. -
Seite 85: Marking On Images For Printing
DEUTSCH ENGLISH Digital Still Camera mode (VP-D190/D190i only) Digitalkamera-Modus für Einzelbilder (nur bei VP-D190/D190i) Marking on images for printing Bilder zum Drucken markieren This camcorder supports the DPOF (Digital Print Order Format) Dieser Camcorder unterstützt das Druckformat DPOF (Digital print format. Print Order Format). -
Seite 86: Protection From Accidental Erasure
DEUTSCH ENGLISH Digital Still Camera mode (VP-D190/D190i only) Digitalkamera-Modus für Einzelbilder (nur bei VP-D190/D190i) Protection from accidental erasure Bilder vor versehentlichem Löschen schützen You can protect important images from accidental erasure. Sie können wichtige Bilder vor versehentlichem Löschen schützen. If you execute FORMAT, all images including protected images will be erased. -
Seite 87: Deleting Still Images
DEUTSCH ENGLISH Digital Still Camera mode (VP-D190/D190i only) Digitalkamera-Modus für Einzelbilder (nur bei VP-D190/D190i) Deleting Still images Bilder löschen You can erase the still images recorded on the Sie können Bilder von der SmartMedia-Karte löschen. SmartMediaCard. Wenn Sie Bilder mit Löschschutz löschen möchten, schalten Sie If you want to delete protected images, you must first deactivate zunächst den Löschschutz aus. -
Seite 88: Formatting A Smartmediacard
DEUTSCH ENGLISH Digital Still Camera mode (VP-D190/D190i only) Digitalkamera-Modus für Einzelbilder (nur bei VP-D190/D190i) Formatting a SmartMediaCard SmartMedia-Karte formatieren You can use the MEMORY FORMAT functions to completely Mit der Menüoption MEMORY FORMAT können Sie alle auf delete all images and options on a SmartMediaCard, including einer SmartMedia-Karte vorhandenen Daten löschen. -
Seite 89: Maintenance
DEUTSCH ENGLISH Maintenance Hinweise zu Betrieb und Pflege des Camcorders After finishing a recording Nach der Verwendung At the end of a recording you must remove the power source. Nehmen Sie nach der Verwendung des Camcorders den Akku vom Gerät ab. When recording with a Lithium Ion Battery Pack, leaving the Wenn Sie den Camcorder längere Zeit mit angeschlossenem pack on the camcorder can reduce the life span of the battery. -
Seite 90: Cleaning And Maintaining The Camcorder
DEUTSCH ENGLISH Maintenance Hinweise zu Betrieb und Pflege des Camcorders Cleaning and Maintaining the Camcorder Camcorder reinigen Cleaning the VIEWFINDER Suchermonitor reinigen 1. Ziehen Sie das Okular ein kleines 1. Pull the VIEWFINDER out. Stück aus dem Camcorder heraus. 2. As shown in the illustration, press the 2. -
Seite 91: Using Your Camcorder Abroad
DEUTSCH ENGLISH Maintenance Hinweise zu Betrieb und Pflege des Camcorders Using Your Camcorder Abroad Camcorder im Ausland verwenden Each country or region has its own electric and colour systems. TV-Farbsystem und Netzspannung können von Land zu Land unterschiedlich sein. Before using your camcorder abroad, check the following items. Vor der Verwendung des Camcorders im Ausland sollten Sie folgende Punkte prüfen. -
Seite 92: Troubleshooting
ENGLISH DEUTSCH Troubleshooting Bei Problemen Bei Problemen Troubleshooting Bevor Sie sich an den Kundendienst wenden, sollten Sie Before contacting a service centre, perform the following simple folgende Punkte überprüfen. Damit können Sie unnötigen checks. Zeitaufwand und Kosten vermeiden. They may save you the time and expense of an unnecessary call. Self Diagnosis Display Diagnose von Fehleranzeigen Anzeige... -
Seite 93: Self Diagnosis Display In M.rec/M.play Mode
DEUTSCH ENGLISH Troubleshooting Bei Problemen Self Diagnosis Display in M.REC/M.PLAY mode Diagnose von Fehleranzeigen im M.REC- und M.PLAY-Modus Display Informs that... Action Anzeige blinkt Bedeutung Maßnahme Blinking Keine SmartMedia-Karte im There no card or memory in the NO MEMORY! NO MEMORY! SmartMedia-Karte einsetzen. - Seite 94 SEARCH. Beim Bildsuchlauf kann die Bildanzeige Störungen Mosaikförmiges aufweisen. Es handelt sich hierbei nicht um einen Mangel Bildrauschen beim Edit- oder einen Defekt. Suchlauf Samsung-Hotline (allg. Anfragen): 0180-5 12 12 13 Fax: 0180-5 12 12 14 (EUR 0,12/Min.)
-
Seite 95: Specifications
-20˚C ~ 60˚C (-4˚F ~ 140˚F) Länge 104 mm, Höhe 114 mm, Breite 53,5 mm Abmessungen External dimension Length 104mm, Height 114mm, Width 53.5mm VP-D130/D130i: 470 g, VP-D190/D190i: 480 g Gewicht (ohne Lithium-Ionen-Akku und Kassette) Weight VP-D130/D130i : 470g, VP-D190/D190i : 480g... -
Seite 96: Index
DEUTSCH ENGLISH INDEX Index - L - - A - - A - - H - LCD ........28, 29 Accessories ........ 12 Akku ........... 22 Halteschlaufe ......20 Anschluss an Fernsehgerät 66, 67 Audio dubbing ......62 - M - - I - Audiomodus ....... - Seite 97 Zeichen tragen, entsprechen den für dieses Produkt geltenden Richtlinien der Europäischen Union. Für Camcorder sind dies z. B. die Niederspannungsrichtlinie und die Richtlinie zur Elektromagnetischen Verträglichkeit (EMV). *Samsung Electronics’ Internet Home Page *Samsung Electronics’ Internet-Adressen United Kingdom http://www.samsungelectronics.co.uk Großbritannien...