Herunterladen Diese Seite drucken

Werbung

Verfügbare Sprachen
  • DE

Verfügbare Sprachen

  • DEUTSCH, seite 10
Technical Support
If you need any technical help, please visit our official support site and contact our support
team before returning the products, https://support.reolink.com.
Technische Unterstützung
Wenn Sie Hilfe brauchen, kontaktieren Sie bitte Reolink Support Team zuerst, bevor Sie Ihre
Bestellung zurücksenden. Meiste Fragen oder Probleme können von unserem Online Support
Center beantwortet und gelöst werden: https://support.reolink.com.
Support technique
Si vous avez besoin d'aide, veuillez contacter Reolink avant de retourner votre produit. La
plupart des questions peuvent être répondues via notre centre de support en ligne à l'adresse
https://support.reolink.com.
Supporto Tecnico
Se avete bisogno di aiuto, le chiediamo gentilmente di contattare Reolink prima di restituire
il prodotto. La maggior parte delle domande può essere risolta tramite il nostro centro di
assistenza online all'indirizzo https://support.reolink.com.
Soporte técnico
Si necesita ayuda, comuníquese con Reolink antes de devolver su producto. La mayoría de las
preguntas se pueden responder a través de nuestro centro de soporte en línea en
https://support.reolink.com.
REOLINK INNOVATION LIMITED
FLAT/RM 705 7/F FA YUEN COMMERCIAL BUILDING 75-77 FA YUEN
STREET MONG KOK KL HONG KONG
Product Ident GmbH
EU REP
Hoferstasse 9B, 71636 Ludwigsburg, Germany
Email: prodsg@libelleconsulting.com
APEX CE SPECIALISTS LIMITED
UK REP
Addr.: 89 Princess Street, Manchester, M14HT, UK
Email: info@apex-ce.com
M a y 2 02 3
Q S G 1 _ A
58 . 03 . 0 0 5 . 0 1 0 8
Operational Instruction
Apply to: Argus 3 Ultra, Argus 3 Pro,
Argus 3 Plus, Argus 3 Plus 4K
@ R e o l i n kTe c h
h t t p s ://re o l i n k . c o m
E N/D E /FR /I T/E S

Werbung

loading

Inhaltszusammenfassung für Reolink Argus 3 Ultra

  • Seite 1 Soporte técnico Si necesita ayuda, comuníquese con Reolink antes de devolver su producto. La mayoría de las Apply to: Argus 3 Ultra, Argus 3 Pro, preguntas se pueden responder a través de nuestro centro de soporte en línea en https://support.reolink.com.
  • Seite 2 Content What's in the Box What’s in the Box · · · · · · · · · · · · · · · · · · · · · · · · · · · · · · · · · · · · · · · · · · · · · · · · · · · · · · · · · · · · · · · · · · · · · · · · · · · · 2 Camera Introduction ·...
  • Seite 3 Camera Introduction Set up the Camera Set up the Camera Using a Smartphone USB-C Port Speaker Step 1 Scan to download the Reolink App from the App Store or Google Play store. Spotlight Status LED 6 IR Leds Lens Daylight Sensor...
  • Seite 4 For better weatherproof performance, please always cover the charging port with the rubber Step 1 Download and install the Reolink Client: Go to https://reolink.com > Support > App&Client. plug after charging the battery. Step 2 Launch the Reolink Client, click the “...
  • Seite 5 Install the Camera Mount the Camera Notes on Camera Installation Position • Install the camera 2-3 meters Rotate to separate the base from (7-10 ft) above ground. This the bracket. height maximizes the detection range of the PIR motion sensor. Mounting Height: 2-3 Meters •...
  • Seite 6 Install the Camera with Loop Strap Screw the camera to the bracket. Adjust the camera angle to get the best field of view. Thread the loop strap through the slots and fasten the strap. It is the most recommended installation method if you plan to mount the camera to the tree. Secure the camera by turning the part on the bracket identified in the chart clockwise.
  • Seite 7 When the green light is on, 2. Charge the battery with a standard and high-quality DC 5V battery charger or Reolink solar the battery is fully charged panel. It’s not compatible with solar panels from any other brands.
  • Seite 8 This equipment should be Reolink declares that this device is in instructions, may cause harmful interference minimum distance 20 cm between the installed and operated with minimum compliance with the essential requirements to radio communications.
  • Seite 9 This marking indicates that this product agreement to the Terms of Service and should not be disposed with other household Privacy Policy at reolink.com. Keep out of wastes.throughout the EU. To prevent possible reach of children. harm to the environment or human health...
  • Seite 10 Überblick Lieferumfang Lieferumfang · · · · · · · · · · · · · · · · · · · · · · · · · · · · · · · · · · · · · · · · · · · · · · · · · · · · · · · · · · · · · · · · · · · · · · · · · · · · · · 18 Über die Kamera ·...
  • Seite 11 
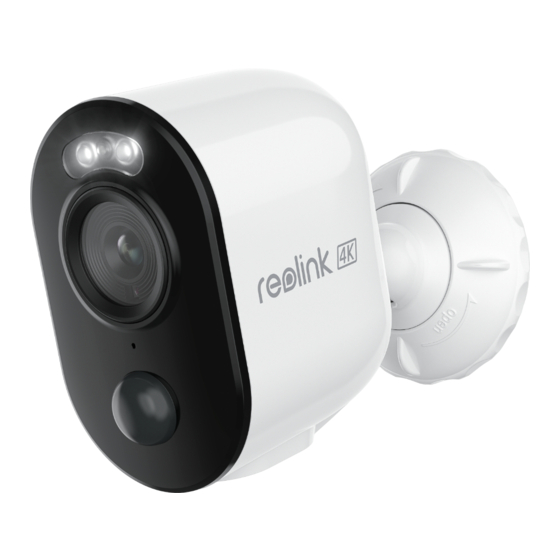
Über die Kamera Kamera-Einrichtung Kamera-Einrichtung mit Smartphone USB-C Ladeanschluss Lautsprecher Schritt 1 Herunterladen Sie Reolink App vom App Store oder Google Play Store. Spotlight Status-LED 6 IR-LEDs Objektiv Tageslichtsensor Eingebautes Mikrofon PIR-Bewegungssensor Reset-Taste * Drücken Sie die Reset-Taste und halten Sie für über 5 Sekunden zur Wiederherstellung der Werkeinstellungen.
  • Seite 12 Kamera-Einrichtung am PC (optional) Für eine bessere Wetterbeständigkeit sollte der Ladeanschluss nach dem Laden des Akkus Schritt 1 Reolink Client herunterladen und installieren: Gehen Sie auf https://reolink.com/de/ > immer mit dem Gummistopfen bedeckt sein. Support > App & Client. Schritt 2 Starten Sie Reolink Client, klicken Sie auf den „...
  • Seite 13 Kamera-Installation Installation an der Wand Hinweise zur Position der Kamera-Installation Drehen Sie die Basis, um sie • Installieren Sie die Kamera 2 von der Halterung zu bis 3 Meter über dem Boden, um entfernen. den größten Erkennungsbereich des PIR-Bewegungssensors zu Installationshöhe: 2-3 Meter ermöglichen.
  • Seite 14 Installation mit Klettverschluss Schrauben Sie die Kamera an die Halterung. Konfigurieren Sie die Kamera-Richtung, um das beste Sichtfeld zu erhalten. Ziehen Sie das mitgelieferte Klettband durch die Kamerahalterung durch und befestigen Sie es dann an einem Baum. Dies ist die empfehlenswerteste Installationsmethode, wenn Sie die Kamera auf einem Baum platzieren wollen.
  • Seite 15 2. Laden Sie den Akku mit einem standardmäßigen und hochwertigen DC 5V Ladegerät oder Falls das grüne Licht leuchtet, ist der Akku voll einem Reolink Solarpanel. Es ist nicht mit Solarpanels anderer Hersteller kompatibel. Wenn die Kamera nicht mit dem WLAN aufgeladen.
  • Seite 16 Konformität ISED-Erklärung zur Strahlungsexposition Installation in Wohngebieten sicherstellen. verantwortlichen Partei genehmigt sind, Reolink erklärt, dass dieses Gerät den Dieses Gerät erzeugt und verwendet können Berechtigung des Benutzers zum Dieses Gerät entspricht den IC RSS-102-...
  • Seite 17 Dieses Produkt wird mit einer eingeschränkten lokaler Funknetze (WAS/RLANs) 2-Jahres-Garantie geliefert, die nur gültig ist, innerhalb des Bandes 5150-5350 MHz wenn es im offiziellen Reolink-Shop oder bei für dieses Gerät sind in allen Ländern einem autorisierten Reolink-Händler gekauft der Europäischen Union auf den wurde.
  • Seite 18 Contenu Contenu de la boîte Contenu de la boîte · · · · · · · · · · · · · · · · · · · · · · · · · · · · · · · · · · · · · · · · · · · · · · · · · · · · · · · · · · · · · · · · · · · · · · · · 34 Introduction de la caméra ·...
  • Seite 19 Introduction de la caméra Configurer la caméra Configurer la caméra à l’aide d’un smartphone Port de Chargement USB-C Haut-parleur Étape 1 Scanner pour télécharger l’application Reolink de l’App Store ou de la boutique Google Play. Projecteur LED d’état 6 Leds IR Objectif Capteur de lumière du jour...
  • Seite 20 Pour une meilleure résistance aux intempéries, gardez toujours le port de chargement USB couvert par le bouchon en caoutchouc après Étape 1 Téléchargez et installez le Reolink Client : Allez sur https://reolink.com > Support > avoir chargé la batterie. App&Client.
  • Seite 21 Installer la caméra Monter la caméra au mur Remarques sur la position d’installation des caméras • Installez la caméra à 2-3 Tournez pour séparer la base mètres au-dessus du sol du support. pour maximiser la portée de détection du capteur de Hauteur de montage: 2-3 mètres mouvement PIR.
  • Seite 22 Installer la caméra avec la sangle à boucle Vissez la caméra au support. Ajustez l’angle de la caméra pour obtenir le meilleur champ de vision. Faites passer la sangle à boucle dans les fentes et attachez la sangle. C’est la méthode d’installation la plus recommandée si vous prévoyez de monter la caméra sur l’arbre.
  • Seite 23 2. Chargez la batterie rechargeable avec un chargeur de batterie 5V/9V CC standard et de haute au WiFi, essayez les solutions suivantes: allumé, la batterie est complètement chargée. qualité ou avec un panneau solaire Reolink. Ne chargez pas la batterie avec des panneaux solaires d’autres marques. • Assurez-vous que vous avez entré le bon Si cela ne fonctionne pas, contactez le service 3.
  • Seite 24 Cet équipement génère, utilise et peut émettre deux conditions suivantes : par la partie responsable de la conformité Reolink déclare que ce dispositif est conforme (1)Cet appareil ne doit pas provoquer des fréquences radio et, s’il n’est pas installé peut annuler l’autorité de l’utilisateur à faire aux exigences essentielles et aux autres d’interférences.
  • Seite 25 2 ans qui n’est valable que s’il est acheté dans 5150MHz --- 5250MHz ( EIRP < 23 dBm ) avec une distance minimale de 20 cm entre le la boutique officielle de Reolink ou auprès d’un 5745MHz --- 5825MHz ( EIRP < 14 dBm ) radiateur et votre corps.
  • Seite 26 Contenuti Cosa c’è nella Scatola Cosa c’è nella Scatola · · · · · · · · · · · · · · · · · · · · · · · · · · · · · · · · · · · · · · · · · · · · · · · · · · · · · · · · · · · · · · · · · · · · · · 50 Presentazione della Telecamera ·...
  • Seite 27 Presentazione della Telecamera Configurare la Telecamera Configurare la Telecamera con Smartphone Porta ricarica USB-C Altoparlante Passaggio 1 : Scansionare per scaricare l’App Reolink dall’App Store o Google Play store. Faretto LED di Stato 6 Led IR Obiettivo Sensore di Luce Diurna...
  • Seite 28 Per fare la telecamera meglio resistere alle intemperie, coprire la porta di carica USB con il tappo di gomma ogni volta dopo la carica Passaggio 1 : Scaricare e installare Client Reolink: andare su https://reolink.com/it > Assistenza > della batteria. App & Client.
  • Seite 29 Installare la Telecamera Montare la Telecamera a Parete Consigli sulla Posizione di Montaggio • Si prega di installare la Ruotare per separare le parti telecamera a 2-3 metri (7-10 piedi) dal braccio. di altezza dal suolo. Questa altezza massimizza il campo di rilevamento Altezza di 2-3 metri del sensore di movimento.
  • Seite 30 Installare la Telecamera con la Cinghia a Strappo Serrare la telecamera al braccio. Regolare l’angolo della telecamera allo scopo di ottenere un migliore campo di visione. Far passare la cinghia a strappo attraverso le fessure e allacciare la cinghia. È la modalità più ideale se si desidera installarla a un albero.
  • Seite 31 Configurazione Iniziale luce verde, significa che la carica della pannello solare Reolink. Non caricare la batteria con il pannello solare di altre marche. batteria è completa. 3. Caricare la batteria quando la temperature è tra lo 0°C e i 45°C e farla funzionare semprequando Se la telecamera non riesce a connettersi al Se non funzionano, contattare l’assistenza...
  • Seite 32 Dichiarazione di esposizione alle dannose in un’installazione residenziale. Dichiarazione di esposizione alle radiazioni ISED Reolink dichiara che questo dispositivo è Questa apparecchiatura genera, utilizza radiazioni FCC conforme ai requisiti essenziali e alle altre e può irradiare energia in radiofrequenza Questa apparecchiatura è...
  • Seite 33 Questo marchio indica che questo prodotto dei Termini di servizio e dell’Informativa sulla non deve essere smaltito insieme ad altri privacy su reolink.com. Tenere fuori dalla rifiuti domestici.in tutta l’UE. Per evitare portata dei bambini. possibili danni all’ambiente o alla salute...
  • Seite 34 Índices Contenido de la Caja Contenido de la Caja · · · · · · · · · · · · · · · · · · · · · · · · · · · · · · · · · · · · · · · · · · · · · · · · · · · · · · · · · · · · · · · · · · · · · · · 66 Introducción de Cámara ·...
  • Seite 35 Introducción de Cámara Configuración de Cámara Configuración de Cámara en un Móvil Puerto de alimentación USB-C Altavoz Paso 1 Escanee para descargar la App Reolink en App Store o Google Play Store. Foco LED de Estado 6 leds IR Objetivo Sensor de Luz Solar Micrófono Integrado...
  • Seite 36 USB cubierto por la tapa de goma después de Paso 1 Descargue e instale el Client Reolink: Vaya a https://reolink.com/es > Soporte > App & Client. haber cargado la batería. Paso 2 Inicie el Client Reolink, y cliquee el botón “...
  • Seite 37 Instalación de Cámara Monte la Cámara a la Pared Notas sobre la Posición de Instalación de Cámara • Instale la cámara a 2-3 metros Rótelo para separar la base (7-10 pies) por encima del suelo para del soporte. maximizar el rango de detección del sensor de movimiento PIR.
  • Seite 38 Instalación de Cámara con Correa de Velcro Atornille la cámara al soporte. Ajuste el ángulo de la cámara para obtener el mejor campo visual. Pase la correa de velcro por las ranuras y abroche la correa. Es la manera más recomendable de instalación si planea montar la cámara en un árbol.
  • Seite 39 2. Cargue la batería recargable con un cargador de batería estándar y de alta calidad de CC no está totalmente cargada hasta que se 5 V/9 V o con panel solar Reolink. No cargue la batería con un panel solar de otras marcas. Si la cámara no logra conectarse a WiFi, por encienda la luz verde.
  • Seite 40 Si el equipo causa interferencia Debe instalarse y operar con una distancia NOTA: El funcionamiento de 5150-5250 MHz Reolink declara que este producto cumple dañina a la recepción de radio o televisión, mínima de 20 cm entre el radiador y su está...
  • Seite 41 área local radioeléctricas (WAS/ tienda oficial de Reolinko en un distribuidor RLAN) dentro de la banda 5150-5350 MHz autorizado de Reolink. Descubra más en : para este dispositivo están restringidas al uso https://reolink.com/warranty-and-return/. en interiores únicamente dentro de todos los países de la Unión Europea (BE/BG/CZ/DK/...

Diese Anleitung auch für:

Argus 3 proArgus 3 plusArgus 3 plus 4k