Herunterladen Inhalt Inhalt Diese Seite drucken
Inhaltsverzeichnis

Werbung

Verfügbare Sprachen

Verfügbare Sprachen

Recomendaciones sobre este manual
Hemos preparado este manual de instrucciones de tal manera que siempre encuentre en
el índice la información que necesite referente a cada tema.
Recomendación
Encontrará instrucciones más detalladas sobre el uso del navegador en el
DVD así como en la ayuda en línea del aparato.
Consulte el capítulo „Preguntas más frecuentes" para obtener respuesta a las preguntas
que se realizan con más frecuencia en nuestro departamento de atención al cliente.
El objetivo de estas instrucciones de uso es familiarizarle con el manejo de su sistema de
navegación en un lenguaje fácil de comprender.
Personal
Anote lo siguiente como garantía de ser Ud. el propietario:
Número de Serie
Contraseña
Texto de recomendaciones .................................................................................
SuperPIN
UUID
Fecha de Compra
Lugar de Compra
El número de serie de su aparato lo encontrará en la parte posterior del aparato. Si es
necesario, transfiera también el número a un lugar seguro.
Indique la contraseña y el texto de recomendaciones a través de la función Seguridad.
Tras activar la función Seguridad, recibirá el SuperPIN y el UUID. Ver página 18.
....................................................................................
....................................................................................
....................................................................................
....................................................................................
....................................................................................
....................................................................................

Werbung

Inhaltsverzeichnis
loading

Inhaltszusammenfassung für Medion GoPal E3212

  • Seite 1 Recomendaciones sobre este manual Hemos preparado este manual de instrucciones de tal manera que siempre encuentre en el índice la información que necesite referente a cada tema. Recomendación Encontrará instrucciones más detalladas sobre el uso del navegador en el DVD así como en la ayuda en línea del aparato. Consulte el capítulo „Preguntas más frecuentes“...
  • Seite 2 La calidad En la elección de componentes, hemos puesto especial atención en las características de alta funcionalidad, fácil utilización, seguridad y fiabilidad. Gracias a un perfecto concepto de Hardware y Software, podemos presentar un ordenador adaptado al futuro de la tecnología con el que pasará...
  • Seite 3: Inhaltsverzeichnis

    Contenido Seguridad y mantenimiento ................1 Recomendaciones de seguridad ..................1 Seguridad de datos ....................... 1 Causas de la alteración de funcionamiento..............2 Reparaciones ......................... 2 Temperatura ambiente....................2 Información de conformidad con la directiva R&TTE ............. 3 Compatibilidad electromagnética.................. 3 Conectar ........................
  • Seite 4 Seguridad ......................18 Introducción de contraseño y texto de recomendación ..........18 Realización de ajustes ....................19 SuperPIN y UUID ......................20 Guardar las modificaciones de la función del Seguridad ..........20 Realizar modificaciones ....................21 Solicitud de contraseña ....................22 Restablecimiento...................23 Reset ...........................
  • Seite 5 Apéndice......................43 Función especial CleanUp (guía inglesa de programas)..........43 Sincronización con el PC ..................... 46 ® ® I. Instalar Microsoft ActiveSync ................46 II. Conectar con el PC....................47 Posibilidades alternativas de carga de la batería ............47 ® ® III.
  • Seite 6 Copyright © 2008, 16/04/08 Reservados todos los derechos. Este manual está protegido por la ley de propiedad intelectual. ® El Copyright pertenece a la empresa Medion Marcas comerciales: ® ® ® MS-DOS y Windows son marcas registradas de Microsoft ®...
  • Seite 7: Seguridad Y Mantenimiento

    Seguridad y mantenimiento Recomendaciones de seguridad Lea este capítulo con atención y siga todas las recomendaciones indicadas. De este modo, garantizará el correcto funcionamiento y la larga vida de su aparato. Mantenga la maleta y el manual de utilización en buen estado, de manera que pueda entregárselos a un nuevo dueño en caso de venta del aparato.
  • Seite 8: Causas De La Alteración De Funcionamiento

    Causas de la alteración de funcionamiento La no observancia de estas advertencias, puede provocar averías o daños en el equipo. La garantía no cubre los daños en estos casos. • Mantenga el sistema de navegación y todos los equipos conectados alejados de la humedad y evite el polvo, el calor y la irradiación solar directa, especialmente en el interior del vehículo.
  • Seite 9: Información De Conformidad Con La Directiva R&Tte

    Por medio de la presente la empresea declara que el aparato cumple con los requisitos esenciales y cualesquiera otras disposiciones aplicables o exigibles de la Directiva 1999/5/CE. Puede encontrar explicaciones completas relativas a esta conformidad en www.medion.com/conformity. Compatibilidad electromagnética •...
  • Seite 10: Conectar

    Conectar Preste atención a las siguientes indicaciones para conectar el aparato correctamente: Alimentación de corriente con el adaptador auto • Utilice el autoadaptador sólo con el encendedor de cigarrillos de un coche (autobatería= DC 12V o batería del camión = DC 24V !).
  • Seite 11: Mantenimiento

    Mantenimiento ¡Atención! Dentro de la carcasa de aparato no se encuentran piezas inesperadas. La vida del aparato se puede alargar siguiendo las siguientes recomendaciones: • Antes de limpiar, retire siempre todos los cables del enchufe. • Limpie el aparato únicamente con un paño suave, húmedo y limpio. •...
  • Seite 12: Transporte

    Transporte Siga las siguientes recomendaciones cuando quiera transportar el aparato: • Antes de transportarlo, espere hasta que el aparato haya alcanzado la temperatura ambiente. • En caso de grandes variaciones de temperatura o de humedad, puede ocurrir que la condensación dentro del aparato provoque un cortocircuito eléctrico. •...
  • Seite 13: Entrega

    Entrega Compruebe que el envío está completo y avísenos en los 14 días posteriores a la compra en caso de que no lo esté. Con el paquete adquirido debe recibir: • Navegación GPS • Cable de alimentación de corriente para encendedores de cigarrillos •...
  • Seite 14: Componentes

    Componentes Imagen frontal Núm Componente Descripción Pantalla táctil Muestra la información contenida en su aparato. Toque la pantalla con el dedo o con un lápiz apropiado "sin punta" para seleccionar los comandos del menú o para introducir datos. Indicativo de carga Se enciende naranja si la batería adicional está...
  • Seite 15: Parte Trasera

    Parte trasera Núm Componente Descripción Interruptor Retire completamente el aparato de la batería principal / (también Hard Reset). Interruptor de la batería Altavoz Reproduce música, instrucciones de voz y advertencias. Componentes...
  • Seite 16: Parte Inferior

    Parte inferior Núm Componente Descripción Conexión mini Conexión a la alimentación de corriente externa y Puerto para conectar con un PC mediante el cable USB (para el ajuste de datos). Caja de Caja para la admisión de una tarjeta SD (Segura ampliación Digital) o MMC (tarjeta multimedia) opcional.
  • Seite 17: Parte Izquierda

    Parte izquierda con la tapa cerrada con la tapa abierta Núm Componente Descripción Conexión Conexión para una segunda antena opcional. externa de la antena Cascos de Conexión de cascos de audición (3,5 mm). audición La escucha prolongada del reproductor a máximo volumen puede dañar la oreja del usuario.
  • Seite 18: Primera Instalación

    Primera instalación A continuación puede ver paso a paso el proceso de primera instalación de la navegación GPS. Retire a continuación la lámina de protección para el transporte de la pantalla. I. Cargar la batería Tiene las siguientes posibilidades para cargar la batería del sistema de navegación: •...
  • Seite 19: Ii. Alimentación De Corriente

    II. Alimentación de corriente Adaptador de automóvil (Illustración similar) 1. Enchufe el pequeño enchufe USB ( ) en el aparato y el enchufe de alimentación de corriente ( ) en el encendedor de cigarrillos. 2. Vigile que no se pierda el contacto durante el viaje. Esto podría ser causa de disfunciones.
  • Seite 20: Iii. Encender El Aparato

    III. Encender el aparato Empuje el interruptor principal en la posición ON (encendido). ¡Atención! Deje siempre el interruptor principal en la posición ON (encendido), a menos que desee realizar una nueva instalación. Si el interruptor se pone en OFF (apagado), se perderán todos los datos de la memoria volátil del ordenador.
  • Seite 21: Iv. Instalar El Software De Navegación

    Recomendación Mientras al sistema de navegación se encuentre conectado a una fuente externa de alimentación o durante el funcionamiento con pilas es suficiente con pulsar brevemente el interruptor de encendido y apagado para apagar el aparato (modo Standby). Su aparato se entrega de modo que incluso en estado encendido y sin ser utilizado, no se apaga.
  • Seite 22: Manejo

    Manejo Encender y apagar el aparato Después de realizar la instalación inicial, el aparato está en su modo de funcionamiento normal. Con el interruptor se activa y desactiva el aparato. 1. Pulse brevemente el interruptor para encender el sistema de navegación. Recomendación Su aparato se entrega de modo que incluso en estado encendido y sin ser utilizado, no se apaga Mediante el botón Ajustes de la pantalla principal...
  • Seite 23 Si no desea seleccionar ninguna de estas tres posibilidades, el aparato se pondrá automáticamente en modo Standby, pasados unos segundos. Para más información sobre opciones adicionales para el modo Standby, ver también el capítulo de la función especial Función especial CleanUp (guía inglesa de programas), página 43, punto 8.
  • Seite 24: Seguridad

    Seguridad En esta función, tiene la posibilidad de proteger su aparato de accesos no deseados. Antes de poder utilizar esta función, debe realizar algunos ajustes determinados. Siga para ello los pasos siguientes: Introducción de contraseño y texto de recomendación Introduzca los ajustes por medio de la pantalla principal Pulse Seguridad para iniciar la función.
  • Seite 25: Realización De Ajustes

    Realización de ajustes Una vez introducidos con éxito la contraseña y el texto de recomendación , aparecerá la siguiente ventana de selección en la que puede realizar los ajustes para la función de Seguridad. Botón Descripción Indique aquí si el aparato debe solicitar la contraseña tras un reset del tipo Hard Reset.
  • Seite 26: Superpin Y Uuid

    SuperPIN y UUID Una vez realizados y aceptados los ajustes, en la pantalla aparecerá el SuperPIN y el UUID (Universally Unique IDentifier = Identificativo único universal). Recomendación Anote estos datos en su manual de utilización (ver página 1) y guárdelo en un lugar seguro.
  • Seite 27: Realizar Modificaciones

    Realizar modificaciones Si ya ha introducido una contraseña y desea realizar modificaciones o modificar la contraseña, inicie la función Seguridad. Aparecerá la siguiente pantalla. 1. Pulse el campo de la derecha para realizar las modificaciones. 2. Introduzca la contraseña actual. Si ha olvidado la contraseña, pulse el signo de interrogación.
  • Seite 28: Solicitud De Contraseña

    Solicitud de contraseña Si ha establecido una contraseña en la función de seguridad, al arrancar el aparato aparece, dependiendo del ajuste, una solicitud de contraseña. 1. Introduzca en el campo de teclas la contraseña elegida por usted. Recomendación La contraseña será mostrada en forma de cuatro asteriscos (****). 2.
  • Seite 29: Restablecimiento

    Restablecimiento Tiene la posibilidad de hacer un reset del sistema de navegación en caso de que deje de reaccionar o de funcionar correctamente. Esta posibilidad reinicia el aparato sin que sea necesaria una nueva instalación. El restablecimiento se utiliza con frecuencia para reorganizar la memoria. Para ello, serán interrumpidos todos los programas actualmente en uso y se instalará...
  • Seite 30: Navegación

    Navegación Recomendaciones de seguridad para la navegación En el DVD encontrará las instrucciones de utilización. Recomendaciones para la navegación • No utilice la navegación GPS la conducción para evitar posibles accidentes tanto a Ud. como a otros! • En caso de no comprender bien el idioma de las recomendaciones o de no sentirse muy cómodo y no saber qué...
  • Seite 31: Recomendaciones Para La Utilización En El Vehículo

    Recomendaciones para la Utilización en el vehículo • Preste atención durante la instalación de la fijación para que ésta no represente un riesgo para la seguridad en caso de accidente. • Sujete bien los componentes en su vehículo y asegúrese durante la instalación de que las condiciones de visibilidad sean buenas.
  • Seite 32: Instalación Del Soporte

    I. Instalación del soporte ¡Atención! Instale la fijación de la navegación GPS en el limpia parabrisas solamente si no obstaculiza la visión. Si esto no fuera posible, monte la fijación con el tablero del aspirador adjunto de modo que la fijación garantice un funcionamiento seguro y sin riesgos.
  • Seite 33: Ii. Fijar El Sistema De Navegación

    II. Fijar el sistema de navegación 1. Conecte el auto adaptador (ver pág. 13), la antena TMC eventualmente y la antena Lápiz GPS externa con el sistema de óptico en navegación, introduzca la soporte tarjeta de memoria. 2. Coloque el aparato en el centro del cuenco.
  • Seite 34: Iii. Conectar El Adaptador De Automóvil

    III. Conectar el adaptador de automóvil (Ilustración similar) 1. Enchufe el pequeño enchufe USB ( ) en el aparato y el enchufe de alimentación de corriente ( ) en el encendedor de cigarrillos. 2. Vigile que no se pierda el contacto durante el viaje. Esto podría ser causa de disfunciones.
  • Seite 35: Iv. Arrancar El Software De Navegación

    IV. Arrancar el software de navegación Recomendación Si su tarjeta de memoria contiene material de planos (adicional), éste debe ser introducido durante el uso del sistema de navegación siempre en el aparato. Si se extrae la tarjeta de memoria durante su utilización, aunque sea brevemente, se deberá...
  • Seite 36: Informaciones Sobre La Vigilancia De Tráfico

    Informaciones sobre la vigilancia de tráfico En caso de tener instalada la función de aviso antes de los puntos de vigilancia del tráfico, aparece la siguiente pantalla: Confirme con , si desea utilizar la navegación con la función de aviso antes de los puntos de vigilancia del tráfico.
  • Seite 37 Seleccione aquí Radar fijo, para ajutar la configuración de los „radares fijos”: Aquí tiene la posibilidad de representar los puntos de vigilancia del tráfico en un mapa o de que no aparezcan. Aquí puede también fijar si desea ser avisado con una señal acústica al llegar a un punto de vigilancia del tráfico.
  • Seite 38: Picture Viewer

    Picture Viewer Su sistema de navegación está provisto de un Picture Viewer. Con el Picture Viewer puede ver imágenes en formato jpg que se encuentren en su tarjeta de memoria en el sistema de navegación. Todas las imágenes que se encuentren en la tarjeta de memoria están inmediatamente disponibles.
  • Seite 39: Pantalla Completa

    Pantalla completa Fig.: Pantalla completa sin lista de servicio Haga clic en la vista de pantalla completa en el campo de pantalla inferior para activar la lista de servicio: Fig.: Pantalla completa con lista de servicio Botón Descripción Imagen anterior Gire alrededor de 90°...
  • Seite 40 Haciendo clic en el símbolo (Mezclar retículas), se divide la imagen mostrada en 6 campos. Fig.: Pantalla completa con mezcla de retículas Haciendo clic en un cuadrado, se muestra esta parte de la imagen agrandada: Fig.: Zoom en modo Haciendo clic en medio de la imagen se vuelve al modo de pantalla completa. Español...
  • Seite 41: Travelguide

    Travelguide Su sistema de navegación está provisto de un Travelguide. El Travelguide (“guía de viajes”) envía información general sobre diferentes campos de ciudades individuales o de regiones de Europa, como por ejemplo lugares de interés turístico, restaurantes, eventos culturales o información de viajes. Inicie el Travelguide desde la pantalla principal haciendo clic en el botón Travelguide.
  • Seite 42: Alarmclock (Función Despertador)

    AlarmClock (Función despertador) Su sistema de navegación está provisto de un AlarmClock / función despertador. Inicie esta función desde la pantalla principal haciendo clic en el icono “AlarmClock“. La función despertador puede así ser encendida como un despertador normal en aparatos apagados (modo Standby / modo ahorro de energía) y puede ser un recordatorio también durante el proceso de navegación.
  • Seite 43: Descripción De Los Iconos

    Descripción de los iconos Botón Descripción Tiempo del sistema actual Modo de ajuste (Ajuste del volumen, tiempo del sistema y sonido del sonido despertador) Modo de noche (Enciende el aparato en el modo Standby) Nueva instalación / desactivación de la función despertador Ajuste del tiempo de la alarma Borrar la introducción...
  • Seite 44: Ajuste De La Hora Del Sistema

    Ajuste de la hora del sistema En el indicativo de la imagen superior derecha se encuentra el indicativo de la hora actual. Puede ajustarlo como sigue: 1. Haga clic en la pantalla principal en . Aparece la siguiente pantalla: 2. Haga clic en para aceptar el ajuste de la hora.
  • Seite 45: Ajustar El Volumen

    3. El sonido despertador seleccionado será marcado con un 4. Cierra la aplicación con Ajustar el volumen Haga clic en el icono para ajustar el volumen de la señal del despertador. Recomendación El volumen configurado se refiere únicamente a la señal del despertador y no cambia el volumen de la reproducción de la navegación y el de otras funciones del sistema.
  • Seite 46: Función Snooze

    Función Snooze Cuando el despertador suene a la hora del despertador, tiene la posibilidad de hacer que se repita la señal del despertador con la función en momentos con regularidad. 1. Haga clic en para activar la función. Hora actual del sistema Hora establecida para el...
  • Seite 47: Preguntas Más Frecuentes

    Preguntas más frecuentes ¿Dónde puedo encontrar más información sobre la navegación GPS ? Puede encontrar instrucciones detalladas de utilización de la navegación en el DVD que acompaña el aparato. Utilice también como ayuda adicional las numerosas funciones de ayuda que están disponibles pulsando una tecla (en general con la F1 del PC) o seleccionando la opción de ayuda.
  • Seite 48: Atención Al Cliente

    Atención al Cliente Fallos y causas posibles El sistema de navegación ya no reacciona o se comporta de forma atípica. • Realice un restablecimiento (véase la pág. 23). ® El sistema de navegación sólo es reconocido por ActiveSync como invitado. •...
  • Seite 49: Apéndice

    Apéndice Función especial CleanUp (guía inglesa de programas) La función CleanUp sirve para borrar intencionadamente los datos de su PC que ya no utilice. IMPORTANTE Utilice esta función con mucho cuidado porque los datos serán borrados y deberá hacer una instalación manual. La función CleanUp se activa inmediatamente después de que comience el tono de inicio que sigue al reset y se indica una „o“en la firma GoPal del menú...
  • Seite 50 6. Format Flash Formatea la memoria interna „My Flash Disk“. Este formateado es solamente necesario en caso de recuperación extensa de fallos. Tras la ejecución de la función de formato se necesita un nuevo calibrado de la pantalla. Además, se borran todos los datos de la memoria interna „My Flash Disk“...
  • Seite 51 Exit Salga de la función CleanUp y reinicie el aparato (como en el caso del restablecimiento) Recomendación Antes del borrado de los datos, esto debe ser confirmado. Escriba aquí YES (sí). Si los datos que deben ser borrados (ya) no están disponibles, aparecerá...
  • Seite 52: Sincronización Con El Pc

    Sincronización con el PC ® ® I. Instalar Microsoft ActiveSync Para la transferencia de datos entre su PC y el sistema de navegación necesita el programa ® ® Microsoft ActiveSync Con este aparato ha adquirido una licencia del programa, que se encuentra en el DVD. Recomendación En el caso de que usted ya sea usuario del sistema operativo Windows ®...
  • Seite 53: Ii. Conectar Con El Pc

    II. Conectar con el PC 1. Arranque el sistema de navegación accionando el interruptor. 2. Conecte el cable USB con el sistema de navegación. 3. Conecte el enchufe USB en una conexión USB libre de su ordenador. 4. El asistente de la instalación de hardware reconoce un aparato nuevo e instala los controladores adecuados.
  • Seite 54: Gps (Global Positioning System)

    GPS (Global Positioning System) El GPS es un sistema que utiliza satélites para determinar la posición. Con ayuda de 24 satélites en la órbita terrestre es posible determinar una posición exacta en la Tierra con un margen de unos pocos metros. Las señales de los satélites se reciben a través de la antena del receptor GPS incorporado y para ello necesita una buena visibilidad desde al menos 4 de estos satélites.
  • Seite 55: Tmc (Traffic Message Channel)

    TMC (Traffic Message Channel) El Traffic Message Channel (TMC) es un servicio de radio digital que funciona de un modo parecido al RDS (Radio Data System) y que se utiliza para transmitir las retenciones de tráfico a un aparato receptor apropiado. Las informaciones sobre el tráfico se transmiten constantemente por frecuencia modulada.
  • Seite 56: Conectar Una Antena Tmc

    Conectar una antena TMC El sistema de navegación tiene integrado un receptor TMC para la recepción de las informaciones relativas a la situación del tráfico. Sin embargo, la recepción sólo se garantiza si la antena TMC adjunta está conectada. 1. Enchufe el conector de la antena TMC al enchufe de la conexión de los cascos de audición del sistema de navegación.
  • Seite 57: Trabajar Con Tarjetas De Memoria

    Trabajar con tarjetas de memoria Su navegación GPS funciona con tarjetas de memoria MMC y SD. Inicio de tarjetas de memoria 1. Retire la tarjeta de memoria (opcional) del embalaje (en caso de que tenga) con precaución. Preste atención para que los contactos no queden obstaculizados ni se ensucien.
  • Seite 58: Intercambio De Datos Con El Lector De Tarjetas

    Intercambio de datos con el lector de tarjetas Si desea copiar archivos de gran tamaño (archivos MP3, tarjetas de navegación) en la tarjeta de memoria, puede guardarlos directamente en la tarjeta de memoria. Muchos ordenadores disponen ya de lector de tarjetas. Introduzca en ellos la tarjeta y copie directamente los archivos.
  • Seite 59: Instalación Alternativa Del Programa De Navegación Desde Una Tarjeta De Memoria

    Instalación alternativa del programa de navegación desde una tarjeta de memoria El programa del sistema de navegación puede también ser instalado directamente con la correspondiente tarjeta de memoria preparada. Si fuera necesario, se debe desinstalar previamente el programa instalado (ver función especial CleanUp, página 43).
  • Seite 60: Especificación Técnica

    Especificación técnica Parámetros Datos Alimentación CA-0511MH-2F Con cable de alimentación de corriente para encendedores de cigarrillos Entrada 12-24V DC, 800mA / seguro 2A (T2AL/250V) 5V / 1A (max.) Salida Alimentación (alternativ) UDID/L&K G12PCL-535-L031 Con cable de alimentación de corriente para encendedores de cigarrillos Entrada 12-24V DC, 800mA / seguro 2A (T2AL/250V)
  • Seite 61: Index

    Index AlarmClock (función despertador) Fallos y causas posibles ...... 42 Función Snooze ......40 FAQ............ 41 Ajustar el volumen......39 Fijar el sistema de navegación .... 27 Ajuste de la hora del sistema...38 Fijar el sistema de navegación ..27 Elección de un sonido desperatador38 Función especial CleanUp ....
  • Seite 62 Alimentación de Corriente....4 Conectar .......... 4 Pantalla táctil ........8 Reparatur ..........2 Picture Viewer Reset ..........23 Pantalla principal ......32 Restablecimiento Utilización........32 Hard Reset........23 Preguntas Más Frecuentes ....41 Reset ..........23 Primera instalación Alimentación de corriente ....13 Cargar la batería ......12 Seguridad ....
  • Seite 63 Notes on these Operating Instructions We have structured these Operating Instructions for the installation so that you will be able to look up the necessary subject-related information by means of the Contents List at any time. Note You will find comprehensive Operating Instructions for navigation on the DVD and online.
  • Seite 64 Quality In selecting the components we have aimed for a high level of functionality, simple han- dling, safety and reliability. A well-balanced hardware and software design allows us to offer you a technologically advanced navigation system that will give great satisfaction in both work and leisure use.
  • Seite 65 Contents Safety and Maintenance ..................1 Safety Instructions ......................1 Data Security ......................... 1 Operating Environment....................2 Repair..........................2 Ambient temperature ....................2 Electromagnetic Compatibility ..................3 Connection ........................3 Power supply through Car Adapter................3 Cabling ......................... 3 Battery Operation......................4 Maintenance .........................
  • Seite 66 Security ......................17 Storing the password and the information note ............17 Making settings ......................18 SuperPIN and UUID ..................... 19 Saves changes in the security function ................ 19 Making subsequent settings..................20 Password Request ....................... 21 Resetting the Navigation System ................. 22 Reset ...........................
  • Seite 67 Appendix .......................42 Special CleanUp Function.................... 42 Synchronisation with the PC..................45 ® ® I. Installing Microsoft ActiveSync ................45 II. Connecting with the PC ..................46 Alternative possibility of charging the battery............46 ® ® III. Working with Microsoft ActiveSync ..............
  • Seite 69: Safety And Maintenance

    Safety and Maintenance Safety Instructions Please read this section carefully and follow all the instructions given. This will help ensure reliable operation and extend the service life for your appliance. Keep the packaging and the user instructions for future reference or inquiries at a later date.
  • Seite 70: Operating Environment

    Operating Environment Failure to follow these instructions may lead to damage to your appliance. The guarantee will be excluded in such cases. • Keep your navigation System and all connected devices away from moisture and avoid dust, heat and direct sunlight, especially in the car. •...
  • Seite 71: Electromagnetic Compatibility

    Electromagnetic Compatibility • When connecting additional or other components the “Electromagnetic Compati- bility Directive” (EMC) must be adhered to. Please also note that only screened ca- ble (maximum 10ft) should be used with this appliance. • For optimal performance, maintain a distance of at least 10 ft. from sources of high- frequency and magnetic interference (televisions, loudspeaker systems, mobile telephones etc.
  • Seite 72: Battery Operation

    Battery Operation Your appliance is operated with a removable battery. In order to prolong the life and effi- ciency of your battery and to ensure safe operation, follow the instructions below: • Batteries cannot withstand heat. Avoid overheating of the appliance and the inte- grated battery.
  • Seite 73: Recycling And Disposal

    Recycling and Disposal Device At the end of its life, the appliance must not be disposed of in household rubbish. Enquire about the options for environmentally-friendly disposal with your local waste disposal company. Packaging To avoid damage during transport, the appliance is stored in protective packaging. Pack- aging is produced mostly from materials which can be disposed of in an environmentally friendly manner and be professionally recycled.
  • Seite 74: Supplied Items

    Supplied Items Please check the integrity and completeness of the supplied items and, if it is not com- plete, forward us any possible claims within 14 days from the purchase date. The purchase package includes: • Navigation system • Power cable for cigarette lighter •...
  • Seite 75: Views

    Views Front Components Ref Component Description Touch Screen Displays the output of your appliance. Tap on the screen with the stylus (will be found in the holder, see page 26) to select menu commands or enter data. Battery charge The loading display will flash orange during indicator the charging process.
  • Seite 76: Back Components

    Back Components Ref Component Description Main switch Switches the device completely off (Hard Reset). Loudspeaker Plays back language statements and warnings. Bottom Components Ref Component Description Mini-USB- Connection for connecting to a PC by means of a Connector USB cable (for data matching) as well as connection to external power supply.
  • Seite 77: Top Components

    Top Components aerial Ref Component Description On/Off switch Switches the device on or off (standby mode).
  • Seite 78: Left Components

    Left Components with closed cover with open cover Ref Component Description External Connection for an optional second aerial. aerial connection Earphone Connects to a pair of stereo headphones (3.5 mm). connector Using this appliance at full volume for extended periods of time may cause damage to the hearing capacity of the listener.
  • Seite 79: Initial Set Up

    Initial Set up The following guides you step by step through the initial Set-up of the navigation system. Firstly, remove the foil from the display. I. Charging the Battery You have the following possibilities to charge the battery of your navigation system: •...
  • Seite 80: Ii. Power Supply

    II. Power Supply Car Adapter (similar picture) 1. Plug the jack ( ) of the connection cable into the corresponding receptor at the bottom of your navigation system. 2. Insert the power adapter ( ) into the cigarette lighter socket and ensure, that it will not lose contact while driving.
  • Seite 81: Iii. Switching On The Device

    III. Switching on the Device Switch the main switch to ON. Attention! Always leave the main switch in the ON position, unless you want to carry out a new reinstallation. If the main switch is in the OFF position, all data will be deleted in the temporary memory.
  • Seite 82: Iv. Installing The Navigation Software

    Note Brief pressure on the on/off button will be enough to switch the de- vice on or off, provided that your navigation system is connected to an external source of electricity or is running in battery operation (standby mode). You can adjust the period of operation to suit your needs using the Settings button on the main screen of your device.
  • Seite 83: General Operating Instructions

    General Operating Instructions Switching on/off the device Your device will be in its normal operating state after the initial setting up. You can activate and deactivate your device with the On-/Off switch. 1. To start your navigation system press briefly the On-/Off switch Note Your device is delivered in a status in which it will not switch off independ- ently.
  • Seite 84 The device will go into the Standby mode automatically after a few seconds if you do not want to select any of these three possibilities. For further settings within the Standby mode also see the chapter on “Special CleanUp Function”, page 42, point 8. This display will also appear after the delay period of a few seconds has expired, if you have activated the DC AutoSuspend Comfort Function.
  • Seite 85: Security

    Security You have the possibility of protecting your device against external access by means of this function. Some one-off settings will have to be made before you will be able to use this function. Proceed as follows to do this: Storing the password and the information note 1.
  • Seite 86: Making Settings

    Making settings The following selection window, through which you will make the settings for the Security Function, will appear after you have entered the password and the information note successfully. Button Description Set here whether the device should request the password after a hard reset.
  • Seite 87: Superpin And Uuid

    SuperPIN and UUID The SuperPIN and the UUID (Universally Unique IDentifier = definite device identification) will appear on the display after you have confirmed the settings. Note Record this data in your Operating Instructions (see Page 1) and keep them in a safe place. You will need this information if you have entered the password incor- rectly 3 times.
  • Seite 88: Making Subsequent Settings

    Making subsequent settings Start the Security Function if you have already entered a password and would like to make a subsequent setting or to change the password. The following display will appear: 1. Click on the right field to make changes. 2.
  • Seite 89: Password Request

    Password Request A password request will appear at the restarting of the device, according to the setting, if you have established a password by means of the Security Function. 1. Enter the password stored by you by means of the keyboard. Note The password will be displayed in the form of small stars (****).
  • Seite 90: Resetting The Navigation System

    Resetting the Navigation System You can reset your navigation system if it is no longer reacting or working properly. This option restarts the navigation system, without reinstallation being necessary. A reset is often used in order to reorganize the memory. In doing so all programs that are running are interrupted and the working memory is reinitialized.
  • Seite 91: Navigation

    Navigation Safety Instructions for Navigation The bundled product DVD contains a comprehensive instruction manual. General Instructions • Do not manipulate the navigation system while driving to protect yourself and others from accidents! • In the event that you do not understand the voice instruction or if you are in any doubt about what to do at the next intersection, then the map or arrow display will provide you with a quick orientation.
  • Seite 92: Notes For Use In A Vehicle

    Notes for Use in a Vehicle • Take care that the holder does not present any risk to safety, even in the case of an accident, when installing it. • Take care that the cable does not impede any safety components. •...
  • Seite 93: Aerial Orientation

    Aerial Orientation The aerial must have unrestricted access to the sky to receive GPS satellite signals. Place the aerial as horizontally as possible for this reason. Try out aerial and installation possibilities in the vehicle if the reception is inadequate. Under certain circumstances it may be necessary to install an external GPS antenna (see page 47).
  • Seite 94: Ii. Attaching The Navigation System

    II. Attaching the Navigation System 1. Connect the car adapter (see page 12) and, if necessary, the TMC aerial and the external Stylus in GPS aerial, to your navigation holder system and insert the memory card. 2. Place the device below in the centre of the holder.
  • Seite 95: Iii. Connecting The Car Adapter

    III. Connecting the Car Adapter (similar picture) 1. Plug the jack ( ) of the connection cable into the corresponding receptor at the bottom of your navigation system (p. 8). 2. Insert the power adapter ( ) into the cigarette lighter socket and ensure, that it will not lose contact while driving.
  • Seite 96: Iv. Starting The Navigation Software

    IV. Starting the Navigation Software Note Your memory card will always have to be inserted into the device during the use of the navigation system, if the card contains (additional) mapping material. It will be necessary to carry out a reset to restart the navigation system if the memory card has been removed while the system was being used (see page 22).
  • Seite 97: Warning Function For Traffic Monitoring Points

    Warning function for traffic monitoring points The following display will appear if the warning function for traffic monitoring points (optional) has been installed: Confirm with , if you want to use navigation with the warning function for traffic monitoring points. Click on the Configure special destinations interface in the Settings Menu, in order to configure the warning function.
  • Seite 98 Click on (Radars) fixes here, in order to make the settings for the ‘radar fixes’: Here, you have the option of having the traffic monitoring points represented on a map or faded out. You can also set whether you would like to be informed by acoustic signals before reaching a traffic monitoring point.
  • Seite 99: Picture Viewer

    Picture Viewer Your navigation system is equipped with a Picture Viewer. You can view the jpg format images on your memory card on your navigation system, with the Picture Viewer. All the images on the memory card will be available immedi- ately.
  • Seite 100: Full Image View

    Full Image View Fig.: Full image view without service strip Tap in the lower area of the screen in the full image view, in order to activate the service strip: Fig.: Full image view with service strip Button Description Previous picture Turn it clockwise by 90°...
  • Seite 101 The image displayed will be subdivided into 6 fields by tapping on the symbol (fade in grid). Fig.: Full image mode with grid Tap on a square in the grid to zoom in on that area of the picture: Fig.: Zoom-in Mode Tap on the centre of the image to go back to viewing the full picture.
  • Seite 102: Travelguide

    Travelguide Your navigation system is equipped with a Travelguide. The Travelguide will supply general information about the different areas of individual towns and cities or regions in Europe, such as sights, restaurants, culture and travel infor- mation. Start the Travelguide from the main screen by tapping the ‘Travelguide’ switch areas. Alternatively, the Travelguide can also be started from the navigation software itself.
  • Seite 103: Alarmclock (Wake Up Function)

    AlarmClock (Wake up function) Your navigation system is equipped with an AlarmClock/waking function. Start this function from the main screen by tapping on the ‘AlarmClock’ button. The waking function can work both as a normal when the device is switched off (Standby Mode / Power Saving Mode) and as a reminder during the current navigation.
  • Seite 104: Description Of The Interfaces

    Description of the Interfaces Button Description Current system time Setting-up mode (Setting volumes, system time and alarm) Night mode (Standby mode) Reset/deactivate the waking function Setting the alarm time Delete the entry Confirmation interface Reduce the volume Increase the volume Back to the previous menu Close the application English...
  • Seite 105: Setting The System Time

    Setting the System Time The display of the current time will be located in the upper right corner of the screen. You can adjust it as follows: 1. Tap on in the main screen. The following screen will appear: 2. Tap on to change the time setting.
  • Seite 106: Selecting An Alarm Signal

    Selecting an Alarm Signal 1. To select an alarm signal touch the symbol. 2. Select the desired alarm sound and confirm the selection with 3. The selected alarm signal is marked by a 4. Close the application with Setting the Volume You can adjust the volume of the alarm signal by tapping on the interface.
  • Seite 107: Snooze Function

    Snooze Function You will have the possibility of making the waking signal repeat at regular intervals by means of the Snooze function, once it has sounded at the alarm time set. 1. Tap on to activate the Snooze function. Current system time Waking time set 2.
  • Seite 108: Faq

    Where can I find more information on the navigation system? Detailed operating instructions for navigation can be found on the corresponding DVD, which accompany your navigation system. Also use the additional Help functions that are available with a single touch of a button (usually F1 on the PC), or by selecting the Help option, as additional assistance.
  • Seite 109: Customer Service

    Customer Service Faults and Possible Causes The navigation system no longer reacts or is behaving atypically. • Carry out a reset (see page 22). The navigation system is recognized only as a guest by ActiveSync®. • See information on page 46. The GPS receiver cannot be initialized or found.
  • Seite 110: Appendix

    Appendix Special CleanUp Function The CleanUp function serves the targeted deletion of data, without using a PC. Note Please use this function very carefully, because it is possible for data to be deleted that can only be entered again manually afterwards. The CleanUp function is activated when the ‘o’...
  • Seite 111 6. Format Flash Formats the internal ‘My Flash Disk’ memory. This formatting can be necessary in the case of a prolonged removal of errors. It will be necessary to recalibrate the screen after the formatting function has been carried out. All data will be deleted from the internal ‘My Flash Disk’...
  • Seite 112 Exit Leaving the CleanUp function and restarting the device (like reset). Note The deletion of the data must be confirmed before the action actually takes place. To do this, press on YES. There will be a corresponding report if the data to be deleted is no longer available.
  • Seite 113: Synchronisation With The Pc

    Synchronisation with the PC ® ® I. Installing Microsoft ActiveSync In order to transfer data between your PC and your navigation system you need the Micro- soft® ActiveSync® program. The cost of the navigation system includes a license for this program which can be found on the DVD.
  • Seite 114: Ii. Connecting With The Pc

    Note When installing the GoPal Assistant, ActiveSync® will be installed automati- cally. II. Connecting with the PC 1. Press the On/Off button to start your navigation system. 2. Connect the USB cable (optional) to your navigation system. 3. Push the USB connector into a free USB port on your computer. 4.
  • Seite 115: Gps (Global Positioning System)

    GPS (Global Positioning System) GPS is a satellite-backed system for determining your position. With the help of 24 satel- lites revolving around the earth, it is possible to determine your position on earth with the accuracy of a few meters. The satellite signals are received by the antenna of the built-in GPS receiver, which must have a "line of sight"...
  • Seite 116: Tmc (Traffic Message Channel)

    TMC (Traffic Message Channel) The Traffic Message Channel (TMC) is a digital radio data service that functions in a similar way to RDS and is used to transmit disruptions to traffic to a suitable reception device. The traffic information is continuously transmitted across FM. The user is less dependent on the half-hourly broadcast traffic information, because the signal is continuously transmitted.
  • Seite 117: Connecting The Tmc Dipole Aerial

    Connecting the TMC Dipole Aerial A TMC receiver is integrated into your navigation system, to receive traffic information. However, reception will only be guaranteed if the TMC angled aerial supplied with the device has been connected. Plug the jack plug of the TMC angled aerial into the earphones connection of your navigation system.
  • Seite 118: Working With Memory Cards

    Working with Memory Cards Your navigation system supports MMC and SD memory cards. Inserting Memory Cards Carefully take the optional memory card out of its packing (if included). Take care not to touch or dirty the contacts. Insert the memory card carefully into the card bay with contacts pointing forward. The card must lock easily.
  • Seite 119: Data Exchange Via Card Reader

    Data Exchange via Card Reader If you wish to copy large quantities of data (MP3 files, navigation maps) to the memory card, these can also be stored directly to the memory card. Many computers already have memory card devices. Insert the card into your computer and copy the data directly to the card.
  • Seite 120: Alternative Installation Of The Navigation Software From A Memory Card

    Alternative Installation of the Navigation Software from a Memory Card The software for your navigation system can also be installed directly from a memory card. The pre-installed software may have to be uninstalled beforehand (see special CleanUp function, Page 42). You will be requested to install the navigation software during the initial adjustment.
  • Seite 121: Specifications

    Specifications Parameter Information Power supply UDID/L&K G12PCL-535-L031 Power supply cable for a cigarette lighter Input 12-24V DC, 800mA / fuse 2A (T2AL/250V) 5V / 1A (max.) Output Power supply (alternatively) CA-0511MH-2F Power supply cable for a cigarette lighter Input 12-24V DC, 800mA / fuse 2A (T2AL/250V) 5V / 1A (max.) Output...
  • Seite 122: Index

    Index Accessing Memory cards ....50 FAQ............ 40 Additional card material......51 Aerial Orientation .......25 Akkubetrieb ..........4 GPS ............ 47 AlarmClock (Wake up function) External GPS antenna ..... 47 Ending the application....39 Interfaces ........36 Hard Reset.......... 22 Selecting an alarm signal ....38 Hotline ..........
  • Seite 123 Picture Viewer Starting the navigation software ..28 Main screen ........31 SuperPIN........i, 19, 20 Operation ........31 Supplied Items ........6 Synchronisation with the PC ....45 Quality ..........ii TMC........... 48 Connecting a TMC dipole aerial ..49 Recycling and Disposal ......5 TMCPro..........
  • Seite 124 English...
  • Seite 125 Hinweise zu dieser Bedienungsanleitung Wir haben diese Bedienungsanleitung für die Installation so gegliedert, dass Sie jederzeit über das Inhaltsverzeichnis die benötigten Informationen themenbezogen nachlesen kön- nen. Hinweis Ausführliche Bedienungsanleitungen für die Navigation finden Sie auf der DVD sowie in der Online-Hilfe des Gerätes. Schlagen Sie im Kapitel „Häufig gestellte Fragen“...
  • Seite 126: Die Qualität

    Sie mit uns Kontakt auf, wir freuen uns, Ihnen helfen zu dürfen. Sie finden in diesem Handbuch ein gesondertes Kapitel zum Thema Kundendienst beginnend auf Seite 42. Copyright © 2008, 15/04/2008 Alle Rechte vorbehalten. Diese Bedienungsanleitung ist urheberrechtlich geschützt. ® Das Copyright liegt bei der Firma MEDION ® ® ® Warenzeichen: MS-DOS und Windows sind eingetragene Warenzeichen der Fa.
  • Seite 127 Inhalt Vervielfältigung dieses Handbuchs..............v Sicherheit und Wartung ..................1 Sicherheitshinweise ....................... 1 Datensicherung......................1 Bedingungen der Betriebsumgebung................2 Reparatur ........................2 Umgebungstemperatur....................2 Konformitätsinformation nach R&TTE ................3 Elektromagnetische Verträglichkeit ................3 Anschließen........................4 Stromversorgung über Autoadapter ................4 Verkabelung ........................4 Akkubetrieb ........................
  • Seite 128 Security ......................18 Passwort und Hinweistext anlegen ................18 Einstellungen vornehmen.................... 19 SuperPIN und UUID..................... 20 Änderung in der Security Funktion speichern .............. 20 Nachträgliche Einstellungen vornehmen ..............21 Passwortabfrage ......................22 Navigationssystem zurücksetzen ..............23 Reset ........................... 23 Vollständiges Abschalten/Hard Reset ................23 Navigieren .....................24 Sicherheitshinweise Navigation ...................
  • Seite 129: Vervielfältigung Dieses Handbuchs

    Kundendienst ....................42 Fehler und mögliche Ursachen ..................42 Benötigen Sie weitere Unterstützung?................. 42 Anhang ......................43 Sonderfunktion CleanUp (englische Programmführung)..........43 Synchronisation mit dem PC ..................46 ® ® I. Microsoft ActiveSync installieren................46 II. Mit dem PC verbinden ..................47 Alternative Lademöglichkeit des Akkus ..............
  • Seite 131: Sicherheit Und Wartung

    Sicherheit und Wartung Sicherheitshinweise Bitte lesen Sie dieses Kapitel aufmerksam durch und befolgen Sie alle aufgeführten Hinwei- se. So gewährleisten Sie einen zuverlässigen Betrieb und eine lange Lebenserwartung Ihres Gerätes. Bewahren Sie die Verpackung und die Bedienungsanleitung gut auf, um sie bei einer Ver- äußerung des Gerätes dem neuen Besitzer weiter geben zu können.
  • Seite 132: Bedingungen Der Betriebsumgebung

    Bedingungen der Betriebsumgebung Das Nichtbeachten dieser Hinweise kann zu Störungen oder zur Beschädigung des Gerätes führen. Die Gewährleistung in diesen Fällen ist ausgeschlossen. • Halten Sie Ihr Navigationssystem und alle angeschlossenen Geräte von Feuchtigkeit fern und vermeiden Sie Staub, Hitze und direkte Sonneneinstrahlung, besonders im Auto.
  • Seite 133: Konformitätsinformation Nach R&Tte

    Konformitätsinformation nach R&TTE Dieses Gerät entspricht den Anforderungen der europäischen Richtlinie für Funkanlagen und Telekommunikationseinrichtungen (R&TTE 1999/5/EG). Vollständige Konformitätser- klärungen sind erhältlich unter www.medion.com/conformity. Elektromagnetische Verträglichkeit • Beim Anschluss von zusätzlichen oder anderer Komponenten müssen die Richtli- nien für elektromagnetische Verträglichkeit (EMV) eingehalten werden. Bitte beach- ten Sie außerdem, dass in Verbindung mit diesem Gerät nur abgeschirmte Kabel für...
  • Seite 134: Anschließen

    Anschließen Beachten Sie nachfolgende Hinweise, um Ihr Gerät ordnungsgemäß anzuschließen: Stromversorgung über Autoadapter • Betreiben Sie den Autoadapter nur im Zigarettenanzünder eines Fahrzeugs (Auto- batterie = DC 12V oder LKW-Batterie = DC 24V !). Wenn Sie sich der Strom- versorgung an Ihrem Fahrzeug nicht sicher sind, fragen Sie den Autohersteller. Verkabelung •...
  • Seite 135: Wartung

    Wartung Achtung! Es befinden sich keine zu wartenden oder zu reinigenden Teile innerhalb des Gehäuses. Die Lebensdauer des Gerätes können Sie durch folgende Maßnahmen verlängern: • Ziehen Sie vor dem Reinigen immer den Stromversorgungsstecker und alle Verbin- dungskabel. • Reinigen Sie das Gerät nur mit einem angefeuchteten, fusselfreien Tuch. •...
  • Seite 136: Transport

    Transport Beachten Sie folgende Hinweise, wenn Sie das Gerät transportieren wollen: • Warten Sie nach einem Transport des Gerätes solange mit der Inbetriebnahme, bis das Gerät die Umgebungstemperatur angenommen hat. • Bei großen Temperatur- oder Feuchtigkeitsschwankungen kann es durch Konden- sation zur Feuchtigkeitsbildung innerhalb des Gerätes kommen, die einen elektri- schen Kurzschluss verursachen kann.
  • Seite 137: Lieferumfang

    Lieferumfang Bitte überprüfen Sie die Vollständigkeit der Lieferung und benachrichtigen Sie uns bitte innerhalb von 14 Tagen nach dem Kauf, falls die Lieferung nicht komplett ist. Mit dem von Ihnen erworbenen Produkt haben Sie erhalten: • Navigationssystem • Stromversorgungskabel Zigarettenanzünder •...
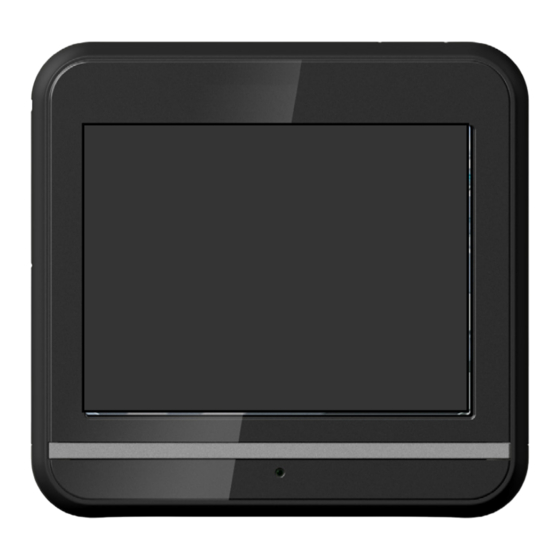
  • Seite 138: Ansichten

    Ansichten Ansicht von vorne Komponente Beschreibung Touch Screen Zeigt die Datenausgabe des Gerätes an. Tippen Sie mit dem Eingabestift (befindet sich in der Halteschale, s. Abb. Seite 27) auf den Bild- schirm, um Menübefehle auszuwählen oder Daten einzugeben. Achtung! Berühren Sie nicht das Display mit kantigen oder spitzen Gegenständen, um Beschädigun- gen zu vermeiden.
  • Seite 139: Rückansicht

    Rückansicht Komponente Beschreibung Hauptschalter/ Trennt das Gerät vollständig von dem Akku Akkuschalter (auch Hard-Reset). Lautsprecher Gibt Musik, Sprachanweisungen und Warnungen wieder. Ansicht von unten Komponente Beschreibung Mini-USB- Anschluss zur externen Stromversorgung und An- Anschluss schluss für die Verbindung mit einem PC über das USB-Kabel (zum Datenabgleich) SD/MMC- Schacht zur Aufnahme einer optionalen SD-...
  • Seite 140: Ansicht Von Oben

    Ansicht von oben Antenne Komponente Beschreibung Ein-/Ausschalter Schaltet das Gerät durch Drücken ein oder aus. (Standby Modus). Deutsch...
  • Seite 141: Linke Seite

    Linke Seite mit geschlossener Abdeckung mit offener Abdeckung Komponente Beschreibung Externe GPS- Anschluss für eine optionale externe GPS-Antenne Antenne Ohrhörer- Anschluss für Stereo-Ohrhörer (3,5 mm). anschluss Wenn dieses Gerät längere Zeit mit erhöhter Lautstärke über einen Kopfhörer betrieben wird, kann das Schäden am Hörvermögen des Zuhörers verursachen.
  • Seite 142: Ersteinrichtung

    Ersteinrichtung Nachfolgend werden wir Sie Schritt für Schritt durch die Ersteinrichtung des Navigations- systems führen. Entfernen Sie ggf. zunächst die Transportschutzfolie vom Display. I. Akku laden Sie haben folgende Möglichkeiten, den Akku Ihres Navigationssystems aufzuladen: • über den mitgelieferten Autoadapter oder •...
  • Seite 143: Ii. Stromversorgung

    II. Stromversorgung Stromversorgung über Autoadapter (Abbildung ähnlich) 1. Stecken Sie den Stecker ( ) des Verbindungskabels in den dafür vorgesehenen An- schluss an der Unterseite Ihres Gerätes (S. 9). 2. Stecken Sie jetzt den Stromversorgungsstecker ( ) in den Zigarettenanzünder und sorgen Sie dafür, dass dieser während der Fahrt nicht den Kontakt verliert.
  • Seite 144: Iii. Gerät Ein- Und Ausschalten

    III. Gerät ein- und ausschalten Schieben Sie den Hauptschalter (s. Seite 9) des Gerätes auf ON. Achtung! Lassen Sie den Hauptschalter immer in der Position ON, es sei denn, Sie möchten eine neue Ersteinrichtung durchführen. Wird der Schalter auf OFF gestellt, gehen alle Daten im flüchtigen Speicher Ihres Gerätes verloren.
  • Seite 145: Iv. Navigationssoftware Installieren

    Hinweis Solange Ihr Navigationssystem sich an einer externen Stromversorgung befindet oder im Akkubetrieb läuft, genügt ein kurzer Druck auf den Ein- / Ausschalter, um das Gerät ein- bzw. auszuschalten (Standby Modus). Über den Button Einstellungen auf dem Hauptbildschirm Ihres Gerätes können Sie die Betriebszeit Ihren Bedürfnissen anpassen.
  • Seite 146: Allgemeine Bedienungshinweise

    Allgemeine Bedienungshinweise Ein- und Ausschalten Nach der Ersteinrichtung befindet sich Ihr Gerät in seinen normalen Betriebszustand. 1. Drücken Sie kurz den Ein- und Ausschalter , um Ihr Navigationssystem einzu- schalten. Hinweis Ihr Gerät wird so ausgeliefert, dass es sich im eingeschalteten Zustand auch bei Nichtbenutzung nicht von alleine ausschaltet.
  • Seite 147 Wenn Sie keine dieser drei Möglichkeiten auswählen wollen, geht das Gerät nach einigen Sekunden automatisch in den Standby Modus. Für weitere Einstellungen zum Standby Modus siehe auch Kapitel Sonderfunktion Clea- nUp (englische Programmführung), Seite 43, Punkt 8. Haben Sie die Komfortfunktion DC AutoSuspend aktiviert, erscheint nach Ablauf der Ver- zögerungszeit von einigen Sekunden ebenfalls dieser Bildschirm.
  • Seite 148: Security

    Security Über diese Funktion haben Sie die Möglichkeit Ihr Gerät vor fremden Zugriff zu schützen. Bevor Sie diese Funktion nutzen können, müssen einige einmalige Einstellungen vorge- nommen werden. Gehen Sie dazu wie folgt vor: Passwort und Hinweistext anlegen 1. Gehen Sie über den Hauptbildschirm in die Einstellungen 2.
  • Seite 149: Einstellungen Vornehmen

    Einstellungen vornehmen Nachdem Sie erfolgreich das Passwort und den Hinweistext eingeben haben, erscheint das nachfolgende Auswahlfenster, worüber Sie die Einstellungen für die Funktion Security vornehmen. Taste Beschreibung Stellen Sie hier ein, ob das Gerät nach einem Kaltstart (Hard Reset) das Passwort abfragen soll. Stellen Sie hier ein, ob das Gerät nach einem Neustart (Reset) das Passwort abfragen soll.
  • Seite 150: Superpin Und Uuid

    SuperPIN und UUID Nachdem Sie die Einstellungen vorgenommen haben, erscheint auf dem Bildschirm die SuperPIN und die UUID (Universally Unique IDentifier = eindeutige Geräteidentifikation). Hinweis Notieren Sie diese Daten in Ihre Bedienungsanleitung (siehe Seite 1) und bewahren diese an einem sicheren Ort auf. Diese Angaben benötigen Sie, wenn Sie das Passwort 3 Mal falsch einge- geben haben.
  • Seite 151: Nachträgliche Einstellungen Vornehmen

    Nachträgliche Einstellungen vornehmen Wenn Sie bereits ein Passwort eingeben haben und nachträglich Einstellung vornehmen bzw. das Passwort ändern möchten, starten Sie die Security Funktion. Der nachfolgende Bildschirm erscheint. 1. Tippen Sie auf das rechte Feld, um Änderungen vorzunehmen. 2. Geben Sie das aktuelle Passwort ein. Sollten Sie das Passwort vergessen haben, tip- pen Sie auf das Fragezeichen: es erscheint der von Ihnen eingegebene Hinweistext.
  • Seite 152: Passwortabfrage

    Passwortabfrage Wenn Sie ein Passwort über die Security Funktion festgelegt haben, erscheint, je nach Einstellung, beim Neustart des Gerätes eine Passwortabfrage. 1. Geben Sie über das Tastenfeld das von Ihnen angelegte Passwort ein. Hinweis Das Passwort wird in Form von Sternchen (****) angezeigt. 2.
  • Seite 153: Navigationssystem Zurücksetzen

    Navigationssystem zurücksetzen Sie haben die Möglichkeit, Ihr Navigationssystem zurückzusetzen, falls es nicht mehr ord- nungsgemäß reagiert oder arbeitet. Diese Möglichkeit startet das Navigationssystem neu, ohne dass eine Neuinstallation erfor- derlich ist. Der Reset wird oft verwendet, um den Speicher zu reorganisieren. Dabei wer- den alle laufenden Programme abgebrochen und der Arbeitspeicher wird neu initialisiert.
  • Seite 154: Navigieren

    Navigieren Sicherheitshinweise Navigation Eine ausführlichere Bedienungsanleitung finden Sie auf der DVD. Hinweise für die Navigation • Bedienen Sie das Navigationssystem nicht während der Fahrt, um sich selbst und andere vor Unfällen zu schützen! • Falls Sie die Sprachhinweise einmal nicht verstanden haben oder sich nicht sicher sind, was an der nächsten Kreuzung zu tun ist, können Sie sich anhand der Karten- oder Pfeildarstellung schnell orientieren.
  • Seite 155: Hinweise Für Die Benutzung Im Fahrzeug

    Hinweise für die Benutzung im Fahrzeug • Achten Sie bei der Installation der Halterung darauf, dass die Halterung auch bei ei- nem Unfall kein Sicherheitsrisiko darstellt. • Befestigen Sie die Komponenten fest in Ihrem Fahrzeug und achten Sie bei der In- stallation auf freie Sichtverhältnisse.
  • Seite 156: Antennenausrichtung

    Antennenausrichtung Für den Empfang der GPS-Satellitensignale muss die Antenne eine freie Sicht zum Himmel haben. Probieren Sie bei nicht ausreichendem Empfang im Fahrzeug verschiedene Monta- ge- und Antennenausrichtungsmöglichkeiten aus. Unter Umständen kann der Anschluss einer externen GPS-Antenne (siehe Seite 48) von Nöten sein. I.
  • Seite 157: Ii. Navigationssystem Befestigen

    II. Navigationssystem befestigen 1. Verbinden Sie den Autoadapter (s. Seite 13) und ggf. die TMC- Wurfantenne und die externe GPS-Antenne mit Ihrem Navi- Eingabe- gationssystem, stecken Sie stift ggf. eine Speicherkarte ein. in Halter 2. Setzen Sie das Gerät mittig unten auf die Halteschale.
  • Seite 158: Iii. Autoadapter Anschließen

    III. Autoadapter anschließen (Abbildung ähnlich) 1. Stecken Sie den Stecker ( ) des Verbindungskabels in den dafür vorgesehenen An- schluss an der Unterseite Ihres Gerätes (S. 9). 2. Stecken Sie jetzt den Stromversorgungsstecker ( ) in den Zigarettenanzünder und sorgen Sie dafür, dass dieser während der Fahrt nicht den Kontakt verliert. Dies kann sonst zu Fehlfunktionen führen.
  • Seite 159: Iv. Navigationssoftware Starten

    IV. Navigationssoftware starten Hinweis Enthält Ihre Speicherkarte (zusätzliches) Kartenmaterial muss diese wäh- rend der Benutzung des Navigationssystems immer im Gerät eingelegt sein. Wird die Speicherkarte während der Benutzung auch nur kurzzeitig ent- fernt, muss zum Neustart des Navigationssystems ein Reset durchgeführt werden (siehe Seite 23).
  • Seite 160: Informationen Zur Verkehrsüberwachung

    Informationen zur Verkehrsüberwachung Bei installierter Warnfunktion vor Verkehrsüberwachungspunkten erscheint der folgende Bildschirm: Bestätigen Sie mit , wenn Sie die Navigation mit der Warnfunktion vor Verkehrsüber- wachungspunkten nutzen wollen. Um die Warnfunktion zu konfigurieren, tippen Sie im Menü Einstellungen auf die Schalt- fläche Sonderziele konfigurieren.
  • Seite 161 Tippen Sie hier auf Stationäre Blitzer, um die Einstellung für die „stationären Blitzer” vorzunehmen: Hier haben Sie die Möglichkeit, die Verkehrsüberwachungspunkte in einer Karte darstellen zu lassen oder diese auszublenden. Hier können Sie auch einstellen, ob Sie durch akusti- sche Signale vor Erreichen eines Verkehrsüberwachungspunktes benachrichtigt werden möchten.
  • Seite 162: Picture Viewer

    Picture Viewer Ihr Navigationssystem ist mit einem Picture Viewer ausgestattet. Mit dem Picture Viewer können Sie Bilder im jpg-Format, die sich auf Ihrer Speicherkarte befinden, auf Ihrem Navigationssystem ansehen. Sämtliche Bilder, die sich auf der Spei- cherkarte befinden, sind sofort verfügbar. Bedienung des Picture Viewers Starten Sie den Picture Viewer vom Hauptbildschirm aus durch Tippen auf die Schaltflä- chen „Picture Viewer“.
  • Seite 163: Vollbildansicht

    Vollbildansicht Abb.: Vollbildansicht ohne Service-Leiste Tippen Sie in der Vollbildansicht in den unteren Bildschirmbereich, um die Service-Leiste zu aktivieren: Abb.: Vollbildansicht mit Service-Leiste Taste Beschreibung Vorheriges Bild Drehen um je 90° im Uhrzeigersinn Rasterfelder einblenden Dia-Show starten Dia-Show unterbrechen Drehen um je 90° gegen den Uhrzeigersinn Nächstes Bild Durch Tippen in die Mitte des Bildes, kehren Sie in die Miniatur-Ansicht zurück.
  • Seite 164 Durch Tippen auf das Symbol (Rasterfelder einblenden), wird das gezeigte Bild in 6 Felder unterteilt. Abb.: Vollbildmodus mit Rasterfeldern Durch Tippen auf ein Viereck wird dieser Bereich des Bildes vergrößert dargestellt: Abb.: Zoom in Modus Durch Tippen in die Mitte des Bildes gelangen Sie in den Vollbildmodus zurück. Deutsch...
  • Seite 165: Travelguide

    Travelguide Ihr Navigationssystem ist mit einem Travelguide ausgestattet. Der Travelguide liefert allgemeine Informationen zu verschiedenen Bereichen einzelner Städte oder Regionen in Europa, wie z. B. Sehenswürdigkeiten, Restaurants, Kultur und Reiseinfos. Starten Sie den Travelguide vom Hauptbildschirm aus durch Antippen der Schaltfläche „Travelguide“.
  • Seite 166: Alarmclock (Weckfunktion)

    AlarmClock (Weckfunktion) Ihr Navigationssystem ist mit einer AlarmClock / Weckfunktion ausgestattet. Starten Sie diese Funktion vom Hauptbildschirm aus durch Antippen der Schaltfläche AlarmClock. Die Weckfunktion kann sowohl als normaler Wecker bei ausgeschaltetem Gerät (Standby Modus / Stromsparmodus) wie auch als Erinnerung während der laufenden Navigation erfolgen.
  • Seite 167: Beschreibung Der Schaltflächen

    Beschreibung der Schaltflächen Taste Beschreibung Aktuelle Systemzeit Einrichtungsmodus (Einstellen von Lautstärke, Systemzeit und Weckton) Nachtmodus (Schaltet das Gerät in den Standby Modus) Neueinrichtung/Deaktivieren der Weckfunktion Einstellen Weckzeit Löschen der Eingabe Bestätigungsschaltfläche Lautstärke verringern Lautstärke erhöhen zurück in das vorige Menü schließt die Anwendung AlarmClock (Weckfunktion)
  • Seite 168: Einstellen Der Systemzeit

    Einstellen der Systemzeit In der oberen rechten Bildschirmecke befindet sich die Anzeige der aktuellen Uhrzeit. Diese können Sie wie folgt anpassen: 1. Tippen Sie im Hauptbildschirm auf . Es erscheint folgender Bildschirm: 2. Tippen Sie auf , um hier die Zeiteinstellung vorzunehmen. Hinweis Die Systemzeit wird bei GPS-Empfang aktualisiert.
  • Seite 169: Lautstärke Einstellen

    3. Die Auswahl wird durch ein gekennzeichnet. 4. Verlassen Sie das Menü mit Lautstärke einstellen Durch Antippen der Schaltfläche können Sie die Lautstärke des Wecksignals anpas- sen. Hinweis Die hier eingestellte Lautstärke bezieht sich nur auf das Wecksignal und verändert nicht die Lautstärke der Sprachausgabe der Navigation oder anderen Funktionen des Systems.
  • Seite 170: Snooze-Funktion

    Snooze-Funktion Wenn der Wecker zur eingestellten Alarmzeit ertönt haben Sie die Möglichkeit, das Weck- signal über die Snooze-Funktion in regelmäßigen Abständen wiederholen zu lassen. Gehen Sie hierzu wie folgt vor: Tippen Sie dazu bei Anzeige des Wecksymbols auf , um die Snooze-Funktion zu akti- vieren.
  • Seite 171: Häufig Gestellte Fragen

    Häufig gestellte Fragen Wo finde ich mehr Informationen zum Navigationssystem. Ausführliche Bedienungsanleitungen für die Navigation finden Sie auf der DVD, die Ihrem Gerät beiliegt. Nutzen Sie als zusätzliche Hilfe auch die umfangreichen Hilfefunktio- nen, die mit einem Tastendruck (meist F1 am PC) bzw. Auswahl der Hilfeoption zur Verfügung stehen.
  • Seite 172: Kundendienst

    Kundendienst Fehler und mögliche Ursachen Das Navigationssystem reagiert nicht mehr oder verhält sich untypisch. • Führen Sie einen Reset durch (siehe S. 23). ® Das Navigationssystem wird von ActiveSync nur als Gast erkannt. • Siehe Informationen auf Seite 47. Der GPS-Empfänger kann nicht initialisiert oder gefunden werden. Falls trotz korrekter Installation des Systems weiterhin kein GPS-Signal auf dem Bildschirm gemeldet wird, kann das folgende Ursachen haben: •...
  • Seite 173: Anhang

    Anhang Sonderfunktion CleanUp (englische Programmführung) Die CleanUp-Funktion dient der gezielten Löschung von Daten ohne Benutzung eines PCs. Wichtig Bitte nutzen Sie diese Funktion sehr vorsichtig, da Daten gelöscht werden können, die dann erst manuell wieder aufgespielt werden müssen. Die CleanUp-Funktion wird aktiviert, wenn unmittelbar nach dem Startton nach einem Reset für kurze Zeit das „o“...
  • Seite 174 5. Factoryreset Zurückversetzen in den Auslieferungszustand bei intakter Hauptinstallation. 6. Format Flash Formatiert den internen „My Flash Disk“ Speicher. Diese Formatierung könnte im Fall einer erweiterten Fehlerbehebung notwendig sein. Nach Durchführung der Format- Funktion ist eine neue Kalibrierung des Bildschirms erforderlich. Außerdem werden alle Daten aus dem internen „My Flash Disk“...
  • Seite 175 Exit Verlassen der CleanUp-Funktion und Geräteneustart (wie Reset). Hinweis Vor dem eigentlichen Löschvorgang der Daten muss dieser erst bestätigt werden. Tippen Sie hierzu auf YES. Zum Wiederherstellen der Dateien im internen Speicher (Installationsdatei- en und Kartenmaterial) lesen Sie bitte das Kapitel „Übertragen von In- stallationsdateien und Kartenmaterial in den internen Speicher“...
  • Seite 176: Synchronisation Mit Dem Pc

    Synchronisation mit dem PC ® ® I. Microsoft ActiveSync installieren Zur Übertragung von Daten zwischen Ihrem PC und Ihrem Navigationssystem benötigen ® ® Sie das Programm Microsoft ActiveSync . Eine Lizenz dieses Programms haben Sie mit diesem Gerät erworben und befindet sich auf der DVD. Hinweis Falls Sie Nutzer des Windows Vista®...
  • Seite 177: Ii. Mit Dem Pc Verbinden

    Hinweis Bei Installation des GoPal Assistant wird ActiveSync® automatisch mit installiert. II. Mit dem PC verbinden 1. Starten Sie Ihr Navigationssystem, indem Sie den Ein- / Ausschalter betätigen. 2. Verbinden Sie das USB Kabel mit dem Navigationssystem. 3. Stecken Sie das andere Ende des USB Kabels in einen freien USB-Anschluss an Ihrem Computer.
  • Seite 178: Gps (Global Positioning System)

    GPS (Global Positioning System) Das GPS ist ein satellitengestütztes System zur Standortbestimmung. Mit Hilfe von 24 erdumkreisenden Satelliten ist eine auf wenige Meter genaue Bestimmung der Position auf der Erde möglich. Der Empfang der Satellitensignale erfolgt über die Antenne des einge- bauten GPS-Empfängers, die dazu eine „freie Sicht“...
  • Seite 179: Tmc (Traffic Message Channel)

    TMC (Traffic Message Channel) Traffic Message Channel (TMC) ist ein digitaler Radio-Datendienst, der ähnlich wie RDS funktioniert und zur Übertragung von Verkehrsstörungen an ein geeignetes Empfangsge- rät verwendet wird. Die Verkehrsinformationen werden ständig über FM übertragen. Da das Signal ständig übertragen wird, ist der Benutzer weniger von den nur halbstünd- lich ausgestrahlten Verkehrshinweisen abhängig.
  • Seite 180: Umgang Mit Speicherkarten

    Umgang mit Speicherkarten Ihr Navigationssystem unterstützt MMC und SD Speicherkarten. Einsetzen von Speicherkarten 1. Entnehmen Sie vorsichtig die optionale Speicherkarte aus der Verpackung (falls vorhanden). Achten Sie darauf, dass die Kontakte nicht berührt oder verschmutzt werden. 2. Schieben Sie die Speicherkarte vorsichtig, mit der Kontaktseite voraus, in den Kar- tenschacht.
  • Seite 181: Datenaustausch Über Kartenleser

    Datenaustausch über Kartenleser Wenn Sie aber große Datenmengen (MP3 Dateien, Navigationskarten) auf die Speicherkar- te kopieren wollen, können Sie diese auch direkt auf die Speicherkarte speichern. Viele Computer verfügen bereits über Kartenleser. Legen Sie dort die Karte ein und kopieren Sie die Daten direkt auf die Karte.
  • Seite 182: Alternative Installation Der Navigationssoftware Von Einer Speicherkarte

    Alternative Installation der Navigationssoftware von einer Speicherkarte Die Software für Ihr Navigationssystem kann auch direkt von einer entsprechend vorberei- teten Speicherkarte installiert werden. Ggf. muss die vorinstallierte Software vorher deinstalliert werden (s. Sonderfunktion CleanUp, Seite 43). Während der Ersteinrichtung werden Sie aufgefordert die Navigationssoftware zu installie- ren.
  • Seite 183: Technische Daten

    Technische Daten Parameter Angaben Stromversorgung UDID/L&K G12PCL-535-L031 Stromversorgungskabel für Zigaretten- anzünder Eingang 12-24V DC, 800mA / Sicherung 2A (T2AL/250V) 5V / 1A (max.) Ausgang Stromversorgung (alternativ) CA-0511MH-2F Stromversorgungskabel für Zigaretten- anzünder Eingang 12-24V DC, 800mA / Sicherung 2A (T2AL/250V) 5V / 1A (max.) Ausgang Speicherkartentyp MMC- und SD...
  • Seite 184: Index

    Index Akkubetrieb ........4, 5 FAQ............ 41 AlarmClock (Weckfunktion) Fehler und Ursachen ......42 Auswahl eines Wecktons....38 Beenden .........40 Einstellen der Systemzeit....38 GPS ............ 48 Hauptbildschirm ......36 Externe GPS-Antenne ..... 48 Lautstärke einstellen .......39 Schaltflächen ........37 Häufig gestellte Fragen ...... 41 Snooze-Funktion......40 Hinweistext ....i, 18, 19, 21, 22 Alternative Installation der...
  • Seite 185 Transport ......... 6 Umgebungstemperatur ....2 Ohrhöreranschluss......11 Verkabelung........4 Wartung........... 5 Sonderfunktion CleanUp....17, 43 Passwort ....i, 18, 19, 20, 21, 22 Speicherkarten ........50 Pflege des Displays .......5 Stromversorgung......4, 13 Picture Viewer Stromversorgung über Autoadapter ..4 Bedienung ........32 SuperPIN......i, 20, 21, 22 Hauptbildschirm ......32...
  • Seite 186 Deutsch...

Inhaltsverzeichnis