Tamiya King Tiger Bedienungsanleitung
Quicklinks

Verwandte Anleitungen für Tamiya King Tiger


Inhaltszusammenfassung für Tamiya King Tiger
- Seite 1 ecuE ITEM 56004 0487...
- Seite 2 Germans Long Nose TypePHers day Fahrzeug -vorvvärts/rückwärtserechts Oder links were able to produce a total Of 487 King Tiger Zanæ lang 'fahreh könnén, den Turm schwenken unddas Mün• tanks, Which were considered to be the best all duneslicht aofbiitien •lasSen: Natürtich könnte...
- Seite 3 "Schraube always in correct order. <Suspension Housing> *This kit is designed to use the Tamiya <Schwingarmgehä use> NJ-Cd 7,2V Racing æck battery. For strobe light operation, two IJM2 size dry cells are Chassis also required. Please purchase separate- iy at your nearest hobby shop.
- Seite 4 Clutch Engaging Device» Assembly Of Clutch Engaging Device <Kuppåungsgehäuse» Kupplungsgehäuse Clutch Engaging Device Gear There must be a little space between the Kupplungsgehäuse Getriebegehäuse clutches F4. Remove a piece not cement. Enlarge holes paper from the bag containing metal *Nicht kieben to fit rods.
- Seite 5 TAMIYA <Strobe Switch> Attaching Servo to Turret Gear *Attach the flashing switch Servoto the turret gearboxwhen using a four channel, •Qichtschalter> four servo radio installation. Einbau Servo auf Turmgetriebe Bei Verwendung pine' 4Kana\anlage mit 4 Servos, das Schafterservo für das Licht an das The shape of servo control horns vary Turmgetfiebegchäuse...
- Seite 6 <Assembied Rear Panel> Assembly Of Rear Panel Panzer Heck Exhaust Pipes 2mmx6 Screw 'Schraube Auspuff B 29 Attaching Exhaust Pipes» <Einbau Auspuif» Make a hole from inside tinst Ein Loch von innen bohren Make a hole withagimlet Ein Loch bohren Note the direction.
-
Seite 7: Assembly Of Wheels
TAMIYA <Assembly ot Wheels» Assembly of Wheels Goad Wheel Räder <Laufrad AUow a space <ldier Wheel> Make 2 sets. 2mmx 10 Screw Spje} ssen. 'Schraube 2 Satz machen. Idler Wheel Spannrad A Idler Wheel C Spannrad Idler Wheel Spannrad B... - Seite 8 <Upper Hull Left Side> Upper Hull Left Side <Deckplatte links» Deckplatte links B 34 D 12 B 34 Upper Huli Panzerobetteil off. hneiden B 37 Meta\lic Grey (XF.56) Gun Mount M.G. Lager Söb Front Light Frontlicht Grey Metallic Gvey Red Brown (XFS6)MetaiiicGrey B 17 (XF.ö4)
- Seite 9 TAMIYA <Assembiy of Flashing Device> Assembly of Flashing Device <Zusamrnenbau Blinlicht» Zusammenbau Blinklicht By the use of the switch on the strobe light unit, you can change from automa- <Turret Shaft» tic flashing to manual (servo controlled) Shield> QTuJmschaft» flashing. When using a four channel sys- <Rohrkragen»...
- Seite 10 <Assembly of Turret» <Einbau Turm» Assembly of Turret 2mmx6 Screw {Schraube Einbau Turm 3mmx6 Screw "Schraube In case you change batteries for strobe 2mmx6 Screw 3mmx6 ISchraube light unit, take batte0' box in and out be- Schraube tween D17 and turret shaft.
- Seite 11 Tracks Ketteneinbau Catepiller Track Connector Kettenachse Ketten TAMIYA COLOR CATALOGUE The latest in cars, boats, tanks and ships. Motorized, radio controlled and museum quality models are atl shown in full color In Tamiya's latest catalogue. At your nearest hobby supply house.
- Seite 12 It prevents arcing and Insures good current flow. auf den Fahrreglejs schützt vor schlechtem Kontakt. Tamlya Switch Lubricant x 6 Screw (sold separately) 'Schraube Tamiya Schalter-Schmiermittel (getrennt Zu ka Resistor Widerstand < Seno Horn» Servo-Horn Purple The shape...
- Seite 13 TAMIYA Sewo Horn •e Servo-Horn Servos <Turret Switch Servo» The shape of servo hom varies from <Turmsc.haiter Servo* manufacturer to manufacturer. un• Cutch Servo» *Not used for 2 channel 2 servo unit. needed arms of your servo horns. <KuppEungs Servo>...
- Seite 14 Schaller Servo *Kupplungs Servo Installing Running Båttery Einbau des Fahrakkus Running Battery Tamiya NiCd 72V Racing P-ack Fahrakku Tamiya Ni-Cd 7,2V Racing Pack *Connect yetiow to yeiiow and green to green. *Ceib mit geib und g?ün mit gtün verbinden. CAUTION *Connect plugs.
- Seite 15 <MateriaI required> Tamiya plastic putty; Flat brush; 7mm wide, 1.5cm wide spatula screwdrivers and some lacquer thinner. I. Apply a Imm thick coating of Tamiya putty wlth the spatula to surface desired. 2. Press the screwdriver blade into the putty to simulate the corrugations, work- ing from the top down.
- Seite 16 2. Make sure that the sticks of the transmitter sharp turn. If either of the two clutches is half <RADIO CONTROL TANK KING TIGER> disengagedv the track on that side slows down at neutral. <Operation of Tiger» 3. Turn the transmitter switch "On"...
- Seite 17 [nose gravel paths. It is relatively easy for the model tank to make turns .Vorsicht!. Tamiya's Tiger Tank uses an electrlc motor and does Da Elektro+unkfernsteuerautos Ni-Cd Akkus hohetKa- not make much noise. It ISvery powerful, and must on gravel paths, but in such places the tracks are...
- Seite 18 — Båttetié2AhSéhlüS€e TROUBLESHOOTING EVtt:Kabét e on MqtoV1ihdSchaiter3UrnpOleOR A Motet does not turn @earSha9OGüV3Apøwmachiheoif<tOöéarinOE Thé SWitch(iSaetüåied by thå servo. JfÄhé F The-tanWdoee turn andrun thS&ri€etfi6tOG f@åtéaQfivemjnuteS€ Servo does not operate, "Cheek-the SWitcheS Ot 'The:clutches cannef be.eompietély•diSent Battemis2weak,e tranSmitter and receivervand.ttåke suWthätthe gagee, Voltage and% current: Of 'thebatteries are-correct...
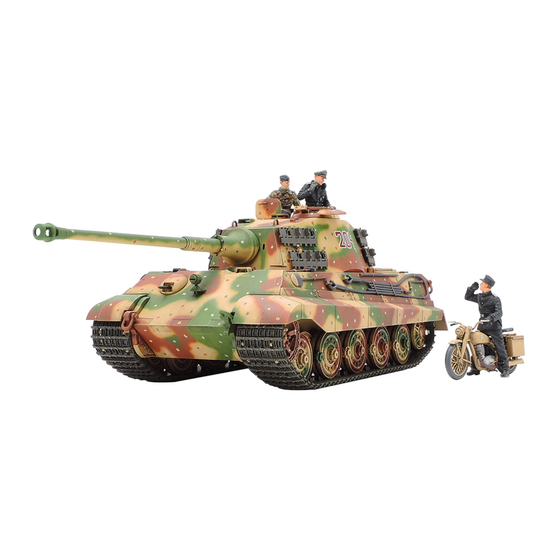
- Seite 19 To camouflage their vehicles, field forces often painted dark greenor reddish brown patterns on the dark yellow. The King Tiger manufactured 19441945 generaltypainted ih dark yellow. Toward the end of the war, how- ever, some tanks Ofthis type were...
- Seite 20 PARTS PARTS PARTS Gun Metat Unnecessary Parts 0—000 PARTS Gley Brown Metal (XFS6) (XF$4) (X. 10) PARTS Unnecessary Parts PARTS Extra sc.ews & ruts are inctuded. RIC TANK & CAR MODELS them as spares WEST GERMAN LEOPARD Metal Box» (Tool Rod Bag) Upper Hull Clutch {Screw Bag A)