Werbung
Verfügbare Sprachen
Verfügbare Sprachen
Quicklinks
Werbung

Verwandte Anleitungen für Vitrifrigo SLIM 90


Inhaltszusammenfassung für Vitrifrigo SLIM 90
- Seite 1 MANUALE ISTRUZIONI SERIE SLIM GRAZIE PER AVER ACQUISTATO UN PRODOTTO VITRIFRIGO...
- Seite 3 Inversione riscontro Montaggio porta Inversione maniglia porta 7. SOSTITUZIONE PANNELLO FINITURA 8. COLLEGAMENTO ELETTRICO 9. AVVIAMENTO Pannello di controllo Slim 90 e 150 Pannello di controllo Slim 250 On / Standby Night mode Turbo mode Impostazioni temperatura Slim 90 e 150...
- Seite 4 1. INTRODUZIONE Gentile cliente, grazie per aver scelto un nostro prodotto. La Vitrifrigo si augura che Lei possa rimanere completamente soddisfatto dell’acquisto effettuato. Il presente manuale è considerato parte integrante del frigorifero e deve seguire il percorso di vendita fino all’utilizzatore.
- Seite 5 ATTENZIONE Non esporre mai il frigo alla pioggia ATTENZIONE Non aprire mai o danneggiare l’impianto di raffreddamento posto sul retro del frigorifero. L’impianto di raffreddamento è pressurizzato e contiene sostanze nocive per la salute umana. Destinazione del prodotto • Il presente apparecchio è concepito per essere utilizzato in applicazioni come Camper •...
- Seite 6 Prima di eseguire qualsiasi operazione di manutenzione o pulizia, disinserire la presa di corrente. • Per eventuali problemi di funzionamento rivolgersi presso il centro assistenza Vitrifrigo più vicino; in ogni caso avvalersi di personale qualificato. • Non conservare sostanze esplosive in questo apparecchio, come bombolette per aerosol con propellente infiammabile.
- Seite 7 Vitrifrigo s.r.l. Via Mazzini 75 - fraz. Montecchio - 61022 VALLEFOGLIA(PU) – Italia tel. +39 0721 154500 - fax. +39 0721 497739 e-mail info@vitrifrigo.com - www.vitrifrigo.com 4. DESCRIZIONE DELL’APPARECCHIO • L’etichetta riportante matricola e dati tecnici è posizionata all’interno del frigo. Le prime sei cifre della matricola identificano l’anno e la settimana di costruzione.
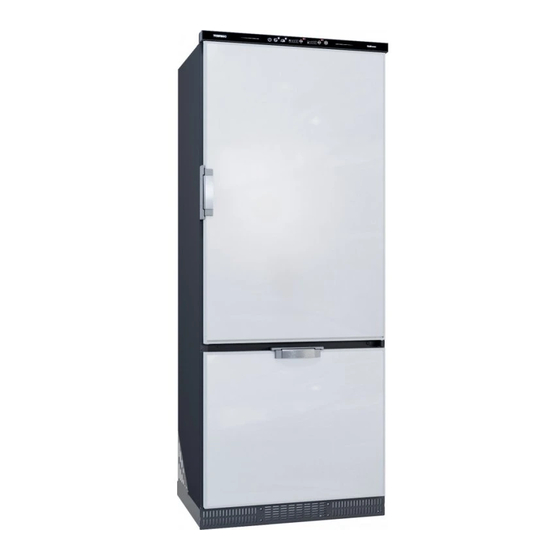
- Seite 8 SLIM 90 • A) Porta frigo B) Maniglia C) Vano frigo D) Ripiani a filo E) Portafrutta* F) Porta bottiglie G) Mascherina comandi H) Vano freezer I) Sportellino freezer J) Mobile coibentato K) Unità condensante remotabile *Dove è presente SLIM 150 •...
- Seite 9 5. INSTALLAZIONE Posizionare il frigo su una superficie piana e stabile. Il frigo è provvisto di 4 punti (Slim 90 e 150) o 6 punti (Slim 250) di fissaggio. Prima dell’installazione è necessario forare la cassa coibentata nei punti indicati nell’Allegato 2.
- Seite 10 (Allegato 5) Montaggio porta Fissare la cerniera inferiore (Slim 90) nel lato opposto a quello originale, inserire la porta dall’alto nel perno cerniera. Montare la cerniera superiore e riposizionare la mascherina nell’apposita sede.
- Seite 11 RISPETTARE LA POLARITÀ Sez (mm^2) Lung. max. linea 12V (m) Lung. max. linea 24V (m) • Dimensioni cavi: collegamento tra batteria ed unità elettronica. IMPOSTAZIONI STANDARD PROTEZIONE BATTERIA 12 V stacco V 12 V attacco V 24 V stacco V 24 V attacco V 10,4 11,7...
- Seite 12 Nello Slim 250 assicurarsi di non chiudere le aperture di aspirazione aria per non compromettere l’ottimale funzionamento del frigo. Pannello di controllo Slim 90 e Slim 150 On / Stand by Indicatore livello refrigerazione...
- Seite 13 Per garantire un funzionamento ottimale, mettere a livello il veicolo prima di azionare il frigorifero Per avere prestazioni ottimali, accendere il frigorifero 8 ore prima di introdurre il cibo. Raccomandiamo di pulire l’interno del frigorifero con molta cura, prima di usarlo.
- Seite 14 Impostazione temperatura Slim 90 e 150 Dopo aver acceso il frigorifero, per impostare il livello di raffreddamento agire sui tasti +/-. Con il tasto indicato dal simbolo “-“ si diminuisce il set fino allo step minimo, mentre con il tasto indicato dal “+” si arriva allo step massimo.
- Seite 15 Sbrinamento Slim 90 e 150 Uno strato di ghiaccio all’interno del frigo (sullo schienale) e nel congelatore riduce la capacità di raffreddamento del frigo. I frigoriferi della serie SLIM sono dotati di sbrinamento automatico, impostato dalla fabbrica. In caso di accumulo eccessivo di ghiaccio è comunque necessario sbrinare il frigo manualmente.
- Seite 16 10. MANUTENZIONE Pulitura E’ importante pulire regolarmente il frigorifero per prestazioni ottimali. Rimuovere i ripiani e il cassetto. Utilizzare un panno morbido umido per l’esterno del frigo. Per la parte interna utilizzare un panno morbido e un detergente neutro per usi domestici. ATTENZIONE Non pulire il frigorifero con sapone o con agenti chimici aggressivi o caustici.
- Seite 17 Temperatura interna Il frigorifero non si Verificare che la porta sia chiusa perfettamente ferma troppo alta Non si accende la luce di La luce è guasta Chiamare l’assistenza cortesia Frigorifero Controllare che il frigorifero sia posizionato in piano e non sia a contatto rumoroso diretto con oggetti che possano causare vibrazioni ALLARMI...
- Seite 18 INSTRUCTION MANUAL SERIES SLIM THANK YOU FOR PURCHASING A VITRIFRIGO PRODUCT...
- Seite 19 Feedback inversion Door assembly Door handle inversion 7. FINISHING PANEL REPLACEMENT 8. ELECTRICAL CONNECTION 9. START-UP Control Panel Slim 90 and 150 Control Panel Slim 250 On / Standby Night mode Turbo mode Temperature settings Slim 90 and 150 Temperature settings Slim 250...
- Seite 20 1. INTRODUCTION Dear client: Thank you for choosing one of our products. Vitrifrigo hopes that you will be completely satisfied with your purchase. This manual is considered an integral part of the refrigerator and must follow the sales path to the user.
- Seite 21 ATTENTION Never open or damage the cooling system located on the back of the refrigerator. The cooling system is pressurized and contains substances harmful to human health. Destination of the product: • This appliance is designed to be used in applications such as motorhomes •...
- Seite 22 Before carrying out any maintenance or cleaning operation, disconnect the power plug. • For any operating problems, contact the nearest Vitrifrigo assistance centre; in any case make use of qualified personnel. • Do not store explosive substances in this appliance, such as aerosol cans with flammable propellant.
- Seite 23 Vitrifrigo s.r.l. Via Mazzini 75 - fraz. Montecchio - 61022 VALLEFOGLIA(PU) – Italia tel. +39 0721 154500 - fax. +39 0721 497739 e-mail info@vitrifrigo.com - www.vitrifrigo.com 4. DESCRIPTION OF THE APPLIANCE • The label showing the serial number and the technical data is placed inside the refrigerator.
- Seite 24 SLIM 90 • A) Fridge door B) Fridge door latch C) Fridge compartment D) Wire shelves E) Fruit compartment* F) Door shelf G) Control panel H) Freezer compartment I) Freezer door J) Insulated box K) Removable condensing unit *Where there is it SLIM 150 •...
- Seite 25 Place the fridge on a flat and stable surface. The fridge is equipped with 4 fixing points (Slim 90 e 150) or 6 fixing points (Slim 250). Before installation it is necessary to drill the insulated casing in the points indicated in (Annex 2) We recommend using 3.9x16 screws (not supplied).
- Seite 26 (Annex 5) Door mounting Secure the lower hinge (Slim 90) on the opposite side to the original one, insert the door from above into the hinge pin. Assemble the upper hinge and reposition the mask in its seat.
- Seite 27 RESPECT THE POLARITY Section (mm^2) Max line length 12V (m) Max line length 24V (m) • Cable size: Battery and electronics connection. STANDARD BATTERY PROTECTION SETTINGS 12 V cut-out V 12 V cut-in V 24 V cut-out V 24 V cut-in V 10,4 11,7 22,8...
- Seite 28 In the Slim 250 make sure not to close the air intake openings so as not to jeopardize the optimal functioning of the fridge. Control panel Slim 90 and Slim 150 On / Stand by Cooling level indicators...
- Seite 29 As soon as the lowest temperature is reached, turbo mode turn off automatically and the cooling level returns to the last set for a specific time depending on the model. Cooler level setting Slim 90 and 150 After switching on the refrigerator, for set the cooling level push the switches +/-. With the button indicated by the simbol “-“...
- Seite 30 With an ambient temperature between 15°C and 25°C, it is recommended to set the refrigerator to a cooling level 3. A higher ambient temperature requires a higher cooling level, while a lower temperature requires a lower level. Cooler level setting Slim 250 After turning on the refrigerator, to set the cooling level, use the 5 and 7 keys belonging to the respective compartments.
- Seite 31 Defrosting Slim 90 and 150 An ice layer inside the fridge reduces the cooling capacity of the fridge. You must periodically defrost your fridge. The SLIM series refrigerators are equipped with an automatic defrosting system, set by the manufacturer. Anyway, in case of high frost build up, a manual defrost is required. First turn off the refrigerator, after emptying it.
- Seite 32 10. MAINTENANCE Cleaning It is important regularly clean the refrigerator for optimum performance. Remove the shelves and drawer. Use a soft damp cloth for the outside of the fridge. Use a soft cloth and a neutral detergent for domestic use. ATTENTION Do not clean the fridge with soap or with aggressive or caustic chemicals.
- Seite 33 Internal temperature The refrigerator Check that the door is closed perfectly does not stop too high The courtesy light The light is out of order Call for assistance does not turn on Check that the refrigerator is placed on level ground and is not in direct Noisy refrigerator contact with objects that can cause vibrations ALLARMS...
- Seite 34 MANUEL D’INSTRUCTIONS SÉRIE SLIM MERCI D’AVOIR ACHETÉ UN PRODUIT VITRIFRIGO...
- Seite 35 Assemblage de porte Inversion de la poignée de porte 7. REMPLACEMENT DU PANNEAU DE FINITION 8. CONNEXION ÉLECTRIQUE 9. AVVIAMENTO Panneau de commande Slim 90 et 150 Panneau de commande Slim 250 On / Standby Night mode Turbo mode Paramètres de température Slim 90 et 150 Paramètres de température Slim 250...
- Seite 36 1. INTRODUCTION Cher Client, Merci d’avoir choisi notre produit. VITRIFRIGO espère que vous serez entièrement satisfait de votre achat. Ce manuel est considéré comme faisant partie intégrante du réfrigérateur et il doit suivre le parcours de vente jusqu’à l’utilisateur. Chaque réfrigérateur, avant d’être expédié, est soumis à des contrôles et à des tests pours’assurer de son bon fonctionnement.
- Seite 37 ATTENTION Ne jamais ouvrir ou endommager le système de refroidissement situé à l’arrière du réfrigérateur. Le système de refroidissement est sous pression et contient des substances nocives pour la santé humaine. Destination du produit • Cet appareil est conçu pour être utilisé dans des applications telles que les camping- cars •...
- Seite 38 • Avant d’effectuer toute opération d’entretien ou de nettoyage, débranchez la prise de courant. • Pour tout problème de fonctionnement, contactez le centre d’assistance Vitrifrigo le plus proche ; dans tous les cas faire appel à du personnel qualifié. • Ne stockez pas de substances explosives dans cet appareil, telles que des bombes aérosols contenant un propulseur inflammable.
- Seite 39 Vitrifrigo s.r.l. Via Mazzini 75 - fraz. Montecchio - 61022 VALLEFOGLIA(PU) – Italia tel. +39 0721 154500 - fax. +39 0721 497739 e-mail info@vitrifrigo.com - www.vitrifrigo.com 4. DESCRIPTION DE L’APPAREIL • L’étiquette avec le numéro de série et les données techniques se trouve à l’intérieur du réfrigérateur.
- Seite 40 SLIM 90 • A) Porte de réfrigérateur B) Poignée de porte de réfrigérateur C) Compartiment réfrigérateur D) Étagères encastrées E) Compartiment à fruits* F) Porte-bouteilles G) Façade des commandes H) Compartiment congélateur I) Porte du congélateur J) Armoire isolée K) Unité de condensation à...
- Seite 41 Placer le réfrigérateur sur une surface plane et stable. Le réfrigérateur est équipé de 4 points (Slim 90 e 150) ou 6 points (Slim 250) de fixation. Avant l’installation, il est nécessaire de percer le coffrage isolé à ces points. Nous vous recommandons l’utilisation de vis 3.9x16 (non fournies).
- Seite 42 (Annexe 5) Assemblage de porte Fixez la charnière inférieure (Slim 90) sur le côté opposé à celui d’origine, insérez la porte par le haut dans l’axe de la charnière. Monter la charnière supérieure et repositionner le masque dans son siège.
- Seite 43 RESPECTER LA POLARITÈ Section (mm^2) Longueur de ligne max. 12V (m) Longueur de ligne max 24V (m) • Dimensions des câbles : connexion entre la batterie et l’unité électronique. PARAMÈTRES STANDARD POUR LA PROTECTION DE LA BATTERIE 12 V cut-out V 12 V cut-in V 24 V cut-out V 24 V cut-in V...
- Seite 44 Dans le Slim 250, veillez à ne pas fermer les ouvertures d’entrée d’air afin de ne pas compromettre le fonctionnement optimal du réfrigérateur. Panneau de commande Slim 90 et Slim 150 On / Stand by Indicateur de niveau de réfrigération...
- Seite 45 On / Standby Pour allumer le réfrigérateur, maintenez enfoncé le bouton indiqué sur la figure pendant 1 seconde. A ce moment toutes les fonctions sont actives. La source d’alimentation est automatiquement sélectionnée au niveau de la source DC. Pour garantir un fonctionnement optimal, mettez le véhicule à niveau avant d’utiliser le réfrigérateur.
- Seite 46 À la fin de ce temps, le mode turbo s’arrête automatiquement et le fonctionnement passe au dernier réglage défini. Configuration de la température Slim 90 et 150 Après avoir allumé le réfrigérateur, pour configurer le niveau de refroidissement, actionner les touches +/-. Avec la touche indiquée par le symbole « - », on diminue le réglage jusqu’à...
- Seite 47 Il est recommandé d’utiliser ce mode même lorsque le compartiment est plein. Dégivrer Slim 90 et 150 Une couche de glace à l’intérieur du réfrigérateur réduit la capacité de refroidissement du réfrigérateur. Vous devez périodiquement dégivrer votre réfrigérateur. Les réfrigérateurs de la série SLIM sont équipés d’un système de dégivrage automatique, réglé...
- Seite 48 Dépose du tiroir (Slim 150 et 250) Pour extraire les tiroirs des guides coulissants, il est nécessaire d’appliquer une pression sur les deux leviers, droit et gauche, présents dans les guides. Voir Annexe 8 10. ENTRETIEN Nettoyage Il est important de nettoyer régulièrement le réfrigérateur pour une performance optimale.
- Seite 49 Contrôler que : a) la porte ferme hermétiquement, Rendement Le réfrigérateur b) le réfrigérateur ne se trouve pas à proximité de sources de chaleur et ne refroidit pas insuffisant qu’il est suffisamment aéré, c) le condenseur n’est pas obstrué par de la poussière Le réfrigérateur Température interne Vérifier que la porte est parfaitement fermée...
- Seite 50 HANDBUCH SERIE SLIM WIR DANKEN IHNEN SICH FÜR EIN VITRIFRIGO PRODUKT ENTSCHIEDEN ZU HABEN...
- Seite 51 Entfernung des unteren Scharniers Umkehrung der Scharniere Feedback-Inversion Türmontage Türgriffumkehrung 7. AUSTAUSCH DER ABSCHLUSSPLATTE 8. ELEKTRISCHE VERBINDUNG 9. BEGINNEND Bedienfeld Slim 90 und 150 Bedienfeld Slim 250 On / Standby Night mode Turbo mode Temperatureinstellungen Slim 90 und 150 Temperatureinstellungen Slim 250 Belüftungsposition...
- Seite 52 1. EINLEITUNG Lieber Kunde, vielen Dank, dass Sie sich für ein Produkt von uns entschieden haben. VITRIFRIGO hofft, dass Sie mit Ihrem Kauf vollkommen zufrieden sind. Das vorliegende Handbuch ist integraler Bestandteil des Kühlschranks und muss diesen vom Kauf bis zum Endnutzer begleiten. Jeder Kühlschrank wird vor dem Versand verschiedenen Kontrollen und Abnahmen unterzogen, um den ordnungsgemäßen...
- Seite 53 ACHTUNG Öffnen oder beschädigen Sie niemals das Kühlsystem auf der Rückseite des Kühlschranks. Das Kühlsystem steht unter Druck und enthält gesundheitsschädliche Substanzen. Bestimmungszweck des Produkts • Dieses Gerät ist für den Einsatz in Anwendungen wie Wohnmobilen konzipiert • Dieses Gerät kann für die Einbauinstallation verwendet werden. •...
- Seite 54 Ziehen Sie vor der Durchführung von Wartungs- oder Reinigungsarbeiten den Netzstecker. • Wenden Sie sich bei Betriebsproblemen an das nächstgelegene Vitrifrigo- Kundendienstzentrum; auf jeden Fall qualifiziertes Personal heranziehen. • Lagern Sie in diesem Gerät keine explosiven Stoffe, wie z. B. Aerosoldosen mit brennbaren Treibmitteln.
- Seite 55 Vitrifrigo s.r.l. Via Mazzini 75 - fraz. Montecchio - 61022 VALLEFOGLIA(PU) – Italia tel. +39 0721 154500 - fax. +39 0721 497739 e-mail info@vitrifrigo.com - www.vitrifrigo.com 4. BESCHREIBUNG DES GERÄTS • Das Typenschild mit der Seriennummer und den technischen Daten befindet sich im Inneren des Kühlschranks.
- Seite 56 SLIM 90 • A) Kühlschranktür B) Kühlschranktürgriff C) Kühlschrankfach D) Flächenbündige Regale E) Fruchtfach** F) Flaschenhalter G) Bedienfeld H) Gefrierfach I) Gefrierfachtür J) Isoliertes Gehäuse K) Abnehmbare Kondensatoreinheit *Wo es vorhanden ist SLIM 150 • A) Bedienfeld B) Kühlschranktür C) Kühlschranktürgriff D) Flächenbündige...
- Seite 57 5. INSTALLATION Stellen Sie den Kühlschrank auf eine ebene, stabile Oberfläche. Der Kühlschrank ist mit 4 (Slim 90 e 150) oder 6 punti (Slim 250) Befestigungspunkten ausgestattet. Vor der Installation ist es notwendig, das isolierte Gehäuse an diesen Stellen zu bohren, (Anhang 2).
- Seite 58 Entfernen der Kappen auf der gegenüberliegenden Seite wieder. (Anhang 5) Türmontage Befestigen Sie das untere Scharnier (Slim 90) auf der gegenüberliegenden Seite des Originals, führen Sie die Tür von oben in den Scharnierstift ein. Montieren Sie das obere Scharnier und positionieren Sie die Maske wieder in ihrem Sitz.
- Seite 59 gemäß den folgenden Anweisungen direkt an die Batterie an. BEACHTEN SIE DIE POLARITÄT Querschnitt (mm^2) Max. Leitungsl. 12V (m) Max. Leitungsl. 24V (m) • Dimensioni cavi: collegamento tra batteria ed unità elettronica. STANDARDEINSTELLUNGEN FÜR DEN BATTERIESCHUTZ 12 V Abschaltung V 12 V Einschaltung V 24 V Abschaltung V 24 V Einschaltung V...
- Seite 60 Gerüchen im Kühlschrank zu vermeiden, bewahren Sie die Lebensmittel separat in geschlossenen Boxen auf. Achten Sie beim Slim 250 darauf, die Lufteinlassöffnungen nicht zu verschließen, um die optimale Funktion des Kühlschranks nicht zu gefährden. Bedienfelds Slim 90 oder Slim 150 On / Stand by Kühlstandsanzeige Night Mode Taste für Kühlstandsanzeige...
- Seite 61 Um einen optimalen Betrieb zu gewährleisten, nivellieren Sie das Fahrzeug, bevor Sie den Kühlschrank in Betrieb nehmen. Für eine optimale Leistung schalten Sie den Kühlschrank 8 Stunden vor dem Einbringen der Speisen ein. Wir empfehlen Ihnen, das Innere des Kühlschranks vor der Verwendung sehr sorgfältig zu reinigen.
- Seite 62 Temperatureinstellung Slim 90 und 150 Drücken Sie nach dem Einschalten des Kühlschranks zur Einstellung der Kühlstufe die Tasten +/- Mit der Taste, die durch das Symbol “-“ angezeigt wird, verringern Sie die Einstellung auf die minimale Stufe, während Sie mit der Taste, die durch das “+”...
- Seite 63 Lagerung von Obst. Es wird empfohlen, diesen Modus auch dann zu verwenden, wenn das Fach voll ist. Abtauen Slim 90 und 150 Eine Eisschicht im Inneren des Kühlschranks reduziert die Kühlleistung des Kühlschranks. Sie müssen Ihren Kühlschrank regelmäßig abtauen. Die Kühlschränke der SLIM-Serie sind mit einem vom Hersteller eingestellten automatischen Abtausystem ausgestattet.
- Seite 64 Schubladenausbau (Slim 150 und 250) Um die Schubladen aus den Gleitführungen herauszuziehen, muss Druck ausgeübt werden an den beiden Hebeln rechts und links in den Führungen. Siehe Anhang 8. 10. WARTUNG Reinigen Es ist wichtig, den Kühlschrank regelmäßig zu reinigen, um eine optimale Leistung zu erzielen.
- Seite 65 Kontrollieren Sie, dass: (a) die Tür hermetisch verschlossen ist, Der Kühlschrank Unzureichende Leistung (b) der Kühlschrank nicht in der Nähe von Wärmequellen steht und kühlt nicht ausreichend belüftet ist, (c) der Verflüssiger nicht mit Staub verstopft ist Innentemperatur zu Der Kühlschrank Prüfen, ob die Tür perfekt geschlossen ist stoppt nicht hoch...
- Seite 66 MANUAL DE INSTRUCCIONES SERIE SLIM GRACIAS POR HABER COMPRADO UN PRODUCTO VITRIFRIGO...
- Seite 67 Montaje de la Puerta Inversión de la manilla de la puerta 7. SUSTITUCIÓN DEL PANEL DE ACABADO 8. CONEXIÓN ELÉCTRICA 9. PUESTA EN MARCHA Panel de control Slim 90 y 150 Panel de control Slim 250 On / Standby Night mode Turbo mode...
- Seite 68 1. INTRODUCCIÓN Estimado cliente: Gracias por haber escogido un producto nuestro. VITRIFRIGO espera que esté completamente satisfecho con su compra. Este manual se considera parte integrante del frigorífico y debe seguir el recorrido de venta hasta el usuario. Cada frigorífico, antes de su envío, se somete a controles y pruebas para asegurar su correcto funcionamiento.Para más información y aclaraciones, ponerse en contacto con...
- Seite 69 ATENCIÓN Nunca abra ni dañe el sistema de enfriamiento ubicado en la parte posterior del refrigerador. El sistema de refrigeración está presurizado y contiene sustancias nocivas para la salud humana. Destino del producto • Este aparato está diseñado para ser utilizado en aplicaciones tales como autocaravanas •...
- Seite 70 • Para cualquier problema de funcionamiento, póngase en contacto con el centro de asistencia Vitrifrigo más cercano; en todo caso hacer uso de personal cualificado. • No almacene sustancias explosivas en este aparato, como latas de aerosol con propelente inflamable.
- Seite 71 Vitrifrigo s.r.l. Via Mazzini 75 - fraz. Montecchio - 61022 VALLEFOGLIA(PU) – Italia tel. +39 0721 154500 - fax. +39 0721 497739 e-mail info@vitrifrigo.com - www.vitrifrigo.com 4. DESCRIPCIÓN DEL APARATO • La etiqueta con el número de serie y los datos técnicos se ubica en el interior del frigorífico.
- Seite 72 SLIM 90 • A) Puerta del frigorífico B) Manija C) Compartimento del frigorífico D) Estanterías empotrables E) Compartimento de frutas* F) Botellero G) Panel de control H) Compartimento congelador I) Puerta del congelador J) Mueble aislado K) Unidad condensadora extraíble...
- Seite 73 Coloque el frigorífico sobre una superficie plana y estable. El frigorífico está equipado con 4 puntos (Slim 90 e 150) o 6 puntos (Slim 250) de fijación. Antes de la instalación, es necesario perforar la carcasa aislada en estos puntos. Se recomienda utilizar tornillos 3,9x16 (no suministrados)( Anexo 2).
- Seite 74 (Anexo 5) Montaje de puerta Asegure la bisagra inferior (Slim 90) en el lado opuesto al original, inserte la puerta desde arriba en el pasador de la bisagra. Ensamble la bisagra superior y vuelva a colocar la máscara en su asiento.
- Seite 75 RESPETAR LA POLARIDAD Sección (mm^2) Long máx de la línea 12V (m) Long máx de la línea 24V (m) • Dimensiones del cable: conexión entre batería y unidad electrónica. AJUSTES ESTÁNDAR DE PROTECCIÓN DE LA BATERÍA 12 V cut-out V 12 V cut-in V 24 V cut-out V 24 V cut-in V...
- Seite 76 En el Slim 250 asegúrate de no cerrar las aberturas de entrada de aire para no poner en riesgo el óptimo funcionamiento del frigorífico. Panel de control Slim 90 y Slim 150 On / Stand by Indicador de nivel de refrigeración Night Mode Botón de nivel de refrigeración...
- Seite 77 La fuente de alimentación se elige automáticamente, dando prioridad a la fuente DC. Para garantizar un funcionamiento óptimo, nivele el vehículo antes de utilizar el frigorífico. Para un rendimiento óptimo, encienda el frigorífico 8 horas antes de introducir los alimentos. Recomendamos limpiar el interior del frigorífico con mucho cuidado antes de usarlo.
- Seite 78 Ajuste de temperatura Slim 90 y 150 Después de encender el frigorífico, utilice las teclas +/- para ajustar el nivel de enfriamiento. Con la tecla indicada por el símbolo «-» se disminuye el ajuste al paso mínimo, mientras que con la tecla indicada por el «+» se alcanza el paso máximo.
- Seite 79 Se recomienda utilizar este modo incluso cuando el compartimento está lleno. Desescarche Slim 90 e 150 Una capa de hielo dentro del frigorífico (en la parte posterior) y en el congelador reduce la capacidad de enfriamiento del frigorífico.
- Seite 80 Extracción de cajones (Slim 150 y 250) Para extraer los cajones de las guías deslizantes es necesario aplicar presión. en las dos palancas, derecha e izquierda, presentes en las guías. Ver Anexo 8. 10. MANTENIMIENTO Limpieza Es importante limpiar el frigorífico regularmente para un rendimiento óptimo. Retire los estantes y el cajón.
- Seite 81 Se requiere Desconectar el cable de alimentación, esperar un minuto y volver a realizar un reset conectarlo. Intentar encenderlo de nuevo. El frigorífico no arranca Termostato in STANDBY Encender desde el panel de control Controlar que: a) la puerta cierra herméticamente, El frigorífico Rendimiento insuficiente b) que el frigorífico no esté...
- Seite 82 ALLEGATI - ANNEXES Allegato MODELLI E MISURE GENERALI Annex MODELS AND GENERAL MEASUREMENTS MODEL (mm) (mm) (mm) SLIM 90 CHR SLIM 150 CHR 1517 SLIM 250 CHR 1523 Allegato FISSAGGI DISPOSITIVO Annex INSTALLATIONS FIG.1 - FISSAGGI INTERNI A SCOMPARSA INTERNAL CONCEALED FIXING...
- Seite 83 Allegato INSTALLAZIONI SLIM 90 E SLIM 150 Annex INSTALLATIONS SLIM 90 AND SLIM 150 CONDENSATORE REMOTO Esempi di installazioni con posizioni differenti dell’unità refrigerante VENTILATO Installation examples with different cooling unit positions REMOTE FAN CONDENSER Allegato RIMOZIONE PORTA Annex DOOR REMOVAL FIG.2 - RIMOZIONE CERNIERA PORTA...
- Seite 84 Allegato INVERSIONE RISCONTRO Annex DOOR RETAINER INVERSION FIG.1 - SPOSTARLO VERSO I FORI BLU MOVE IT TO THE BLUE HOLES Allegato SOSTITUZIONE PANNELLO FINITURA Annex FINISHING PANEL REPLACEMENT CHROMELOCK Rimuovere la base in plastica utilizzando un cacciavite rimuovere uno o entrambi i pannelli e sostituirli Il pannello può...
- Seite 85 Allegato PORTAFRUTTA Annex FRUIT COMPARTMENT FIG.1 - PORTAFRUTTA CHIUSO FRUIT COMPARTMENT CLOSED FIG.2 - PORTAFRUTTA APERTO OPEN FRUIT COMPARTMENT Allegato RIMOZIONE CASSETTO SLIM 150 E SLIM 250 Annex DRAWER REMOVAL SLIM 150 AND SLIM 250 Premere verticalmente in maniera simultanea i meccanismi laterali e tirare il cassetto verso l’esterno per estrarlo dalle guide N.B.
- Seite 86 - è conforme alla Direttiva Bassa Tensione (LVD) 2014/35 CE - è conforme alla Direttiva Compatibilità Elettromagnetica (EMC) 2014/30 CE UE DECLARATION OF CONFORMITY Vitrifrigo srl, with Registered Office in via Mazzini 75, 61022 locality Montecchio, VALLEFOGLIA, Italy declares under its own responsibility that the product:...
- Seite 87 IDENTIFICAZIONE PRODOTTO / PRODUCT IDENTIFICATION SERIE SLIM / SLIM SERIES ALLEGATI ANNEXES...
- Seite 88 VITRIFRIGO S.r.l. Via Mazzini, 75 Fraz. Montecchio 61022 Vallefoglia (PU) tel. +39 0721.154.500 fax +39 0721.497.739 www.vitrifrigo.com REV 02 - 2023 Made in Italy...