Little Tikes Flowin' Fun Water Table 639944M8X1 Zusammenbauanleitung

Verwandte Anleitungen für Little Tikes Flowin' Fun Water Table 639944M8X1


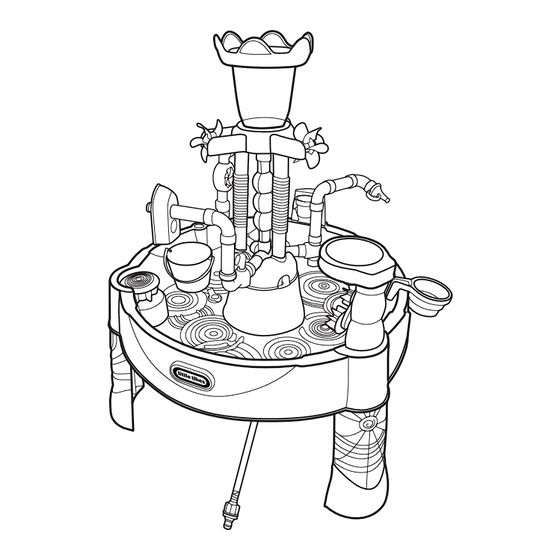
Inhaltszusammenfassung für Little Tikes Flowin' Fun Water Table 639944M8X1
- Seite 1 XIM639944 - 2/24 years Flowin’ Fun Water Table ™ ASSEMBLY INSTRUCTIONS #639944M8X1 Adult assembly required. Approx. assembly time: 30 min.
- Seite 2 The Little Tikes Company makes fun, high quality toys. We warrant to the original purchaser that this product is free of defects in materials or workmanship for one year * from the date of purchase (dated sales receipt is required...
- Seite 3 A Few Things Before You Start! BEFORE you begin assembly, make sure you have all the parts listed below. • Some packages of hardware may have extras pieces. • Questions? We’re here to help. Little Tikes customer service team at 1-800-321-0183. Tools Required (not included)
-
Seite 4: Let's Get Started
Let’s get started! Recommended (not included) The plug edge must be Close the drain plug. completely pulled through by hand or with pliers. First insert the drain plug (part O) into opening on table top (part A) Next, flip table over. Work the plug around the Push drain plug through the opening. - Seite 5 The funnel is a snap! First, place center funnel (part E) upside down on a table. Then place center holder (part G) upside down on the center funnel. Ensure opening for tube is positioned through center holder. Press down until you hear a snap! Add the bubble tube and hose! First, insert the center bubble tube (K) into the assembled funnel.
- Seite 6 Add the bubble tube and hose! (cont.) Insert center connector assembly (part H) onto the bottom of the bubble tube. Then, insert the end of the hose (part C) onto the opening in the funnel. PUSH tube down. Snap in the columns! Insert the (3) center columns (part D) into the center holder.
- Seite 7 Center it First thread ribbed end of clear tubing up and through the opening directly behind the “U” shaped cut out on the center cap (F) as shown. Press center cap onto connector assembly while inserting the (3) center columns. Then snap the (3) center columns into the center cap.
- Seite 8 Spinners! Water wheel! Attach (3) spinners (part I) to the Place water wheel (part R) onto the center holder. table. Funnel spinner! Dump bucket! Assemble the funnel spinner assembly Assemble the dump bucket (Q1, Q2) (P1,P2,P3) and insert into the table top. and insert into the table top.
- Seite 9 3 Sprinklers are better than 1! Attach sprinkler stick (part J) onto the center connector. 3 sprinkler settings! Time to build! Use (4) clear tubes (part N), (2) elbows (part L), elbow with spout (part M) and boat accessory to create a pipeline.
- Seite 10 Almost done, get the water flowin’! Assemble the hose connectors, shown below. REMOVE WASHER Hose connector Hose washer connector Hose stem connector washer Hose Hose connector connector Water table holds approx. 7 gallons (26.50 litres) of water. Insert assmbled hose connector stem into clear tubing.
- Seite 11 INSTRUCTIONS DE MONTAGE Montage par un adulte requis. Durée de montage approximative : 30 min. Merci d’avoir choisi l’ensemble Flowin’ Fun Water Table™ de Little Tikes © . Nous sommes déterminés à fournir un jouet durable et facile à monter, procurant à...
- Seite 12 Étape 8 : Faites bouger les roues à aubes! The Little Tikes Company fabrique des jouets amusants de qualité exceptionnelle. Nous garantissons à l’acheteur d’ o rigine que ce produit est exempt de vices de matériau ou de fabrication pendant une année* à compter de sa date d’achat (le reçu d’achat daté est exigé comme preuve d’achat). Au titre de la présente •...
-
Seite 13: Pasos De Montaje
Piezas • Las ilustraciones son solo a modo de referencia. Los estilos pueden ser distintos del contenido real. S. Eje del conector de manguera Accessories • Si tiene preguntas, estamos aquí para ayudarlo. Llame a Bote (1) nuestro equipo de servicio al cliente al 1-800-321-0183. T. - Seite 14 • Drehen Sie den Tisch um. Ziehen Sie den Stopfen durch die Öffnung, aber nur an seinem © The Little Tikes Company, una compañía de MGA Entertainment. LITTLE TIKES® es una marca registrada de Little Tikes en EE.UU. y otros países. Todos los logotipos, nombres, personajes, representaciones, imágenes, eslóganes y apariencia del Rand.
-
Seite 15: Instrukcja Montażu
- Zamknij korek spustowy. © The Little Tikes® Company, ein Unternehmen von MGA Entertainment. LITTLE TIKES® ist ein Marke von Little Tikes in den USA und anderen Ländern. Alle Logos, Namen, Figuren, Abbilder, Bilder, Slogans und Verpackungsdesigns sind das Eigentum von Little Tikes. Diese Verpackung bitte für mögliche Rückfragen aufbewahren. Sie enthält Krok 2: Zamocuj nogi wichtige Informationen. -
Seite 16: Montage-Instructies
• Vragen? Wij staan voor u klaar om te helpen. Neem contact op met de klantenservice © The Little Tikes Company, onderdeel van MGA Entertainment. LITTLE TIKES® is een handelsmerk van Little Tikes in de V.S. en andere landen. Alle logo’ s , namen, symbolen, gelijkenissen, afbeeldingen, slogans en verpakkingsvormen zijn het eigendom van Little Tikes. -
Seite 17: Istruzioni Di Montaggio
Stampato negli Stati Uniti. © The Little Tikes Company, una società di MGA Entertainment. LITTLE TIKES® è un marchio di fabbrica di Little Tikes negli USA e altri Paesi. Tutti i logo, • PRIMA di iniziare l’assemblaggio, assicurarsi di disporre di tutte le parti elencate di i nomi, i caratteri, le rassomiglianze, le immagini, gli slogan e i tipi di confezionamento sono proprietà... - Seite 18 Empresso nos E.U.A. cliente da Little Tikes. © The Little Tikes Company, uma companhia da MGA Entertainment. LITTLE TIKES® é uma marca comercial da Little Tikes nos EUA e em outros países. • Ferramentas necessárias: alicate Todos os logotipos, nomes, identidades visuais, imagens, slogans e aparência das embalagens são de propriedade da Little Tikes. Guarde esta morada e a embalagem para consulta, pois esta contém informações importantes.