Herunterladen Diese Seite drucken

Werbung

Verfügbare Sprachen
  • DE

Verfügbare Sprachen

  • DEUTSCH, seite 1
Thermo-/Hygrometer
Thermo-hygrometer | Termohigrómetro |
Thermo-hygromètre | Fermoigrometro |
Termohigrometrem
Bedienungsanleitung
WS 2322 | WS 2323
Operating instructions | Instrucciones de operación
Mode d'emploi | Istruzioni per l'uso | Instrukcja obsługi

Werbung

loading

Inhaltszusammenfassung für ADE WS 2322

  • Seite 1 Thermo-/Hygrometer Thermo-hygrometer | Termohigrómetro | Thermo-hygromètre | Fermoigrometro | Termohigrometrem Bedienungsanleitung WS 2322 | WS 2323 Operating instructions | Instrucciones de operación Mode d‘emploi | Istruzioni per l‘uso | Instrukcja obsługi...
  • Seite 2 Funktionen mit einem außergewöhnlichen Design vereint. Mit dieser Funkuhr haben Sie die Uhrzeit stets präzise im Blick. Die langjährige Erfahrung der Marke ADE stellt eine technisch hohen Standard und bewährte Qualität sicher. Wir wünschen Ihnen viel Freude und ein perfektes Raumklima!
  • Seite 3 Ziehen Sie die Schutzfolie vom Display. Allgemeines Über diese Anleitung Diese Bedienungsanleitung beschreibt den sicheren Umgang und die Pflege des Artikels. Bewahren Sie diese Bedienungsanleitung auf, falls Sie später et- was nachlesen möchten. Wenn Sie den Artikel an jemand anderen weitergeben, geben Sie auch diese Anleitung mit.
  • Seite 4 Zeichenerklärung Dieses Symbol in Verbindung mit dem Wort GEFAHR warnt vor schweren Verletzungen. Dieses Symbol in Verbindung mit dem Wort WAR- NUNG warnt vor Verletzungen mittleren und leich- ten Grades. Dieses Symbol in Verbindung mit dem Wort HIN- WEIS warnt vor Sachschäden. Dieses Symbol kennzeichnet zusätzliche Informati- onen und allgemeine Hinweise.
  • Seite 5 Inhaltsverzeichnis Allgemeines .....................3 Lieferumfang ...................6 Sicherheit ....................7 Bestimmungsgemäßer Gebrauch ..........10 Auf einen Blick ..................11 Inbetriebnahme ..................13 Gebrauch ....................16 Weckfunktion ..................17 Reinigen ....................20 Störung / Abhilfe ................. 20 Technische Daten .................21 Konformitätserklärung ..............22...
  • Seite 6 Garantie ....................23 Entsorgen ....................23 Lieferumfang ‚ Hygrometer ‚ 1 Batterie Typ LR03 (AAA), 1,5 V ‚ Bedienungsanleitung...
  • Seite 7 Sicherheit ‚ Dieser Artikel kann von Kindern ab 8 Jahren und darüber sowie von Personen mit verringerten physischen, sensori- schen oder mentalen Fähigkeiten oder Mangel an Erfahrung und Wissen benutzt werden, wenn sie beaufsichtigt oder bezüglich des sicheren Gebrauchs des Artikels unterwiesen wurden und die daraus resultierenden Gefahren verstehen.
  • Seite 8 GEFAHR für Kinder ‚ Kinder von Verpackungsmaterial fernhalten. Bei Verschlucken besteht Erstickungsgefahr. GEFAHR von Brand/Verbrennung und/oder Explosion ‚ Explosionsgefahr bei unsachgemäßem Auswechseln der Batterien. Batterien nur durch denselben oder einen gleich- wertigen Batterietyp ersetzen. „Technische Daten“ beachten ‚ Batterien dürfen nicht geladen, mit anderen Mitteln reakti- viert, auseinander genommen, ins Feuer geworfen oder kurz- geschlossen werden.
  • Seite 9 VORSICHT vor Sachschäden ‚ Artikel vor starken Stößen und Erschütterungen schützen. ‚ Batterie aus der Uhr herausnehmen, wenn diese verbraucht ist oder wenn Sie den Artikel länger nicht benutzen. So ver- meiden Sie Schäden, die durch Auslaufen entstehen können. ‚ Beim Einsetzen und Wechseln der Batterie auf die richtige Polarität (+/-) achten.
  • Seite 10 Bestimmungsgemäßer Gebrauch Dieses Gerät dient zur Überwachung der Temperatur und Luft- feuchtigkeit. Außerdem zeigt das Gerät die Uhrzeit und verfügt über eine Weckfunktion. Für die gewerbliche Nutzung ist das Gerät nicht geeignet. Funktionen und Bedienung sind bei beiden Geräte- formen identisch.
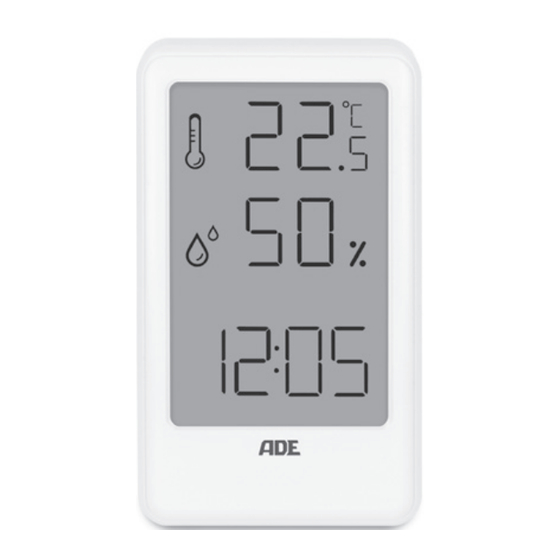
  • Seite 11 Auf einen Blick Uhrzeit (Stunden, Minuten) Luftfeuchtigkeit in Prozent Innenraumtemperatur in °C oder °F...
  • Seite 12 Aufhänge-Öse Bedientasten MODE, UP, MAX/MIN, °C/°F Batteriefach, 1x LR03 (AAA) Ausklappbarer Standfuß...
  • Seite 13 Inbetriebnahme Batterie einlegen Für den Gebrauch benötigen Sie eine Batterie des Typs LR03 (AAA), 1,5 V. 1. Mit etwas Kraft auf den Batteriefachdeckel drücken und Deckel in Richtung OPEN schieben. Deckel abnehmen. 2. Batterie so einlegen, wie auf dem Boden des Batteriefachs abgebildet.
  • Seite 14 ‚ Alte Batterie umweltgerecht entsorgen, siehe „Entsorgen“. Uhrzeit einstellen Sobald das Gerät mit Strom versorgt wird, wird im Display Fol- gendes angezeigt: ‚ Raumtemperatur in °C ‚ Luftfeuchtigkeit in Prozent ‚ Uhrzeit (startet bei 12:00 Uhr) Um die korrekte Uhrzeit einzustellen: 1.
  • Seite 15 5. Nachfolgende Einstellungen durchführen: − Stundenzeit. − 12-Stundenanzeige (12 hr) oder 24-Stundenanzeige (24 hr) wählen. − Jahr − Monat − Tag In Europa ist die 24-Stundenanzeige gebräuchlich. Bei der 12-Stundenanzeige werden Vormittagsstunden mit AM und Nachmittagsstunden mit PM im Display gekennzeichnet.
  • Seite 16 Gebrauch Display-Anzeigen Im Display werden im Standardmodus in großen Ziffern Uhrzeit, Luftfeuchtigkeit in % sowie die gemessene Raumtemperatur in °C oder °F angezeigt. − Taste UP drücken, um für einige Sekunden das Datum an- gezeigt zu bekommen. − Taste °C/°F drücken, um zwischen den Maßeinheit der Tem- peratur °C oder °F zu wechseln.
  • Seite 17 ‚ 3x Taste MAX/MIN drücken: Aktuell gemessene Werte werden wieder angezeigt. Um MAX/MIN-Werte manuell zu löschen: − Taste MAX/MIN ca. 2 Sekunden gedrückt halten. Weckfunktion Weckzeit einstellen Ausgehend von der normalen Zeitanzeige: 1. Taste MODE kurz drücken (Display-Anzeige „0:00“, wenn noch keine Weckzeit eingestellt wurde).
  • Seite 18 Durch kurzes Drücken von MODE, können Sie zwischen Standardmodus und Weckmodus hin und her wech- seln. Sie erkennen den Weckmodus daran, das der Dop- pelpunkt im Display nicht blinkt, sondern dauerhaft angezeigt wird. Wecksymbole Geweckt werden Zur eingestellten Zeit werden Sie von einem Wecksignal geweckt. Weckalarm für 24 Stunden unterbrechen −...
  • Seite 19 Weckfunktion/Stundenalarm aus- und einschalten Wenn der Stundenalarm aktiviert ist, ertönt zu jeder vollen Zeit ein Signalton. Ausgehend von der normalen Zeitanzeige (Dop- pelpunkt im Display blinkt): 1. Taste MODE drücken. Weckzeit wird angezeigt (Doppelpunkt im Display blinkt nicht). 2. Wiederholt UP drücken, um die gewünschte Funktion zu wählen.
  • Seite 20 Reinigen − Artikel bei Bedarf mit einem weichen, trockenen Tuch entstauben oder mit einem leicht angefeuchteten Tuch ab- wischen. Störung / Abhilfe Temperaturangabe erscheint zu hoch. ‚ Prüfen, ob Artikel direkter Sonnenstrahlung ausgesetzt ist. Anzeige ist unleserlich, Funktion ist unklar oder Werte sind offensichtlich falsch.
  • Seite 21 ‚ Gemessene Temperatur ist 70 °C oder liegt darüber. Im Display wird -50 °C angezeigt. ‚ Gemessene Temperatur ist -50 °C oder liegt darunter. Technische Daten Modell: Thermo-/Hygrometer WS 2322 / WS 2323 Batterie: 1x LR03 (AAA) / 1,5 V Bemessungsstrom: < 10 μA Messbereich: Temperatur: ca.
  • Seite 22 Konformitätserklärung Hiermit erklärt die GRENDS GmbH, dass das Thermo-/Hygrome- ter WS 2322 / WS 2323 den Richtlinien 2014/30/EU und 2011/65/EU entspricht. Die Erklärung verliert ihre Gültigkeit, falls an dem Artikel eine nicht mit uns abgestimmte Änderung vorgenommen wurde.
  • Seite 23 Garantie Die Firma GRENDS GmbH garantiert für 2 Jahre ab Kaufdatum die kostenfreie Behebung von Mängeln aufgrund Material- oder Fab- rikationsfehlern durch Reparatur oder Austausch. Bitte geben Sie den Artikel im Garantiefall mit dem Kaufbeleg (unter Angabe des Reklamationsgrundes) an Ihren Händler zurück. Entsorgen Verpackung entsorgen Entsorgen Sie die Verpackung sortenrein.
  • Seite 24 Dieses Symbol besagt, dass dieses Elektro- bzw. Elektronikgerät am Ende seiner Lebensdauer nicht im Hausmüll entsorgt werden darf, sondern vom Endnutzer einer getrennten Sammlung zugeführt werden muss. Zur Rückgabe stehen in Ihrer Nähe kostenfreie Sammelstellen für Elektroaltgeräte sowie ggf. weitere Annahmestellen für die Wie- derverwendung der Geräte zur Verfügung.
  • Seite 25 Die Batterien sind vor dem Entsorgen aus dem Grundgerät zu entnehmen! Die Batterien müssen getrennt von den anderen Ge- räteteilen entsorgt werden. Dieses Symbol besagt, dass Batterien und Akkus nicht zusammen mit dem Hausmüll entsorgt werden dürfen. Sie sind gesetzlich verpflichtet, alle Batterien bei einer Sammelstelle ihrer Gemeinde/ihres Stadt- teils oder im Handel abzugeben.
  • Seite 26 With this radio-controlled clock, you always have the exact time in view. The wealth of experience of the ADE brand ensures a high technical standard and proven quality. We wish you a lot of joy and a perfect indoor...
  • Seite 27 Pull the protective film off the display. General information About this operating manual This operating manual describes how to operate and maintain your product safely. Keep this operating manual in a safe place for future reference. If you pass this product on to someone else, pass on this operating manual as well.
  • Seite 28 Explanation of symbols This symbol combined with the word DANGER warns of serious injuries. This symbol combined with the word WARNING warns of moderate and mild injuries. This symbol combined with the word NOTE warns of material damage. This symbol indicates additional information and general notes.
  • Seite 29 Table of Contents General information ................27 Scope of delivery ................. 30 Safety ......................31 Intended use ..................34 Product overview ................35 Start-up ....................37 Use ......................40 Alarm ......................41 Cleaning ....................44 Fault/Remedy ..................44 Technical data..................45...
  • Seite 30 Declaration of conformity..............46 Warranty ....................47 Scope of delivery ‚ Hygrometer ‚ 1 LR03 (AAA) battery, 1.5 V ‚ Operating Manual...
  • Seite 31 Safety ‚ This device can be used by children aged 8 years and above and persons with reduced physical, sensory or mental capabilities or lack of experience and knowledge if they have been given supervision or instruction concerning the safe use of the device and understand the hazards involved.
  • Seite 32 DANGER for children ‚ Keep children away from packaging material. There is a risk of choking if swallowed. RISK of fire/burning and/or explosion ‚ The batteries can explode when changed improperly. Replace the batteries only with the same or equivalent battery type.
  • Seite 33 BEWARE of material damage ‚ The product must not be exposed to strong shocks or vibrations. ‚ Remove the battery from the clock when empty or when the product will be left unused for an extended period. You will thus avoid damage that may result from leakage of battery acid.
  • Seite 34 Intended use This device is intended for monitoring temperature and humidity. The device also shows the time and has an alarm function. The device is not suitable for commercial purposes. Functions and operation are the same for both unit types.
  • Seite 35 Product overview Time (hours, minutes) Humidity in percentage Indoor temperature in °C or °F...
  • Seite 36 Hanging loop MODE, UP, MAX/MIN, °C/°F operating buttons Battery compartment, 1x LR03 (AAA) Fold-out stand...
  • Seite 37 Start-up Inserting the batteries The device is powered by one 1.5 V LR03 (AAA) battery. 1. Press the battery compartment cover slightly and slide it towards OPEN. Remove the cover. 2. Insert the batteries as shown on the bottom of the battery compartment.
  • Seite 38 Setting the time When you power up the device, the display shows the following information: ‚ Room temperature in °C ‚ Humidity in percentage ‚ Time (starts at 12:00 p.m.) Proceed as follows to set the correct time: 1. Keep the MODE button pressed until the minute digits flash on the display.
  • Seite 39 5. Adjust the following settings: − Hour digits. − Select a 12-hour (12 hr) or 24-hour (24 hr) display. − Year − Month − Day The 24-hour display is common in Europe. If you select the 12-hour display, morning hours will be displayed with the letters AM and afternoon hours with the letters PM.
  • Seite 40 Display indications In standard mode, the display shows time, humidity in % and room temperature reading in °C or °F in large digits. − Pressing the UP button displays the date for a few seconds. − Pressing the °C/°F button toggles between temperature units °C and °F.
  • Seite 41 Deleting MAX/MIN values manually: − Press and hold the MAX/MIN button for about 2 seconds. Alarm Setting the alarm time Starting from normal time display: 1. Briefly press the MODE button (the display shows “0:00” if the alarm time has not yet been set). 2.
  • Seite 42 Briefly pressing the MODE button toggles between standard mode and alarm mode. In alarm mode, the colon symbol does not flash and is displayed permanently. Alarm symbols Waking up You will be woken by a wake-up signal at the set time. Interrupting the alarm for 24 hours −...
  • Seite 43 Switching the alarm function/hour alarm off and on When the hour alarm is enabled, the alarm clock beeps at every full hour. From the normal time display (the colon flashes on the display): 1. Press the MODE button. The alarm time is displayed (the colon does not flash on the display).
  • Seite 44 Cleaning − If necessary, dust the item with a soft, dry cloth or wipe it with a slightly moistened cloth. Fault/Remedy Temperature indication appears too high. ‚ Check whether the product is exposed to direct sunlight. Display is illegible, function is unclear or values are obviously incorrect.
  • Seite 45 The display shows -50 °C. ‚ The temperature reading is -50 °C or below. Technical data Model: Thermometer/Hygrometer WS 2322/WS 2323 Battery: 1x LR03 (AAA)/1.5 V Rated current: < 10 μA Measuring range: Temperature: approx. -50.0 °C to 70.0 °C (approx.
  • Seite 46 Declaration of conformity GRENDS GmbH hereby declares that Thermometer/ Hygrometer WS 2322/WS 2323 complies with Directives 2014/30/EU and 2011/65/EU. This declaration loses its validity if any modification is made to the item that has not been agreed with us in advance.
  • Seite 47 Warranty GRENDS GmbH warrants for 2 years from the date of purchase that it will remedy any defects due to faulty material or workmanship free of charge by repair or replacement. In the event of a warranty claim, please return the product with the proof of purchase (specifying the reason for claim) to your dealer.
  • Seite 48 ¡Estimada/o clienta/e! Se ha decidido por la compra de un producto de gran calidad de la marca ADE, que aúna unas funciones inteligentes con un diseño extraordinario. Con este reloj radio controlado tendrá siempre a la vista la hora exacta. La larga experiencia de la marca ADE le asegura unos elevados estándares técnicos y...
  • Seite 49 Retire la lámina de protección de la pantalla. Información general Acerca de estas instrucciones Este manual de instrucciones describe el manejo seguro y el cuidado del artículo. Conserve este manual de instrucciones por si necesita volver a consultarlo. Si le entrega el artículo a otra persona, acompáñelo también de estas instrucciones.
  • Seite 50 Explicación de símbolos Este símbolo unido a la palabra PELIGRO advierte de heridas graves. Este símbolo unido a la palabra ADVERTENCIA advierte de heridas de grado medio o leve. Este símbolo unido a la palabra INDICACIÓN advierte de daños materiales. Este símbolo significa información adicional e indicaciones generales.
  • Seite 51 Índice Información general ................49 Volumen de entrega ................52 Seguridad ....................53 Uso adecuado ..................56 De un vistazo ..................57 Puesta en marcha ................59 Utilización ....................62 Despertador ..................63 Limpieza ....................66 Problema/Solución ................66 Datos técnicos ..................67...
  • Seite 52 Declaración de conformidad ............68 Garantía ....................69 Volumen de entrega ‚ Higrómetro ‚ 1 pilas tipo LR03 (AAA), 1,5 V ‚ Manual de instrucciones...
  • Seite 53 Seguridad ‚ Pueden utilizar este aparato niños mayores de 8 años, así como personas con capacidades físicas, sensoriales o mentales reducidas o con falta de experiencia y conocimientos, siempre que sean supervisados o se les enseñe el uso seguro del artículo y comprendan los peligros resultantes.
  • Seite 54 RIESGOS para los niños ‚ Mantenga alejados a los niños del material de embalaje. Este puede suponer un riesgo de asfixia si se ingiere. RIESGO de incendio/combustión y/o explosión ‚ Riesgo de explosión por la sustitución inadecuada de las pilas. Cambie las pilas únicamente por otras iguales o del mismo tipo.
  • Seite 55 PRECAUCIÓN por daños materiales ‚ Proteja el aparato de golpes y sacudidas fuertes. ‚ Saque las pilas del aparato cuando estén gastadas o cuando no vaya a utilizarlo durante un periodo prolongado de tiempo. De este modo evitará los daños que pudieran producirse por una fuga del líquido de las pilas.
  • Seite 56 Uso adecuado Este dispositivo se utiliza para controlar la temperatura y la humedad. El aparto muestra también la hora y dispone de una función de despertador. El aparato no es adecuado para uso comercial. Las funciones y el manejo son idénticos en ambos modelos del aparato.
  • Seite 57 De un vistazo Hora (horas, minutos) Humedad del aire calibrada en tanto por ciento Temperatura interior en °C o en °F...
  • Seite 58 Anilla para colgar Botones de control MODE, UP, MAX/MIN, °C/°F Compartimento para la pila, 1 x LR03 (AAA) Soporte plegable...
  • Seite 59 Puesta en marcha Colocación de la pila Para utilizarlo, es necesaria una pila del tipo LR03 (AAA), de 1,5 V. 1. Presione haciendo un poco de fuerza la tapa del compartimento de las pilas y deslícela en dirección hacia OPEN. Retire la tapa. 2.
  • Seite 60 ‚ Utilice únicamente el tipo de pilas especificado en los «Datos técnicos». ‚ Elimine las pilas conforme a la normativa medioambiental, consulte «Eliminación». Ajustar la hora Una vez que el dispositivo tiene alimentación eléctrica, en la pantalla aparecerá lo siguiente: ‚...
  • Seite 61 − Pulse el botón UP para seleccionar el valor deseado. − Pulse después el botón MODE para guardar los ajustes. 5. Realice los siguientes ajustes: − Hora − Seleccione visualización de 12 horas (12 h) o 24 horas (24 h). −...
  • Seite 62 Utilización Pantalla-Indicadores En el modo estándar, en la pantalla se muestran, en dígitos grandes, la hora, la humedad del aire en % y la temperatura ambiente en ºC o en ºF. − Pulse el botón UP para mostrar la fecha durante unos segundos.
  • Seite 63 ‚ Pulse 3 veces el botón MAX/MIN: Se visualizarán de nuevo los valores actuales. Para borrar manualmente los valores MAX/MIN: − mantenga pulsado el botón MAX/MIN durante 2 segundos. Despertador Ajustar hora de alarma En cuanto al indicador de hora normal: 1.
  • Seite 64 Pulsando brevemente MODE, puede cambiar entre el modo estándar o el modo despertador. Reconocerá el modo despertador porque los dos puntos de la pantalla no parpadean, sino que permanecen fijos. Símbolo de despertador Despertarse A la hora ajustada, será despertado por una señal de alarma. Interrumpir el despertador durante 24 horas −...
  • Seite 65 Activar y desactivar la función despertador/aviso de horas Cuando el aviso de horas está activado, suena una señal acústica a las horas en punto. Desde la visualización normal de la hora (dos puntos parpadeando en la pantalla): 1. Pulse el botón MODE. Se muestra la hora de alarma (dos puntos sin parpadear en la pantalla).
  • Seite 66 Limpieza − En caso necesario, quite el polvo al artículo con un paño suave seco o límpielo con un paño ligeramente húmedo. Problema/Solución La indicación de temperatura aparenta ser excesivamente alta. ‚ Compruebe si el aparato está expuesto a la luz solar directa. La indicación es ilegible, la función no está...
  • Seite 67 En la pantalla se muestra -50 °C. ‚ La temperatura medida es de -50 °C o inferior. Datos técnicos Modelo: Termo-higrómetro WS 2322/WS 2323 Pilas: 1x LR03 (AAA)/1,5 V Intensidad de corriente: < 10 μA Rango de medición: Temperatura: -50,0 °C - 70,0 °C ( -58 °F - 158 °F)
  • Seite 68 Nuestros productos se están desarrollando y mejorando continuamente. Por este motivo, cabe la posibilidad de que en cualquier momento pudiera haber cambios en el diseño o modificaciones técnicas. Declaración de conformidad Por la presente, GRENDS GmbH declara que el termohigrómetro WS 2322/WS 2323 cumple las directivas 2014/30/UE y 2011/65/UE.
  • Seite 69 Garantía La empresa GRENDS GmbH garantiza durante 2 años a partir de la fecha de compra la subsanación gratuita de los defectos debidos a fallos de material o fabricación, mediante reparación o cambio del equipo. En caso de solicitar la aplicación de la garantía, lleve el artículo a su distribuidor con el justificante de compra (explicando el motivo de la reclamación).
  • Seite 70 Chère cliente, cher client ! Nous sommes ravis que vous ayez choisi un appareil de haute qualité de la marque ADE, qui allie des fonctions intelligentes à un design exceptionnel. Grâce à cette horloge radiopilotée, vous êtes toujours ponctuel. Les années d’expérience de la marque ADE garantissent une...
  • Seite 71 Retirez le film de protection de la face du réveil. Généralités À propos de ce mode d’emploi Ce mode d’emploi décrit l’utilisation conforme ainsi que les procédures d’entretien de l’article. Conservez ce manuel pour toute référence ultérieure. Si vous cédez l’article à une tierce personne, transmettez-lui également ce mode d’emploi.
  • Seite 72 Légende Ce symbole, associé au mot DANGER, met en garde contre des blessures graves. Ce symbole, associé au mot AVERTISSEMENT, met en gade contre les blessures moyennes et légères. Ce symbole, associé au mot REMARQUE met en garde contre des dommages matériels. Ce symbole désigne des informations supplémentaires ainsi que des indications d’ordre général.
  • Seite 73 Table des matières Généralités ..................... 71 Contenu de l’emballage ..............74 Sécurité ....................75 Utilisation conforme ................78 Aperçu ....................79 Mise en marche ..................81 Utilisation ....................84 Fonction réveil ..................85 Nettoyage ....................88 Problèmes/solutions ................88 Caractéristiques techniques ............89...
  • Seite 74 Déclaration de conformité .............. 90 Garantie ....................91 Contenu de l’emballage ‚ Hygromètre ‚ 1 pile de type LR03 (AAA), 1,5 V ‚ Mode d’emploi...
  • Seite 75 Sécurité ‚ Cet article peut être utilisé par des enfants dès l’âge de 8 ans ainsi que par des personnes aux capacités physiques, sensorielles ou mentales limitées ou ayant peu d’expérience et de connaissances si ceux-ci sont sous surveillance ou ont été...
  • Seite 76 DANGER pour les enfants ‚ Tenir l’emballage à l’écart des enfants. Risque d’étouffement en cas d'ingestion. DANGER d’incendie/brûlure et/ou d’explosion ‚ Risque d’explosion en cas de remplacement non conforme des piles. Ne remplacer les piles que par le même type ou un type de piles équivalent.
  • Seite 77 ATTENTION Risque de dommages matériels ‚ Évitez d'exposer l’article à des chocs ou secousses violents. ‚ Retirez la pile de l'horloge lorsqu'elle est usée ou lorsque vous ne comptez pas utiliser l'article pendant longtemps. Vous éviterez ainsi les dommages qui pourraient résulter d’une fuite des piles.
  • Seite 78 Utilisation conforme Cet appareil est conçu pour contrôler la température et l'humidité de l'air. De plus, l'appareil indique l'heure et dispose d'une fonction de réveil. Il n’est pas adapté à un usage commercial. Les fonctionnalités et l'utilisation sont identiques dans les deux formes d'appareils.
  • Seite 79 Aperçu Heure (heures, minutes) Humidité de l’air en pourcentage Température intérieure en °C ou °F...
  • Seite 80 4 Œillet de suspension 5 Touches de commande MODE, UP, MAX/MIN, °C/°F 6 Compartiment à piles, 1x LR03 (AAA) 7 Pied repliable...
  • Seite 81 Mise en marche Insertion de la pile Cet appareil fonctionne avec les piles de type LR03 (AAA) de 1,5 V. 1. Appuyez légèrement sur le couvercle du compartiment à piles et faites-le glisser vers OPEN. Retirez le couvercle. 2. Placez la pile de la façon indiquée sur le fond du compartiment à...
  • Seite 82 ‚ Mettre l’ancienne pile au rebut dans le respect de l’environnement, voir « Mise au rebut ». Régler l’heure Dès que l’appareil est alimenté en électricité, l’écran affiche ce qui suit : ‚ Température ambiante en °C ‚ Humidité de l’air en pourcentage ‚...
  • Seite 83 5. Procéder aux réglages suivants : − Heure. − Sélectionner l'affichage sur 12 heures (12 h) ou sur 24 heures (24 h). − Année − Mois − Jour En Europe, c'est le format d'affichage sur 24 heures qui est le plus courant. En cas d'affichage au format 12 heures, les heures du matin sont indiquées par «...
  • Seite 84 Utilisation Affichages à l’écran En mode standard, l'écran affiche l'heure en grands chiffres, l'humidité de l'air en % ainsi que la température ambiante mesurée en °C ou °F. − Appuyer sur la touche UP pour afficher la date pendant quelques secondes. −...
  • Seite 85 ‚ Appuyer 3 fois sur la touche MAX/MIN : Les valeurs actuellement mesurées sont à nouveau affichées. Suppression manuelle des valeurs MAX/MIN : − Maintenir enfoncée la touche MAX/MIN pendant environ 2 secondes. Fonction réveil Régler l’heure de réveil Depuis l’affichage normal de l’heure : 1.
  • Seite 86 7. Appuyez à nouveau sur la touche MODE pour revenir à l'heure normale. Appuyez brièvement sur la touche MODE pour passer du mode standard au mode réveil. Vous pouvez reconnaître le mode de réveil au fait que le double point ne clignote pas à l'écran, mais reste affiché en permanence.
  • Seite 87 Fonction d'arrêt automatique Si vous n'appuyez sur aucune touche, la sonnerie s'éteint automatiquement au bout d’une minute. La sonnerie se déclenchera de nouveau au bout de 24 heures. Activer et désactiver la fonction de réveil/l’alarme horaire Si l'alarme horaire est activée, un signal sonore retentit après chaque heure.
  • Seite 88 La fonction de réveil et l'alarme horaire sont activées. La fonction de réveil et l'alarme horaire sont Aucun désactivées. affichage Nettoyage − Au besoin, dépoussiérer l’appareil à l’aide d’un chiffon doux et sec ou l’essuyer avec un chiffon légèrement humide. Problèmes/solutions La température indiquée est trop élevée.
  • Seite 89 L'écran affiche « -50 °C ». ‚ La température mesurée est de -50 °C ou inférieure. Caractéristiques techniques Modèle : Thermo-/Hygromètre WS 2322/WS 2323 Pile : 1 x LR03 (AAA)/ 1,5 V Intensité nominale : < 10 μA Plage de mesure : Température : env.
  • Seite 90 à tout moment. Déclaration de conformité L’entreprise GRENDS GmbH déclare par la présente que le thermo-/hygromètre WS 2322/WS 2323 est conforme aux directives 2014/30/UE et 2011/65/UE. Cette déclaration perd sa validité si l’article subit des modifications sans notre assentiment.
  • Seite 91 Garantie La société GRENDS GmbH garantit la prise en charge gratuite, par des réparations ou par un échange, de tout dysfonctionnement résultant d’un défaut matériel ou de fabrication pendant 2 ans à compter de la date d’achat. Dans le cas où vous souhaitez faire usage de cette garantie, veuillez remettre l’article ainsi que la preuve d’achat (en indiquant les raisons de votre réclamation) à...
  • Seite 92 Gentile cliente! La ringraziamo per aver scelto un prodotto di alta qualità della ADE che unisce funzioni intelligenti e un design fuori dal comune. Questo orologio radiocontrollato permette di vedere l'orario in modo preciso. La lunga esperienza della ADE garantisce standard tecnici elevati e qualità...
  • Seite 93 Rimuovere la pellicola protettiva dal display. Informazioni generali Informazioni sulle presenti istruzioni Queste istruzioni per l'uso descrivono l'utilizzo sicuro e la cura del prodotto. Conservarle per eventuali consultazioni future. In caso di cessione del prodotto a terzi, consegnare anche le presenti istruzioni per l'uso. La mancata osservanza delle istruzioni per l'uso può...
  • Seite 94 Descrizione dei simboli Questo simbolo accompagnato dalla parola PERICOLO mette in guardia contro il rischio di gravi lesioni. Questo simbolo accompagnato dalla parola AVVERTENZA indica il rischio di lesioni di lieve o media entità. Questo simbolo accompagnato dalla parola ATTENZIONE indica il rischio di danni alle cose. Questo simbolo indica ulteriori informazioni o indicazioni generali.
  • Seite 95 Indice dei contenuti Informazioni generali ................ 93 Ambito della fornitura ............... 96 Sicurezza ....................97 Destinazione d'uso ................100 Descrizione ..................101 Messa in funzione ................103 Uso ......................106 Funzione di sveglia ................107 Pulizia .....................110 Risoluzione dei problemi ..............110 Dati tecnici ....................111...
  • Seite 96 Dichiarazione di conformità ............112 Garanzia ....................113 Ambito della fornitura ‚ Igrometro ‚ 1 batteria di tipo LR03 (AAA) da 1,5 V ‚ Istruzioni per l'uso...
  • Seite 97 Sicurezza ‚ Il dispositivo può essere utilizzato da bambini con un’età superiore a 8 anni e da persone che hanno capacità fisiche, sensoriali o mentali ridotte, oppure con mancanza di esperienza o di conoscenza, solo sotto la supervisione di una persona responsabile o se hanno ricevuto e compreso le istruzioni e i pericoli che potrebbero manifestarsi durante l’uso del dispositivo.
  • Seite 98 PERICOLO per i bambini ‚ Tenere lontano dalla portata dei bambini il materiale di imballaggio. Rischio di soffocamento in caso di ingestione. PERICOLO di incendio, ustioni e/o esplosione ‚ La sostituzione non corretta delle batterie può costituire un pericolo di esplosione. Sostituire le batterie solo con batterie dello stesso tipo o equivalenti.
  • Seite 99 ATTENZIONE a danni materiali ‚ Proteggere l’articolo da urti o da oscillazioni violente. ‚ Rimuovere la batteria dal prodotto se quest’ultima è esaurita o se il prodotto non viene utilizzato da un lungo periodo di tempo. In tal modo si eviteranno danni causati da eventuali perdite di liquido dalle batterie.
  • Seite 100 Destinazione d'uso Il presente apparecchio viene utilizzato per monitorare la temperatura e l’umidità dell’aria. Inoltre, l'apparecchio mostra l'ora e dispone della funzione sveglia. L'apparecchio non è adatto per essere utilizzato a scopi commerciali. Le funzioni e le modalità di utilizzo sono identiche per entrambi i tipi di dispositivo.
  • Seite 101 Descrizione Orario (ore, minuti) Umidità in percentuale Temperatura interna in °C o °F...
  • Seite 102 Occhiello di sospensione Tasti di comando MODE, UP, MAX/MIN, °C/°F Vano batteria, 1 di tipo LR03 (AAA) Base pieghevole...
  • Seite 103 Messa in funzione Installazione della batteria Per l'utilizzo è necessaria una batteria di tipo LR03 (AAA) da 1,5 V. 1. Esercitare una leggera pressione sul vano batteria e far scorrere il coperchio verso OPEN. Rimuovere il coperchio. 2. Inserire le batterie come indicato sul fondo del vano batterie. Prestare attenzione alla corretta polarità...
  • Seite 104 ‚ Provvedere allo smaltimento corretto delle batterie, vedi “Smaltimento”. Impostazione dell'ora Una volta che l’apparecchio è alimentato, sul display viene visualizzato quanto segue: ‚ Temperatura ambiente in °C ‚ Umidità in percentuale ‚ Orario (parte dalle ore 12:00) Per la regolazione corretta dell’orario: 1.
  • Seite 105 5. Eseguire le seguenti impostazioni: − Ore. − Scegliere la visualizzazione dell’orario a 12 (12 hr) o a 24 ore (24 hr). − Anno − Mese − Giorno In Europa la visualizzazione dell’orario più comune è quella a 24 ore. Con la visualizzazione a 12 ore, le ore mattutine vengono indicate con “AM”...
  • Seite 106 Visualizzazione del display In modalità standard, sul display vengono visualizzati l'orario, l'umidità in % e la temperatura ambiente misurata in °C o °F a grandi cifre. − Premere il tasto UP per visualizzare la data per alcuni secondi. − Premere il tasto °C/°F per scegliere l’unità di misura della temperatura in °C o in °F.
  • Seite 107 Per i valori MAX/MIN manualmente: − Tenere premuto il tasto MAX/MIN per circa 2 secondi. Funzione di sveglia Impostazione della sveglia A partire dalla visualizzazione dell'ora normale: 1. Premere brevemente il tasto MODE (indicazione sul display “0:00”, se ancora non è impostata alcuna sveglia). 2.
  • Seite 108 Premendo brevemente MODE, è possibile passare dalla modalità standard alla modalità sveglia. La modalità sveglia è riconoscibile dal fatto che i due punti sul display non lampeggiano, rimanendo visualizzati in modo fisso. Simboli della sveglia Risveglio All'orario impostato, si verrà svegliati dalla sveglia. Interruzione della sveglia per 24 ore −...
  • Seite 109 Disattivazione e attivazione della sveglia/della suoneria oraria Quando la suoneria oraria è attivata, viene emesso un segnale acustico ad ogni ora piena. Partendo dalla visualizzazione normale dell'ora (sul display lampeggiano due punti): 1. Premere il tasto MODE. Viene visualizzato l’orario della sveglia (i due punti sul display non lampeggiano).
  • Seite 110 Pulizia − Se necessario, rimuovere la polvere dall'articolo con un panno morbido e asciutto o pulire con un panno leggermente umido. Risoluzione dei problemi La temperatura sembra troppo alta. ‚ Controllare che l’articolo non sia esposto alla luce diretta del sole.
  • Seite 111 ‚ La temperatura misurata è pari o superiore a 70 °C. Sul display verrà visualizzato -50 °C. ‚ La temperatura misurata è pari o inferiore a -50 °C Dati tecnici Modello: Termoigrometro WS 2322/WS 2323 Batteria: 1 di tipo LR03 (AAA)/ 1,5 V Corrente nominale: <10 μA Portata: Temperatura: circa -50,0 °C ~ 70,0 °C...
  • Seite 112 Pertanto, modifiche tecniche e nel design sono possibili in qualsiasi momento. Dichiarazione di conformità Con la presente, GRENDS dichiara che il termoigrometro WS 2322/ WS 2323 è conforme alle direttive 2014/30/UE e 2011/65/UE. La presente dichiarazione perde ogni sua validità qualora al prodotto vengano apportate modifiche senza la nostra autorizzazione.
  • Seite 113 Garanzia La ditta GRENDS GmbH garantisce la riparazione o la sostituzione gratuita dell'unità per un periodo di 2 anni a partire dalla data di acquisto, nel caso di difetti di materiale o fabbricazione del prodotto. A tale scopo, consegnare al rivenditore il prodotto e la prova di acquisto (citando i motivi del reclamo).
  • Seite 114 Szanowny Kliencie! Zakupiony produkt marki ADE łączy w sobie wysoką jakość i inteligentne funkcje z wyjątkową stylistyką. Dzięki niniejszemu zegarowi radiowemu godzina jest zawsze precyzyjnie w zasięgu wzroku. Wieloletnie doświadczenie marki ADE gwarantuje wysoki standard techniczny oraz sprawdzoną jakość. Życzymy samych przyjemności i idealnego klimatu w pomieszczeniu! Zespół...
  • Seite 115 Zdjąć folię ochronną z wyświetlacza. Informacje ogólne O niniejszej instrukcji Niniejsza instrukcja obsługi zawiera opis bezpiecznej obsługi i pielęgnacji artykułu. Instrukcję obsługi należy przechowywać w celu jej późniejszego wykorzystania. Jeżeli produkt będzie przekazywany innej osobie, należy przekazać również tę instrukcję. Nieprzestrzeganie instrukcji obsługi może spowodować...
  • Seite 116 Objaśnienie znaków Ten symbol w połączeniu ze słowem NIEBEZPIECZEŃSTWO ostrzega przed poważnymi obrażeniami ciała. Ten symbol w połączeniu ze słowem OSTRZEŻENIE ostrzega przed obrażeniami ciała średniego i lekkiego stopnia. Ten symbol w połączeniu ze słowem WSKAZÓWKA ostrzega przed stratami materialnymi. Ten symbol oznacza dodatkowe informacje i ogólne wskazówki.
  • Seite 117 Spis treści Informacje ogólne ................113 Zakres dostawy ...................116 Bezpieczeństwo..................117 Użycie zgodne z przeznaczeniem ..........120 W skrócie ..................... 121 Uruchomienie ..................123 Użytkowanie ..................126 Funkcja budzenia ................127 Czyszczenie ..................130 Usterka / środek zaradczy .............. 130 Danych technicznych ..............131...
  • Seite 118 Deklaracja zgodności ..............132 Gwarancja .................... 133 Zakres dostawy ‚ Higrometr ‚ 1 bateria typu LR03 (AAA), 1,5 V ‚ Instrukcja obsługi...
  • Seite 119 Bezpieczeństwo ‚ Produkt może być używany przez dzieci od 8. roku życia oraz przez osoby z ograniczonymi zdolnościami fizycznymi, sensorycznymi lub umysłowymi bądź takie, którym brakuje doświadczenia i wiedzy, tylko wtedy gdy są one nadzorowane lub przeszły przeszkolenie z zakresu bezpiecznego użytkowania produktu i znają niebezpieczeństwa z tym związane.
  • Seite 120 NIEBEZPIECZEŃSTWO dla dzieci ‚ Dzieci należy trzymać z dala od opakowania. W przypadku połknięcia istnieje niebezpieczeństwo uduszenia się. NIEBEZPIECZEŃSTWO pożaru/obrażeń i/lub wybuchu ‚ Niebezpieczeństwo wybuchu w razie niewłaściwej wymiany baterii. Baterie należy wymieniać na baterie tego samego lub równowartościowego typu. Przestrzegać parametrów z punktu „Dane techniczne”.
  • Seite 121 OSTROŻNIE — straty materialne ‚ Produkt należy chronić przed silnymi uderzeniami i wstrząsami. ‚ Należy wyjmować baterie z urządzenia, jeśli są wyczerpane lub urządzenie nie będzie używane przez dłuższy czas. W ten sposób unika się uszkodzeń, jakie mogą powstać na skutek wycieku.
  • Seite 122 Użycie zgodne z przeznaczeniem To urządzenie służy do monitoringu temperatury i wilgotności powietrza. Dodatkowo wskazuje czas i ma funkcję budzenia. Urządzenie nie jest przeznaczone do zastosowań komercyjnych. Funkcje i obsługa są identyczne w obu formach urządzenia.
  • Seite 123 W skrócie Czas (godziny, minuty) Wilgotność powietrza w procentach Temperatura wewnętrzna w °C lub °F...
  • Seite 124 Ucho zaczepowe Przyciski obsługowe MODE, UP, MAX/MIN, °C/°F Komora na baterię, 1 szt. LR03 (AAA) Rozkładana nóżka...
  • Seite 125 Uruchomienie Wkładanie baterii Do użytkowania urządzenia wymagana jest bateria typu LR03 (AAA), 1,5 V. 1. Nacisnąć nieco mocniej pokrywę komory baterii i przesunąć ją w kierunku OPEN. Zdjąć pokrywę. 2. Baterie ułożyć w taki sposób, jak jest to przedstawione na spodzie komory na baterie.
  • Seite 126 ‚ Należy używać wyłącznie typu baterii podanego w punkcie „Dane techniczne”. ‚ Stare baterie należy utylizować zgodnie z zasadami ochrony środowiska, patrz „Utylizacja”. Ustawianie godziny Po podłączeniu urządzenia do zasilania na wyświetlaczu pojawią się: ‚ Temperatura w pomieszczeniu w °C ‚...
  • Seite 127 − Nacisnąć Przycisk MODE, aby zapisać ustawienie. 5. Dokonać następujących ustawień: − Godzina. − wskazywanie w formacie 12-godzinnym (12 hr) lub 24-godzinnym (24 hr). − Rok − Miesiąc − Dzień W Europie zwykle stosuje się wskazywania w formacie 24-godzinnym. W przypadku formatu 12-godzinnego godziny przedpołudniowe będą...
  • Seite 128 Użytkowanie Wskazania wyświetlacza Na wyświetlaczu w trybie domyślnym wyświetlane są dużymi cyframi czas, wilgotność powietrza w % oraz zmierzona temperatura pomieszczenia w °C lub °F. − Nacisnąć przycisk UP, aby na kilka sekund wyświetlić datę. − Nacisnąć °C/°F, aby przełączyć jednostkę miary temperatury na °C lub °F.
  • Seite 129 Aby ręcznie usunąć wartości MAX/MIN: − Nacisnąć i przytrzymać przez ok. 2 sekundy przycisk MAX/MIN. Funkcja budzenia Ustawianie czasu budzenia Wychodząc od zwykłego wskazania czasu: 1. Jeśli nie został jeszcze ustawiony czas budzenia, nacisnąć krótko przycisk MODE (widok na wyświetlaczu „0:00”). 2.
  • Seite 130 Krótkim naciśnięciem MODE można przełączać w obu kierunkach pomiędzy trybem domyślnym a trybem budzenia. Tryb budzenia można rozpoznać po tym, że dwukropek na wyświetlaczu nie miga, tylko jest stale wyświetlany. Symbole budzenia Budzenie O ustawionym czasie nastąpi pobudka w postaci sygnał alarmu. Wstrzymanie alarmu budzenia na 24 godziny −...
  • Seite 131 Wyłączanie i włączanie funkcji budzenia / alarmu godzinowego Jeśli włączona jest funkcja alarmu godzinowego, o każdej pełnej godzinie rozlega się sygnał dźwiękowy. Zaczynając od zwykłego wskazania czasu (dwukropek na wyświetlaczu miga): 1. Nacisnąć przycisk MODE. Wyświetlony zostanie czas budzenia (dwukropek na wyświetlaczu nie miga).
  • Seite 132 Czyszczenie − W razie potrzeby produkt odkurzyć miękką, suchą szmatką lub przetrzeć lekko wilgotną szmatką. Usterka / środek zaradczy Dane temperatury wydają się za wysokie. ‚ Sprawdzić, czy produktu nie jest narażony na bezpośrednie nasłonecznienie. Nieczytelny wskaźnik, niejasna funkcja lub nieprawdziwe wartości.
  • Seite 133 ‚ Zmierzona temperatura wynosi 70°C lub więcej. Na wyświetlaczu pojawia się „-50°C” . ‚ Zmierzona temperatura wynosi -50°C lub mniej. Danych technicznych Model: Termometr/higrometr WS 2322 / WS 2323 Bateria: 1 szt. LR03 (AAA) / 1,5 V Prąd znamionowy: <10 μA Zakres pomiarowy: Temperatura: ok.
  • Seite 134 Nasze produkty są stale rozwijane i usprawniane. Z tego powodu możliwe są różnice w wyglądzie i zmiany techniczne. Deklaracja zgodności GRENDS GmbH oświadcza niniejszym, że termohigrometr WS 2322 / WS 2323 jest zgodny z dyrektywami 2014/30/UE i 2011/65/UE. Deklaracja traci ważność, jeżeli w przedmiocie dokonano zmian, które nie zostały z nami uzgodnione.
  • Seite 135 Gwarancja Firma GRENDS GmbH gwarantuje przez 2 lata od daty zakupu bezpłatne usuwanie usterek z tytułu usterek materiałowych lub produkcyjnych w drodze naprawy lub wymiany. W przypadku korzystania z gwarancji prosimy o zwrócenie sprzedawcy artykułu wraz z dowodem zakupu (podając również powód reklamacji).

Diese Anleitung auch für:

Ws 2323