Inhaltsverzeichnis

Verwandte Anleitungen für Kesser K-IRHP-4980


Inhaltszusammenfassung für Kesser K-IRHP-4980
- Seite 1 Bedienungsanleitung/instruction manual manuel d'instructions/ manuale d'istruzioni/ manual de instrucciones Infrarot Heizung WIFI www.eshopping.de Hergestellt für Dilaw Warehouse GmbH // Fuggerstraße 15a // 48165 Münster // Germany...
- Seite 2 Liebe Kundin, Lieber Kunde, danke, dass Sie sich für unser Produkt entschieden haben. Bitte lesen Sie die Bedienungsanleitung aufmerksam durch, bevor Sie das Produkt montieren oder benutzen, um Schäden durch nicht sachgemäßen Gebrauch zu vermeiden. Sollten Sie dieses Produkt an Dritte weitergeben, muss diese Bedienungsanleitung mit ausgehändigt werden. Dear Customer, Thank you for choosing our product.
-
Seite 3: Teilebeschreibung
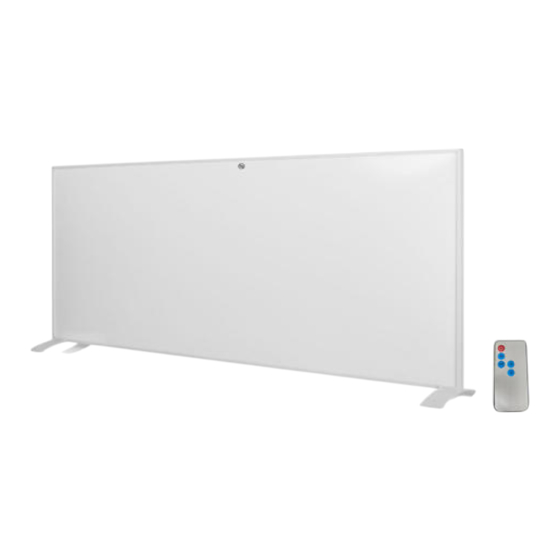
TEILEBESCHREIBUNG 1. Ein / Aus-Schalter 2. Anzeige 3. Ein / Aus-Taste 4. WiFi-Taste 5. +-Taste 6. – Knopf 7. Timer-Taste 8. Heizanzeige 9. Wandhalterung 10. Heizung 11 . Füße 12. Fernbedienung www.eshopping.de Hergestellt für Dilaw Warehouse GmbH // Fuggerstraße 15a // 48165 Münster // Germany... - Seite 4 BITTE LESEN UND SPEICHERN SIE DIESE WICHTIGEN SICHERHEITSHINWEISE Bei der Verwendung von Elektrogeräten sollten immer grundlegende Vorsichtsmaßnahmen befolgt werden, um das Risiko von Feuer, Stromschlag und Verletzungen von Personen zu verringern, einschließlich der folgenden: LESEN SIE ALLE ANWEISUNGEN, BEVOR SIE DIESE HEIZUNG VERWENDEN. ...
- Seite 5 mangelnder Erfahrung und Kenntnis bestimmt, es sei denn, sie wurden von einer für ihre Sicherheit verantwortlichen Person beaufsichtigt oder angewiesen. Kinder sollten beaufsichtigt werden, um sicherzustellen, dass sie nicht mit dem Gerät spielen. Trennen Sie die Heizung immer vom Stromnetz, wenn sie nicht in Gebrauch ist. ...
- Seite 6 3. Setzen Sie die Kunststoffschienenbeschläge in die Löcher ein (3). (4 ) DIE MITGLIEDSTAATEN ERLASSEN DIE Schrauben Sie die 4 Befestigungsschrauben in die Kunststoffschienenbeschläge(4). 5. Befestigen Sie die Flächenheizung an den Schrauben und bewegen Sie die Heizung nach links, so dass die Schrauben in die Sicherungsschlitze fallen (5). -Fußmontage (1) DIE MITGLIEDSTAATEN ERLASSEN Wenn die Heizung nicht an der Wand montiert ist, müssen die mitgelieferten Füße am Gerät angebracht werden.
- Seite 7 Um mit der Verwendung der Heizung zu beginnen, befolgen Sie bitte diese Anweisungen: 1. an die Stromversorgung angeschlossen, Öffnen Sie den mechanischen Schalter des Produktprofils, das WIFI-Licht blinkt, das WIFI-Licht blinkt Geschwindigkeitszustand (PCB- Programm Standardzustand für Blitz, Blitz 3 bis 1 Sekunde, langsamer Blitz 1 bis 3 Sekunden), die Heizung in einem Heizzustand (die Standardtemperatur von 37 °...
- Seite 8 Methode A: Internet APP-Downloads (1) Öffnen Sie den "APP Store" auf dem Mobiltelefon (2) Geben Sie "Smart Graffiti" ein und klicken Sie auf Suchen; (3) Klicken Sie hier, um das Herunterladen und Installieren zu starten und zu beginnen. Methode B:Scannen Sie den QR-Code (1) Öffnen Sie das Telefon und scannen Sie den QR-Code unten (2) Klicken Sie im Browser auf Öffnen ;...
- Seite 9 (3) Öffnen Sie die Software "Smart life" auf dem Mobiltelefon, um die Telefonnummer einzugeben, um den Bestätigungscode zu erhalten. (4) Geben Sie den Verifizierungscode ein und klicken Sie auf Login; (5) Klicken Sie auf Gerät hinzufügen, um das WLAN auszuwählen, geben Sie das WIFI-Passwort ein und klicken Sie auf OK, um das Gerät zu verbinden.
- Seite 10 (1) Öffnen Sie die Software "Smart Graffiti", um das Bediengerät auszuwählen; (2) Klicken Sie auf das zu bedienende Gerät und rufen Sie die Bedienoberfläche des Geräts auf, während der Netzschalter in der unteren linken Ecke der Mobiltelefonschnittstelle AUS anzeigt und das Gerät ausgeschaltet ist. (3) Klicken Sie auf Timing, Timing in die Schnittstelle, klicken Sie auf Add Timing, wählen Sie die Stechuhr, Minuten, Wochenstatus, passen Sie den Schalterstatus zum Öffnen an, klicken Sie auf die Schaltfläche OK, um zurückzukehren, um die Timing-Schnittstelle hinzuzufügen, klicken...
- Seite 11 zurückzukehren, und klicken Sie dann auf "Mehr" "Bitte", um zur linken oberen Ecke der Schnittstelle zurückzukehren. 11 、 Stornierung der Gerätefreigabe (1) Öffnen Sie die Software "Smart Graffiti" und rufen Sie das "Personal Center" auf, um auf Device Sharing zu klicken. (2) Löschen Sie die Telefonnummern der freigegebenen Mitglieder, um die Gerätefreigabe zu kündigen.
- Seite 12 (2) Klicken Sie auf die Schaltfläche "..." in der oberen rechten Ecke der Bedienoberfläche, und klicken Sie dann auf Gerätenamen ändern. (3) Klicken Sie auf Gerätenamen ändern und geben Sie den Speicherort ein, um die Geräte oder einen anderen Namen zu unterscheiden. Klicken Sie auf Speichern, und die Änderung ist erfolgreich.
-
Seite 13: Technische Daten
Technische Daten Modell: K-IRHP-4980 Spannung 220-240V ~ 220-240V ~ 220-240V ~ 220-240V ~ Frequenz 50/60 Hz 50/60 Hz 50/60 Hz 50/60 Hz Macht 350 W 550W 700 W 1000W Größe der Einheit 600 * 600mm 900 * 600mm 1200 * 600mm... -
Seite 14: Eg-Konformitätserklärung
DILAW Warehouse GmbH Fuggerstaße 15a 48169 Münster, Deutschland Tel. (+49) (0) 2505 - 80294 – 91 erklärt hiermit, dass folgendes Produkt Produktbezeichnung: Kesser Infrarotheizung WIFI Modellbezeichnung: K-IRHP-4980 Baujahr: 2022 allen einschlägigen Bestimmungen der angewandten Rechtsvorschriften (nachfolgend) - einschließlich deren zum Zeitpunkt der Erklärung geltenden Änderungen - entspricht. Die alleinige Verantwortung für die Ausstellung dieser Konformitätserklärung trägt der Hersteller. - Seite 15 Technische Unterlagen bei: DILAW Warehouse GmbH Fuggerstaße 15a 48169 Münster, Deutschland Tel. (+49) (0) 2505 - 80294 – 91 Ort: Münster Datum: 29.06.2022 Kesserwani Walid Geschätfsführer www.eshopping.de Hergestellt für Dilaw Warehouse GmbH // Fuggerstraße 15a // 48165 Münster // Germany...
-
Seite 16: Part Description
PART DESCRIPTION 1. On/Off Switch 2. Display 3. Power button 4. WiFi button 5. + button 6. – Button 7. Timer button 8. Heating indicator 9. Wall mount 10. Heating 11 . Feet 12. Remote control www.eshopping.de Hergestellt für Dilaw Warehouse GmbH // Fuggerstraße 15a // 48165 Münster // Germany... - Seite 17 PLEASE READ AND SAVE THESE IMPORTANT SAFETY INSTRUCTIONS When using electrical appliances, basic precautions should always be followed to reduce the risk of fire, electric shock and injury to persons, including the following: READ ALL THE INSTRUCTIONS BEFORE USING THIS HEATER. ...
- Seite 18 Do not run a string under the material. Do not cover the cord with throwing carpets, runners or similar covers. Do not operate a heater after it has malfunctioned. Do not operate the heater with a sounding (or glowing) alarm. Disconnect the power supply on the service panel and have the heater inspected by a reputable electrician before reusing.
- Seite 19 -Foot mounting 1. THE MEMBER STATES SHALL ADOPT If the heater is not mounted on the wall, the feet supplied must be attached to the appliance. 2. To fasten the feet, remove the lower screws from the heating housing. 3.Place the feet and secure them by putting the screws back into the case. 4.Make sure that the feet are correctly located at the bottom of the heater.
- Seite 20 open the mechanical switch on the side of the heater, B. as long as the ambient temperature is below 37 ° C , heaters in heating state). Power Button: Touch the "Power Button", the LCD lights up and the "WiFi Icon" lights up and is in the standard flash state (3 times/second).
- Seite 21 Intelligent Graffiti Control Software Download Method Method A: Internet APP Downloads (1) Open the "APP Store" on your mobile phone (2) Enter "Smart Graffiti" and click Search; (3) Click here to start and begin downloading and installing. Method B:Scan the QR Code (1) Open the phone and scan the QR code below (2) Click Open in the browser ;...
- Seite 22 (1) Turn on the mechanical switch on the side of the product and touch the power button on the LCD. The LCD lights up and the WIFI indicator flashes. The standard temperature of the LCD is 37 degrees. (2) Long press the WIFI icon button for 3 seconds, the indicator light will light up and switch to flash state.
- Seite 23 (1) Open the "Smart Graffiti" software to select the operator panel; (2) Click on the device to be operated and enter the user interface of the device while the power button in the lower left corner of the mobile phone interface shows OFF and the device is turned off.
- Seite 24 Replace 12、 WIFI address: (1) Remove the device on the mobile phone: (1) Open the "Smart Graffiti" software to access my device; (2) Click on the device that needs to replace the WIFI address to enter the user interface of the device.
- Seite 25 For short-term storage, simply unplug the heater and leave it out; For long-term storage, they can be dismantled from the wall or covered with some material. Specifications Model: K-IRHP-4980 Voltage 220-240V ~ 220-240V ~...
-
Seite 26: Ec Declaration Of Conformity
Fuggerstaße 15a 48169 Münster, Germany Phone (+49) (0) 2505 - 80294 – 91 hereby declares that the following product Product Name: Kesser Infrared Heater WIFI Model name: K-IRHP-4980 Year Built: 2022 complies with all relevant provisions of the applicable legislation (hereinafter), including any amendments in force at the time of the declaration. - Seite 27 The following legislation has been applied: 2014/30/EU Electromagnetic compatibility EMC. EN 55014-1:2017+A11:2020 EN IEC 61000-3-2:2019 EN 61000-3-3:2013+A1:2019 EN 55014-2:2015 2006/35/EU Low Voltage Directive LVD EN 60335-1:2012+A11:2014+A1:2019+A14:2019+A2:2019+A15:2021 EN 60335-2-30:2009+A11:2012+A1:2020+A12:2020 EN 62233:2008 Technical documentation at: DILAW Warehouse GmbH Fuggerstaße 15a 48169 Münster, Germany Phone (+49) (0) 2505 - 80294 –...
- Seite 28 DESCRIPTION DE LA PIÈCE 1. Interrupteur marche / arrêt 2. Affichage 3. Bouton d’alimentation 4. Bouton WiFi 5. + bouton 6. – Bouton 7. Bouton de minuterie 8. Indicateur de chauffage 9. Support mural 10. Chauffage 11 . Pieds 12. Télécommande www.eshopping.de Hergestellt für Dilaw Warehouse GmbH // Fuggerstraße 15a // 48165 Münster // Germany...
- Seite 29 VEUILLEZ LIRE ET SAUVEGARDER CES INSTRUCTIONS DE SÉCURITÉ IMPORTANTES Lors de l’utilisation d’appareils électriques, les précautions de base doivent toujours être suivies pour réduire le risque d’incendie, de choc électrique et de blessure des personnes, notamment les suivantes: LISEZ TOUTES LES INSTRUCTIONS AVANT D’UTILISER CET APPAREIL DE CHAUFFAGE. ...
- Seite 30 instruites par une personne responsable de leur sécurité. Les enfants doivent être surveillés pour s’assurer qu’ils ne jouent pas avec l’appareil. Débranchez toujours l’appareil de chauffage lorsqu’il n’est pas utilisé. Ne faites pas fonctionner l’appareil de chauffage avec un câble ou une fiche ...
- Seite 31 4. LES ÉTATS MEMBRES ADOPTENT LES VIS VISSEZ les 4 vis de fixation dans les ferrures de rail en plastique(4). 5. Fixez le réchauffeur de surface aux vis et déplacez le réchauffeur vers la gauche afin que les vis tombent dans les fentes de sécurité (5). -Montage au pied 1.
- Seite 32 Pour commencer à utiliser l’appareil de chauffage, veuillez suivre ces instructions : Connecté à l’alimentation, ouvrez le commutateur mécanique du profil du produit, la lumière WIFI clignote, la lumière WIFI clignote l’état de vitesse (état standard du programme PCB pour flash, flash 3 à 1 seconde, flash lent 1 à 3 secondes), le chauffage dans un état de chauffage (la température standard de 37 °...
- Seite 33 Méthode A: Téléchargements d’applications Internet (1) Ouvrez l’APP Store sur votre téléphone mobile (2) Entrez « Smart Graffiti » et cliquez sur Rechercher; (3) Cliquez ici pour démarrer et commencer le téléchargement et l’installation. Méthode B: Scannez le code QR (1) Ouvrez le téléphone et scannez le code QR ci-dessous (2) Cliquez sur Ouvrir dans le navigateur ;...
- Seite 34 (3) Ouvrez le logiciel « Smart life » sur le téléphone mobile pour entrer le numéro de téléphone afin d’obtenir le code de vérification. (4) Entrez le code de vérification et cliquez sur Connexion; (5) Cliquez sur Ajouter un appareil pour sélectionner le Wi-Fi, entrez le mot de passe WIFI et cliquez sur OK pour connecter l’appareil.
- Seite 35 (2) Cliquez sur l’appareil à utiliser et entrez dans l’interface utilisateur de l’appareil pendant que le bouton d’alimentation dans le coin inférieur gauche de l’interface du téléphone mobile s’affiche ÉTEINT et que l’appareil est éteint. (3) Cliquez sur timing, timing dans l’interface, cliquez sur Add Timing, sélectionnez l’horloge, les minutes, l’état de la semaine, ajustez l’état du commutateur pour l’ouvrir, cliquez sur le bouton OK pour revenir pour ajouter l’interface de synchronisation, cliquez sur la température, la température réglée dans l’interface, réglez la température de démarrage (la...
- Seite 36 (1) Ouvrez le logiciel « Smart Graffiti » et allez dans le « Personal Center » pour cliquer sur Partage d’appareil. (2) Supprimez les numéros de téléphone des membres partagés pour annuler le partage de l’appareil. Remplacez l’adresse 12、 WIFI: (1) Retirez l’appareil sur le téléphone mobile: (1) Ouvrez le logiciel «...
- Seite 37 Pour le stockage à court terme, il suffit de débrancher l’appareil de chauffage et de le laisser dehors; Pour un stockage à long terme, ils peuvent être démontés du mur ou recouverts d’un matériau. Spécifications Modèle: K-IRHP-4980 Tension 220-240V ~ 220-240V ~...
- Seite 38 WARRANY & SERVICE LIMITÉ Garantie du fabricant d’un an. Veuillez contacter votre fournisseur pour obtenir les détails de la garantie ainsi que votre preuve d’achat. Élimination correcte de ce produit Cet étiquetage indique que ce produit ne doit pas être éliminé avec d’autres déchets ménagers dans toute l’UE.
- Seite 39 DESCRIZIONE DELLA PARTE 1. Interruttore On / Off 2. Visualizzazione 3. Pulsante di accensione 4. Pulsante WiFi 5. + pulsante 6. – Pulsante 7. Pulsante timer 8. Indicatore di riscaldamento 9. Montaggio a parete 10. Riscaldamento 11 . Piedi 12. Telecomando www.eshopping.de Hergestellt für Dilaw Warehouse GmbH // Fuggerstraße 15a // 48165 Münster // Germany...
- Seite 40 SI PREGA DI LEGGERE E SALVARE QUESTE IMPORTANTI ISTRUZIONI DI SICUREZZA Quando si utilizzano apparecchi elettrici, devono sempre essere seguite le precauzioni di base per ridurre il rischio di incendio, scosse elettriche e lesioni alle persone, tra cui: LEGGERE TUTTE LE ISTRUZIONI PRIMA DI UTILIZZARE QUESTO RISCALDATORE. ...
- Seite 41 riscaldatore non funziona, è caduto o è stato danneggiato in alcun modo. Restituirlo a un centro di assistenza autorizzato per l'esame, la regolazione elettrica o meccanica o la riparazione. Solo al coperto. Non utilizzare all'aperto. Questo riscaldatore non è destinato all'uso in bagni, lavanderie e interni simili. Non ...
- Seite 42 -Montaggio a pedale 1. GLI STATI MEMBRI ADOTTANO Se il riscaldatore non è montato sulla parete, i piedini forniti devono essere fissati all'apparecchio. 2. Per fissare i piedini, rimuovere le viti inferiori dall'alloggiamento del riscaldamento. 3.Posizionare i piedini e fissarli rimettendo le viti nella custodia. 4.Assicurarsi che i piedini siano posizionati correttamente nella parte inferiore del riscaldatore.
- Seite 43 purché la temperatura ambiente sia inferiore a 37 ° C , riscaldatori in stato di riscaldamento). Pulsante di accensione: toccare il "Pulsante di accensione", l'LCD si illumina e l'"Icona WiFi" si illumina ed è nello stato flash standard (3 volte al secondo). La temperatura media del display LCD lampeggia e indica la temperatura standard "37 °C".
- Seite 44 (1) Apri il telefono e scansiona il codice QR qui sotto (2) Fare clic su Apri nel browser; (3) Clicca qui per scaricarlo e installarlo; 8 connessione WIFI A: Ricerca automatica: (1) Attivare la funzione Bluetooth; (2) Aprire l'"APP" scaricata; (3) Fare clic su Rilevamento automatico;...
- Seite 45 C: Se una connessione non è riuscita sullo schermo del telefono, è necessario passare allo stato di lampeggiamento lento. (1) In modalità flash, premere il pulsante di ripristino WIFI sul lato dell'interruttore (1) Tenere premuto il pulsante dell'icona Wi-Fi per 5 secondi per passare allo stato di lampeggiamento lento.
- Seite 46 la temperatura di impostazione massima di 37 ° C), fare clic su OK per tornare per aggiungere l'interfaccia per l'operazione di temporizzazione, fare clic su "Salva" per salvare l'interfaccia delle impostazioni nell'angolo destro per tornare all'interfaccia di temporizzazione, "per favore" per tornare all'angolo in alto a sinistra, fare clic su Interfaccia di temporizzazione per i dispositivi operativi, Cronometraggio barca impostato per completare la prenotazione.
- Seite 47 (1) Aprire il software "Smart Graffiti" per accedere al mio dispositivo; (2) Fare clic sul dispositivo che deve sostituire l'indirizzo WIFI per accedere all'interfaccia utente del dispositivo. (3) Fare clic sul pulsante "..." in alto a destra dell'interfaccia utente; (4) Fare clic su Rimuovi dispositivo, quindi fare clic su OK per rimuovere il dispositivo. (5) Rimuovere il dispositivo manualmente: premere il tasto SET per 5 secondi per rimuovere direttamente il dispositivo.
- Seite 48 Per la conservazione a breve termine, è sufficiente scollegare il riscaldatore e lasciarlo fuori; Per la conservazione a lungo termine, possono essere smontati dal muro o coperti con del materiale. Indicazioni Modello: K-IRHP-4980 Voltaggio 220-240V ~ 220-240V ~ 220-240V ~...
- Seite 49 WARRANY & SERVIZIO LIMITATI Un anno di garanzia del produttore. Si prega di contattare il fornitore per i dettagli della garanzia insieme alla prova di acquisto. Corretto smaltimento di questo prodotto Questa etichettatura indica che questo prodotto non deve essere smaltito con altri rifiuti domestici in tutta l'UE.
- Seite 50 DESCRIPCIÓN DE LA PIEZA 1. Interruptor de encendido / apagado 2. Pantalla 3. Botón de encendido 4. Botón WiFi 5. + botón 6.- Botón 7. Botón del temporizador 8. Indicador de calefacción 9. Montaje en pared 10. Calefacción 11 . Pies 12.
- Seite 51 LEA Y GUARDE ESTAS IMPORTANTES INSTRUCCIONES DE SEGURIDAD Al usar aparatos eléctricos, siempre se deben seguir las precauciones básicas para reducir el riesgo de incendio, descarga eléctrica y lesiones a las personas, incluidas las siguientes: LEA TODAS LAS INSTRUCCIONES ANTES DE USAR ESTE CALENTADOR. ...
- Seite 52 mecánico, o reparación. Solo en interiores. No usar al aire libre. Este calentador no está diseñado para su uso en baños, lavaderos e interiores similares. Nunca coloque el calentador donde podría caer en una bañera u otro recipiente de agua.
- Seite 53 -Montaje del pie 1. LOS ESTADOS MIEMBROS ADOPTARÁN Si el calentador no está montado en la pared, los pies suministrados deberán estar unidos al aparato. 2. Para sujetar los pies, retire los tornillos inferiores de la carcasa de calefacción. 3.Coloque los pies y asegúrelos colocando los tornillos de nuevo en la caja. 4.Asegúrese de que los pies estén correctamente ubicados en la parte inferior del calentador.
- Seite 54 estándar del proceso PCB de 37 ° C, así que abra el interruptor mecánico en el costado del calentador, B. siempre que la temperatura ambiente sea inferior a 37 ° C , calentadores en estado de calefacción). Botón de encendido: Toque el "Botón de encendido", la pantalla LCD se ilumina y el ...
- Seite 55 (2) Ingrese "Smart Graffiti" y haga clic en Buscar; (3) Haga clic aquí para comenzar y comenzar a descargar e instalar. Método B: Escanear el código QR (1) Abra el teléfono y escanee el código QR a continuación (2) Haga clic en Abrir en el navegador; (3) Haga clic aquí...
- Seite 56 (5) Haga clic en Agregar dispositivo para seleccionar el Wi-Fi, ingrese la contraseña WIFI y haga clic en Aceptar para conectar el dispositivo. (6) Si la interfaz del teléfono indica que el complemento se ha realizado correctamente y el indicador WIFI del dispositivo deja de parpadear y se ilumina durante mucho tiempo, significa que el complemento está...
- Seite 57 (3) Haga clic en el tiempo, el temporizador en la interfaz, haga clic en Agregar tiempo, seleccione el reloj de tiempo, los minutos, el estado de la semana, ajuste el estado del interruptor para abrir, haga clic en el botón Aceptar para volver a agregar la interfaz de tiempo, haga clic en la temperatura, la temperatura establecida en la interfaz, establezca la temperatura de arranque (se espera que la temperatura alcance la temperatura de la habitación, Generalmente seleccione la temperatura de ajuste más alta de 37 °...
- Seite 58 (1) Abra el software "Smart Graffiti" y vaya al "Centro personal" para hacer clic en Compartir dispositivos. (2) Elimine los números de teléfono de los miembros compartidos para cancelar el uso compartido del dispositivo. Reemplace la dirección WIFI de 12、: (1) Retire el dispositivo en el teléfono móvil: (1) Abra el software "Smart Graffiti"...
- Seite 59 Para el almacenamiento a corto plazo, simplemente desenchufe el calentador y déjelo fuera; Para el almacenamiento a largo plazo, se pueden desmontar de la pared o cubrir con algún material. Características técnicas Modelo: K-IRHP-4980 Voltaje 220-240V ~ 220-240V ~ 220-240V ~...
- Seite 60 Tamaño de la 600 * 600 mm 900 * 600 mm 1200 * 600 mm 1200 * 800 mm unidad Consulte la información del paquete y asegúrese de que su voltaje de entrada coincida con el voltaje de entrada nominal, tolerancias para todas las especificaciones: Aprox. +5%, - WARRANY Y SERVICIO LIMITADO Un año de garantía del fabricante.