Celestron StarSense Explorer LT 80AZ Kurzanleitung Zur Einrichtung
Inhaltsverzeichnis
Verfügbare Sprachen
Verfügbare Sprachen
Quicklinks
Quick Setup Guide
ENGLISH
5
Place the eyepiece accessory tray on top of the
tripod's center leg brace. Thread the tray into the
threaded hole in the center of the leg brace until it
is fully seated.
NOTE: If necessary, rotate the accessory tray
counterclockwise until the accessory holes
are not covered by the leg brace arms as
shown here.
8
Tighten the altitude rod guide screw to hold the
telescope in place.
1
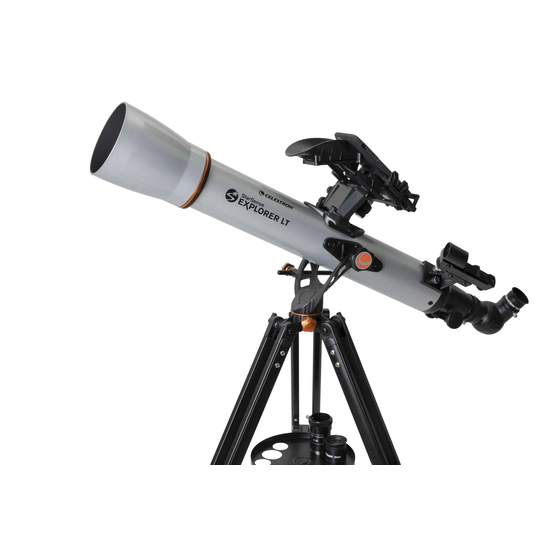
80AZ
Unpack your telescope and verify that all parts
ITEM #22451
are present. Your StarSense Explorer LT includes:
a telescope tube with altitude slow motion rod
attached, a lens cap, an accessory bag, a tripod with
alt-azimuth yoke mount and center leg brace attached,
a StarSense smartphone dock, two eyepieces, a 2x
Barlow lens, two tube mounting screws, an erect
image diagonal, an eyepiece accessory tray, a
StarPointer finderscope and StarSense Explorer
app code card.
3
Extend the center portion of each of the three tripod
legs down about 6 to 12 inches. Use the tightening
screw on each leg to secure the extended leg in place.
6
Loosen the knob on the altitude rod guide on the
side of the yoke mount so the hole is unobstructed.
9
Insert the two tube mounting screws through the
yoke mount and into the hubs on the telescope tube
to secure it in place.
2
To set up the tripod, spread the legs outward until
they are fully extended and push down the center
leg brace.
4
Check to ensure that all three legs are the same
height once extended to provide a level platform for
the telescope.
7
Slide the altitude rod
into the rod guide on the
mount and lower the altitude hubs on the telescope
tube into the cradles on the top of each yoke arm.
10
To install the finderscope, remove the two silver nuts
from the threaded posts on the top of the tube, near
the focuser.
ENGLISH
1
|
Inhaltsverzeichnis

Verwandte Anleitungen für Celestron StarSense Explorer LT 80AZ


Inhaltszusammenfassung für Celestron StarSense Explorer LT 80AZ
- Seite 9 80AZ Kurzanleitung zur Einrichtung DEUTSCH ARTIKELNR. 22451 Packen Sie Ihr Teleskop aus und überprüfen Sie die Zum Aufbau des Stativs die Beine nach außen Vollständigkeit aller Teile. Ihr StarSense Explorer ziehen, bis sie vollständig ausgezogen sind. Drücken Sie die mittlere Beinstrebe nach unten. LT enthält: einen Teleskoptubus mit angebrachter Höhen-Feineinstellungsregler, eine Objektivkappe, eine Zubehörtasche, ein Stativ mit Altazimut-...
-
Seite 10: App Herunterladen
Ihrer draußen nehmen. Suchen Sie im Apple App Store Teleskopverpackung. Starten Sie die App. Wenn oder bei Google Play nach „Celestron StarSense Sie dazu aufgefordert werden, geben Sie den Explorer“. Die App ist groß. Daher empfehlen Aktivierungscode auf der Postkarte ein, um die wir, sie über eine bestehende WLAN-Verbindung... - Seite 11 Bewegen des Teleskops Um die Montierung nach links und rechts zu Halten Sie das Stativbein mit einer Hand, ergreifen Sie den Fokussierer des Teleskoptubus und bewegen bewegen, lösen Sie den Azimut-Spannknopf an der Jochmontierung zwischen zwei Stativbeinen. Sie ihn wie gewünscht nach links oder rechts. Der Widerstand, den Sie beim Bewegen des Teleskops spüren, kann durch Festziehen oder Lösen des Knopfes auf ein für Sie angenehmes Maß...
- Seite 12 Für weitere Informationen zu diesem Produkt, besuchen Sie die entsprechende Produktseite auf celestron.com SONNENSTRAHLEN-WARNHINWEIS: Niemals ohne einen vorschriftsmäßigen Sonnenfilter durch ein Teleskop in die Sonne schauen. www.celestron.com/pages/warranty Brauchen Sie Unterstützung? Wenden Sie sich an die technische Unterstützung von Celestron unter celestron.com/pages/technical-support 08-19 DEUTSCH...